


Copy link to clipboard
Copied
Hi, I was wondering if you could figure out how the particle effect of this video is made. Thank you in advance. This is the video: VIOLET MELODY - Patrik Pietschmann (Original Piano Music) - YouTube


 1 Correct answer

Hi. To put the particles behind the bars adds quite a level of complexity. However, let's start from scratch:
In your main comp have your video, duplicate it (Ctrl +D) and Precompose it - call it Precomp ( make sure you Move All Attributes and Open New Composition for the precompositions we're going to be doing).
In Precomp add the Keylight effect and key out the green bars (toggle the Transparency Grid on at the bottom of the screen, it's the checkerboard symbol next to Active Camera). You should
... 64
Replies
64
64
Replies
64

Copy link to clipboard
Copied
Hi,
I'm trying to follow your guide but until now I couldn't get the result.
Here my questions are :
1) What layer do I have to draw a wide thin box? On the video layer or on a new shape layer? How exactly should this wide thin box be?
2) How can I have in my main comp the Precomp 2? I have to paste and copy it into the main comp, right?
3) How do I draw a tight mask around the keyboard only?
Thank you.
Copy link to clipboard
Copied
Hi.
1 Draw on the video layer - it needs to be wide enough to be able to see a small bit of the green bars through (it's not critical how wide it is but, if at the end, the particles are starting too far away from the top of the keyboard you can always make it thinner).
2 To get Precomp 2 into the main comp select it in the Project Panel and drag it into the main comp
3 Start off the screen draw a line exactly along the top of the keyboard and off the other end of the screen, click and continue the line at a 90 degree angle to below the bottom of the screen, click and continue the line below the screen to the other end, click and making a 90 degree turn join the line to your first point. The only critical thing is the line running along the top of the keyboard, the rest can be really rough (not 90 degrees) as long as it is drawn in the area off the screen.
I trust you have read this whole thread as the original poster had some issues which you might have as well.
Good luck with it.

Copy link to clipboard
Copied
Hey Towerguy,
I am confused with what you mean by "Precompose Precomp". Do I select both layers in Precomp and precompose those or do I have to go back to my Main comp, click on Precomp, and hit precompose? I know it might be a dumb question, but I'm still trying my best to learn After Effects.
I hope you respond soon!
Copy link to clipboard
Copied
Hi, duplicate Precomp in the Project Panel (Ctrl+D),
Copy link to clipboard
Copied
Hi Towerguy,
First of all thanks for your reply.
I read the whole thread a lot of times and tried the procedure so many times and I am exhausted.
My problem that after made all the steps particles don't work as they should. They come out just randomly as and where they want and they don't come out when the bars hit the piano roll. Furthermore the bars are cut when I draw the wide thin box above the top of the keyboard
I don't know what to try more.
My Trapcode particular version is 2.5.1
Here a screenshot of my project

Hope you can help to figure it out.
Thank you again
Copy link to clipboard
Copied
I have the exact same problem with the cut bars, but to fix your particles not showing you have to set your Particles/sec to something like 100000. For me, it somewhat works but I have particles coming from throughout the entire keyboard area in addition to a few clusters of particles where the incoming notes are. Here are my screenshots:
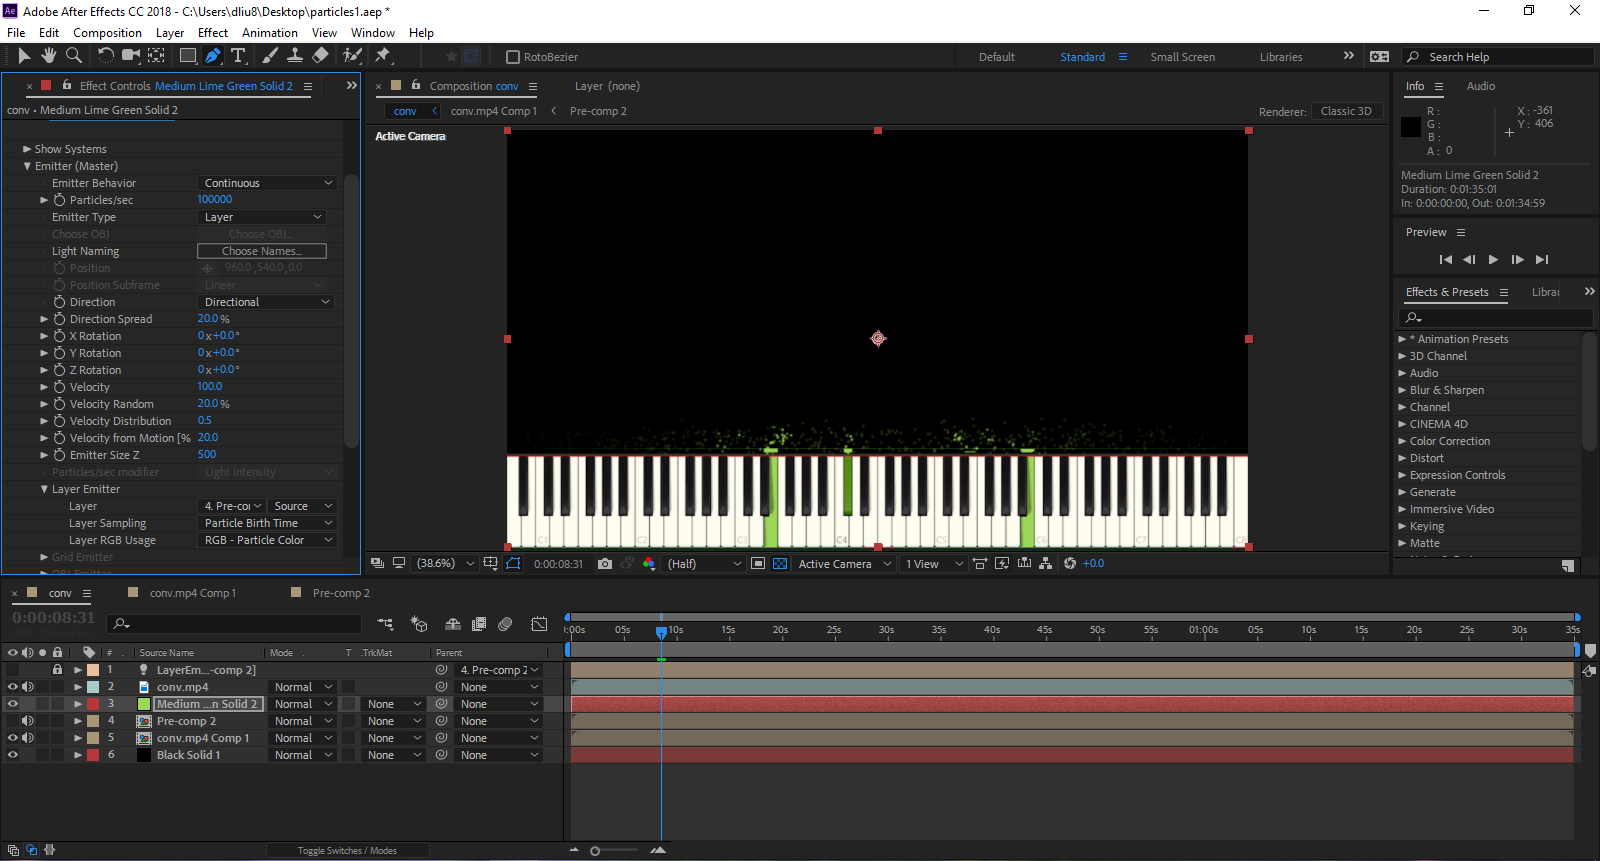


If someone can find out what I'm doing wrong I'd highly appreciate it!
Copy link to clipboard
Copied
Hi. I have no idea what is going on however:
There are pink lines on the right hand side of the screen (one going down and one going across) which shouldn't be there. I suspect you have nudged the video out of position in Precomp 1. (Go into Precomp 1, select the video and press Ctrl+Alt+F. Does this get rid of the pink lines?). Have you mistakenly drawn the thin mask on Precomp 1 instead of Precomp 2? Precomp 1 should show all of the bars coming down from the top, Precomp 2 should be the masked thin line.
Copy link to clipboard
Copied
The above reply is to Chopinish (didn't realise this post is now onto two pages).
However dliu862 you have drawn the mask on Precomp 1, it should only be on Precomp 2. Also make sure that the mask does not include any of the keyboard, not even the slightest slither - I think that is why you are getting all those extra particles.
Copy link to clipboard
Copied
NEW, SIMPLER WAY TO DO IT.
The original poster needed to have the particles come from behind the bars, which makes the process far, far more complicated and is probably unnecessary.
Here is a simpler way that will render much faster:
In your main comp have your video, duplicate it (Ctrl +D) and Precompose the top layer - call it Precomp
In Precomp add the Keylight Effect and key out the green bars (toggle the Transparency Grid on at the bottom of the screen, it's the checkerboard symbol next to Active Camera). You should see a checkerboard pattern where the green used to be which shows that it is transparent. Add a new solid and make it the same green as the bars (use the eyedropper tool and sample the green from the Keylight swatch). Put the green solid below the video. You should see a TrkMat pulldown box beside the pickwhip symbol - if not press the Toggle Switches/Modes button at the very bottom of the screen and it should appear. Toggle the box open and select Alpha Inverted Matte. This will leave you with only green bars on a transparent background. Turn on the eyeball switch beside the video - the video will reappear. Use the pen tool and draw a wide thin box just above the top of the keyboard - this is the area that the particles will appear from*. Toggle open the video layer and you will see Masks listed. Select the heading "Masks" and copy it (Ctrl +C). Select the Green Solid layer and paste the mask (Ctrl + V). Turn off the eyeball for the video layer and you should have a thin slit which the green bars will move through with a transparent background.
Now, in your Main comp: make a solid and add Particular to it.
The layers should now be:
Particular
Precomp (turn off the eyeball - make it 3D)
Video
Now go to your Particular settings. In emitter settings: Particles/sec very high (say 100,000?); Emitter Type - Layer; Layer Emitter - Precomp: Layer Sampling - Particle Birth Time. You should now have little green balls coming out from the green bars when they reach the keyboard - now is the time to work on the actual particles to get them to look like you want.
* make sure that you don't have any part of the keyboard within the mask, even the smallest bit will cause extra particles to emit from it.

Copy link to clipboard
Copied
Thank you Towerguy , worked perfectly
Copy link to clipboard
Copied
Hi Towerguy,
Thanks a lot for your help.
Actually I found the problem but I don't know how to resolve it.
Unfortunately when I precompose the PRECOMP 1 for the PRECOMP 2 my video and the red solid merge as "PRECOMP 2" under the "PRECOMP 1" panel.

I am interested to keep particles behind the bars
Thanks a lot again for your help!
Copy link to clipboard
Copied
Sorry, my mistake. Duplicate your original Precomp in the Project Panel (Ctrl+D) to create Precomp 2 (not as I said by selecting the layers). For now you can copy the layers from Precomp 2 into Precomp 1 (delete the "Precomp 2" layer you created), then delete the masks on both layers in Precomp 1.
(I've edited my earlier comment to correct it)
Copy link to clipboard
Copied
It looks like I've been solved the problem but now the particles come out from all over the keyboard and not only when the bars hit the keys.
The layer sampling is on "still".

How can I solve that?
Copy link to clipboard
Copied
Layer sampling should be one of the others (try Birth Time). Check that there is absolutely nothing in the bottom of the mask in Precomp 2, even the tiniest trace of the keyboard will give you added particles - also double check that the eye icon is turned off on the video layer.
Copy link to clipboard
Copied
I tried all the 3 options of Layer Sampling but nothing changed. I tried to lift the mask a bit up but I still have the added particles.
I checked and everything is set correctly.
What could it be?

All over the top of the keys there is a yellow bar/line and probably that makes the added particles. I don't know how to delete it.
Copy link to clipboard
Copied
Hi. I've no idea how you have ended up with Precomp 2 looking like that? At the top of this page dlui862 has three screen shots, the final one is what Precomp 2 should look like. It looks like you haven't set the Track Matte up (in either comp?) as per instructions:
Put the green solid below the video. You should see a TrkMat pulldown box beside the pickwhip symbol - if not press the Toggle Switches/Modes button at the very bottom of the screen and it should appear. Toggle the box open and select Alpha Inverted Matte. This will leave you with only green bars on a transparent background.
Then in Precomp2 you need to mask the keyboard out entirely (including the yellow line) and make the mask thinner and even. You need to copy/paste the mask onto the solid, and turn off the eye icon on the video layer - as per instructions:
In Precomp 2 turn on the eyeball switch beside the video - the video will reappear. Use the pen tool and draw a wide thin box just above the top of the keyboard - this is the area that the particles will appear from. Toggle open the video layer and you will see Masks listed. Select the heading "Masks" and copy it (Ctrl +C). Select the Green Solid layer and paste the mask (Ctrl + V). Turn off the eyeball for the video layer and you should have a thin slit which the green bars will move through with a transparent background.
Copy link to clipboard
Copied
I managed to get everything working with a few steps modified. I've included a video for those who still have issues:
https://drive.google.com/open?id=1h6J0mMR2HP_30GPVfFUKlcyDhD9-5StA
Copy link to clipboard
Copied
Thanks dlui862, great job!
Copy link to clipboard
Copied
Hi Towerguy,
Do you know how to make the delay effect of the particles?
Now I made the particles work when the bars hit the top of the keyboard but particles appear only when the bar hits the keyboard and when the bar disappears completely also the particles disappear immediately.
I would like to set the particles keep appearing also after the bars completely disappeared under the keyboard.
Does anyone know what I should set to get it?
Copy link to clipboard
Copied
Hi, set the Life longer.
Copy link to clipboard
Copied
I found the solution :
If you set the "Layer Sampling" to "Still" the particles life follows the bars life but if you set "Particle Birth Time" the particles life is independent from bars life.
Changing "Life/Sec" in "Particles" section doesn't work if you don't change the "Layer Sampling" to "Particle Birth Time".

I hope this can help other people interested.
Thank you Towerguy

Copy link to clipboard
Copied
Copy link to clipboard
Copied
Thanks so much to Towerguy and thanks so much for the video to dliu862
My problem, in having added particles, was that I don't know why but Synthesia adds a colored line over the keyboard when I changed the bars color like red or yellow.

Today I just remade a Synthesia video with green bars and the colored line all over the keyboard is magically disappeared so I don't know if this happens only to me.
Now it works as it has to.

Just I don't understand why if I create a video with different bars color than green my video gets a colored line all the over the keyboard that produces the added particles.
Did anyone get that kind of issue before?

Copy link to clipboard
Copied
Thank you Towerguy and Dlui862 for all the tips and the video. These really helped to get this working for me too.
This isn't an after effects query but since it is related:
Does anyone know of some good Particular emitter settings to get the particles reactions looking a bit like those in the Rousseau Piano YouTube videos (if at all possible - he isn't the only one that has this nice fluid with dust effect)?
I've tried quite a few presets (including the combined ones) and messed around with settings but it seems quite hard to make it look decent. With increasing Y wind you can make it look like a spark (With 1.000.000 particles/sec!) which is ok but totally not what has been done before on YouTube.
Perhaps another plugin has been used.

Copy link to clipboard
Copied
Hi, thanks for the project. I have a question how to slowly particular effect ? ''slow motion'' please support.

Find more inspiration, events, and resources on the new Adobe Community
Explore Now
 AdChoices
in this video...
He made particles come from all the keys when a chord is played or more no. Of keys when played at once...
And also in the middle his background image was saying"Harry Potter '' and it gets brightened when the particles comes near it...
and he made those LED lights which are actually very bright and real..
please, it would be very helpful if you can guide me in this...
i have progressed good so far in creating the particles but this I am not able to do on my own..