- Home
- After Effects
- Discussions
- Random scaling order for multiple objects
- Random scaling order for multiple objects
Copy link to clipboard
Copied
Hello,
I have a circle with lots of stars inside (as shown in image) and I want to make the stars appear randomly scaling up. Whats the best way of doing that other than manually? Is there an expression I can use? It's better for the stars to be in the same layer or each one in a separate layer?
Thank you!
 1 Correct answer
If each star is a layer, a scale expression like this should work:
minFade = .1;
maxFade = .3;
tTotal = 3; // duration of entire animation
seedRandom(index,true);
myFade = random(minFade,maxFade);
myDelay = random(0,tTotal-myFade);
s = linear(time,myDelay,myDelay+myFade,0,value[0]);
[s,s]
Dan
Copy link to clipboard
Copied
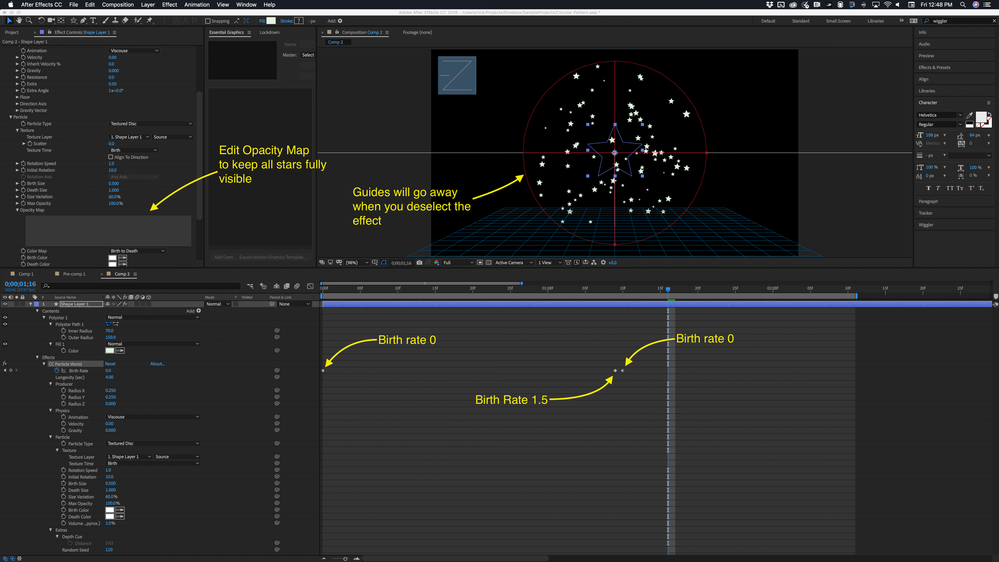
I would use CC Particle World. Create a single small star on a shape layer, add CC Particle World and make these adjustments. The X and Y radius determine the size of the circle:
Using multiple shapes and a few expressions is also possible but it's going to take a bunch of work and fiddling around. Unless the stars must end up in s specific position and have a specific number, this is probably the easiest solution. Playing with the random property at the bottom of the effect will change the shape of the pattern.
When you get the stars the way you want them, pre-compose moving all attributes then use the Layer>Time>Enable Time Remapping (Alt/Option + Ctrl/Cmnd + t) then set a keyframe at the time you want, press K to move to the last time remapping keyframe and delete it.
There you go. Should take about 10 minutes.
Copy link to clipboard
Copied
Thank you for your answer! However, the stars have to end in the specific places shown in the picture, so I don't know if particles would work in this case... the stars are shape layers from illustrator.
Copy link to clipboard
Copied
If you need specific places you can put a bunch of stars, all on a single layer, in the place you want them, press the U key twice to reveal all modified properties, then set keyframes for PolyStar>Transform Polystar>Scale and Opacity, then just drag the keyframes around in the timeline. Here's the manual workflow.
- Select the PolyStar tool and draw as many stars as you want on a single shape layer
- Type fill in the search field and select all of the Fills for all polystar shapes in the layer and delete them
- Type stroke in the search field and select all of the strokes in the shape layer and delete them
- Use the Add button to add a new fill at the bottom of the shapes stack
- Type opacity, scale in the timeline search field to reveal all of the Polystar>transform> scale and opacity properties
- Drag a selection around all of the scale and opacity settings and set keyframes for zero and zero
- Move down the timeline a few frames and set new keyframes for scale and opacity of 100
- Start grabbing keyframes in groups and slide them around the timeline to randomize the appearance of each star
That's about it. The search field in the Timeline makes it easy to find the properties and set a bunch of them at once. Here's what that looks like:
Copy link to clipboard
Copied
If each star is a layer, a scale expression like this should work:
minFade = .1;
maxFade = .3;
tTotal = 3; // duration of entire animation
seedRandom(index,true);
myFade = random(minFade,maxFade);
myDelay = random(0,tTotal-myFade);
s = linear(time,myDelay,myDelay+myFade,0,value[0]);
[s,s]
Dan
Copy link to clipboard
Copied
Thank you a lot Dan! This is exactly what i wanted!
Copy link to clipboard
Copied
Hello Dan,
Is there a way to add bounce or ease to the random scaling animation of these assets?
Best
Copy link to clipboard
Copied
You could add ease by changing this line:
s = linear(time,myDelay,myDelay+myFade,0,value[0]);to this:
s = ease(time,myDelay,myDelay+myFade,0,value[0]);Bounce would be trickier, and would depend on exactly what you had in mind.
Copy link to clipboard
Copied
If you used Shape Layers to create the stars and they are all on a single Shape Layer, you can place all of them into a Shape Group - select all the Shape>Content props and hit CTRL+G, to Create a Shape Group containing all the selected Shape>Paths. Then add the Wiggle Transform Shape Operator and keyframe the Wiggle Shape Operator's, Wiggle Transform>Transform Scale Property.
If the default setting is too wiggly, set the Wiggles/Second prop to 0.5
HTH
Copy link to clipboard
Copied
Thank you! I think this would work as well! But as I set the stars in separated layers, Dan's answer was the one that worked best for me.
Find more inspiration, events, and resources on the new Adobe Community
Explore Now


