Rotobrush Selecting Entire Frame
Copy link to clipboard
Copied
Hey all, I'm having an annoying issue with the Rotobrush tool in After Effects that I hope you can all help me out with. I'm very familiar with Premiere, but my After Effects knowledge/experience is lacking for sure, so it's quite possible I'm missing something pretty basic.
I'm working with linked comps created from clips in a Premiere timeline. The only effects applied to the original clips were adjusting speed and framing. I open the comps in AE, and when I go to roto, it gives me a warning my clip framerate doesn't match my comp framerate, and then selects the entire frame. I change my comp framerate to match my clip framerate, and it still selects the entire frame. Here's a video of me doing this: Rotobrush Issue - YouTube
I searched briefly for anyone else having this issue, and it's definitely a known problem, but I didn't see any sort of workaround or solve.
Looking forward to hearing what y'all think!
E: Just some additional notes, this has been happening on both Mac and PC systems, on AE v16.1.2 Build 55.
Copy link to clipboard
Copied
I would export the clip in question from Premiere Pro. No Dynamic link. It's fouling things up.
Copy link to clipboard
Copied
That must be it. Thanks for the suggestion, Dave! I'll give it a shot ![]()
Copy link to clipboard
Copied
Retiming or reframing footage and then using rotobrush or any other time-sensitive effect will cause famine, biblical floods and culminate in unexpected results in AE. So ... as Dave suggests, render your clips to an intermediate CODEC and give the ole brush a workout.
Copy link to clipboard
Copied
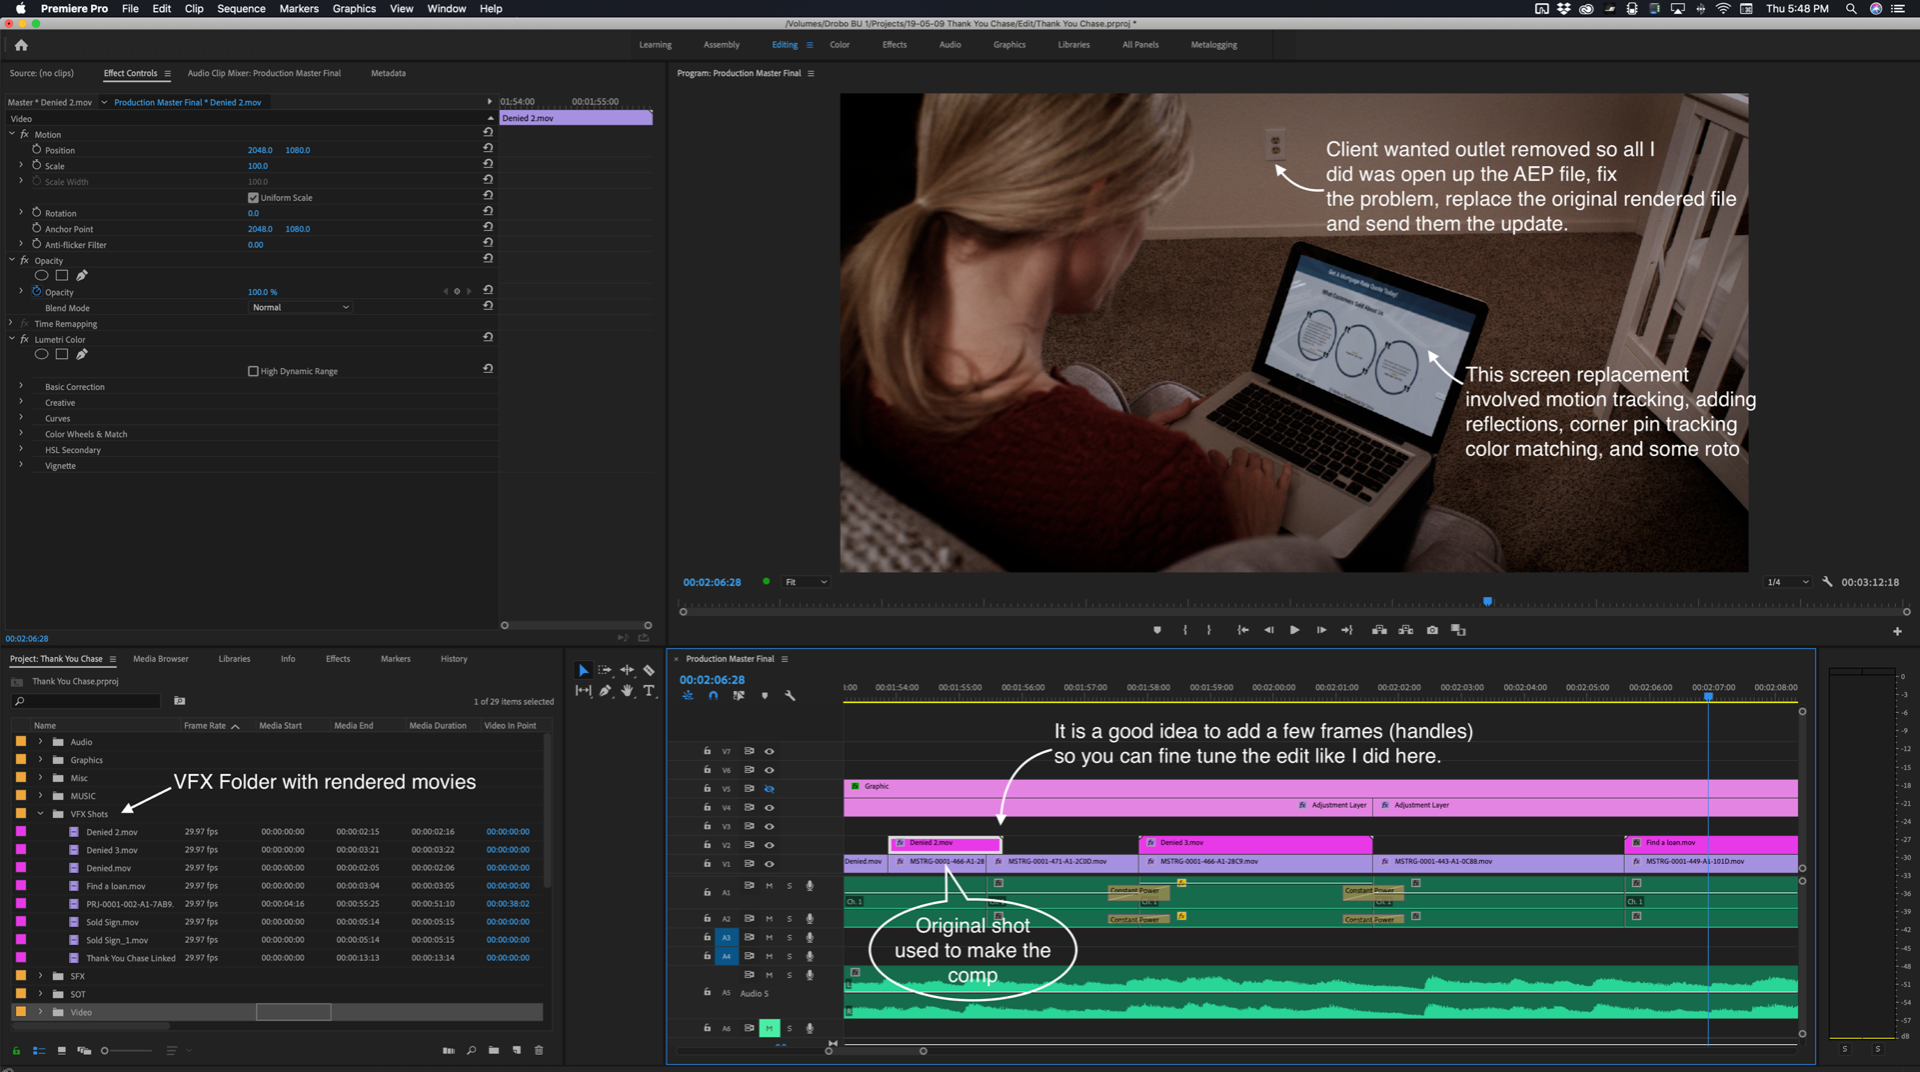
Speed changes in Premiere Pro do not come into After Effects. Neither do effects. If you need to bring in a clip do it before speed changes or render and replace in Premiere Pro. Almost every time I use Dynamic Link in Premiere Pro to create a comp in After Effects I undo the action in Premiere Pro restoring the original clip in the sequence right after I save the AEP project I then complete my work in After Effects, render the shot, and then create a new bin in PPro just for effects shots, import the rendered (using a suitable production format and NEVER an mp4) comp and just drop it in the PPro Sequence right above the original shot. This is EZ, safe, eliminates rendering problems, speeds up the editing process in Premiere Pro in the long run, makes it much easier to make changes later, saves you time, and, in spite of sounding like more work, is easier and more dependable. The ONLY shots in a Premiere Pro sequence that I keep as a Dynamic Link are short shots with minimal effects that will render and preview nearly in real time. In the last seven or eight projects, I completed had visual effects on about 1/3 of the shots and not one of them was just a Dynamic Link. They were all rendered in AE. The timeline of one of the projects looks like this:

See the note on removing the outlet? If this complex composite was all dynamic link the likelihood of a problem would have gone up about 10 fold because of everything involved in the shot. Because it was a comp all I did was open finder and give a new name to the Find a loan.mov, open the AEP, remove the outlet, add the comp to the render cue and hit render, wait about 10 minutes, open up Premiere Pro and render the final movie for distribution. If the client needed to see just this shot for approval that would have not taken any extra time to speak of.
Now let's move on to a possible solution to your problem. First, let me ask a question. Have you used Rotobrush before and do you completely understand the process? If the answer is no to either part of that question you have some homework to do. I suspect that you are not familiar with all of the recommendations because your Layer Panel is at 50% magnification factor and the Comp Panel resolution is set to Auto. Rotobrush should only be done at 100% and Full Resolution. I also see you have Stereo Mixer applied to the layer. Rotobrush should be the only effect applied to the layer. If you need to use other effects add them, pre-compose, then use Rotobrush on the Nested Comp.
The first thing to do is to check the frame rate of the clip in the Project Panel. Make sure that the comp matches this frame rate or create a comp from the clip.
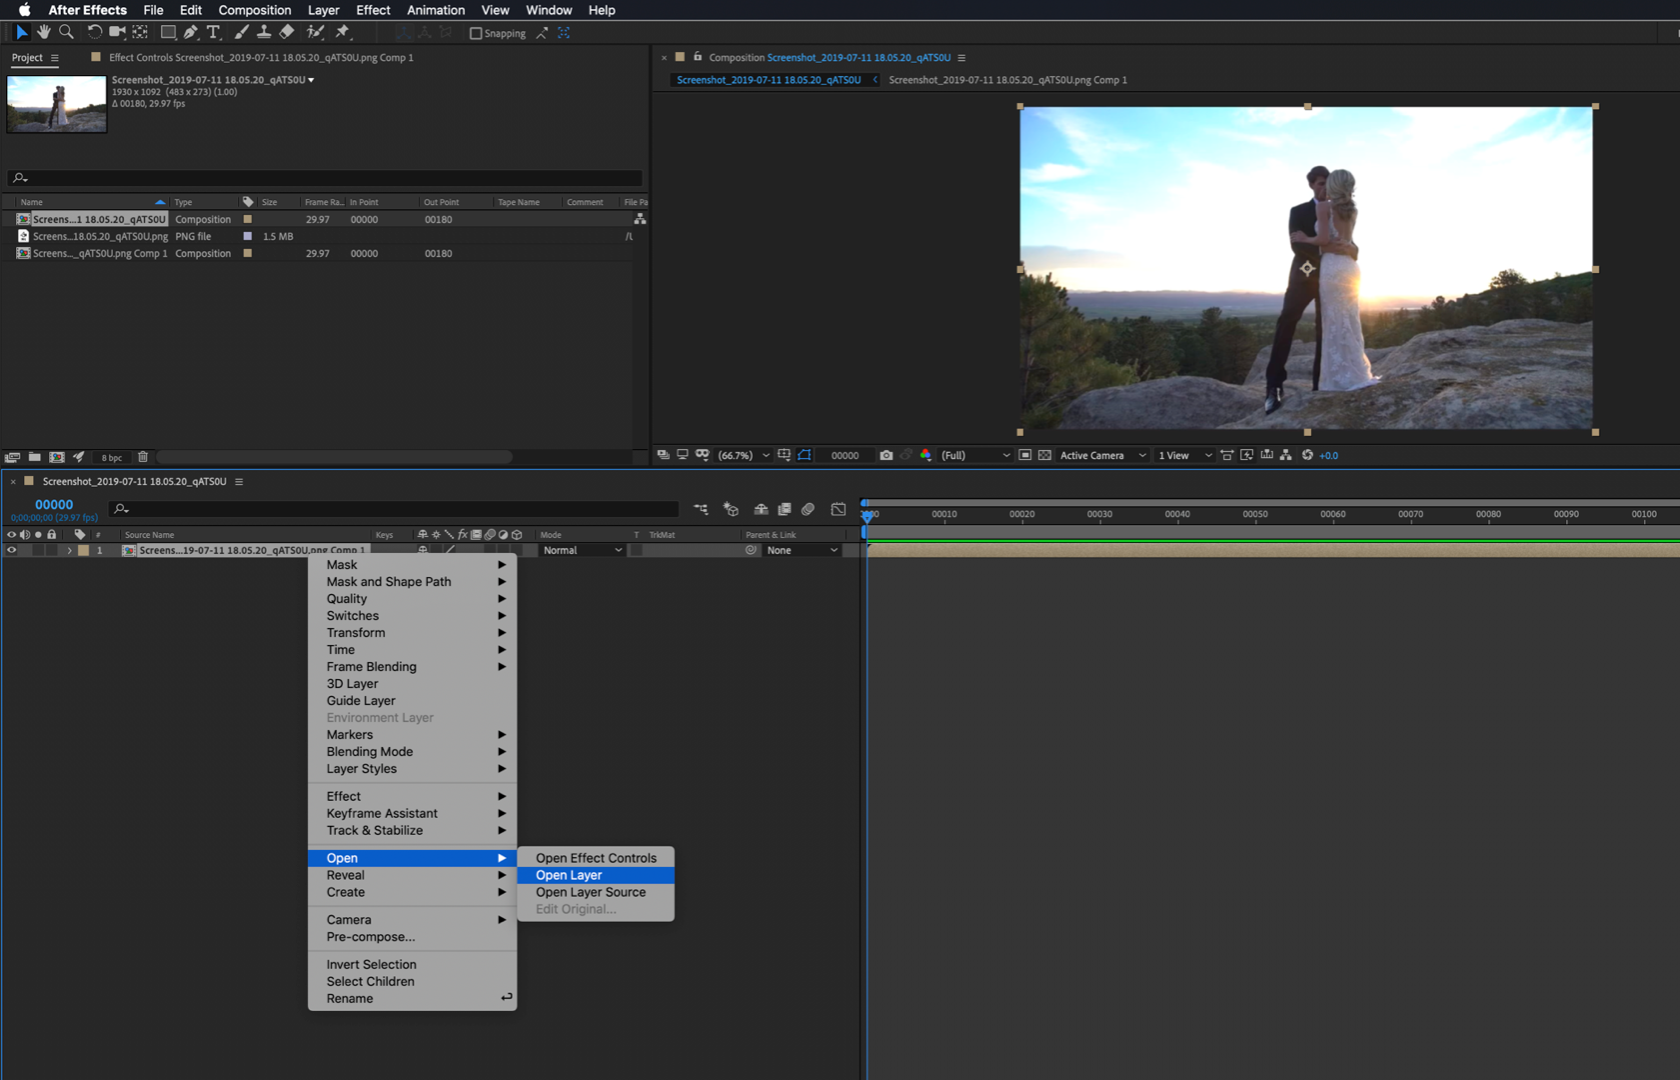
Select the footage in the timeline and then choose RotoBrush. Make sure the Layer panel, not the Footage Panel is active. Try selecting any point on the footage. If you have problems go back to the Main Comp and Pre-compose the footage layer moving all attributes to the new composition. Then Right Click on the Pre-comp (nested comp) and select open Layer Panel and try again.

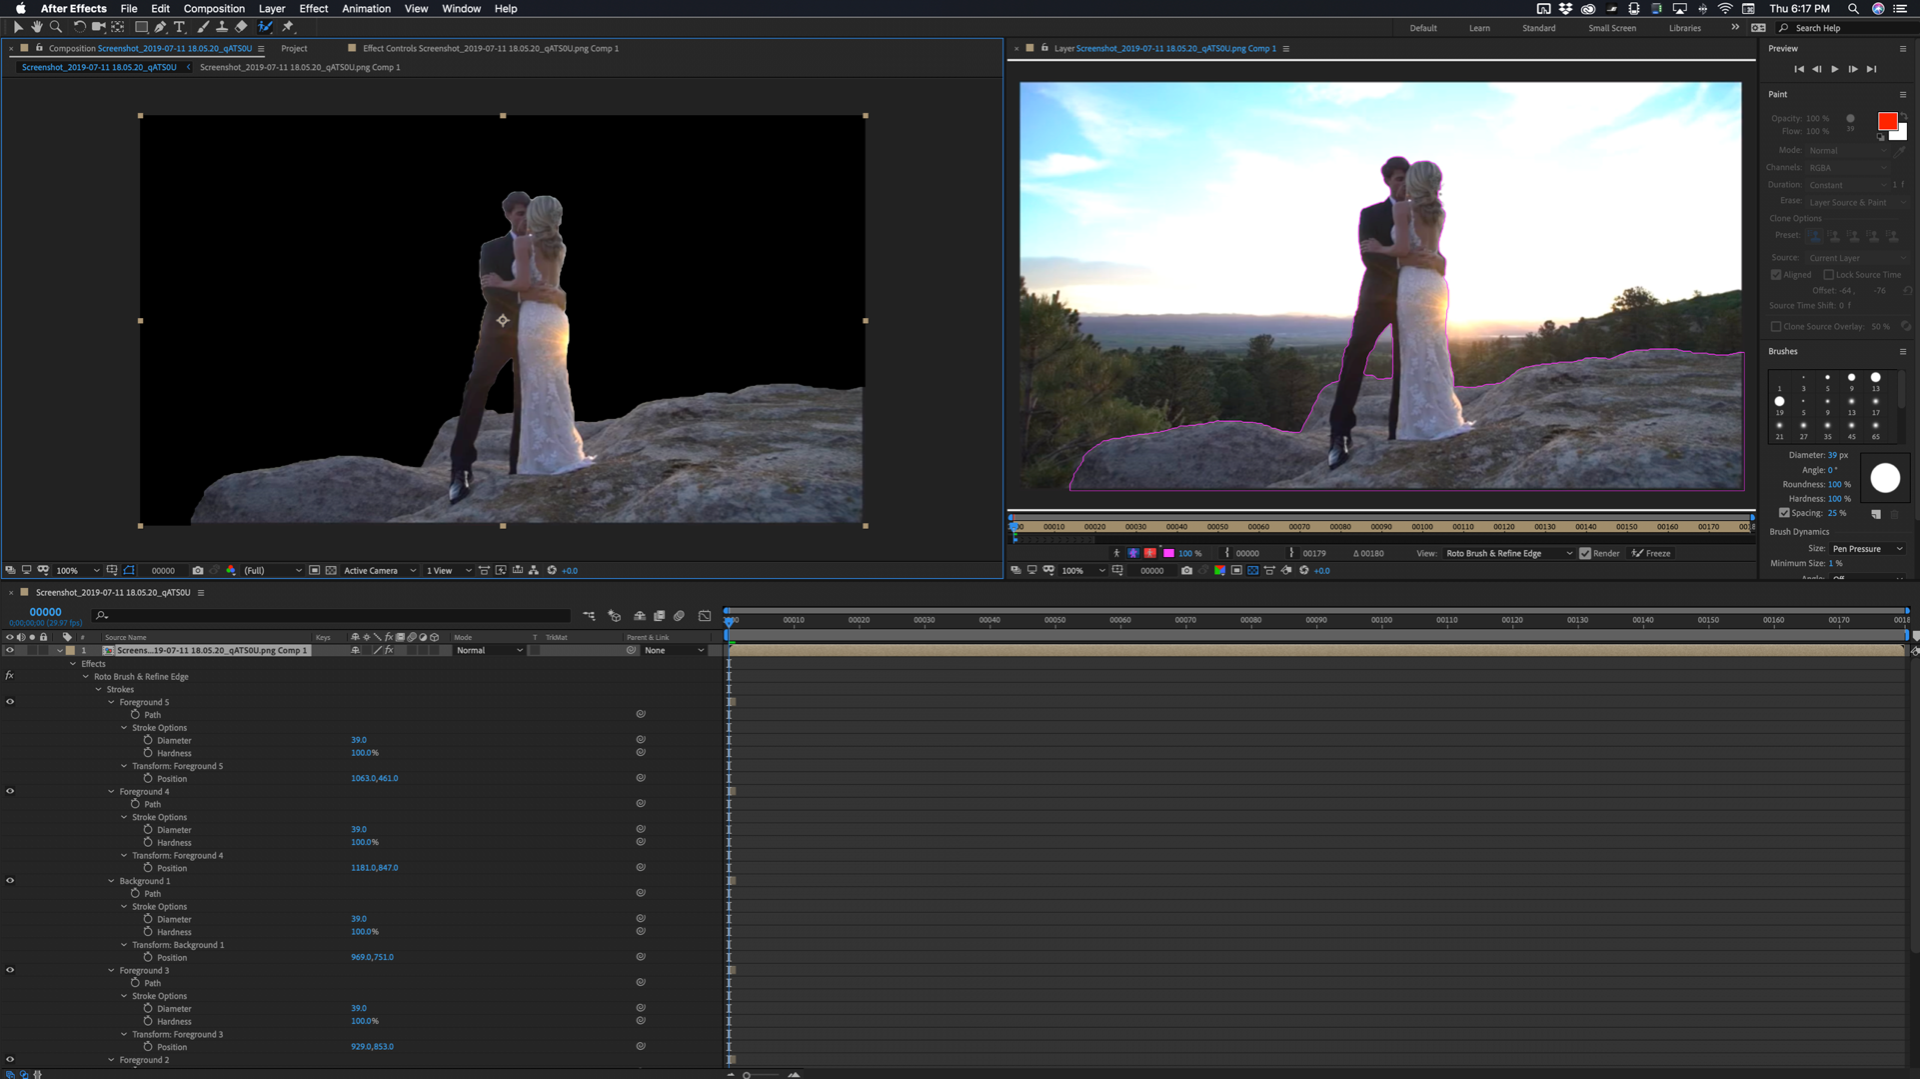
When you get the layer panel open, select the Paint workspace so you have easy access to all the tools, choose the Rotobrush tool (Alt/Option + w) adjust your brush size and paint away. It took me 5 brush strokes to get here so it is not the image that is causing the problem. I just screen captured a still from your YouTube video:

You can see all the modified properties of the layer.
The best practice is to use Rotobrush on a separate comp and then when you have the matte generated, if the shot is longer than just a couple of seconds, Render the footage with an alpha channel or render just the black and white alpha channel and use that in your main comp.
If you insist on using Rotobrush in a Dynamic Link project you absolutely must make sure you Freeze the roto or render and replace the Rotobrush layer in the comp. If you do not Premiere pro will be using a background instance of After Effects that does not use GPU supported effects or much of anything else to propagate Rotobrush again in the background, which is slow and probably inaccurate, is prone to other failures, and it's going to take forever and a day to render a preview and then the final product.
Last tip. I don't know what format the original footage is but if it is a prosumer or professional camera you should have no problems. If it came from a consumer camera then it may be a very good idea to render a digital intermediate (DI) using a Mezzanine format (visually lossless) before you start doing any serious compositing.
If matching the frame rate of the comp to the original frame rate of the footage does not fix the problem, or Pre-composing making sure you move all attributes to the new comp does not solve the problem then you have GPU issues and need to check your drivers or disable it, AE is not up to date, or you have not followed the user guide.
I'm not sure what all you want to separate from the background but if it is just a sky replacement I probably would have used a Procedural Matte instead of Rotobrush.
Copy link to clipboard
Copied
Not The Problem, Never Was. STOP ASSUMING THINGS. You are constantly leading people down paths of false salutions based off of pure assumption and have been for years.
Copy link to clipboard
Copied
But it was the problem for me and his tip work, so what are you so frustrated about?
Copy link to clipboard
Copied
Legend, thank you!
Copy link to clipboard
Copied
Thank you all for the cautionary tales and incredibly useful advice! You guys are AWESOME!!!
Copy link to clipboard
Copied
Precompose the Layer and then use Rotobrush on the subsequent comp - this should fix your issue without massive workarounds and get you up and running quickly.
Copy link to clipboard
Copied
The only thing that is 100% certain, if you try and rotobrush a layer that has the time stretched you will get a warning and I just discovered that the entire frame will be selected in the latest version of After Effects if you try and use Rotobrush. I don't know if that happened in previous versions because I always make sure that the frame rate matches the comp's frame rate with I'm creating doing roto work.
If the comp was created by selecting a clip in a Premiere Pro sequence that had a speed change the footage in the speed change will show up in After Effects. You can see it in the timeline by enabling the In, Out, Duration, and Stretch columns by clicking on the {} icon in the bottom right corner of the Timeline.
Just pre-composing a Stretched layer will solve the frame rate problem but the frames will all be reinterpreted and the likelihood that you will get the best matte possible goes way down. The bigger the time stretch the lower the quality of the Matte. Pre-composing will get you to a place where Rotobrush will work, but it will work better if you are processing the original frames. There is a fairly simple option to end up with a comp that has the true frame rate of the footage and the correct in and out points.
The first thing to do is to make sure that Synchronize Time of related events is turned on in your AE Preferences. Now follow these steps:
- Duplicate the footage layer in the comp created by dynamic link
- Select the top copy and pre-compose but this time Do Not move all attributes to the new composition but open it. This will give you a composition that does not have a time stretched layer, but it also does not have any in or out points
- Return to the main comp and put the CTI on the first frame
- Return to the Pre-comp and the CTI will have moved to the same frame that is in the main comp
- Set a new in point using the keyboard shortcut Alt/Option +[.
- Repeat the procedure for the out point of the pre-comp (Alt/Option + ]). You now have a comp with trimmed footage at the correct frame rate for roto.
- Complete your Rotobrush and either render the result or use the Pre-comp as a track matte for the original footage
That will get you there and solve the whole frame selected problem. The choice is yours. If Pre-composing and moving all attributes give you a good enough matte then that option has the fewest steps. If you want to get the best results then use the checklist I just posted. It's the most efficient way I can think of to deal with a frame rate mismatch.
Copy link to clipboard
Copied
Thank you Angie, this fixed it immediately for me.
Copy link to clipboard
Copied
I was really, really surprised to be dealing with an issue in After Effects where I tried using the rotobrush and it would only select the whole frame. I had retimed footage in Premiere to speed it up and then Dymanic Linked the footage to After Effects to rotobrush a portion out and add a logo. It's funny I ran into the exact issues while doing the two main causes of the problem. Thanks to everyone on this thread for the help!
Copy link to clipboard
Copied
The first thing to do if you are having problems with Rotobrush is to delete the Rotobrush effect from the layer, pre-compose the layer, name it "For Roto" or something similar, making sure that you are moving all attributes to the new comp. Trimming the pre-comp might be a good idea if the layer is not as long as the comp. There is no need to open the "For Roto" comp but you do need to open the layer in the Footage Panel using the Layer menu or a right-click and apply Rotobrush there. If you still have problems you might want to open up the "For Roto" comp and add some color correction to the footage so the edges are a little better defined. To tell the truth, I do a fair amount of color correction and garbage masking on most of the footage I'm going to rotobrush because it just works better on most shots if you do.
Copy link to clipboard
Copied
Hi Rick,
Hope you're doing well. I am having a bit of an issue.
I added color correction to a clip to help rotobrush see the edges a little better.
Then I pre-comp the clip, moving all attributes into the new comp.
How do I now apply rotobrush to the new pre-comp? Searched every menu and lots of Googling, but can't seem to find the answer. Any help would be much apprecated. Thank you.
Copy link to clipboard
Copied
Open your nested comp (the Pre-comp) in the layer panel by selecting the nested comp in the timeline and going to the Layer/Open Layer Menu. Now the nested comp is in the Layer Panel, and you can use Rotobrush or paint or any other layer tool.
Find more inspiration, events, and resources on the new Adobe Community
Explore Now
