Copy link to clipboard
Copied
I'm using some expressions to create a similar effect to the macOS dock. When I independently scale the layers they adjust their position automatically.
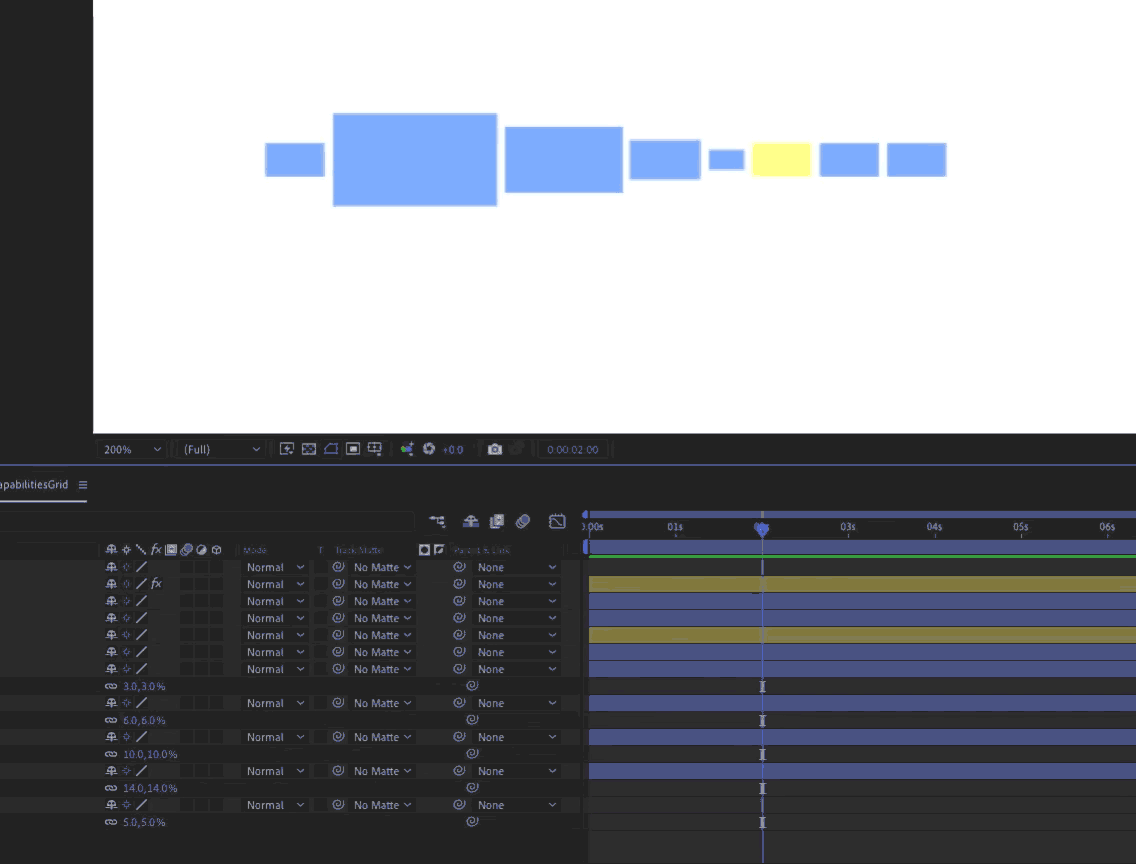
I want to add this 'cursor' when it's near is going to scale, and needs to change its position as well
But when I activate the expression doesn't change
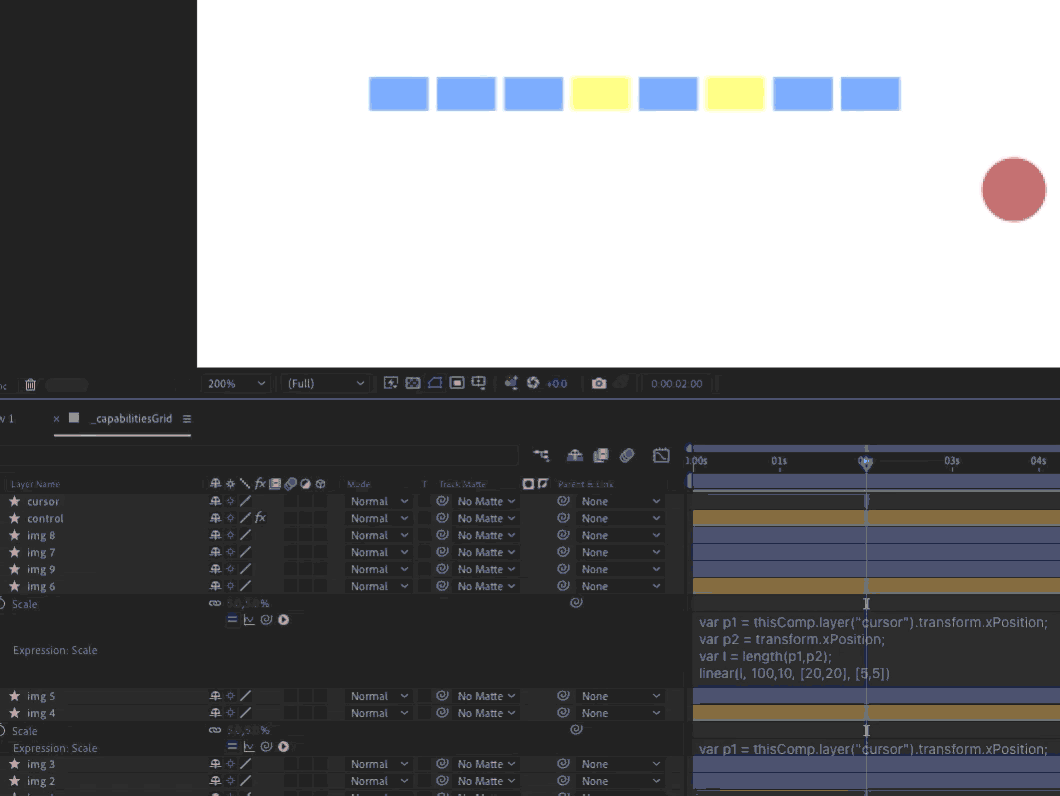
it also offsets the shape a bit
Copy link to clipboard
Copied
You need to provide the actual code so people can tell you what to change or add. Those screenshots and partially visible expressions don't tell us everything and are kinda useless.
Mylenium
Copy link to clipboard
Copied
yeah you're right, here is the code I'm using
This is the expression for placing the layer beside the previous layer, adding a spacing between them
var spaceBetween = thisComp.layer("control").effect("padding")("Slider");
//previousLayerValues
var previousLayerHalfWidth = thisComp.layer(thisLayer, 1).sourceRectAtTime().width / 2;
var previousLayerScale = thisComp.layer(thisLayer, 1).transform.scale[0] / 100;
var previousLayerPosition = thisComp.layer(thisLayer, 1).transform.xPosition.valueAtTime(time);
//thisLayerValues
var thisLayerHalfWidth = thisLayer.sourceRectAtTime().width / 2;
var thisLayerScale = transform.scale[0] / 100;
var thisLayerFinalScale = thisLayerHalfWidth * thisLayerScale;
previousLayerPosition + spaceBetween + (Math.round(previousLayerHalfWidth*previousLayerScale)) + thisLayerFinalScale
This is the expression I'm using to scale depending on the 'cursor' position
var position1 = thisComp.layer("cursor").transform.xPosition;
var position2 = transform.xPosition;
var theLenght = length(position1,position2);
linear(theLenght, 100,10, [20,20], [5,5])
Copy link to clipboard
Copied
I don't have time to write the expressions for you now but the workflow involves using sourctRectAtTime and multiply the size by the scale change and use that to adjust the position by sliding the shape layer (or individual shape if all of your rectangles are on the same shape layer when the cursor layer gets close.
The spacing for all layers would be controlled by referring to the first layer in the chain and using sratTime to offset each layer to the right. As long as you reference the other layer's scale, everything should stay lined up.
If I get some time this evening, I'll try and post the solution. If you share your problem project file, it will be a lot easier for me to dig into your code and solve the problem. You'll basically need to throw a multiply by .01 using the X scale value to make the position react to the scale changes and control the way the layers move by shifting the shape layer rectangle/transform rectangle/Anchor point to the left edge of the rectangle. I hope that makes a little sense.
Copy link to clipboard
Copied
Copy link to clipboard
Copied
You cannot simply use linear equations. of course this will never work because neither layer ever knows that there is more than one other layer. You have to pack the stuff into a for() loop and iterate through all layers every time to see what their actual positions and scales are.
Mylenium
Copy link to clipboard
Copied
I think I have solved this for you. You will need a Null as a Null Controller layer, four Layer Control Sliders, A Cursor layer (I make an arrow shape layer with the anchor point at the tip of the arrow, and standard shape layers with one rectangle to keep it simple, or regular layers (footage, solids, images) or text layers and the following expressions. Here's the explanations.
Start by setting the layer Anchor Point X value to zero or use this expression for Anchor Point:
[0, height/2]
If you are using a shape layer rectangle, and the rectangle is normalized (Rectangle1/Transform Rectangle 1/Position = 0, 0] so it is in the center of the layer, you add this expression to the Shape Layer's anchor point:
x = - content("Rectangle 1").content("Rectangle Path 1").size[0]/2;
y = 0;
[x, y]
Then you add a bunch of controllers to a Conntroller Null layer and add this expression to every layer's scale:
ls = thisComp.layer("Controller Null").effect("Layeer Size")("Slider");
sG = thisComp.layer("Controller Null").effect("Grow Ratio")("Slider")/100;
prox = thisComp.layer("Controller Null").effect("Proximity")("Slider");
cP = thisComp.layer("Cursor").position;
box = sourceRectAtTime();
w = box.width;
h = box.height;
g = sG;
cP = thisComp.layer("Cursor").position;
t = length(cP + [- w, 0], position);
x = thisComp.width / w * ls;
yR = thisComp.height / h;
t = length(cP + [- 200, 0], position);
ofst = ease(t, 0, prox, x * sG, 0);
[x + ofst, yR * ls]
The sliders are listed, and the expression will give you a bunch of layers that are the same ratio as the comp and a percentage of the comp size
Add this expression to Position every layer below the first layer in the stack, and every new layer will line up to the left of the top layer in the stack and be centered.
ref = thisComp.layer(index-1);
refP = ref.position;
refS = ref.scale * .01;
refBox = ref.sourceRectAtTime();
ls = thisComp.layer("Controller Null").effect("Layeer Size")("Slider");
sG = thisComp.layer("Controller Null").effect("Grow Ratio")("Slider");
prox = thisComp.layer("Controller Null").effect("Proximity")("Slider");
pad = thisComp.layer("Controller Null").effect("Pad")("Slider");
cP = thisComp.layer("Cursor").position;box = sourceRectAtTime();
t = length(position, cP);
ofst = ease(t, 0, prox, sG, 0);
w = box.width;
h = box.height;
xR = thisComp.width / w;
yR = thisComp.height / h;
[refP[0] + ((refBox.width + ofst) * refS[0]) + pad, refP[1]]
The expression will also work with Left Justified Text layers. I could add some more code to take care of center and right justified text.
Here's the result:
I need a little more work on the text layers to get the growth consistent, but if you had all text layers, everything should work.
You could modify the scale expression to use two sliders for height and width ratios or just take the layer size if you wanted to simplify things.
This should get you started.
Copy link to clipboard
Copied
Doesn't really solve the problem for the non-sequential change illustrated in the original images. if that's required you can't avoid using a loop.
Mylenium
Get ready! An upgraded Adobe Community experience is coming in January.
Learn more