- Home
- After Effects
- Discussions
- Treating a Layer as a Single Object with Puppet To...
- Treating a Layer as a Single Object with Puppet To...
Copy link to clipboard
Copied
Hi,
I'm trying to rig a layer in After Effects with the Puppet Tool to give it a bouncy movement
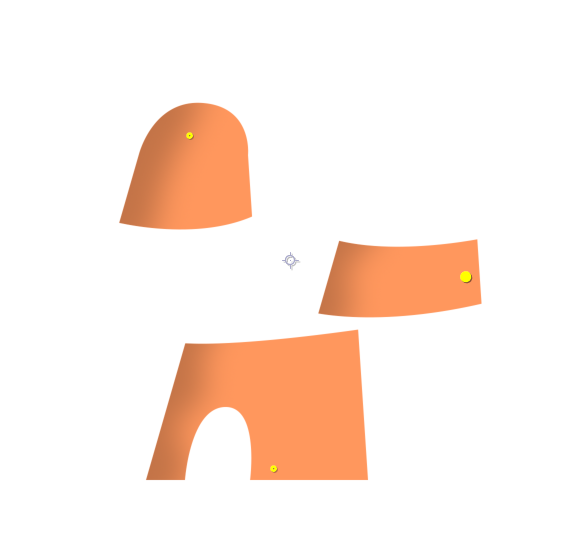
However, the puppet tool interprets each segment of this layer as a different object, shown here:
I want the layer to be treated as a single object by the puppet tool. How can I do that, if possible? I tried this both with a pre-comp and rendering it out as a PNG image. Both cases treated the segments separately.
 1 Correct answer
- Make a New Comp of your PNG file only (named "PNG_precomp")
- Add a comp-sized solid to the PNG_precomp and place it at the bottom
- Make a New Comp ("MAIN_comp")
- Place your PNG_precomp into that MAIN_comp
- Apply puppet pin to that layer
- Puppet Animation
- Double Click (open) the PNG_precomp
- Turn off Solid at the bottom
- Return to MAIN_comp.
Copy link to clipboard
Copied
Put a solid layer or a shape layer that's roughly the shape of this behind it solid green inside a precomp with those shapes.
Apply Puppet Pin to the precomp. Key out the green with something like Color Key.
Copy link to clipboard
Copied
After you apply the puppet pin, you can just turn off the solid layer in the precomp. (unless you like keying stuff) 😉
Copy link to clipboard
Copied
Well, I do! 😛
Copy link to clipboard
Copied
Maybe I'm not following this right, but the Puppet Pin still wants to interperet it as separate objects, and the green area can't be selected by the pins at all.
If it helps, here is the layer setup for this:
Which is precomped into this composition as [Mill], and this is where I'm using the Puppet Pin:
Copy link to clipboard
Copied
Your cropped screenshots do not tell us much about the layer structure. It looks like you are creating the shape with masked solids. You would be a lot better off using shape layers. If you did that you would not need the green.
I am guessing that you did not delete the Puppet Pin effect and start over when you added the green between the layers. As long as there is no break in the alpha channel the mesh is created when you place the first pin, so if you did not delete the entire puppet pin effect you still had 3 meshes on the three separate areas.
If you start over and get the mesh to cover the entire shape then you can go back to the nested comp (pre-comp) and turn off the green layer so you don't need to do any keying.
I would have used a shape layer instead of masked solids, but the same rule applies. Puppet will always apply a mesh that covers visibble pixels. Transparency will be ignored.
Copy link to clipboard
Copied
- Make a New Comp of your PNG file only (named "PNG_precomp")
- Add a comp-sized solid to the PNG_precomp and place it at the bottom
- Make a New Comp ("MAIN_comp")
- Place your PNG_precomp into that MAIN_comp
- Apply puppet pin to that layer
- Puppet Animation
- Double Click (open) the PNG_precomp
- Turn off Solid at the bottom
- Return to MAIN_comp.
Copy link to clipboard
Copied
The directions couldn't be clearer. Thank you for your help.
Copy link to clipboard
Copied
Thank you so much! Legend.
Copy link to clipboard
Copied
After looking through the comments, I found a slightly modified solution that works best for me:
1. Create completely empty PNG with transperancy with the same size of your precomp
2. Precomp your graphics
3. Add the PNG below
4. Apply Puppet tool on the precomp
5. The image doesn't break into elements ! 🙂
Cheers!
Find more inspiration, events, and resources on the new Adobe Community
Explore Now


