 Adobe Community
- Home
- After Effects
- Discussions
- Re: What is the correct approach to use AE?
- Re: What is the correct approach to use AE?

Copy link to clipboard
Copied
Hey all!
I am learning AE and am in doubt of the best approach to use it together with my editing software.
I have this project that I added several overlapping texts to along the time-line using the editing program (like tags, captions, etc). But it's quite boring and I would like to take some advantage of the cool features of AE and bring those texts to life. The problem is that from the top of my head I can see two different approaches to do this but cannot spot which one would be the more productive and correct one.
The first approach would be to render my project in my editing program, then import it with AE, make and apply the compositions directly on it and re-render it. In this case the final version of my project would be rendered in AE.
The second approach would be to use AE as a totally separate program only to make the compositions (one for each text entry) and export them with a green-screen. Then import all the compositions from my editing program into my project, put each one in the proper place and apply a chroma-key filter. In this case the final version of my project would be rendered in the EDITING program and the compositions would be treated as elements of the project just like the audio tracks, footages, images, etc. I confess that this approach makes more sense for me but since I am a freshman on this ground I really would like to hear some of your advice.

Thanks!


 1 Correct answer

Second aproach is not to great to be honnest. Using green screen for graphics is not the best way.
What I would propose is:
a) make separate text animations in AE, then render them with alpha channel (without background), import to your editing software, put together with your video clips and render from your editing software
b) you can also edit everything in your editing software, render that to some intermediate codec, import that edited footage into AE and use it as a referal (guide layer) for
 10
Replies
10
10
Replies
10
Copy link to clipboard
Copied
Second aproach is not to great to be honnest. Using green screen for graphics is not the best way.
What I would propose is:
a) make separate text animations in AE, then render them with alpha channel (without background), import to your editing software, put together with your video clips and render from your editing software
b) you can also edit everything in your editing software, render that to some intermediate codec, import that edited footage into AE and use it as a referal (guide layer) for your animations, make your texts, animations exactly as you wish and exactly where you wish to see them, then render that composition from AE with your footage or remove footage, leave just your texts - render them as one composition. Then import to your editing program, import your earlier rendered footage and put them together.
No matter what you chose - forget about green/blue screens for text animations and just render your animations without background (with alpha channel).

Copy link to clipboard
Copied
You are nearly on the right track, but using green-screen is not necessary, actual doesn't make sense at all 
You can:
- export your video clean (without texts), import this into AE as video, add text and effects on separate layers and export this from AE -> use a high-res codec for this, like DNxHD185X to keep quality up until final export
- create all your texts in one composition, timed to your video or not, export this as video in high-res codec with alpha-channel, import this into editing software and treat this as normal footage, meaning make your in's and out's and insert it into your timeline as you like
- if your are using Premiere, you can link your AE composition right into your timeline, skipping all the export-parts and keep the ability to easily make changes - however, expect feelable lags in Premiere, because of AE has to render everything in realtime (and AE is not designed to do anything in realtime)
Copy link to clipboard
Copied
Cool, thank you very much for your inputs!
I thought on the green screen because I didn't know that was possible to export footage with alpha channel (as I said I am a total freshman). I am aware about alpha channel but I thought that it was restricted to still images.
Martin, I do NOT use Premiere. I actually tried it several years ago but currently I am more used to Vegas that serves me for the little I need (I do not do video editing for living, only for personal projects).
Thanks all for your valuable help!
Copy link to clipboard
Copied
Glad we could help.
Linking to Premiere is actually laggy. I only use it for very small needs, or as an intermediate step to check appearance or timings.
One more thing about alpha:
Alpha channel does not apply to all codecs in general. H264 as no alpha support, as far as I know.
But you have always the option to create a single b/w video from your alpha and use this as alpha mask in your editing software. So you'll have one rgb video and another rgb (but actually only black and white) video for the alpha mask. This is a workaround, if embedded alpha fails for some reason.
Copy link to clipboard
Copied
Martin, yeah, I suppose so. I played some with Premiere around 15 years ago and actually it was the first editing software I had some experience. Fast forward to current days I found in Vegas a very good balance between professional features and easiness of use. Actually I learn the basics VERY quickly and I really doubt that I would have done the same thing with Premiere even having a small background.
As I mentioned before I do not do this for living so I think that I am comfy to chose the tool that works for me without stress. I think that I would have to act completely different if I was going to embrace video editing as a daily work as an employee on an agency for instances. In any case if things change I always can learn Premiere. Just not NOW!
And thank you for the extra tips!

Copy link to clipboard
Copied
After Effects is for creating shots or motion graphics that you cannot create in an NLE. Do not plan on editing in After Effects.
If you are primarily concerned with editing texts DO NOT waste time creating individual text animations to use as overlays, exporting and rendering scenes from Premiere Pro to composite in AE, or making a separate composite (comp) of each text overlay in After Effects. Learn how to use the essential graphics panel. Absolutely everything you can do to a text layer in After Effects can be turned into a Motion Graphics Template. There are a bunch of tutorials out there from sites like Lester Banks and Premiere Gal but the best way to get started creating your own MOGRT files is to spend an hour with the User Guide so you will learn the basics: Create Motion Graphics templates with Essential Graphics Pane. That way when you look at the tutorials you will have a better idea about what is going on and you'll be able to tell when a tutorial is not giving you the best advice.
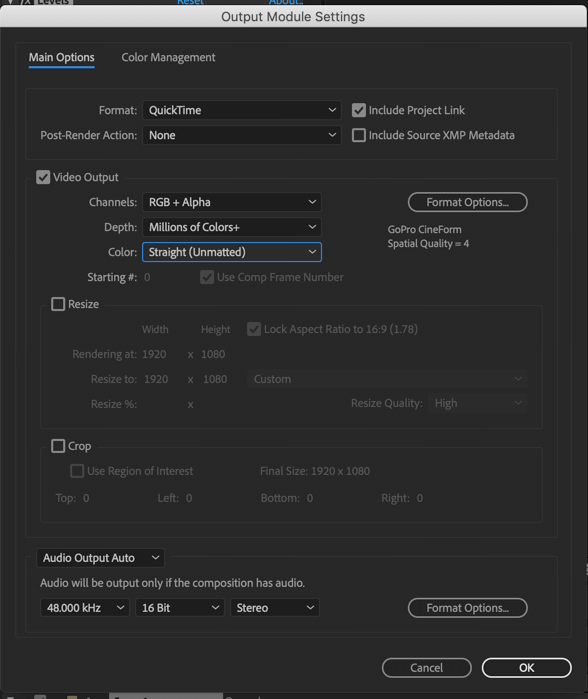
If you insist on sticking with Vegas and their titling system is not going to have to set up each text animation in a separate AE comp and render it as a lossless with alpha file (use the Render Cue and the Output Module preset until you are an expert in video compression), and layer it in Vegas. Changes will require a new comp and a new render. Previews will be slow, and it will take you a lot longer to complete the project that it would for you to create a MOGRT for the charts, one for the lower 1/3's, one for the map overlays, and one for the bullet lists then edit the text and timing in Premiere Pro. My typical industrial film has about 40 graphics in every half hour. Some lower thirds, some charts, some graphs, some bullet points, and some titles. It typically takes me about 15 or 20 minutes to design a MOGRT, then about 30 seconds inside PPro to edit the text or data. It would take five to ten minutes to edit a template comp in AE and then render the file to use in another NLE so the time savings is significant.
The principals of editing are all the same. If your Creative Cloud subscription includes Premiere Pro it would be a real shame not to use it. It will only take you a little while to learn the UI for Premiere Pro and take advantage of the capabilities.
Copy link to clipboard
Copied
Thank you for your reply Rick!
Yeah, for now I am willing to stick with Vegas.
Copy link to clipboard
Copied
If you have Premiere Pro as part of your subscription I would not shy away from diving in. I have used almost every NLE out there and it is no more difficult, in fact, it is easier to cut a simple piece in Premiere Pro than it is in Vegas if you take 10 minutes to learn what the q, w, j, k, l, and Shift + Cmnd + k key do. If it is not part of your subscription then I can see sticking with Vegas, but doing 10 different titles is going to take you almost 10 times longer to do in AE than it would take to create one MOGRT and edit the text directly in Premiere.
Copy link to clipboard
Copied
I would like to make an observation... In the OP I mentioned the use of the green screen and you guys told me to forget about it and stick to the alpha channel.
Then I went test it today but honesty I think that this is unusable (at least for me). I made a very simple lower-third animation with 12 seconds and after exported it resulted in an AVI file with almost 1 GB. Then I exported the very same video in H.264 (MP4) with a green screen and it resulted in a 454 Kb file. Dudes, this is ridiculous. LoL! Before the waste in amount of space there is all the time spent moving files around.
Anyway, I imported both versions in Vegas and compared them. I sincerely couldn't see any relevant difference. The only thing is that the alpha channel file is totally straight-forward and I have to do nothing with it. By the other hand, the file with the green screen demands that I apply the Chroma-keyer and a color correction filter (I don't know why but the original blue became purple but it was a quick and easy correction). The only other difference is that the green screen version became slightly transparent, but I really can live with it. Other than that the visual result is equally satisfactory.
OK, even having the extra labor I think that the green screen version is one of the rare cases when size matters!
Other than that, please let me know if I am doing something wrong.

Copy link to clipboard
Copied
Your H.264 file is full of compression artifacts, noise, and is not a good solution, especially if you are going to greenscreen. The blocks of color information are at best the average of the nearest 16 pixels so the edges of a moving title are going to be hard to key and almost impossible to look clean. The final rendered file at 100% is going to show those artifacts. There is no way around these compression problems unless you choose a 3rd party specialized rendering app capable of intraframe compression and 444 color space. You would still need to render a lossless file, load it in the specialized compressor and render your h.264 file from that. When you did that the file size would increase eight to ten times so it's a no win situation to try and render h.264 from After Effects and use it as a production file.
The only option you have if you want to use compressed formats is to render a separate alpha channel video. It will be black and white. Then render the color channels. Then import both clips, line them up and use the black and white, alpha only video as a luma track matte for the original color titles. If you use H.264 still have compression artifacts to deal with but at least you can pull a clean alpha channel. Most of the other compressed formats are better because they do not use interframe compression (look it up).
There are several visually lossless format options you can choose that are going to give you smaller files and an alpha channel, but none of them are going to be as small as an h.264 file. Choosing the best one for your workflow is going to require some research. Personally, I would use Go Pro Cineform - 10 bit. It is a very good option, it is free, and it works on any OS.
Yes, visually lossless frame based (intraframe) files are fairly large but storage is incredibly cheap. When I started editing digital video the ultra SCSI II drive array that I bought to edit standard definition video would hold about two hours of Standard Def and it cost me $20,000. I can buy a terabyte of enterprise lever extremely fast SSD storage for a couple hundred and a 4 TB enterprise hard drive for $75 or the highest rated 4 TB enterprise drive for $124. Complaining about storage space is not going to get you very much sympathy. I shot for 2 hours on Monday and came home with 2.7 TB of raw video files for a sequence that will run about 40 seconds when it is edited.
Work with compressed files if you must, but don't complain when the final render looks like crap. It would take several days to learn enough about video compression to understand exactly why h.264 is about the worst production format you could possibly choose. Take my word for it. You are not going to be very happy with the results.
Just another reason to use Premiere Pro.

 AdChoices