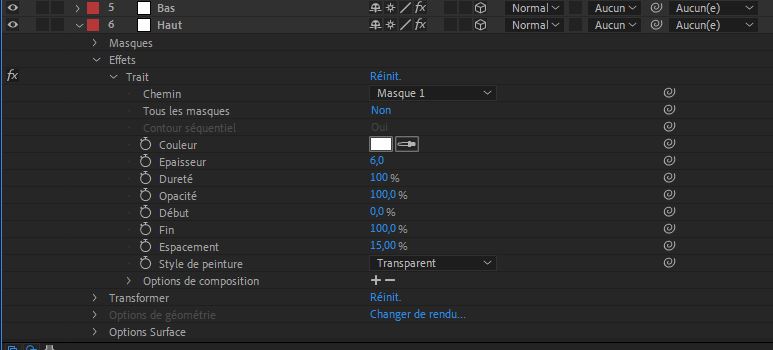
I would start the project by creating a square shape layer with a fill and a stroke that is the size of your cube. If the sides of the cube are images and you have added a square mask and the stroke effect then you have to make sure the Stroke/Paint Style is set to On Original Image.
When the squares are all set up and the anchor point is in the exact center of the square, make the layer 3D and offset the anchor point of the layer by exactly half the width of the square in Z. If you are using a shape layer then the size of the rectangle is easy to calculate. It is half the rectangle size plus half of the stroke width. You now have something like this:

This square is 500 X 500 and the stroke is 10 so the Anchor Point needs to be set to 255 in Z.
When that is set up start duplicating the square layer. If you want the front of the cube to have a hole in it and the stroke needs to make a frame remove the fill from the top of the shape layer that is going to be the front or set the Paint Style for the Stroke effect to On Transparent. If the front can just be open you'll only need 5 layers. It's a good idea to name your duplicate layers.
It's time to build your cube. Select all 6 copies of the square layer and press 'r' to reveal the rotation property of all 6 layers. Start with the Front layer. You don't have to do anything for that layer so you can close the rotation properties. Now start with the left, back, and right layers and rotate them in 90º increments in Y so Left is 90º, Back is 180º, Right is 270º, then rotate the Top 270º in X and the bottom 90º in Y.
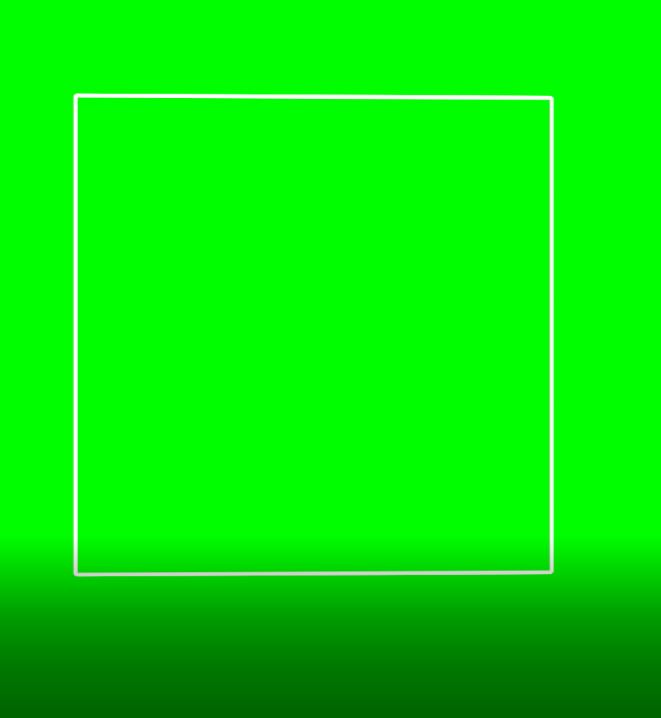
If you are using 6 shape layers open the fill property of the Front shape layer and turn it off or delete it. If you are using a stroke on an image then set the Stroke/Paint Options to Paint on Transparent. You'll end up with something like this:

To make the cube easy to animate add a 3D null to the comp at comp center and parent all of the cube sides to the null. Then lock your layers and control the movement and animation of the cube with the Null.
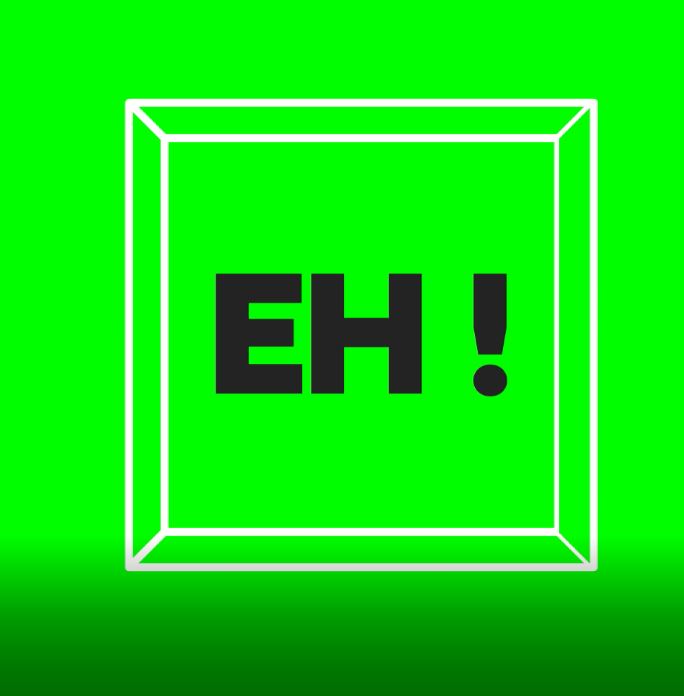
The last step is to add your logo layer to the comp. Make sure the anchor point is in the center of the logo, then make it 3D. If you want the logo to rotate with the cube just parent it to the Null. If you want the logo to stay facing the front use the pickwhip in the Layer/Link column to tie the position of the logo to the position of the null. I've substituted a text layer for the logo and set the logo to remain facing front. When all of that is done you can add lights and a camera. You can control the perspective by changing the focal length and position of the camera. The farther the camera is away from the cube the more parallel the lines will all be. The closer you have the camera to the cube the greater the perspective. Perspective is always controlled by distance from the camera, framing is controlled by focal length (zoom in camera properties). I set the blend mode of the cube sides to Alpha Add to clean up the intersecting edges. You could also add 1 pixel of stroke if you get light leaks. You'll end up with something like this.

You are now free to put the logo in the box anywhere you like in the comp by simply moving and animating the null. You can find the project file here. I also added Bevil Alpha to the Logo layer to give it a little depth.
If you want just the strokes you have to set up a matte. The easiest way to do this is to select all of the cube side layers and the null, copy them, paste them and then pre-compose or just create a new comp and paste them, turn off the Front face, make sure all layers have a fill, turn off accepts lights and shadows, then tie the animated properties of the null in the main comp to the null in the pre-comp using expressions. Then add Dan's expression for opacity to all of the cube face layers. You'll end up with something like this after you set the pre-comp mask as a track matte for the Logo.

Here's Dan's expression. I have it saved as an animation preset and I use it all the time:
toCompVec([0, 0, 1])[2] > 0 ? value : 0


 2
Replies
2
Replies


 AdChoices