Exit
  • Global community
    • Language:
      • Deutsch
      • English
      • Español
      • Français
      • Português
  • 日本語コミュニティ
  • 한국 커뮤니티
0

How do I get from 200fps slow-mo footage back up to normal speed 24fps using time remapping in after effects???

New Here ,
Mar 01, 2019 Mar 01, 2019

Hi

I'm editing a bit of video shot at 200fps which I've imported into After effects and interpreted as 24fps to match the composition settings. Using time remapping and speed ramps I want to transition from normal speed into slow-mo and then back to normal speed again. I understand that because the footage is interpreted at 24fps and is therefore imported as "slow-mo" I need to increase parts to get it back to "normal" but I can't find an accurate way to do this other than dragging the keyframes about. When moving keyframes in the timeline in premiere it shows a increase/decrease percentage so I can see when I have returned to the original speed. Is there a way to get a similar numeric value in after effects? Alternatively I'll just have to drag the keyframes and judge it by eye until the speed of the clip looks normal. I'm sure theres a more accurate and probably easy way to accomplish this I just haven't come across it yet.

Any advice or help regarding ways of returning to normal speed from a piece of slow-mo footage would be much appreciated.

Cheers,

Charlie

4.4K
Translate
Report
Community guidelines
Be kind and respectful, give credit to the original source of content, and search for duplicates before posting. Learn more
community guidelines

correct answers 1 Correct answer

Community Expert , Mar 01, 2019 Mar 01, 2019

It sounds like you are a little confused about how frame rates work. Let me try and clear that up. Andrews suggestion works OK but it is more difficult to achieve perfect real-time playback. I work the other way around. Interpret the footage at the actual frame rate that was used to shoot the footage (200 fps) so it always plays back in real time, then slow it down as needed.

Let me say that again. If you interpret the footage at the same frame rate as it was shot it will playback in real time no

...
Translate
Community Expert ,
Mar 01, 2019 Mar 01, 2019

You just need to do a little math to work out the percentage of change required.

In your case, 200/24 = 8.33

In graph view in After Effects, as you drag a time remapping keyframe it reports the rate of playback as you adjust it.  For fine adjustment you'll need to scale the timeline quite large.

In your case, the result should look like this:

Screen Shot 2019-03-02 at 12.07.33 pm.png

This means the 24fps video has been increased so that 8.32 seconds of footage is being played per second of timeline, or 24fps * 8.32 = 199.68 fps.

Translate
Report
Community guidelines
Be kind and respectful, give credit to the original source of content, and search for duplicates before posting. Learn more
community guidelines
Community Expert ,
Mar 01, 2019 Mar 01, 2019

It sounds like you are a little confused about how frame rates work. Let me try and clear that up. Andrews suggestion works OK but it is more difficult to achieve perfect real-time playback. I work the other way around. Interpret the footage at the actual frame rate that was used to shoot the footage (200 fps) so it always plays back in real time, then slow it down as needed.

Let me say that again. If you interpret the footage at the same frame rate as it was shot it will playback in real time no matter what the frame rate of the composition.  200 fps footage interpreted as 200 fps footage will always playback one second of screen time for one second of real time.

If you want to start in real time, then slow down to slow motion, then return to real-time the easiest thing to do is interpret the footage at the same frame that was used to shoot it. In this case 200 fps. Now put it in a comp that is the frame rate you desire for your final project.   It sounds like you want to use 24 fps. Now it is just a matter of deciding how much you want to slow down the footage and when. If you want to slow down the footage from the original 200 fps so that every original frame is shown then you just have to do the math.

The speed graph in time remapping displays in seconds per second so normal speed is 1.000 sec/sec. 200 fps footage played back at 20 gives you 10 seconds of screen time for 1 second of real time or 20 / 200 seconds/second. 24 would be 24/200 or .12 seconds per second. Did you follow that? Let's move on to a real-world example using Time Remapping.

Let's say you want to play in real time for 4 seconds, then slow down and show the next 4 seconds at maximum slow motion, then return to normal speed for 4 seconds. The workflow goes like this:

  1. Make sure the composition is long enough to accommodate all of the footage by adding sufficient time to the timeline. You are going to have to add enough time to accommodate 4 seconds of footage at .12 seconds per second.
  2. To keep the math simple change the time indicator to frames instead of time
  3. Enable Time Remapping (Alt/Option + Ctrl/Cmnd + t) which will extend the out point of the footage to the end of the comp
  4. Move the CTI to 96 frames (4 seconds) and set a time remapping keyframe
  5. Move the CTI to 192 frames and set another time remapping keyframe You end up with a timeline that looks like this:
    Screenshot_2019-03-01 18.01.01_lVGXw9.png
  6. The next part is easy. You need to add some time to the timeline. If you want to see every frame you have to move the last two keyframes together to the left. Four seconds at 200 frames per second is 800 so adding in the 96 frames of real-time you move the CTI to frame number 896. Now grab the last two keyframes and slide them so keyframe (at 1600 frames) is now at frame 896. Your timeline looks like this:
    Screenshot_2019-03-01 18.09.52_BpYqy2.png
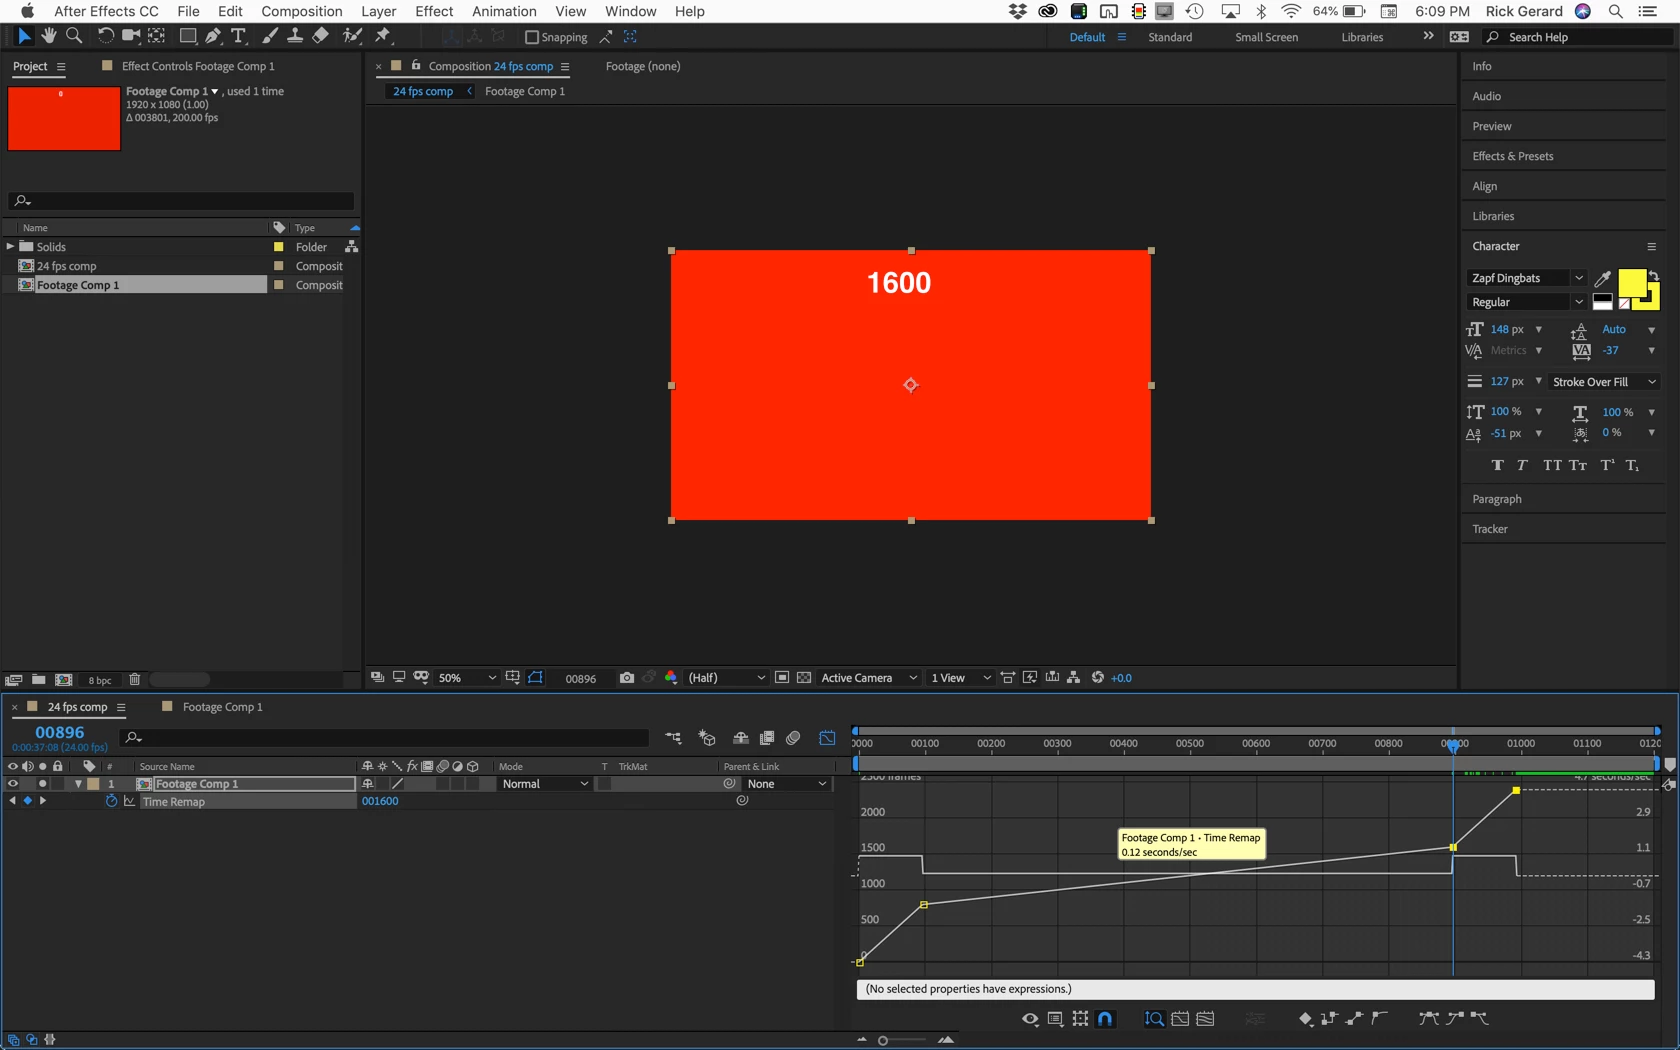
  7. The video now plays for 4 seconds in real time, then drops to .12 seconds per frame showing every frame of the original footage, then speeds back up to real-time of 1 second/second.
  8. The last step would be to add a ramp in and out of slow motion. To do this pick a point before the slow motion starts between the first and second keyframes and another point between the last two keyframes. I chose 20 frames so a keyframe is now added at 76 and 916. Grab all the keyframes except the first two and slide 20 frames to the left, then grab the last two keyframes and slide them 20 more frames to the left. This will give you this:
    Screenshot_2019-03-01 18.27.32_XR7KFD.png
  9. You can then zoom in on the timeline, change the graph editor to edit the speed graph and put a smooth ramp in the speed change like this:
    Screenshot_2019-03-01 18.23.49_zLXUrf.png
  10. The speed change line should be straight and that will put a curve in the value graph that gives you a smooth transition from real-time to .12 time slow motion.

I hope this makes sense. It takes a while for most folks to wrap their head around time changes and frame rates.

You can work the other way around, interpret the footage at 24 so it always plays back in slow motion, then do the reverse math to speed it up to real time, but the calculations are not as simple and there is no real easy way to return a clip to real time.

Translate
Report
Community guidelines
Be kind and respectful, give credit to the original source of content, and search for duplicates before posting. Learn more
community guidelines
New Here ,
Mar 02, 2019 Mar 02, 2019

Thanks for responding to my question it was really helpful. After wrapping my head around it I think i've figured out how to slow down the footage. I just wanted to check when you say "add some time to the timeline" you said "move the last two keyframes to the left. Did you mean move them to the right as surely sliding to the left would speed them up? Is moving them to the right also the case with the extra keyframes used for the speed ramp?

Im also a little confused as to how you managed to create the smooth speed ramp. I followed correctly up to step 9 by adding the keyframes to get the extra steps however I'm unsure how you manages to go from the steps to a straight line (smooth speed ramp) in the speed graph. Is it by playing with the handles?

Translate
Report
Community guidelines
Be kind and respectful, give credit to the original source of content, and search for duplicates before posting. Learn more
community guidelines
Community Expert ,
Mar 02, 2019 Mar 02, 2019
LATEST

Yes, move them to the right. Just like it shows in the screenshot. Didn't proofread my answer. Good catch.

Translate
Report
Community guidelines
Be kind and respectful, give credit to the original source of content, and search for duplicates before posting. Learn more
community guidelines