- Home
- After Effects
- Discussions
- Learning the right rotoscoping workflow
- Learning the right rotoscoping workflow
Copy link to clipboard
Copied
Hi,
I'm new (about 3 days in) to After Effects and am trying to rotoscope this person from the backgrond; to exchange everything else in the scene (chair and all else).
I'm happy to spend the time and learn any tools within After Effects, but I want to make sure I'm learning the right workflow for the job, to not waste time unecessarily.
I naively thought I could RotoBrush and Fine Tune a 7m clip and render it out over night, and my laptop is just saying, 'don't even try'.
So, any guidance on how I might best approach this 7m30s job. I'm starting with an h.264 1920x1080 file from a Canon 5D and need to end up with a lossless (export of the same quality) of just the man, for compositing in Premiere.
Even a short bullet pointed list of the process/workflow would be great, so I know that at least I'm learning the right things for the job. I'm not in this for general After Effects mastery, but to get this result so I can continue on with my Premiere Pro edit/project.
Image pulled from the source video is attached. The highest quality rotoscope result is the goal; time is not the issue, as long as it's the quickest route to the right result.
Thanks so much for guidance,
Matt
NOTE: Title edited by Mod.
 1 Correct answer
The procedural matte + Roto is the way to go, and, trust me, you will be done in less time if you edit the footage in Premiere Pro and then use Dynamic Link to create comps that are just the shots you need to be worked on. Even if you end up using every frame, you won't get as tired, the likelihood of fouling up a couple of frames, and having to re-render the entire thing is lowered.
My workflow for this kind of thing is always, cut in Premiere Pro, select the clip I am working on, right-clic
...Copy link to clipboard
Copied
There's really no quickest route here. A blck vest and a black book/ ledger set against a black background and the nto boot all the ugly things that give toto artists nightmares - low light, transparencies and then some. Sorry, but the only sensible answer here is conventional mask-based rotoscoping. Everything else isn't going to work. Time to stock up on coffee for the next few days and just chew through it.
Mylenium
Copy link to clipboard
Copied
Thanks Mylenium for the response.
My idea - and how I started, was to do the body - up to the neck - using the pen tool, and render that out. I think I've managed that. Then, because of the hair I figured to do the second piece - the head - with the rotobrush tool and rotobrush fine tune. Is that what you might mean by 'conventional mask-based'?
When doing the rotobrush tool, I can't figure out how much to approach at one time, and how to split the clip 7m30s into sizes manageable for this second process.
Could you suggest if this is the way to go for the head: rotobrush and fine tune?
Is there a way to deal with manageable pieces and then put them all back together, to then render out a single (at least for the head) 7m30s master?
Lastly, if I'm bringing in a Canon 5D h.264, what format do you recommend to render out to use as a master (I can do proxys for editing), but what would be the best way out - format - of After Effects in this situation (with a body render and a head render) where I won't lose quality going back into Premiere Pro?
Thank you for confirming my first thoughts, and a little more detail for the above would be much appreciated.
So, taking a day or days is normal for this - it's not just me?
Cool,
Matt
Copy link to clipboard
Copied
You can't muddy up the waters by slpitting the layer if you want to use Rotobrush. That's the whole point - it analyzes the motion of the clip and propagates across time. Aside from the fact that once you're back in the layer view you still essdentially work on the whole clip and thus any performance gains my go to waste, you simply create the problem of the seams at the splitting points not matching. That's the crux of using any semi-automated process/ tool. That's why you have to make up your mind and ideally only use one controllable method, not a crazy mix. That doesn't preclude refining a rotobrushed clip with masks layer, but frankly that would be like doing the work twice.
So for what it's worth, just sink your teeth into masking, laborious and tedious as it can be. At least it has the potential to look good and depending on how much motion there actually is, you may only need minor tweaks every few frames plus the process can easily be optimized further by copy&pasting mask shapes. This would in fact even work when the clip is split and ensure consistent behavior across the cuts.
The formats don't really matter - you're already working off compressed footage, but of course you may want to use something like TIFF sequences for output to embed your Alpha channel/ transparency and not further degrade quality with additional compression.
Mylenium
Copy link to clipboard
Copied
Thank you Mylenium.
I don't wish to appear ungrateful for your time and advice, but I'm really none the wiser about a workflow for tackling this.
I assume "there's no quickest workflow" means I could do anything. Which isn't all that helpful.
Although you did follow it with "the only sensible answer here is conventional mask-based rotoscoping. Everything else isn't going to work. " So, you're saying 'conventional mask-based rotoscoping' is the only thing that will work.
That doesn't enlighten me as to workflow. With three days of After Effects, I have to assume you mean using something like the pen tool and key frames.?.
I don't know how a 'conventional mask' with the pen tool will cope with hair? I didn't think using the pen for the lower half and the rotobrush for the head/hair was a 'crazy mix', but again, I'm new to rotoscoping.
You allude to splitting the clip as a bad idea; but the computer doesn't seem to be able to cope with the whole piece in one go; or, more likely I'm doing something wrong.
Lastly, I'd have to say that a comment like 'formats don't matter' is suspect. Not a professional comment or way of thinking. With the tools and possibilities we have here - and being new to rotoscoping and alpha channels, I think everything matters, especially things like format. I don't want to spend two days rotoscoping only to find out I lost quality or exported a black back ground.
Again, although you say 'formats don't matter', you then follow it with specific guidance that could be really useful, if I could trust it; or understand the reasoning.
In any case, do not feel I'm ungrateful, or need any more of your time. I'll work it out.
I was really out for a 1, 2, 3 (this tool, this tool, this format, this way) kind of answer. Actually a workflow.
Thank you for the pieces of guidance I can use.
Cool,
Matt
Copy link to clipboard
Copied
For anyone else wondering how to proceed, I did come across this advice to a 'similar question' and it may have some useful bits in it. I'm still trying to decode it:) Matt
---------------
If the footage was shot with rotobrush in mind, and you can get really good propigation, seventeen minutes will take about a whole day to rotobrush. It could easily take much longer.
You do not want more than a few seconds in any single application of Rotobrush. You also do not want 17 minutes of Rotobrush work in a single comp. The AEP file will be huge and much more likely to be damaged when saving or opening.
The best workflow recommendations that I can give you are:
1 - Only one layer in a comp with Rotobrush applied, 2 maximum, you only want to be creating a matte with this comp
2 - If the layer is longer than just a few seconds as soon as you generate an acceptable matte and freeze the frames drop in a test background layer and check it. If it is OK, RENDER the comp to a visually lossless frame-based production format or at least render just the Alpha Channel so you can use that for a track matte. When the render is complete and the matte has been checked, DELETE the comp or at least the layer.
3 - If you have a long clip break it up into 10 or 20-second segments using the Split Layer shortcut Shift + Ctrl/Cmnd + d, then pre-compose each of the layers trimming the pre-comp to the layer length, do all the roto, render all the pieces, then get rid of all those Rotobrush comps.
4 - Many really tough shots can be color corrected to make Rotobrush easier to use. I've even used Colorama to separate the colors and edges, then pre-composed, then run Rotobrush of the garish pre-comp so I could get propagation to work better. Remember, almost every time, all you are looking for is a track matte.
5 - When using Rotobrush make sure you are only processing frames that are going to end up in the final project. Sometimes you need to add some handles, 10 or 20 extra frames at the head and tail if the final edit is not locked, but generally, every frame that you spend time on that does not end up in the final edit is wasted time and money.
Your seventeen-minute shot could be done in just a few sections but you risk fouled up mattes and wasted time. If all of the shot must have the background removed and there is no way to use some kind of procedural matte, then I would break it up into at least 34 pieces.
---------------
Copy link to clipboard
Copied
The efficient way to rotoscope is to figure out ways to save time and use as few keyframes and mask points as you can. Your shot is one that is perfect for a procedural matte to pull clean edges from the chair and the actors hair with a procedural matte, then combine that with a cuple of simple masks and a track matte created with a very simple mask path on a solid to fill in the holes left by the procedural matte. Take a look at this animated gif:
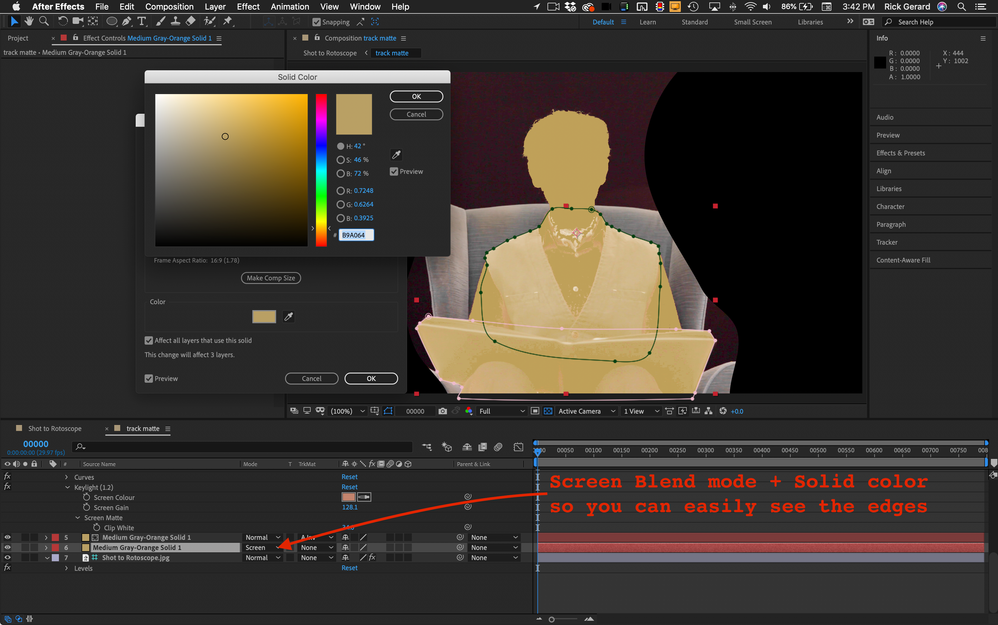
The first thing I did was duplicate the footage layer and insert a light gray solid that I can use as a track matte between the duplicates. I then selected just the top layer and tried extract + Curves, Linear Color Key, and Color Range key to remove the black background and give me some good edges. Color Range produced good detail on the hair. Rotobrush probably would also pull good detail on the hair but using an effect to create an alpha channel from the black background was far fastrer.
The last step was to set the blend mode to screen so I could easily see through the layer and draw a very quick mask around the holes I needed to fill. If there is not very much movement in the shot then you're done. The only part of the project that requires precise masking are the edges of the black book. The rest is taken care of by the procedural matte on the top layer.
By far the best tutorial series I have ever seen on Rotoscoping by hand is given by my friend Scott Squires. He did not use After Effects, but the multiple paths and simplifiation techniques he shows are exactly the same techniques you would use in AE. Pay attention to the prepration, planning and execution of the shots he used in the project. Make sure you look at both parts. Effects Corner: Rotoscoping - Part 1
Copy link to clipboard
Copied
Thank you Rick,
A lot of insight and references to learn more. I'll definitely take the time to watch/read those links.
I see there's many steps from begining to end to make sure the final output is the very best it could be, without losing anything important.
Only thing that may be different than your gif above, is that I need to get rid of the chair as well, so I'll be pulling just the person - and giving him a much cooler chair for the part! Actually, I've already done a decent matte for all 7m30s to the top of the shirt and across the neck.
I think experiementing with effects to pull him out is worth a good go.
I'm going to go through your guidance carefully. Thanks.
Matt
Copy link to clipboard
Copied
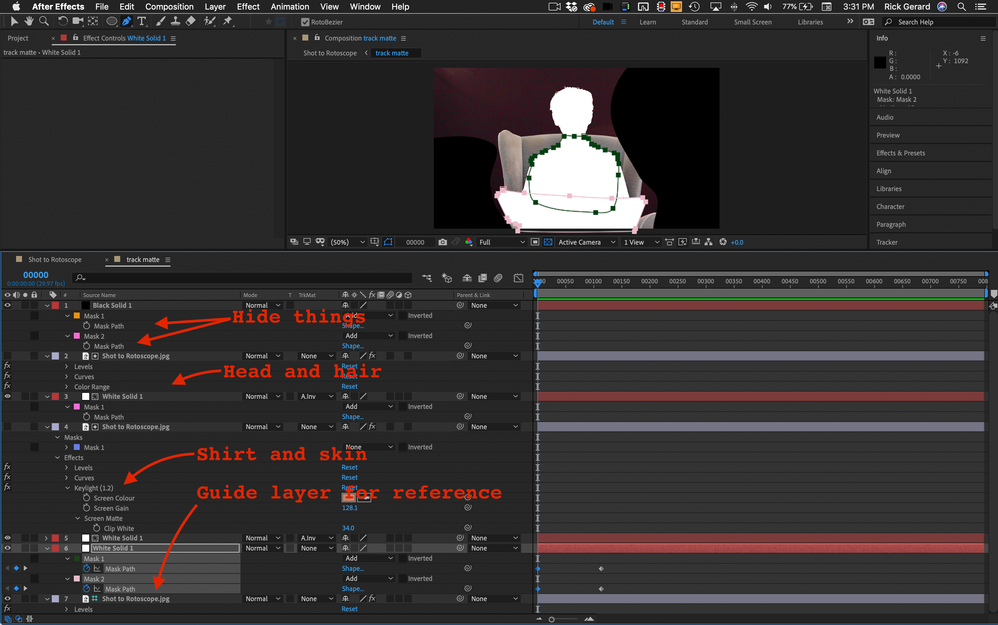
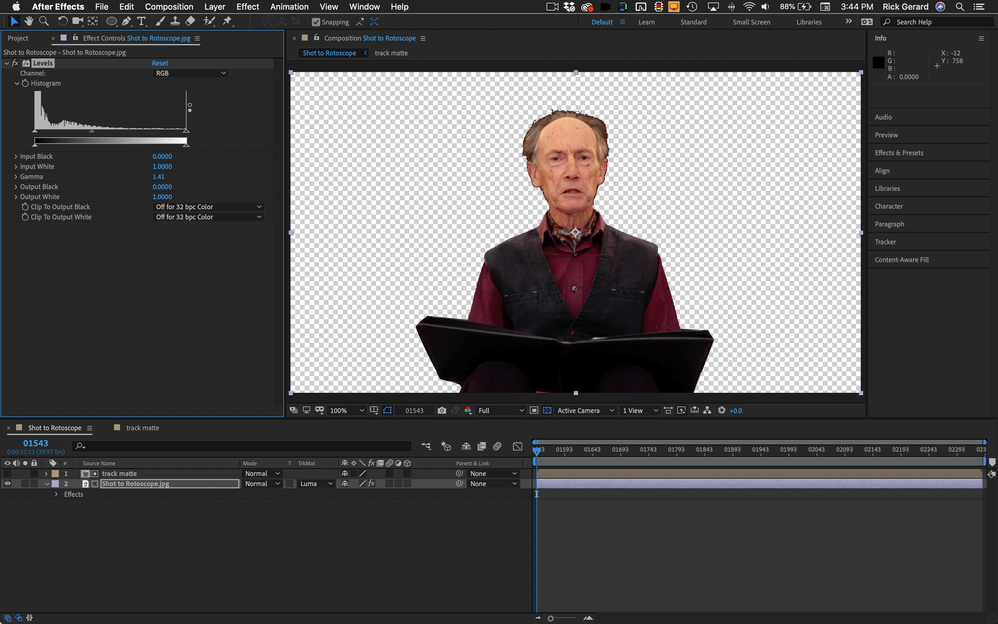
Here are some screenshots showing how I would use color range to create a matte for the head and hair, then on another layer Keylight to create a matte for the sleves and neck, then animate just a couple of masks on the body and the book to roto this scene. Two procedural mattes to find the difficult edges and one solid with just a couple of animated masks would do the trick. There are litterally hundreds of ways to create procedural mattes. Most shots that require roto can be simplified if you combine techniques. Planning and executing the shot is the most important part of creating a workflow that takes hours instead of weeks or months. About 15 years ago I worked on a project with about 40 other artists. My 90-second shot took me about 200 hours to roto because the roto work was an afterthought.
The screenshots with notation:
The Project File for reference.
Copy link to clipboard
Copied
First class! Thank you for the detail. I got sidetracked into researching formats, probably just as a way to avoid roto'ing this shot.
Thanks again. I'll probably report back after I get it done, just to round off the topic.
Cool,
Matt
Copy link to clipboard
Copied
By the way, I have never and would never rotoscope a 7-minute shot because I never make videos that are seven minutes long and only one shot. I only work on the frames that are going to be in the final movie. Sometimes I'll add 10 to 30 frames to each end of a shot to act as handles in case I want to trim the edit a bit when I do the final cut. VFX work and Roto is just too time-consuming to waste time on frames that are not going to be in the final movie. My average comp is under 7 seconds. The average shot length in most of the movies I edit is about 3 seconds.
You might find these threads interesting: Average Shot Length Archives and this one Data From a Century of Cinema Reveals How Movies Have Evolved.
Copy link to clipboard
Copied
Thank you for more informative links. I devour good information, so I'm grateful.
Yes, I understand the idea of doing only what's needed. I'm making a feature, the whole 7m30s will be used and due to the global lockdown I've had things recorded remotely. The idea was to use the shot as is, but in my pursuit of 'making it better', I realise (now) that the background my 'character' was able to put together in his home doesn't have the weight it should.
Necessarily, I now need to cut him out and put him in an environment that matches the character better.
I'll be thinking ahead and making stronger decisions, before getting in this situation again!
Cool,
Matt
Ps. I should add two things - noting the links you shared. One is that I don't want to allow the increasing speed of editing to influence my work, and two, that although I am going to be using the entire 7m30s, it's likely not going to be in one go. But I'll need it all rotoscoped; unfortunately. Thanks again for your input.
Copy link to clipboard
Copied
The procedural matte + Roto is the way to go, and, trust me, you will be done in less time if you edit the footage in Premiere Pro and then use Dynamic Link to create comps that are just the shots you need to be worked on. Even if you end up using every frame, you won't get as tired, the likelihood of fouling up a couple of frames, and having to re-render the entire thing is lowered.
My workflow for this kind of thing is always, cut in Premiere Pro, select the clip I am working on, right-click and select Replace with After Effects composition, Save the AEP, but keep AE open, Return to Premiere Pro and UNDO the last action so the original footage is back in place, Change the color of the clip in the timeline to identify it, then do the work in AE, render to a lossless format, and import into a bin in Premiere Pro I name VFX. The last step is to just drop the clips right on top of the original clips in the Premiere Pro sequence. If the work I have to do in AE is extremely simple and renders very quickly I will keep the dynamic link, but for most of my work, probably more than 90% of it, I render in AE and replace the shot in Premiere Pro.
I've been on a VFX project for a feature film since February. A couple of weeks ago the Producer wanted me to make some changes in a shot. There are only about 50 frames that need fixing. Here is a screenshot of the Project panel.
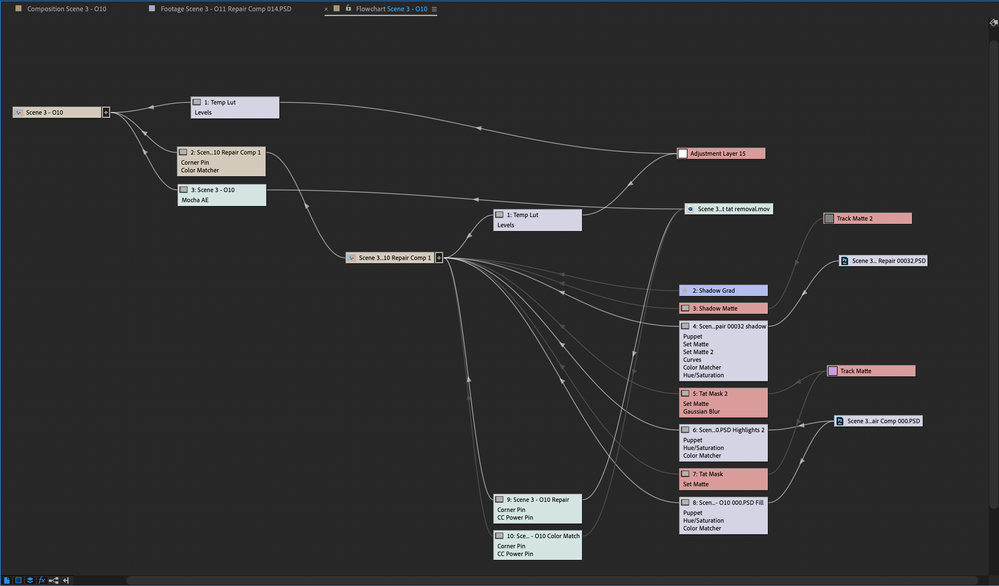
The shot (Scene 3-10) that needs fixing is 0:03:11 - just over 3 seconds. The shot that it comes from is 2:17:02 - just over 2 minutes seventeen seconds. If I take a look at the whole shot the editor sent me this is how complicated the comp is and I have only expanded half of the nested comps that make up just Scene 3 in this 6 scene project.
Doing the repair only required me to dive into this array of layers and effects:
All I had to do was open up 3_10 Repair Comp, go to the Track Matte 2 layer and adjust a half dozen hand rotoscoped mask keyframes on two masks, move back to Layer 4 - adjust the settings and add some keyframes to curves, then open up the Scene 3 00032.psd and do some more clone and healing brushwork, then return to Layer 4 and fine-tune a half dozen puppet pin keyframes and adjust the timing of opacity keyframes to fix the glitch in the roto.
The repair took about 20 minutes to render. If the editor could use an image sequence instead of a Pro-rez file I could have just sent the 50 frames and the render would have taken about 4 minutes. If I had everything in one comp the render could have easily taken several hours and the likelihood of a render failure goes way up.
That project is a moderately complex completely technical job that required a lot of hand roto, a lot of procedural mattes, and a bunch of keyframes, and yes, I could have everything in Scene 3 in one main comp, but it was far simpler to break each shot down into a separate comp.
Copy link to clipboard
Copied
This is wonderful information. Really appreciate the detail. I think the workflow to take is the one you outline at the top of this last message; because, although I will be using the entire 7m 30s, it's going to be in pieces, and who knows what I won't need, once I'm in the edit.
I guess I over do it on preparation; when the work will be less time consuming if I just let go a little and do somethings in parallel.
I wanted to have the background free so I didn't even need to 'act like' it's not there. I guess editors are required to edit with temp cards and shots all the time; I can get used to it!
Again, Thanks.
Find more inspiration, events, and resources on the new Adobe Community
Explore Now


