- Home
- After Effects
- Discussions
- tracking to automate resizing and position ?
- tracking to automate resizing and position ?
Copy link to clipboard
Copied
Hello,
This is my first post here and I am pretty new to AE (but got the basics).
I have several shots done on a tripod of someone drawing onto a wall but as the drawing is evolving the tripod was put a little bit further and further away.
What I need is to track the video and put every shots on the same size in order to be able to zoom out at a desired speed. (additional problem as it's a drawing the tracking has difficulties to recognize the points between 2 shots and to enlarge the trackingzone really slows down the process...any idea ?)
I also tried to do it manually on premiere but it was really time consumming ( and I have several videos like this).
So what do I have to do ? I did a tracking on AE and attached it to a null object but then I don't know what is the best thing to do and how do it ?
Add a camera and link it to the null object ?
Thanks in advance !
 1 Correct answer
I hope the original footage is at least 2X the final comp size.
All you have to do is line up the images on top of each other, start at the bottom, when you get to full wide turn on the next image, switch the difference or overlay or multiply blend mode so you can easily see the overlapping pixels and scale or position the next layer in 3D space. Personally, I'd probably stack everything up in 3D space and move the camera. No tracking required just careful placement and a well-timed move.
Copy link to clipboard
Copied
So what do I have to do ?
Plain and simple: Use another tool. This is beyond what you can do with any of AE's built-in trackers. What you need is something like SynthEyes or Nuke that allows manual placment of track markers, multiple solves and then tools to correlate the markers in different shots for a full on scene/ shot reconstruction.
Mylenium
Copy link to clipboard
Copied
isn't it a little bit too radical ? As I only have 2 d tracking (and resizing) I am sure there is a workaround![]()
In Premiere what I started to do was to cut every shots appart,to put each one on a different layer then to juxtapose the first frame (of the shot) on the last frame of the previous one and by transparency resize and center it ...as you guess it's really time consummng and there always some small scale percentage issues that mess everything....so it's almost working.
I am not an expert but I guess it will be simplier and more effective to do it on AE, isn't it ?
Let' s say I adjust the null object manually on track motion with scale....once it's done what do I do in AE to make it centered on one point and resizing it automatically ?
Copy link to clipboard
Copied
It's possible you could use the Warp Stabilizer to help unify these shots, but depending on how different they are, you may just need to do it manually.
The "Difference" blending mode is excellent for this kind of stuff. You could place each shot atop the previous one, set to Difference, and you'll be able to see the adjustments needed to make it match perfectly. It's likely even an automated tool will only get you close, and you may need to take this approach to make it perfect.
Copy link to clipboard
Copied
Perhaps I misinterpreted your first post, so anything is possible, but still, I think you are going to need something more elaborate for the simple fact that your shots have a different FOV, so they'll never match up without extra work. The lens distortion and parallax would have to be removed/ flattened out for a simple image-based crossfade zoom, so as a minor a treatment with effects like Optics Compensation would be required. Even so, it would still not solve anything as the track data still doesn't line up. Ultimately in my view it doesn't matter - you could spend time doing this "scientifically" as I suggested or simply keyframe this by hand, but it will take quite a bit of labor one way or the other.
Mylenium
Copy link to clipboard
Copied
Here's the problem. Perspective is entirely based on camera position. Field of view depends on focal length. If you move the camera you change the perspective so your match frames are not going to match unless you distort one or both of the images at the seam.
The trick is to hide the problem as well as you can. Since you are filming a wall, if there is nothing in the foreground and you are perfectly square to the wall this is going to be easier. The basic tool is going to be scale and temporary application of the difference, blend, or overlay mode to match up the frames. Then, if the camera is at an angle to the wall or moving application of distortion tools. Unless I completely misunderstand the nature of your shots there is no tracking software out there that will automatically line up this kind of transition.
Show us some footage and we may be able to give you some suggestions. This kind of a project requires a great deal of pre-production planning to make the post-production process easy and the effect seamless.
Copy link to clipboard
Copied
ok, ok and didn't thought the issue would go that far so I didn't mention that the shots were done in stop motion, nothing between the camera and the wall,constant light, the shots are perfectly square (I am a carpenter too, so believe me;)
I am aware that kind of things need to be more planned, it was easier to jump in to it than to be paralysed by all the recquirements to do it in the correct way.
As it will zoom out all the time I don't think the lens distortion will be an issue, also I don't need something neat and perfect.
I need eveything to be the same size in order to do control how it will zoom out (the horizontal plan will be always centered but the vertical plan will go up and down).
Sorry if I have some language approximation as I am not a native english speaker.
I am sorry but I can't show anything...
Copy link to clipboard
Copied
I hope the original footage is at least 2X the final comp size.
All you have to do is line up the images on top of each other, start at the bottom, when you get to full wide turn on the next image, switch the difference or overlay or multiply blend mode so you can easily see the overlapping pixels and scale or position the next layer in 3D space. Personally, I'd probably stack everything up in 3D space and move the camera. No tracking required just careful placement and a well-timed move.
Copy link to clipboard
Copied
Ok, so the same thing I initially done in Premiere but in 3D in AE ? right ?
I think it's nice, how would you set up the camera lens in AE?
Copy link to clipboard
Copied
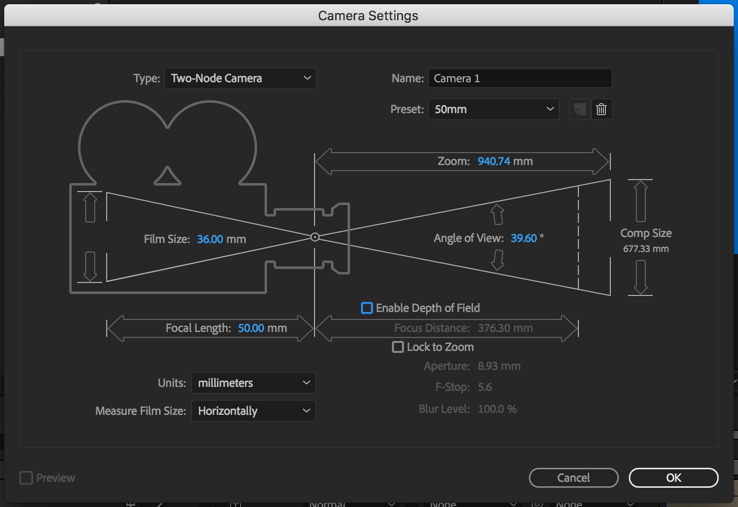
The camera setup is just simple math. If you shot the footage with a pretty normal lens I'd pick the 50mm preset, depth of field off and two node camera:

Note the zoom value. That is the distance this camera will be placed from comp center when it is created.
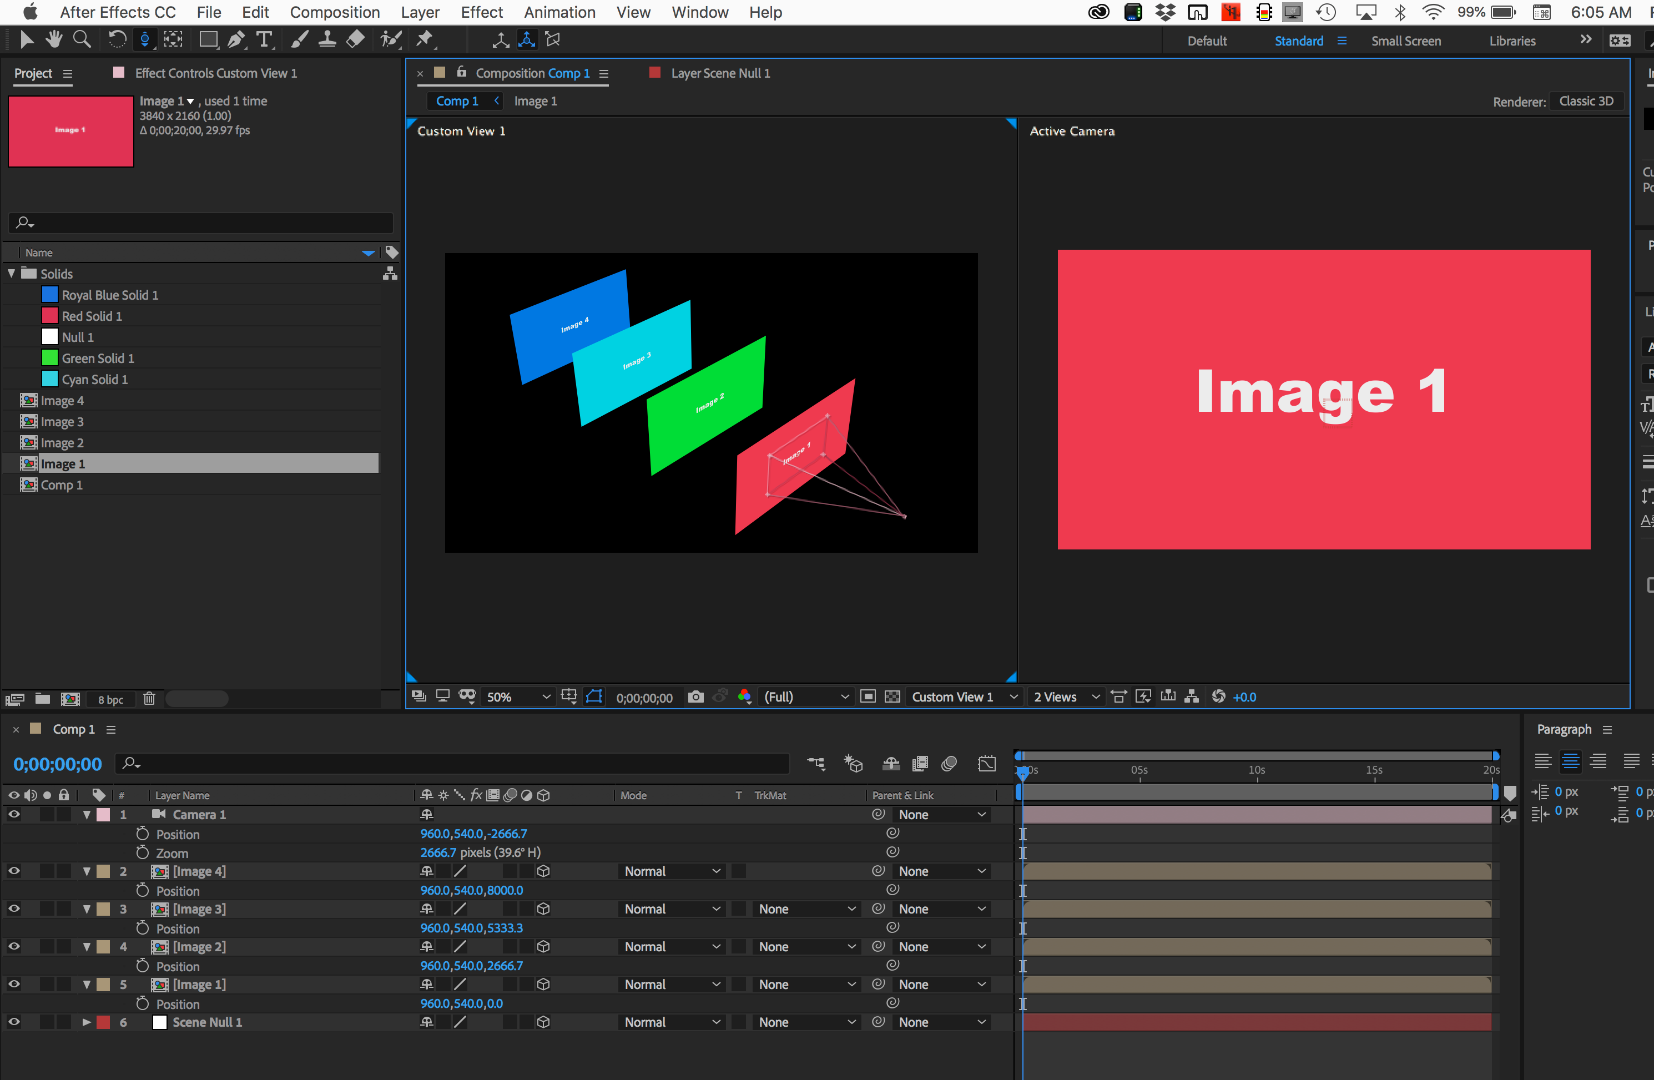
Now set up your composition. In this example, the sample footage layers (Image 1, 2, 3 & 4) are all 2X larger than the composition. Make all layers 3D, reveal the zoom value of the camera by pressing A twice, select it and copy it. Next, select footage layer 2, 3 and 4, reveal the position property by pressing P, double-click on the Z value and paste the zoom value to the Z position. Now go to footage layer 3, double-click the Z value, press the right arrow key to move to the end of the z value and type *2 to multiply the value by 2. Repeat for Image 4 except type *3. This will line your images up in z space so that the images will be at an effective 100% scale when the camera moves, in this case, 2666.6667 pixels from the next layer. Add a null and parent all of the Image layers to the null then animate the position of the null. The setup would look like this:

As long as your images are properly sized and lined up so that when the camera is at the effective 100% scale position you can just cut set the out point for each successive layer at the match point and the transition will be seamless. You can use a blend mode to precisely line up each successive image. When you get the images to match up return the blend mode to Normal. The comp would look like this before you changed the blend mode back to normal so you could see that the images are lined up.

Because you always cut at an effective 100% scale and the images perfectly line up at that point you should only need 2 position keyframes and an easy ease applied to make a nicely timed zoom in on the shot. Just back the null up until the first image fills the frame to start.
It's all pretty simple once you have the footage prepared. Getting the layers properly lined up in Z space so the scale is accurate is just simple arithmetic and lining them up in X and Y is simplified by temporarily using blend modes.
Copy link to clipboard
Copied
Thank you ![]()
Find more inspiration, events, and resources on the new Adobe Community
Explore Now