• Global community
    • Language:
      • Deutsch
      • English
      • Español
      • Français
      • Português
  • 日本語コミュニティ
    Dedicated community for Japanese speakers
  • 한국 커뮤니티
    Dedicated community for Korean speakers
Exit
0

How to export book hardcover with cutting marks at right place into a print-ready PDF?

Explorer ,
Jul 22, 2020 Jul 22, 2020

Copy link to clipboard

Copied

I have designed a book hardcover that needs to be exported into a print-ready PDf that would be printed by a professional printer.


Now, the problem is that the cutting marks (and other printer's marks) are printed right outside of the page and thus the cover edge (when glued onto the board) is not counted as the part of the cover.


I have tried to design the cover as a single InDesign page that consists of front cover, spine and back cover; I have also tried to design it as three pages. Whatever solution I tried, the printer's marks are printed as if it was a page from the book block.


FYI:

- the printer needs 18 mm bleed on each side, which I have set (and slug set to 0 mm on each side);

- spine is 16 mm;

- I want that outside the page block (be it front cover, spine or back cover) at least 6 mm would not be used by printer's marks.


I have attached an MWE (cover_test_three_pages.indd) that needs to be exported into print-ready PDF with printer's marks at right places. Also I have attached the joboptions file (cover_export_test.txt; just rename it to cover_export_test.joboptions, as the forum does not allow to upload files with that extension).


Thanks in advance for the help.


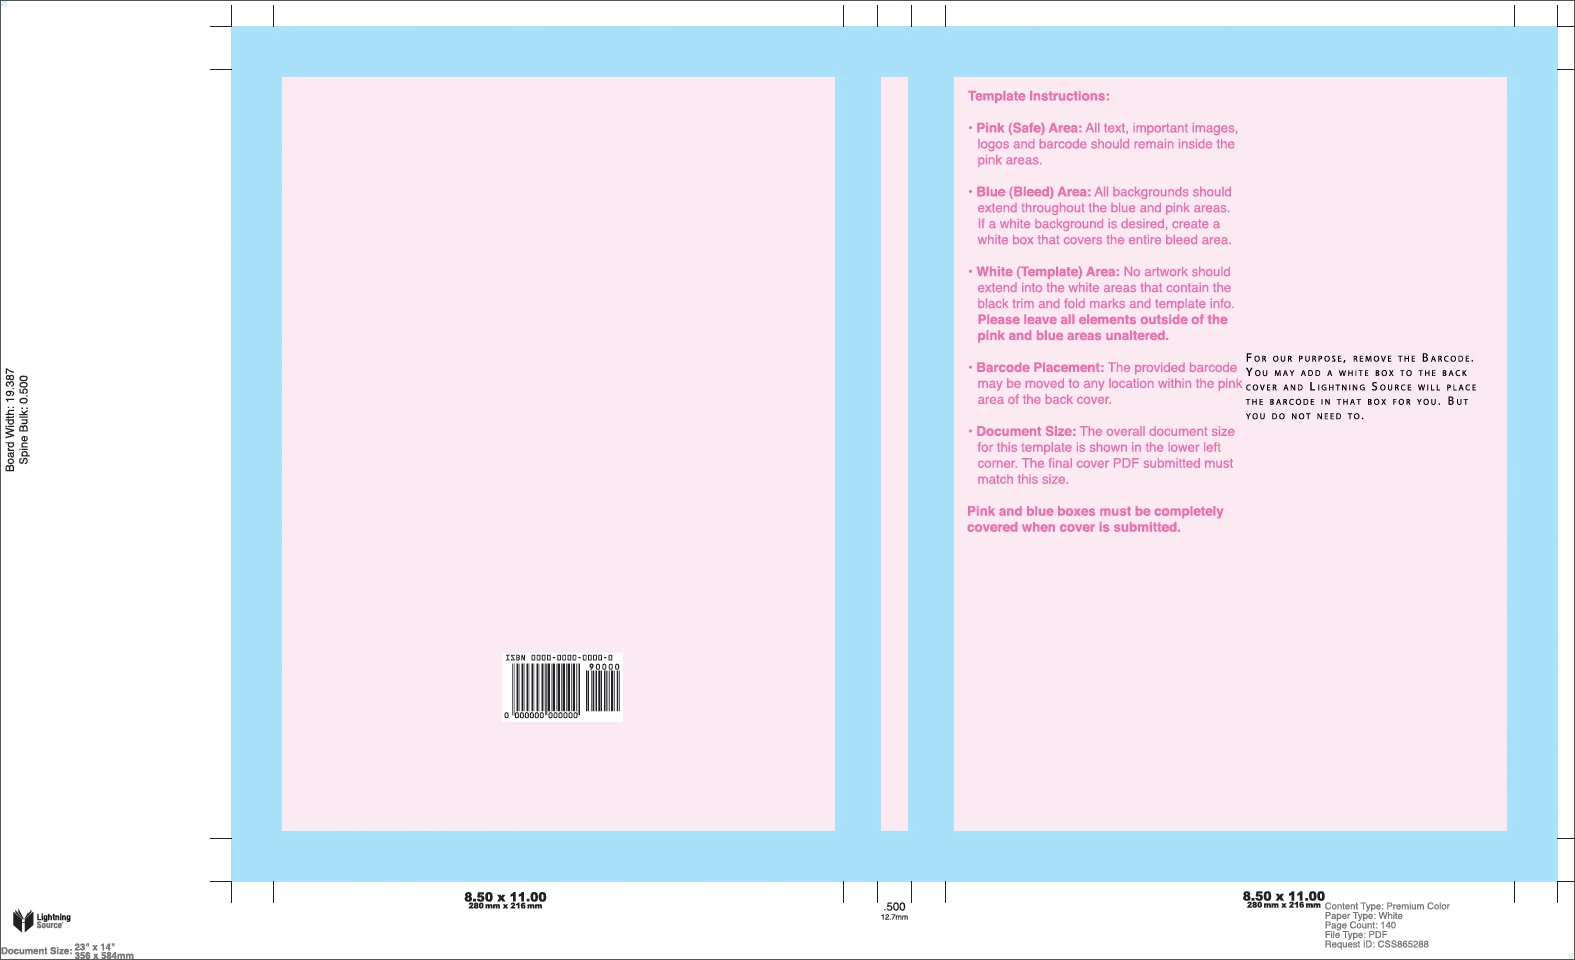
Update: I need it to look like the following image, but the cover (front/spine/back) should be centred (just like it is when I export anything from InDesign). Look at the crop marks, fold marks, etc---they are all outside the cover. I have looked at the INDD file they have created this image from, but they used regular lines to insert those marks, which is not what I want, because that is so imprecise.


cover.png

TOPICS
How to , Import and export , Print

Views

2.2K

Translate

Translate

Report

Report
Community guidelines
Be kind and respectful, give credit to the original source of content, and search for duplicates before posting. Learn more
community guidelines

correct answers 2 Correct answers

Community Expert , Jul 23, 2020 Jul 23, 2020

If you don’t want to build the "bleed" into the document as I suggested in the other thread then you can set the Offset of the crop marks to equal the bleed, and match the printer’s template:


Screen Shot 1.pngScreen Shot 2.png


In this case the "crop" marks indicate folds not cuts—the printer isn’t going to actually trim the page at the crop marks.


Votes

Translate

Translate
Community Expert , Jul 23, 2020 Jul 23, 2020

Here’s your attached file exported with an 18mm Offset:


Screen Shot 3.png

Votes

Translate

Translate
Community Expert ,
Jul 23, 2020 Jul 23, 2020

Copy link to clipboard

Copied

One thing (although I don't fully understand your question) that you might do to help your file is to go to A-Master page. From there, click on File > Document Setup and turn off Facing Pages.


Also, if you want slug set to 0, it currently is set to 12.7 mm. Not sure if that is a factor in anything important.


Mike Witherell

Votes

Translate

Translate

Report

Report
Community guidelines
Be kind and respectful, give credit to the original source of content, and search for duplicates before posting. Learn more
community guidelines
Community Expert ,
Jul 23, 2020 Jul 23, 2020

Copy link to clipboard

Copied

Also, if you are trying to describe separate 4-sided bleeds, you could drag your page icons apart from each other in the Pages panel. I see you already have Document Shuffles turned off.

Mike Witherell

Votes

Translate

Translate

Report

Report
Community guidelines
Be kind and respectful, give credit to the original source of content, and search for duplicates before posting. Learn more
community guidelines
Community Expert ,
Jul 23, 2020 Jul 23, 2020

Copy link to clipboard

Copied

Hi tukusejssirs,

don't know if Mike saw your added screenshot before answering.


I find this one a bit weird. Who ever did this, he/she switched width and height values when going from inches to millimeters. So yes, it's confusing. Width of pages is clear, width of spine is clear, but one has to calculate the outside bleed for example. FWIW: 23 inches is not 584 mm as suggested in the left lower corner.


If this screenshot is from a PDF the only sane thing you could do is to exactly build on it where the inner marks showing is the area of your page, the outer edge of the blue area is your bleed area and the whole thing should fit exactly to your slug area.


Regards,
Uwe Laubender

( ACP )

Votes

Translate

Translate

Report

Report
Community guidelines
Be kind and respectful, give credit to the original source of content, and search for duplicates before posting. Learn more
community guidelines
Community Expert ,
Jul 23, 2020 Jul 23, 2020

Copy link to clipboard

Copied

Yes, the picture confused me. It reminds me how frequently recommended guidance information from printing establishments is quite simply wrong, containing made-in-haste errors!

Mike Witherell

Votes

Translate

Translate

Report

Report
Community guidelines
Be kind and respectful, give credit to the original source of content, and search for duplicates before posting. Learn more
community guidelines
Community Expert ,
Jul 23, 2020 Jul 23, 2020

Copy link to clipboard

Copied

If you don’t want to build the "bleed" into the document as I suggested in the other thread then you can set the Offset of the crop marks to equal the bleed, and match the printer’s template:


Screen Shot 1.pngScreen Shot 2.png


In this case the "crop" marks indicate folds not cuts—the printer isn’t going to actually trim the page at the crop marks.


Votes

Translate

Translate

Report

Report
Community guidelines
Be kind and respectful, give credit to the original source of content, and search for duplicates before posting. Learn more
community guidelines
Community Expert ,
Jul 23, 2020 Jul 23, 2020

Copy link to clipboard

Copied

Here’s your attached file exported with an 18mm Offset:


Screen Shot 3.png

Votes

Translate

Translate

Report

Report
Community guidelines
Be kind and respectful, give credit to the original source of content, and search for duplicates before posting. Learn more
community guidelines
Explorer ,
Jul 23, 2020 Jul 23, 2020

Copy link to clipboard

Copied

LATEST

Thank you all for your time and that you tried to help me. Actually the marks offset was what I was looking for, however, I did not notice it in the export settings yet. Thank you @rob_day!

Votes

Translate

Translate

Report

Report
Community guidelines
Be kind and respectful, give credit to the original source of content, and search for duplicates before posting. Learn more
community guidelines