C.Cella
Inspiring
October 20, 2023
解決済み

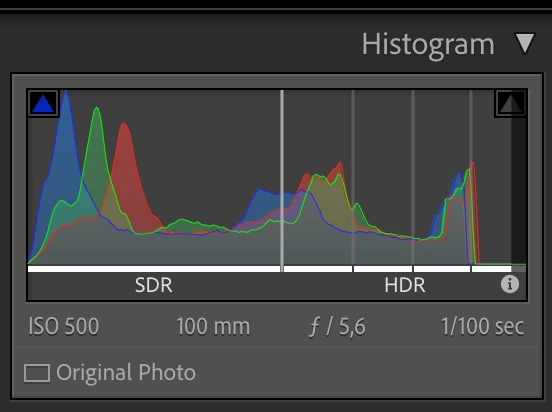
Conversion to HDR is not scaling our SDR Point Curves.

  • October 20, 2023
  • 返信数 3.
  • 2295 ビュー

I often now find myself doing HDR versions of my already edited SDR images but alas our SDR Point Curves are not adapted/scaled properly to HDR when we covert our images to this mode.


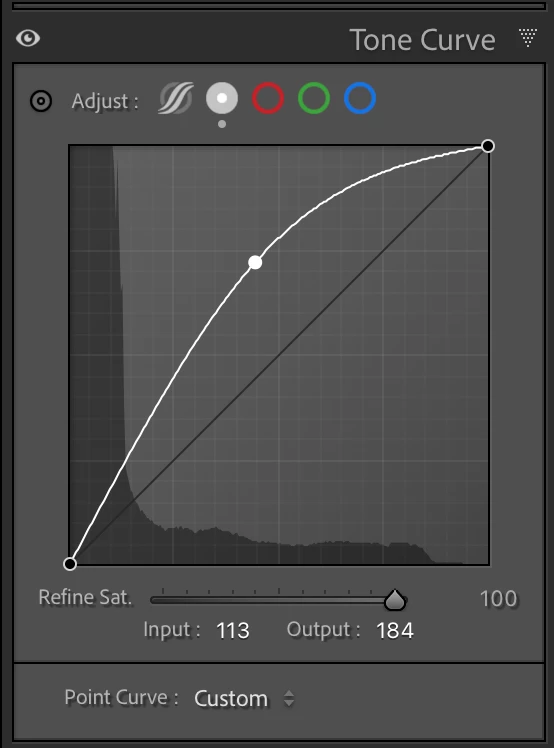
Here is a simple example.


This is the SDR curve.


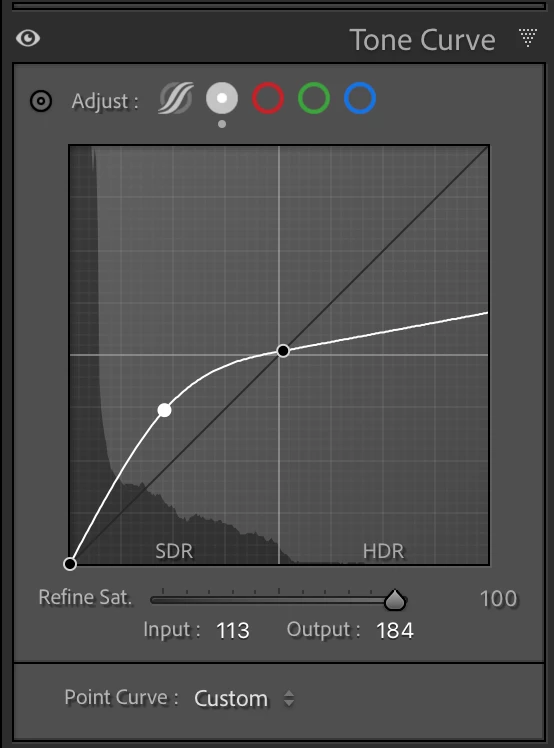
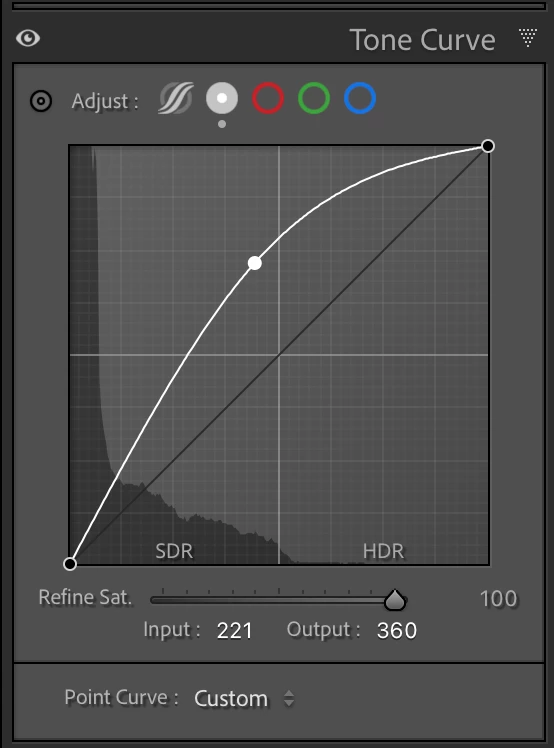
This is the curve when we convert to HDR


This is totally wrong, the curve has not been adapted to HDR ! 

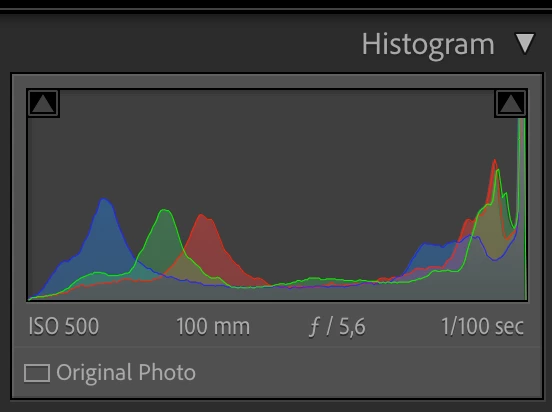
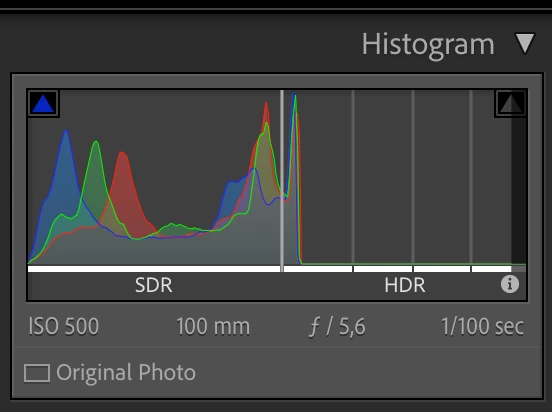
The Highlights and Whites region are lost in the HDR editing, still "crushed" to SDR and we must correct the curve ourselves.


This is the correct result.


  • So when converting to HDR all our SDR Point Curves should be scaled to HDR and not be kept to SDR.

When going from HDR to SDR the existing point curves should be converted as well.

.

このトピックへの返信は締め切られました。
解決に役立った回答 MadManChan2000

You have a misunderstanding of how the point curve works in SDR/HDR.  Curves are never "converted" between SDR and HDR.  It's the same curve.  In SDR, the point curve has values from 0 to 255.  In HDR, it's the same curve, but you now have values from 0 to 500.  The new range for HDR is 256 to 500 and corresponds from SDR white to +4 stops above SDR white. This is all intentional and by design.


Curves optimized for SDR (e.g., big rolloff in highlights) will probably look bad for HDR.  And curves optimized for HDR (e.g., extended highlights) will probably look bad for SDR.  This is normal and expected.  It is also why the HDR button is available at the top of the Edit/Develop stack: it's meant to be used first or early in the workflow, before the use of curves or other features that depend on the SDR/HDR state.  If you start with Curves or other controls and then toggle HDR button, you will likely need to revisit those adjustments.

返信数 3

Community Expert
October 20, 2023

I don't think you want to mathematically completely scale the curve to the HDR range like you are doing. That makes your image look crazy. HDR is about extra headroom, not about the main part of the image being brighter. Most of the image should look the same in SDR as in HDR, just the highlights should pop out into the HDR region. The way you are editing, you're making the entire image incredibly bright. This is not what should happen. In the cat image for example, you just want to get more detail in the bright area top left and in the halo around the cat. The cat itself should remain the same brightness. So it seems to me ACR/Lightroom does the correct thing by just linearly extending the curve instead of scaling it to the entire region. The last cat image for example looks wrong even accounting for the image being blown out in the screenshot. You do not want to do it that way. Only the highlights should be blown out, not the main part of the image. What kind of display are you editing on? 

Also , you should realize that the highlight recovery that ACR always does will have a different effect in HDR because it doesn't have to do as much when there is more headroom, so an image that appears to have nothing blown out  when edited in SDR will often have actual data in the HDR range when you switch. This is normal and due to how ACR tries to fit everything in the SDR range even if your highlights and whites sliders are at zero. 

JohanElzenga
Community Expert
Community Expert
October 20, 2023

I completely agree. Read the great blog that @MadManChan2000 wrote about HDR editing (https://blog.adobe.com/en/publish/2023/10/10/hdr-explained), where he says that "sunglasses are not the answer". Cats do not emit light, but your screenshot suggests that in your photo the cat looks like it does...


-- Johan W. Elzenga
C.Cella
C.Cella作成者
Inspiring
October 20, 2023

@JohanElzenga download the file.


I already said the screenshots are SDR so it's not the reference to look at.


Also you could have looked at the histogram in my screenshots,  nothing is clipping.


@MadManChan2000 article is valid for HDR editing from the ground up.

But we all have thousands of images that have been edited for SDR and now need to be "converted", re-edited.


In a quest for efficency, in the contest of re-editing scaling curves helps.

The math to achieve the desired curve scaling is beyond trivial and I think a quick "scale curve" option could be easily doable.


DdeGannes
Community Expert
Community Expert
October 20, 2023

See the screen capture concerning known bugs with LrC 13.0 and fixes LrC 13.0.1.


Regards, Denis: iMac 27” mid-2015, macOS 11.7.10 Big Sur; 2TB SSD, 24 GB Ram, GPU 2 GB; LrC 12.5,; Lr 6.5, PS 24.7,; ACR 15.5,; (also Laptop Win 11, ver 24H2, LrC 15.0.1, PS 27.0; ) Camera Oly OM-D E-M1.
C.Cella
C.Cella作成者
Inspiring
October 20, 2023

@DdeGannes 


It's none of those bugs.

This is a "problem" of the HDR conversion.


Let me elaborate more.


  1. This is the edited SDR image.


2. This is what happens when we convert to HDR.


The image is not HDR at all, as the histogram shows.


3. To make a truly HDR image we must correct the curves and make them HDR.

The math is simple BUT it actually takes times to get the HDR curve...it is not a one click think AND if one has curves in masking is even more time consuming.

The result after the conversion of the curve is this.


 Image is too dark, obviously so because that image was edited for SDR and it doens't encompass all the HDRe yet.

As last step the user needs to do increase exposure to spread the hsitogram to HDR region.


  • If the engine was actually converting curves to from SDR to HDR all we had to get a true HDR version of our SDR images is simply increase exposure.


Change ONE SLIDER vs edit all curves.


.

Unfortunately the screenshots are all in SDR so the last image looks with blown out higlights/whites but is not the case in HDR.

I hope the examples help.


MadManChan2000
Adobe Employee
Adobe Employee
October 20, 2023

You have a misunderstanding of how the point curve works in SDR/HDR.  Curves are never "converted" between SDR and HDR.  It's the same curve.  In SDR, the point curve has values from 0 to 255.  In HDR, it's the same curve, but you now have values from 0 to 500.  The new range for HDR is 256 to 500 and corresponds from SDR white to +4 stops above SDR white. This is all intentional and by design.


Curves optimized for SDR (e.g., big rolloff in highlights) will probably look bad for HDR.  And curves optimized for HDR (e.g., extended highlights) will probably look bad for SDR.  This is normal and expected.  It is also why the HDR button is available at the top of the Edit/Develop stack: it's meant to be used first or early in the workflow, before the use of curves or other features that depend on the SDR/HDR state.  If you start with Curves or other controls and then toggle HDR button, you will likely need to revisit those adjustments.

Rikk Flohr_Photography
Community Manager
Community Manager
October 20, 2023

Do you see the same result in Camera Raw or only in Lightroom Classic?

Rikk Flohr: Adobe Photography Org
C.Cella
C.Cella作成者
Inspiring
October 20, 2023

@Rikk Flohr: Photography Yes the issue is present in ACR.


The origin of the problem is in the way Camera Raw engine does the conversion to HDR


The  ExtendedToneCurvePV2012 and ExtendedMainCurve are never "converted" from SDR to HDR (or "reverted" form HDR to SDR)


The issue is affecting masking as well.


So I have a done in LrC 12 a Sky Mask and have edited it with a curve.

All works in SDR but when activating HDR happens that mask no longer works BECAUSE there is no "conversion" of the ExtendedMainCurve to the HDR area.


In the screenshots below I visualize the HDR Ranges  (curve not converted to HDR)


That Sky mask has zero High Dynamic Range now, it is still confined to the SD Range so the sky itself looks flat, a blotchy white area with zero transitions AND I msut re-edit it.


Instead with the curve correctly converted to HDR I get these ranges.


Sky shows depth now in HDR, is very tri-dimensional.


.