Participant
July 29, 2019
解決済み

Repair Over Exposed portion of a photo in Lightroom

  • July 29, 2019
  • 返信数 4.
  • 13386 ビュー

Hello Everyone

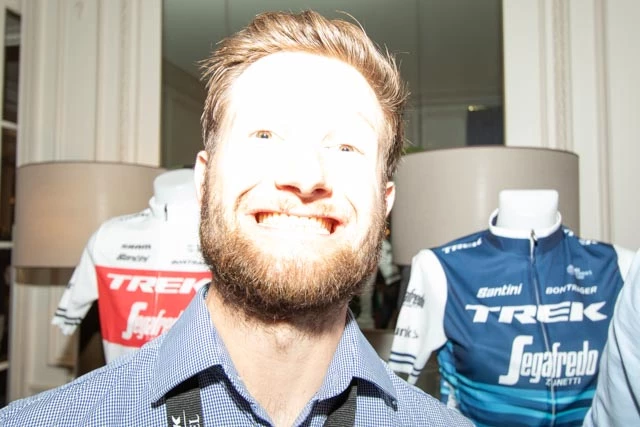
I recently took a photo which appears to be properly exposed except for one area which is really white and blownout overexposure HOW DO I REPAIR THAT AREA OR IS THIS JUST A POOR IMAGE TO PROCESS (CAMERA OPERATOR ERROR). Refer to image attached::

Thanks for he help

Steve TDGM

Message was edited by: Sahil Chawla

    このトピックへの返信は締め切られました。
    解決に役立った回答 TheDigitalDog

    Yes, we need to know if you captured JPEG or raw. Now if raw, it's possible that you didn't over expose the raw data. Keep in mind, exposure is only an attribute of shutter and aperture on the captured data; LR cannot re expose anything! It's possible the preview with the current rendering settings appears over exposed. And if raw, it's possible using some of LR's tools, you can render the image such it doesn't look over exposed any longer. But if indeed, the raw is over exposed (and unfortunately LR nor your camera provides a raw Histogram), we don't know what's really going on with the captured data.

    Might want to view this too:

    https://www.rawdigger.com/howtouse/exposure-for-raw-or-for-jpegs

    返信数 4

    GoldingD
    Legend
    July 31, 2019

    If RAW the following. or variations on it might work. And this just to get the image to a presentable state. IF JPEG, probably SOL

    First up, before doing anything else, see if moving the Whites slider to the left helps. In fact, hold down the ALT key (WINDOWS) while doing that as to see an overlay. I suspect you might get all the way to -100 and no joy.

    So, still blown out. Next use an adjustment brush. For example, the Gradient Filter (in an alternate way). Stat out by pointing and clicking near the upper right corner of the image and dragging outside of the frame (diagonally) this will create an entire frame mask at 100% (all one mask, no actual gradient as gradient is outside of frame).See this at about 6:02 for an example: Mastering Lightroom Classic CC - 12: Graduated Filter - YouTube

    If you press down on the O key, the mask will display if curious. Make sure your clipping info is turned on in the Histogram, With the mask not shown slide that White slider down until the right side of the Histogram is no longer clipped.

    Some might work with Highlights instead of Whites.

    Back in the Basic Panel, adjust your Blacks (down I think) and then your Shadows (also down). Get those blacks back, deepen the shadows.

    For this image, probably lay off that Exposure slider for now (i.e. actually misnamed, should be called brightness)

    Move on to the Tone Curve. Change it to a Point Curve, add three points, Shadows, mid tones high. Pressing down on the shift key, drag the mid tone point up and down to see if anything improves, also consider the shadows, highlights are probably a lost hope.

    Select the Adjustment Brush. Do not have Auto Mask on. Have the overlay displayed (O), brush over the face, the ears, etc. In the brushes panel turn on the Range Mask, select Luminescence. Turn the Overlay off. Adjust the Range up/down while holding down ALT, adjust to include what you want. Some of the background might look like it is included, turn the overlay back on, in the brush panel select erase, erase what you do not want in the mask (Shirt in background?). Turn off overlay and attempt some adjustments

    If you have issues using Range Mask Luminescence, then try Range Mask color

    You might want to apply an adjustment brush to everything but the face, The Gradient brush works well for this in the manner previously stated (not as a pure gradient), remember to Change from Edit to Brush in order to find the Erase capability on that mask

    Participant
    July 31, 2019

    Hello David

    Thanks for that extensive procedure to help with this image. Other wanted to know it was a raw image and histogram in Lightroom Classic 8.3.1 shows a very large spike  (all the way to the top of trhe graph towards the white end (right) and even when I use adjust to prevent clipping at that end that spike is still there. So in the end the image (info) is poor. Mostly due to photograher error (me). Shooting from a low position and small flash close to the subject. Well I will have to take all of this advice as a learning curve and continue.

    TheDigitalDog
    Inspiring
    July 31, 2019

    steveh31792621  wrote

    Hello David

    Thanks for that extensive procedure to help with this image. Other wanted to know it was a raw image and histogram in Lightroom Classic 8.3.1 shows a very large spike  (all the way to the top of trhe graph towards the white end (right) and even when I use adjust to prevent clipping at that end that spike is still there. So in the end the image (info) is poor. Mostly due to photograher error (me). Shooting from a low position and small flash close to the subject. Well I will have to take all of this advice as a learning curve and continue.

    The Histogram in LR/ACR and most raw processors is NOT showing you a raw Histogram. The only way to know if an image is actually over exposed and by how much is by viewing the raw Histogram, not a Histogram showing the current rendering. You need a tool like RawDigger or FastRawViewer to see this.

    https://www.rawdigger.com/

    Author “Color Management for Photographers" & "Photoshop CC Color Management/pluralsight"
    TheDigitalDog
    TheDigitalDog解決!
    Inspiring
    July 30, 2019

    Yes, we need to know if you captured JPEG or raw. Now if raw, it's possible that you didn't over expose the raw data. Keep in mind, exposure is only an attribute of shutter and aperture on the captured data; LR cannot re expose anything! It's possible the preview with the current rendering settings appears over exposed. And if raw, it's possible using some of LR's tools, you can render the image such it doesn't look over exposed any longer. But if indeed, the raw is over exposed (and unfortunately LR nor your camera provides a raw Histogram), we don't know what's really going on with the captured data.

    Might want to view this too:

    https://www.rawdigger.com/howtouse/exposure-for-raw-or-for-jpegs

    Author “Color Management for Photographers" & "Photoshop CC Color Management/pluralsight"
    Randy Hufford
    Community Expert
    Community Expert
    July 29, 2019

    If i was shot in RAW it can be made a-lot better. If it is a JPEG it is pretty much useless.

    Sahil.Chawla
    Adobe Employee
    Adobe Employee
    July 29, 2019

    Hi Steve,

    As you want to correct the over exposed image, could you please have a look at this video and let us know if it helps?

    Lightroom Lesson 1: Correcting Over-Exposed Photo - YouTube


    You may also check this article for more information: Fix an overexposed photo |

    Regards,
    Sahil