

- Startseite
- Premiere Pro
- Diskussionen
- Re: Align textbox to the borders of the frame
- Re: Align textbox to the borders of the frame
Align textbox to the borders of the frame

Link in Zwischenablage kopieren
Kopiert
Hello,
I have been struggling with this issue for some time and I have never found an answer.
I use styles presets .prtextstyle to define my captions styles (a looot of text, because I'm doing subtitles using graphics textbox as Premiere Pro still not support advanced graphics options for subtitles...).
Then I use "Nest" and preset to center and align my text.
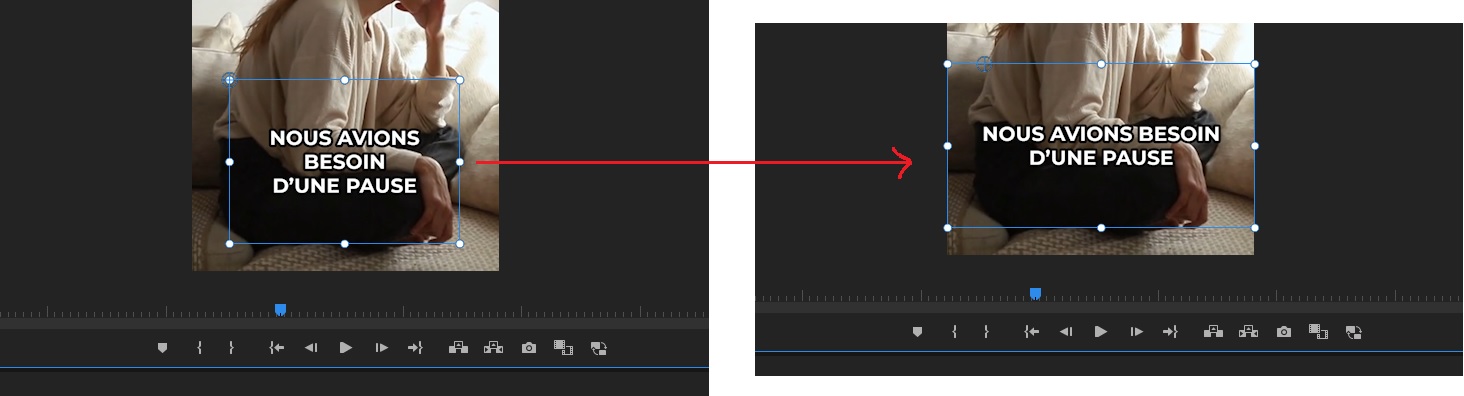
Doing this I can do what I want with subtitles, except that I constantely need to manually adjust the textboxes because they dont take the entire screen as on the screenshot in attachment.
Is there a way to do this automatically?
Thank you very much,


 8
Antworten
8
8
Antworten
8

Link in Zwischenablage kopieren
Kopiert
Are you aware you can now 'Upgrade Caption to Graphic' from the Graphics and Titles menu?
Link in Zwischenablage kopieren
Kopiert
Yes, that is what I am doing, but the graphics obtained doing that are not taking the entire screen. That is exactly my problem
Link in Zwischenablage kopieren
Kopiert
gerard,
I worked on a related question the other day, and was very surprised when I concluded that there was no way. But since I posted nothing, I'll post my experiments here, and perhaps they'll get someone thinking.
I have NOT experimented with nesting for this purpose. And I don't understand why you are so concerned with the bounding box filling the frame. I can imagine reasons, but don't understand yours yet. In any event, my focus was on understanding what happens when you use the "Upgrade Caption to Graphics." And, in any event, the bad news was I see no way to fix these without modifying each graphics element one at a time. You can’t select multiple graphics and access the Effect Controls (nor the Align and Transform section of the EGP). And the usual method of pasting attributes DOES NOT WORK for EGP items. And creating a Style does not carry the position nor anchor point setting. I assume that your nesting is an attempt to overcome this, and perhaps it will.
Here's my comments about the general issues:
When “Upgrading captions to graphics”, we have no default control over the position or size of the text bounding box, nor of the position of the Text anchor point. We can overcome the position/size by standardizing this in the captions before upgrading them. And we can then know the position of the anchor point because it is set by the conversion to be the same as the left/top position of the bounding box.
This is in fact the default behavior when creating “paragraph” text using the regular Text tool/Graphics text by dragging a bounding box before typing text. When creating “point text” (by clicking once and typing with the Text tool), the Text/Transform position is the bottom left of the TEXT, not the bounding box. The Anchor Point is the same (a zero, zero adjustment from position). And Caption text is “paragraph” text, and naturally inherits that characteristic.
Once converted to graphics text, there are 3 anchor points in the effect controls. But the Transform sections of Vector Motion and Video apply to the whole frame (and by default are centered), and, for the current issues, we are only concerned with the Text/Transform settings. So when setting these or testing, be sure not to set Anchor Point in Text/Transform, and then zoom/scale in the Video/Motion section.
Some users that are using the upgrade captions process are doing it to animate captions. Some of them are wanting very short caption segments. I suggest experimenting with the “Create Captions” settings to make the caption segments shorter. It is possible to get close to only one or two words per caption. This may be important for standardizing the size of the bounding box. A bigger box will be required for longer captions, and multi-line captions may present problems we can’t yet anticipate.
I would duplicate the caption track at the very beginning, so you can go back to square one as needed. Right click in the caption track header area; pick “Add track.” Create a track of the same type (probably Subtitle.) Place the CTI at the beginning of the first caption. Drag-select all captions. Alt-drag to copy all captions to the new track.
In the caption track, set all captions to the same bounding box size and position. (See comment above about caption segment length.) Changing one caption bounding box does not change all the boxes. Set one as desired, and then save it as a Caption Track Style. This will automatically apply it to the whole track.
I would keep it simple. Position in the bottom-middle Zone, only about one line in height, and only as wide as necessary for the longest caption. In the end, a) it depends on your particular texts and b) this should be coordinated with the template/animation preset you plan to use.
Determine the pixel position of the bounding box right side and bottom. Double click on the caption text so the bounding box is visible. This is NOT the background nor the highlighting behind the text. It is a thin red line around the entire caption area. We do not need the left and top, which will be indicated as the “position” after the conversion to graphics text. Zoom in to make this easier. Drag a Guide to the bottom of the red bounding box, and note the pixel dimension that is visible on the screen as you drag. Repeat for the right edge.
Select all and “Upgrade caption to graphic.”
Modify one text graphic to set the standard position/anchor point.
If we were doing these one at a time, we could just use the Ctrl+Drag of the text anchor point to see the marks centering it in the bounding box. This method adjusts not only the text anchor point, but also the text position to compensate for the anchor point change. And to go back to my spoiler alert, I don’t have a method that really makes this any easier than one at a time.
If we had a way to later paste the settings from this first item, here is a method to calculate that setting. From the EGP or Effects controls panel (Test/Transform), we get the “position” which is the left, top pixel setting. From our measurement above, we got the right, bottom setting. The anchor point numbers are adjusted from zero, so we just need to calculate the difference between right – left and bottom - top. And the change in “position” matches this by adding back the original left/top number. So for example, if the position reads 440, 902 and the right/bottom was measured as 1480, 1029, half of right– left is: 1480-440 = 1040/2 = 520. Half of bottom – top is: 1029-902 = 127/2 = 64. We enter those as the anchor point, and then adjust the position, which is the original position plus the adjustment. So 440 + 520 = 960, and 902 + 64 = 966.
And that's where I discovered the bad news referred to above.
Stan
Link in Zwischenablage kopieren
Kopiert
Thanks for that. I will read it carefully later.
"Some users that are using the upgrade captions process are doing it to animate captions. Some of them are wanting very short caption segments." >> Indeed, I am using this for both short and/or animated captions. But my main use of graphics here is to be able to add a style to the captions in 1 click.
And the goal is also the cause of the problem, because subtitles should be on 2 lines maximum, but once the style applied, they are not anymore sometimes there are on 3 lines. But maybe my need is too specific.
Link in Zwischenablage kopieren
Kopiert
I can't see in the screenshot, but are you using a vertical (e.g. 1080x1920) frame? That adds challenge to formatting captions.
Because the caption to graphic text is in a paragraph box, it will wrap, so keeping on two lines is a combination of line length and box height. Keep the box height to allow only two lines, and when it wraps to a third line, you either need to reduce the characters, increase the width, or change the font size. My guess has been that this is part of the challenge of vertical frame captions.
I'm guessing you may need a text box that maxes width, but not height.
But I may have this all wrong once you use nesting to control part of it. Are you nesting the entire graphic sequence? Or each graphic by itself?
As I note in the lengthy post, there is a limit to what you can do with a text style in formatting the box.
Stan
Link in Zwischenablage kopieren
Kopiert
You're right, I want to increase the width of the box, without changing the height (and also without changing the size of the text or the font).
I nest the entire graphic sequence, but only to be able to center all the graphics applying a preset to the nest. As subtitles are at the bottom of the frame by default, and because Styles are not saving the position (only the style of the text).
I am talking about a classic 1920x1080 frame (but I also edit 1080x1920 sometimes).
Link in Zwischenablage kopieren
Kopiert
Well, looks like I was doing the wrong thing from the beginning. I finally solved my problem by doing all the "styles" changes on the captions, and upgrade captions to graphics only to animate text.
Link in Zwischenablage kopieren
Kopiert
I'm still looking at options, but this method (do all the styling you can with the captions - particularly to standardize the text box after conversion), then upgrade caption to graphic for the animation.
Stan

Weitere Inspirationen, Events und Ressourcen finden Sie in der neuen Adobe Community
Jetzt ansehen
 AdChoices