• Global community
    • Language:
      • Deutsch
      • English
      • Español
      • Français
      • Português
  • 日本語コミュニティ
    Dedicated community for Japanese speakers
  • 한국 커뮤니티
    Dedicated community for Korean speakers
Exit
35

FAQ: How to fix saturated/over-exposed HLG/HDR clips in Premiere Pro v.22

Adobe Employee ,
Nov 01, 2021 Nov 01, 2021

Copy link to clipboard

Copied

With Premiere Pro v 22, new features around color management for H.264 and HEVC have been introduced. This FAQ will show you how to fix clips that appear overexposed or oversaturated due to these new features. Caution: iPhone shoots HDR by default. 


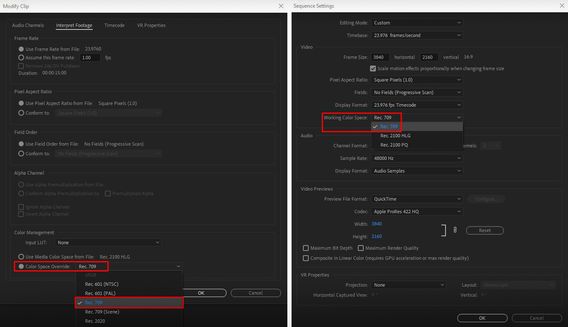
  • In case you don't want or need the HLG/HDR workflow and want to return to the standard workflow, please follow these steps to avoid oversaturated and overexposed previews.
    - Right-click on your media in the Project panel.
    - Select Modify > Interpret Footage > Color Management.
    - Set Color Space Override to Rec.709.
    - Sequence > Sequence settings, set Working Color Space to Rec. 709.
    Color Space Settings.jpg


  • In case you do want to edit & deliver in HLG/HDR, please follow the steps mentioned below. Also, see R. Neil Haugen's in-depth article for the full pro workflow: Premiere Pro 2022 Color Management for Log/RAW Media
  • Turn off HDR shooting on your iPhone by following the directions here. This allows you to return to a standard iPhone workflow.

So why do HLG files look saturated/over-exposed in Pr v 22?

In the previous version of Premiere Pro (v 15.x), HLG media was treated as Rec.709 & the sequence created from that media also used Rec.709 color space.


In Premiere Pro v22, H264 and HEVC are color managed, and the HLG media is treated as Rec.2100. So a timeline created from HLG media in v 22 will automatically be assigned HLG color space.


However, in v 22 opening a project created in the previous version (which had HLG media on Rec.709 timeline) results in HLG to Rec.709 conversion. This causes the clips to look saturated/over-exposed in the newer version of Premiere Pro.


Note: This only happens with projects (HLG media + Rec.709 timeline) created in the previous version. Newer project files will have the appropriate color space assigned and will show the correct preview.


How to solve this issue in v 22?
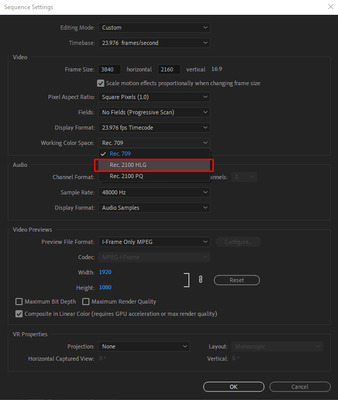
You may manage the color space of the entire timeline made from HLG clips.

  • Highlight the sequence & navigate to Sequence > Sequence settings.
  • Under the Video tab, set Working Color Space to Rec.2100 HLG.SumeetKumarChoubey_0-1635772126435.png

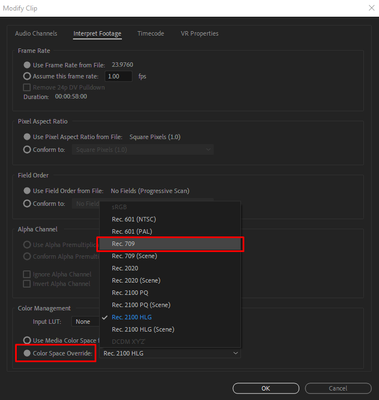
You may also color manage individual media files.

  • To do so, right-click on the HLG file in project panel & navigate to Modify > Interpret Footage. 
  • Under Color Management, set Color Space Override to Rec.709. This will create a preview that matches the color of Premiere Pro v15.x.
    SumeetKumarChoubey_1-1635772218241.png

How to correct saturated/over-exposed previews during H.264/HEVC export?

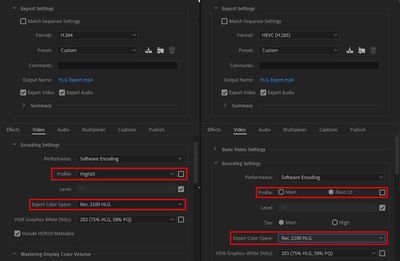
If you have edited in an HLG timeline & would like to export in HLG, please ensure that you use the following export settings.

  • Select your Format as H.264/HEVC.
  •  Navigate to Video tab > Encoding Settings.
  • Set Profile to High10 (for H.264) or Main10 (for HEVC).
  • Set Export Color Space to Rec.2100 HLG.
    Export Settings.jpg
  •  


Please note that the Match Source presets use Rec. 709 color space & might result in an incorrect preview if used to export a sequence based on Rec. 2100 HLG color space.


For the full HDR broadcasters workflow, see this page in the Premiere Pro User Guide.


Hope this helps.

- Sumeet

TOPICS
Editing , FAQ , How to

Views

260.8K

Translate

Translate

Report

Report
Community guidelines
Be kind and respectful, give credit to the original source of content, and search for duplicates before posting. Learn more
community guidelines

correct answers 2 Correct answers

Adobe Employee , Nov 30, 2021 Nov 30, 2021

Karl's video may help you understand how the HDR workflow all works.


Votes

Translate

Translate
Adobe Employee , May 31, 2022 May 31, 2022

For users recording their footage on a Sony Venice camera, using the Modify>Interpret Footage workflow will not work for those clips!


Venice uses the older unmanaged workflow, with a Source Clip Effect that has a toggle switch, and LUTs to adjust from there. You can batch-adjust these clips with an effect preset.
To see what I mean, load a clip in the Source monitor, and then open the Effect Controls panel.  You should see something like this! 


115584650.png


You can remove the source effect from there.

...

Votes

Translate

Translate
replies 207 Replies 207
Enthusiast ,
Nov 01, 2021 Nov 01, 2021

Copy link to clipboard

Copied

I think I figured out something....

1) Importing HLG footage, and creating a new timeline from that footage, retains HLG (As described)

2) My export Preset for H265 was using REC709, Hardware Encoding, exporting with this setting blows out the video

3) Exporting with the H265 built in present and HLG2100, it exports fine, but its software encoding only. (slow, so slow).


my work around is to import my HLG footage, force it to REC709, then start a timeline, and export with the H265 setting REC 209 color space so that hardware encoding still works.


Wish there was a way on import to pick your color space (or a default setting maybe).


So this process does work as described, but I'm not prepared to loose HW encoding for it. so I will use REC709 color space....   Annoying, but not as bad as I thought first go at this.  Mixing footage is what I'm goign to try next to see if I can wrap my head around that workflow.

Votes

Translate

Translate

Report

Report
Community guidelines
Be kind and respectful, give credit to the original source of content, and search for duplicates before posting. Learn more
community guidelines
Engaged ,
Nov 01, 2021 Nov 01, 2021

Copy link to clipboard

Copied

By force Rec 709, you mean you override the color space of the Rec. 2100 HLG footage to Rec. 709? and then place it in a Rec. 709 sequence?


You also should be able to keep the Rec. 2100 HLG footage as-is, add it to your Rec. 709 sequence, and apply the SDR Conform effect: either to the footage itself, or if your sequence is nothing but HLG footage, you can apply SDR Conform as an export effect as well.

Votes

Translate

Translate

Report

Report
Community guidelines
Be kind and respectful, give credit to the original source of content, and search for duplicates before posting. Learn more
community guidelines
Enthusiast ,
Nov 02, 2021 Nov 02, 2021

Copy link to clipboard

Copied

@ah.photo

Yes I meant override the color space to REC709 as you suspected, and then place it on a REC709 timeline.

Working with native HLG doesn't bother me that much after some reflection, it's the lack of ability to export mixed REC709 and HLG and still use hardware encoding.   I'm going to play with this some more to try and narrow down a straightforward process.    I would have been happy having unmanaged color space for H264/h265.  I've never been worried about color space accuracy when importing something in these formats, maybe it's necessary - just not seen a requirement for myself, I was happy with them in the unmanaged color space.


Votes

Translate

Translate

Report

Report
Community guidelines
Be kind and respectful, give credit to the original source of content, and search for duplicates before posting. Learn more
community guidelines
Adobe Employee ,
Nov 02, 2021 Nov 02, 2021

Copy link to clipboard

Copied

FFF,

This should help. Just make a custom ingest preset with the input LUT attached. Hope that works for ya.


Kevin

Votes

Translate

Translate

Report

Report
Community guidelines
Be kind and respectful, give credit to the original source of content, and search for duplicates before posting. Learn more
community guidelines
Enthusiast ,
Nov 02, 2021 Nov 02, 2021

Copy link to clipboard

Copied

Thanks @Kevin-Monahan, it's not a bad idea you're suggesting.  I'm going to play around with a few different ways.  My end goal is for an easy to import and mix rec709 and HLG, and be able to export it with HW encoder benefits with little user intervention.    The ingest preset will work, I will play around with the settings - leaving it alone for most of day is giving me some distance so I can get perspective on the issue.

Votes

Translate

Translate

Report

Report
Community guidelines
Be kind and respectful, give credit to the original source of content, and search for duplicates before posting. Learn more
community guidelines
Enthusiast ,
Nov 02, 2021 Nov 02, 2021

Copy link to clipboard

Copied

Ok I did some more testing; and found an interesting observation....


1) Put ALL HLG2100 footage on timeline, Sequence matches.  Exporting 1.5 min of test using built in HLG2100 H265 setting is SLOW (1.5min clip took 45 min to export), but works, all software encoding only.  No option for hardware


2) Put a Mix of HLG2100 Footage and REC709 on a HLG2100 sequence.  The footage that was a true REC709 was too dark, I had to interpret the REC709 footage to HLG2100 for it to look normal.   Exporting with the built in HLG was fine.   This is puzzling me, why would REC709 footage need to be manually flagged as HLG2100 for it look proper on a HLG timeline and export?  I was under the impression by having them tagged properly that the footage could be mixed and look proper ? *ie properly identified REC709 clip would transform color space to look proper on either HLG2100 timeline or REC709 time line.  (I'm no color export, but would like to understand this behavior).


At the end of the day,  I really need the H265 HW encoder to work.  So it leaves me no choice other than to do everything in REC709.  Flagging the HLG2100 footage as REC709 and placing it on a REC709 timeline it looks a littel different, but I can work with it.


I put up a seperate post as I wanted to be able to display the color space information in the project panel,  those appear blank for me and thus not usefull.  Having this visable would help keep them all sorted properly.


p.s.  I did get around to playing with the SDR conform,  it was helpfull, but at the end of the day I think I will stick to importing footage into a BIN and interpreting it as REC709 before building a time line.  (which is why being able to see this metadata would be nice for me if I can get that work).


Votes

Translate

Translate

Report

Report
Community guidelines
Be kind and respectful, give credit to the original source of content, and search for duplicates before posting. Learn more
community guidelines
Engaged ,
Nov 02, 2021 Nov 02, 2021

Copy link to clipboard

Copied

@FlyingFourFun 


It's my opinion that it's not good practice to set footage or working color spaces just to "make it work", there should be intent when setting these.


For example, if your intending your edit to be SDR, your footage should be Rec 709. Full stop. You'd only want to do make a Rec. 2100 sequence if you intend to export HDR content, and this involves a lot more than just shooting HLG setting the sequence to Rec 2100 HLG. Proper HDR monitoring requires dedicated hardware, metadata, etc. So I'd avoid switching your sequence to Rec 2100 as a "hotfix".


In all fairness, I initially thought the same as you: that tagging source footage with it's proper color space as shot, and adding it to a different color space sequence, would have Premiere conform accordingly. This is not the case it seems.


Premiere retains values from the source footage, and directly places them on the sequence as is: no values modified.

  • HLG footage on a Rec 709 sequence looks overexposed and oversaturated because luminance and gamut values exceed that of SDR/709.
  • 709 footage on a Rec 2100 sequence looks dark and washed out because the 709 luminance range and gamut is much smaller compared to that of HDR/2100
  • Rec 2020 (Wide color) on a Rec 709 sequence, I assume, would look correct as far as luminance goes, but oversaturated, because the 2020 gamut is wider than 709.


On top of that throw in a variable that people can have Display Color Management ENABLED or DISABLED in Premiere, and that will also impact how the footage appears on screen.


I really hope I'm accurate here: but I think overriding the color space of the footage just tonemaps existing bit values to the other gamma and gamut of the new color space.


The override is helpful if for some reason color space is tagged incorrectly, but as I said, I'm personally not a fan of changing it as a means to an end. That's why Ive been advocating for folks to use SDR conform.


To your point regarding metadata, ironically there are metadata fields for color space, but it must be a legacy field because it doesn't seem to show the new color space metadata. I agree, would be nice to have.

Votes

Translate

Translate

Report

Report
Community guidelines
Be kind and respectful, give credit to the original source of content, and search for duplicates before posting. Learn more
community guidelines
Contributor ,
Nov 03, 2021 Nov 03, 2021

Copy link to clipboard

Copied

Hello,


I removed v22... can you let me know if generated proxies will render correclty when SDR conform is applied to main clip? If yes then that's the work flow to go for.


thanks


/J

Votes

Translate

Translate

Report

Report
Community guidelines
Be kind and respectful, give credit to the original source of content, and search for duplicates before posting. Learn more
community guidelines
Engaged ,
Nov 03, 2021 Nov 03, 2021

Copy link to clipboard

Copied

@johnnyk7917700 


I wish that was a simple answer, ha. Brace yourself.

I haven't started any new projects of substance yet on 2022, but I did just do a quick test. SDR conform does not inherently solve the proxy matter on its own, at least as I think many are experincing the issue (while related, it's technically a different issue)


To be clear, SDR conform, when applied to a clip, will apply it's effect to BOTH the source and the proxy, just like any other clip. So if you have a properly rendered proxy, SDR conform will in fact work. In retrospect, I've learned that overriding the color space would as well. Overriding color space does impact both source and proxy.


The proxy issue, as I see it though, is a little bit different, and that is in the same way that it's critical for proxies to be of the same resolution and frame rate of the source, so to must be the color space, especially now that H264/H265 media supports spaces beyond 709.


The back half of this issue is, at least with the default create proxy presets provided by Premiere, proxies seem to be generated in Rec 709 (at least from my quick tests). I think in order to create proper proxies for HLG or PQ footage, you would need to create a custom export preset for proxies that use the appropriate color space, and this would be limited to specific codecs and codec settings (at least in the Adobe apps). For example, ProRes 422 Proxy can only write Rec. 709.


Color space override doesn't come to the rescue here, because if you have a Rec709 proxy that clipped color information at the time of encoding, overriding the color space won't restore that information. It will just ensure that you're not "doubling up" the clipping, but you've stilled clipped the color space once, baked into the proxy.


I'm trying to collect a bunch of this information and eventually make a User Voice suggestion with some things that the Adobe team may want to consider, but there are definitely a lot of things at play.

Votes

Translate

Translate

Report

Report
Community guidelines
Be kind and respectful, give credit to the original source of content, and search for duplicates before posting. Learn more
community guidelines
Contributor ,
Nov 03, 2021 Nov 03, 2021

Copy link to clipboard

Copied

Yes what you said 😄


Votes

Translate

Translate

Report

Report
Community guidelines
Be kind and respectful, give credit to the original source of content, and search for duplicates before posting. Learn more
community guidelines
Adobe Employee ,
Nov 11, 2021 Nov 11, 2021

Copy link to clipboard

Copied

Hi FlyingFourFun,

Thanks for your findings and feedback. Super helpful. 


Yes, I found that exporting Rec. 2100 H.264 files can only be achieved via Software Encoding. Can you make a feature request on User Voice for that for an upvote? 

Here are some H.264 HLG export settings, which my colleague Sumeet suggests, after performing tests with his Sony camera:

Encoding Settings

  • Performance: Software Encoding
  • Profile: High10
  • Level: 5.1 (or whatever is required)
  • Export Color Space: Rec. 2100 HLG
  • HDR Graphics (White): 203
  • Include HDR10 Metadata: Enabled


To experience HDR video, you'll need to view it on a capable HDR monitor, as well. Pro HDR monitors tend to be expensive. Here are a few alternatives I have heard of.

  • The current Apple devices
  • Some of the Atomos devices
  • A decent quality OLED television


I really appreciate the ideas for HDR workflows coming out of this discussion. Let's be sure to provide lots of feedback over on User Voice. Again, if you do, report back so we can upvote.

Thank You,

Kevin

Votes

Translate

Translate

Report

Report
Community guidelines
Be kind and respectful, give credit to the original source of content, and search for duplicates before posting. Learn more
community guidelines
Community Beginner ,
Nov 30, 2021 Nov 30, 2021

Copy link to clipboard

Copied

I tried these settings and the video cannot be opened with Windows media Player anymore, do you know why and how to bypass that issue? Export can ONLY be played with VLC


Votes

Translate

Translate

Report

Report
Community guidelines
Be kind and respectful, give credit to the original source of content, and search for duplicates before posting. Learn more
community guidelines
Community Beginner ,
Nov 01, 2021 Nov 01, 2021

Copy link to clipboard

Copied

What shall we do with the "color mate", Logos and other kind of extras that have this terrible dark "filter" on it? I've changed the sequence color profile, I even made a new sequence with HGL 2100 settings, my logos and color mate still appear to be dark and unacceptable. does anyone have a solution beside the SDR conform trial (it is annoying until I can't find the right point) don't even know or trust my eyes anymore now.


Please help

Votes

Translate

Translate

Report

Report
Community guidelines
Be kind and respectful, give credit to the original source of content, and search for duplicates before posting. Learn more
community guidelines
Adobe Employee ,
Nov 02, 2021 Nov 02, 2021

Copy link to clipboard

Copied

Hi Lion,

Sorry! This is a new feature that was in beta and published in the User Guide but many did not read the guide or try the beta, the usual. I think I would probably roll back and complete the work there until you've worked up a new workflow. Possible? I wish you luck and let us know if you need help.


Thanks,
Kevin

Votes

Translate

Translate

Report

Report
Community guidelines
Be kind and respectful, give credit to the original source of content, and search for duplicates before posting. Learn more
community guidelines
Community Beginner ,
Nov 03, 2021 Nov 03, 2021

Copy link to clipboard

Copied

Thank you Kevin for your hints.


For now I just decided to leave everything in 709 space until I finish the ongoing project and just suffer a bit with few HGL2100 footages which could be adjusted a bit in post. but as future solution if you have a link where I can refer and start a brand new project with HGL2100 setting from the beginning, import the actual footages (even if they are mixed) only thing remains is to interpret them. The issue I try to fix are the Logos and the dynamic links that were created. if not will REimport them brand new. 

If the issue persist I will ask here for help again.


thank you for your time and those who get thorugh same things wish you good luck to find your suitable solution.

Lion

Votes

Translate

Translate

Report

Report
Community guidelines
Be kind and respectful, give credit to the original source of content, and search for duplicates before posting. Learn more
community guidelines
New Here ,
Nov 08, 2021 Nov 08, 2021

Copy link to clipboard

Copied

Hey Kevin, 


This hyperlink would be very helpful as well, if you could post it in the forum that would be really helpful!!


Votes

Translate

Translate

Report

Report
Community guidelines
Be kind and respectful, give credit to the original source of content, and search for duplicates before posting. Learn more
community guidelines
Guide ,
Nov 02, 2021 Nov 02, 2021

Copy link to clipboard

Copied

Pay attention to the following problem. When I created a composition in AE using a dynamic link with Pr. I am having problems with incorrect rendering of the visualization color. I don't know how in the new bundle, but in old projects it is not possible to interpret compositions created in AE with a dynamic link into the desired color space. Now there is only an interpretation of the material for files working in Pr. You think too narrowly, and you cause problems with each new update. Although it should be the opposite and users should receive a high-quality and productive product. I emphasize high-quality and productive. As long as I use the Premier product, I haven't noticed any improvements yet.

Votes

Translate

Translate

Report

Report
Community guidelines
Be kind and respectful, give credit to the original source of content, and search for duplicates before posting. Learn more
community guidelines
Adobe Employee ,
Nov 02, 2021 Nov 02, 2021

Copy link to clipboard

Copied

Baffy,

This is a user to user forum. It is ineffective to address devs here. They're not hanging out here a lot. 

•Pay attention to the following problem. 

•You think too narrowly, and you cause problems with each new update.
•Although it should be the opposite and users should receive a high-quality and productive product.
•I emphasize high-quality and productive.
•As long as I use the Premier product, I haven't noticed any improvements yet.


My recommendation is that you should create your posts to address your fellow colleagues, not Adobe. Otherwise, it's just noise or ranting.

The few Adobe employees that are here regularly are not developers, including myself. I can edit like a wild man (my former students tell me), but I can't code. Please address devs here instead, I'd appreciate it: Premiere Pro User Voice

Thanks,
Kevin

Votes

Translate

Translate

Report

Report
Community guidelines
Be kind and respectful, give credit to the original source of content, and search for duplicates before posting. Learn more
community guidelines
Guide ,
Nov 02, 2021 Nov 02, 2021

Copy link to clipboard

Copied

Kevin, I can't follow your link. No access

Votes

Translate

Translate

Report

Report
Community guidelines
Be kind and respectful, give credit to the original source of content, and search for duplicates before posting. Learn more
community guidelines
Adobe Employee ,
Nov 02, 2021 Nov 02, 2021

Copy link to clipboard

Copied

Please do a search then for: "Premiere Pro User Voice" - otherwise, I don't know why you can't reach the website. That's too weird.


Kevin

Votes

Translate

Translate

Report

Report
Community guidelines
Be kind and respectful, give credit to the original source of content, and search for duplicates before posting. Learn more
community guidelines
Guide ,
Nov 03, 2021 Nov 03, 2021

Copy link to clipboard

Copied

Kevin, how do I become a part of your team?

Votes

Translate

Translate

Report

Report
Community guidelines
Be kind and respectful, give credit to the original source of content, and search for duplicates before posting. Learn more
community guidelines
Adobe Employee ,
Nov 05, 2021 Nov 05, 2021

Copy link to clipboard

Copied

Well, you need to apply for a job at Adobe to start. Any human being can apply for a job at our company. Try that.


Thanks,
Kevin

Votes

Translate

Translate

Report

Report
Community guidelines
Be kind and respectful, give credit to the original source of content, and search for duplicates before posting. Learn more
community guidelines
New Here ,
Nov 08, 2021 Nov 08, 2021

Copy link to clipboard

Copied

me too....

the dynamic link color not same with PR

Votes

Translate

Translate

Report

Report
Community guidelines
Be kind and respectful, give credit to the original source of content, and search for duplicates before posting. Learn more
community guidelines
LEGEND ,
Nov 08, 2021 Nov 08, 2021

Copy link to clipboard

Copied

What are the CM settings for that comp in Ae?


Neil

Votes

Translate

Translate

Report

Report
Community guidelines
Be kind and respectful, give credit to the original source of content, and search for duplicates before posting. Learn more
community guidelines
Community Beginner ,
Nov 03, 2021 Nov 03, 2021

Copy link to clipboard

Copied

What is that supposed to be?

While editing, I'm sitting at a doku with a Sony a7iii Lumix GH5 filmed with 3 cameras
If you put it as the dear Adobe experts say, the following happens, all Lumix files change (does not even begin to look like Filmmt not HLG),
Of course, Sony doesn't look like it was filmed after changing the settings! All too flat and too little saturation. I must
have finished the documentary by the beginning of December!
Of course I tried to open the file with an old version, but that doesn't work because someone wants to be super smart again and everything has to change what worked great!

What am I going to pay for it to work, I need a solution very, very quickly!

Votes

Translate

Translate

Report

Report
Community guidelines
Be kind and respectful, give credit to the original source of content, and search for duplicates before posting. Learn more
community guidelines