

- Home
- Premiere Pro
- Discussions
- Re: FAQ: Premiere Pro 2022 Color Management for Lo...
- Re: FAQ: Premiere Pro 2022 Color Management for Lo...
FAQ: Premiere Pro 2022 Color Management for Log/RAW Media

Copy link to clipboard
Copied
The Premiere 2022 release, the 22.X build series, introduced several new Color Management options and changed the default handling for several LOG and RAW media types. Also changed were the default handling for 'device produced' media in HLG or PQ. Users need to be aware of the changes to continue using several Sony, Canon, and Panasonic cameras in particular. And with the media now produced from most phones and "devices".
I'll give a short practical control setting list, and then a more complete explanation below.
(Also check out this article on monitoring HDR within PrPro2022)
Clip Color Management
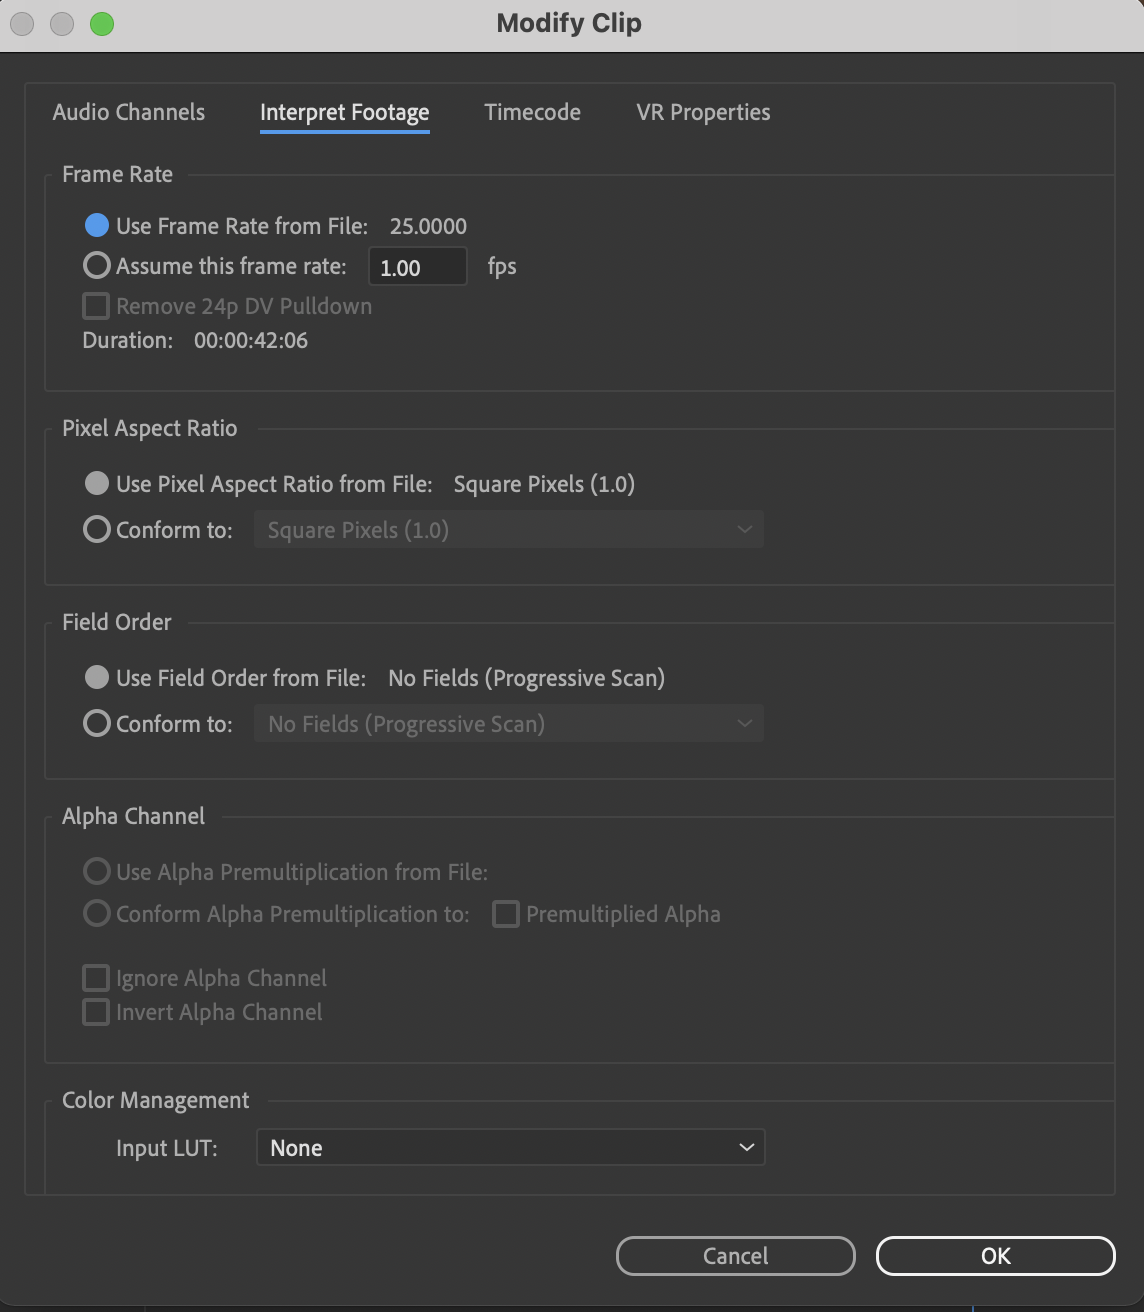
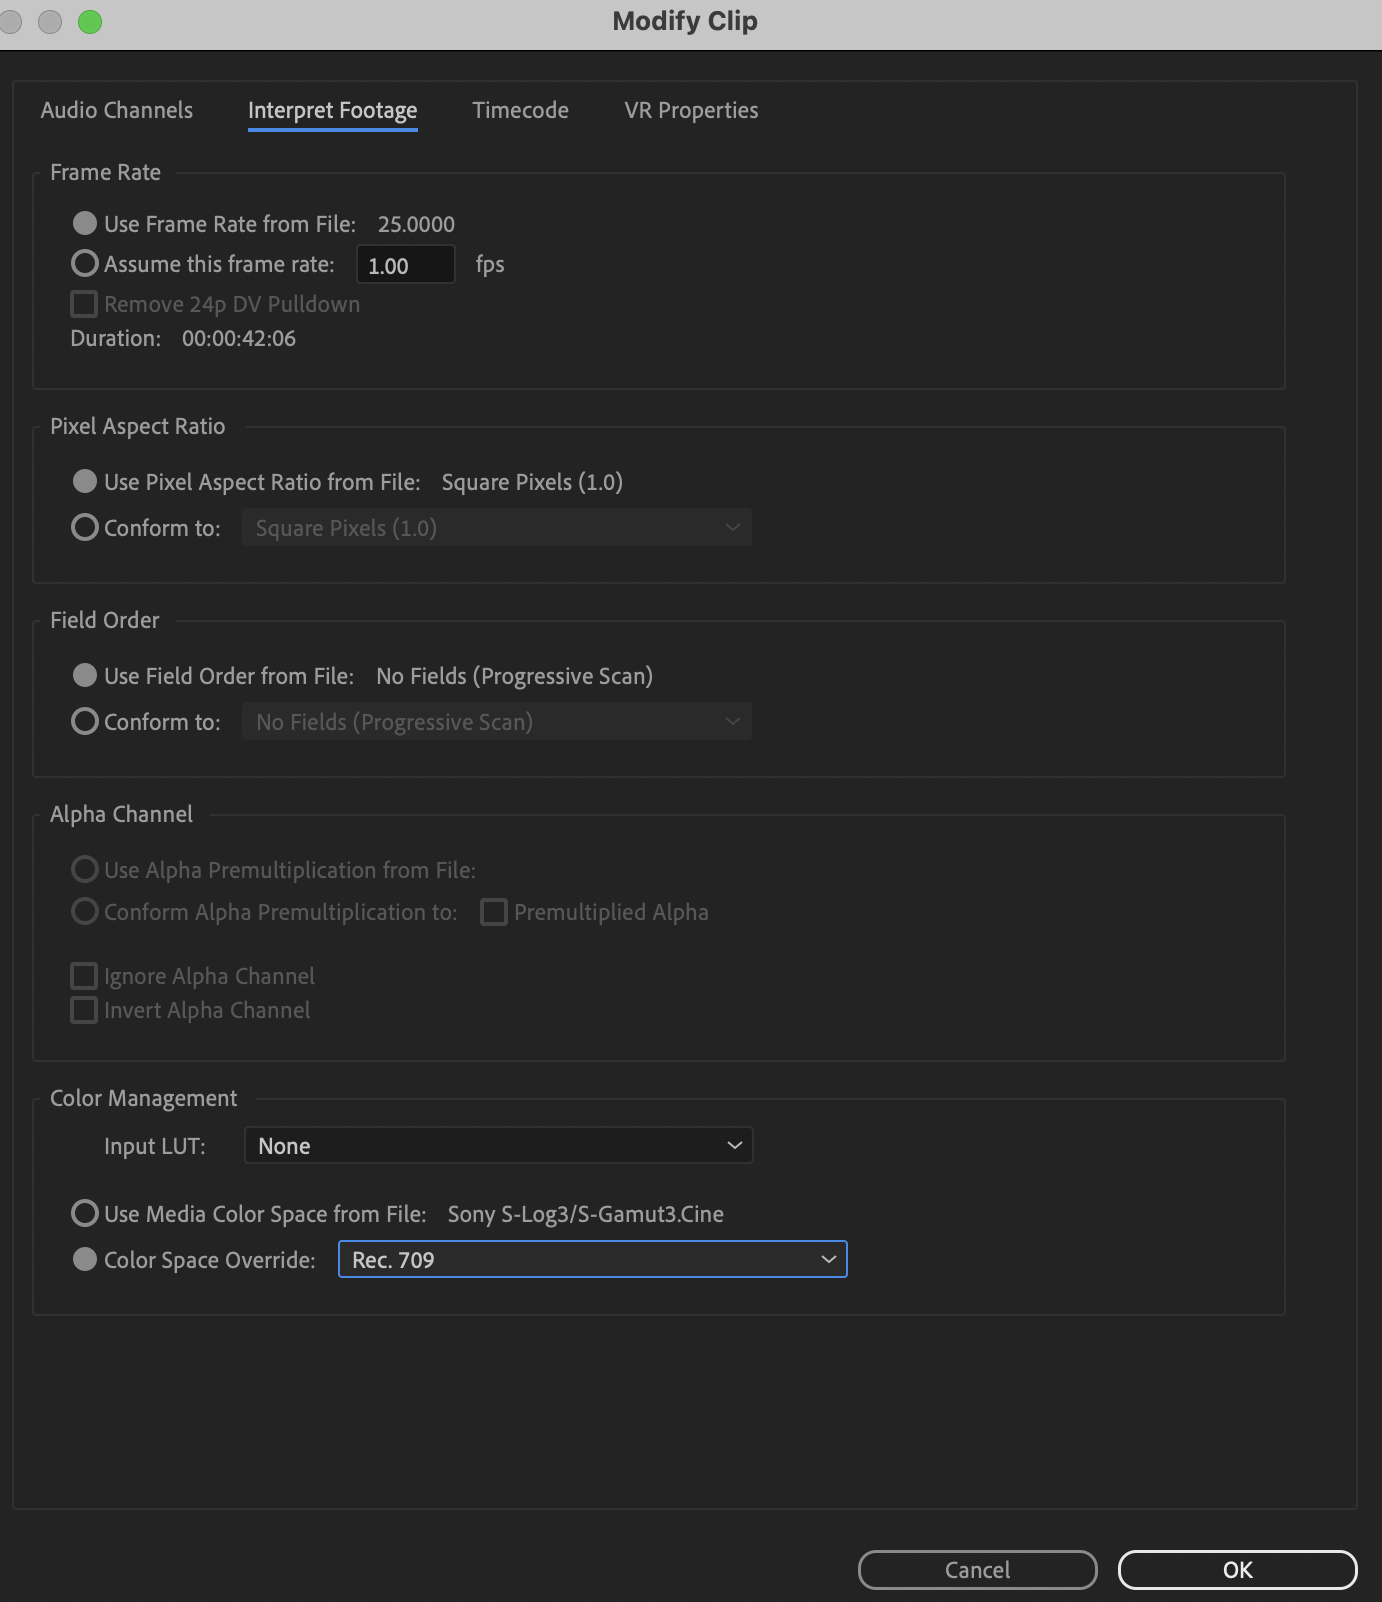
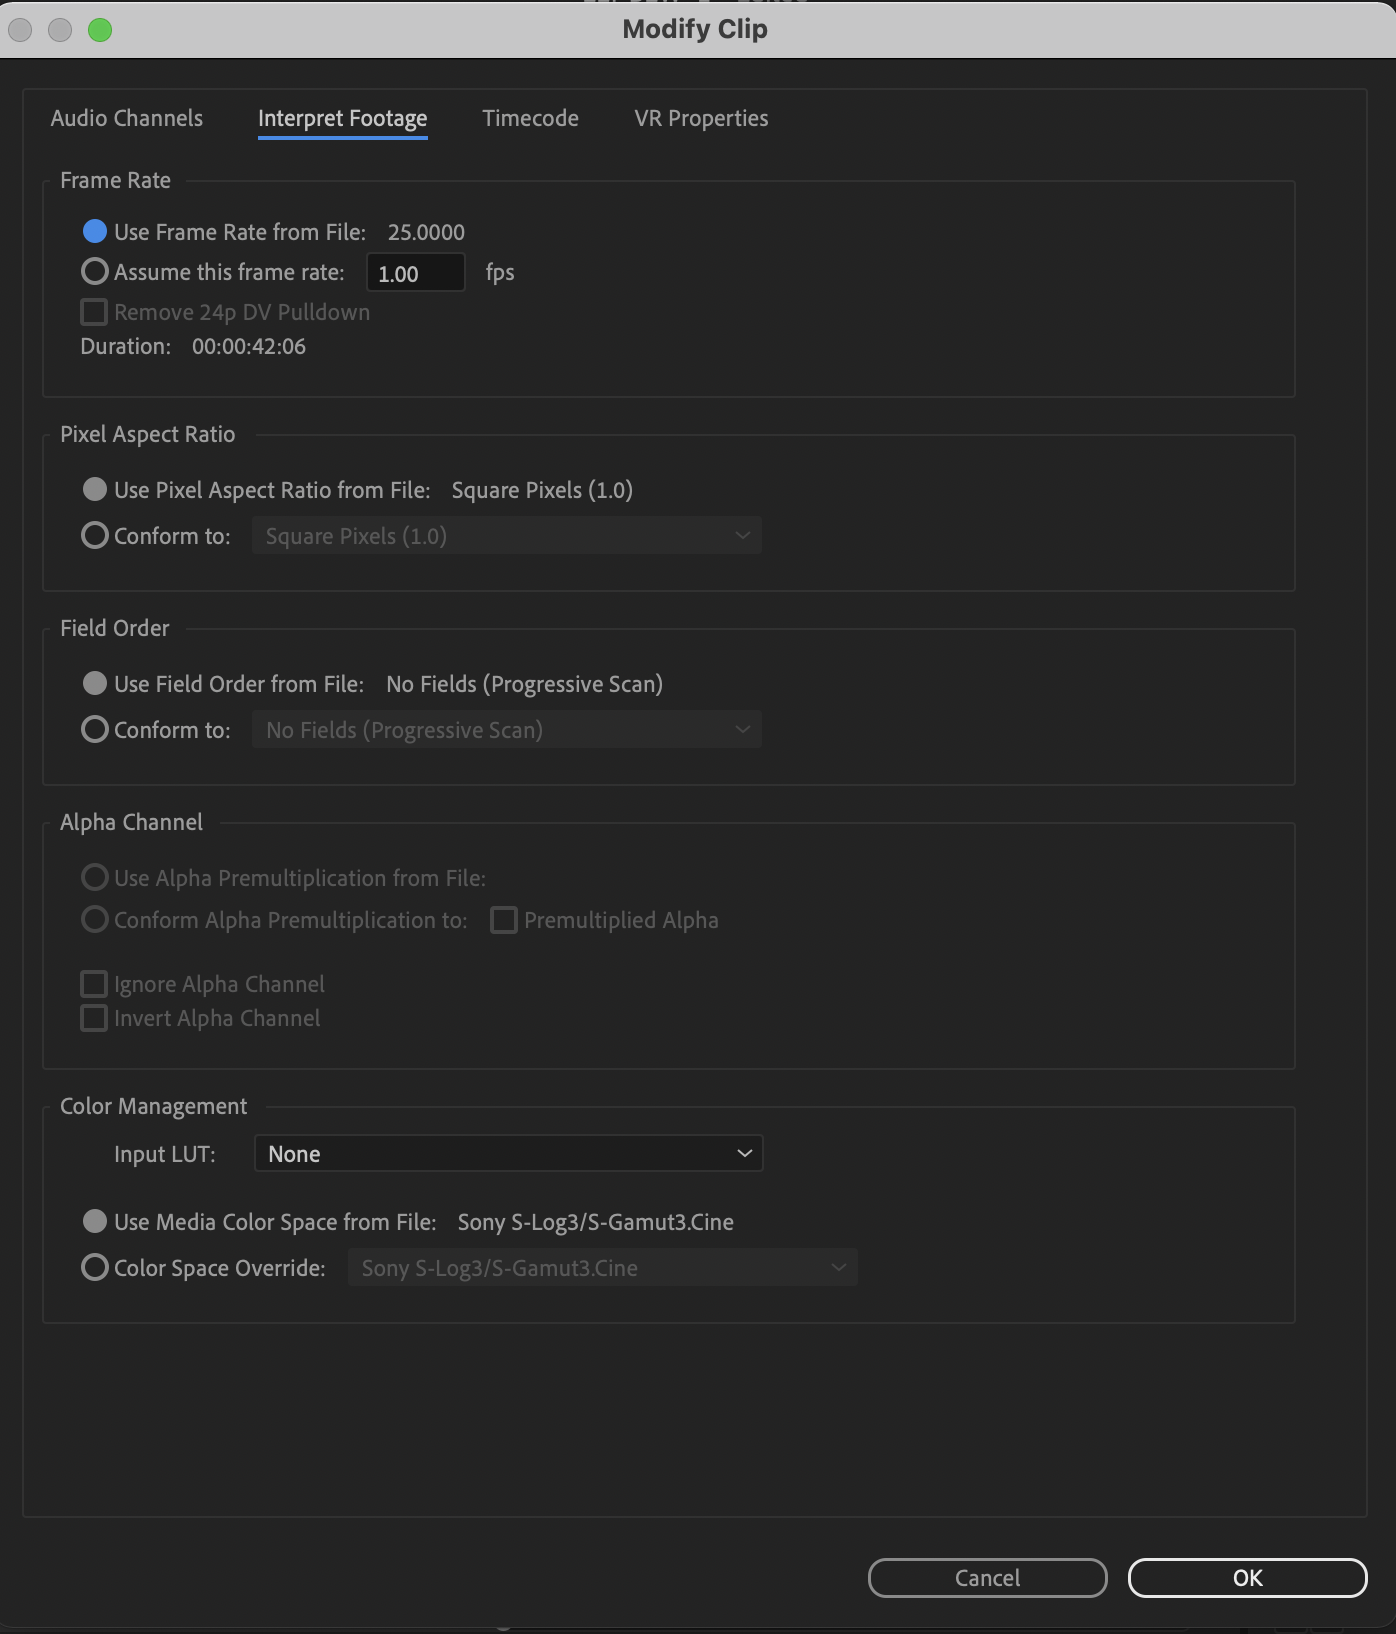
There are now color management settings for clips in the Project panel. Right-click one or more clips, Modify/Interpret Footage. Down at the bottom are several color management options. If your media is 'blown out' on a working timeline, this is where you will start to correct it. For most work at this time, you will want to use the Rec.709 override option.

There were a few manufacturer Log formats that had default transform behaviors in the previous version. Those have all been changed, and many more log formats are now recognized as such.
In Premiere Pro 2022, recognized Log formats may or may not be transformed into Rec.709, the user may need to do so in the Project panel.
And any phone or other "device" produced media that has an HLG or PQ color tag, may or may not be transformed to Rec.709 on import.
Again, unless the user chooses to do so in the project panel.
One further caveat: if you have a clip that Premiere recognizes as HLG or PQ, and use the command to "create new sequence from clip" ... Premiere may still create a sequence with a Rec.709 color space. While dropping the HLG clip onto that sequence without applying color management to Rec.709.
You must check the Sequence color space now.
These are major changes in default color management behavior. And at this time there may be inconsistencies in the process. And still, some media types allow a user CM setting in the Project panel, but some do not.
Sequence Color Management
There are now color management settings for Sequences. With the timeline panel 'active', with a blue line, go to the Sequence/Sequence Settings menu. There are now options for sequence color space there. Again, for most work, using the Rec.709 color space is still the 'normal' expected one for output deliverables and monitors. This should (nearly) always be set the same as the clip's color management.
At this time, Premiere may still 'default' to creating a Rec.709 sequence even when you drop an HLG or PQ on a blank timeline, or use the "new sequence from clip" command from the bin. Yet not apply any transform to fit the clip to the sequence. You have to check and correct sequence settings as needed.

Scopes Color Management
There are also color management settings in the Scopes panel. Right-click, select the desired color space from the list of Rec.601, Rec.709, Rec.2020, and Rec.2100 in either HLG or PQ. If you are working in HDR, then after setting the scopes to an HDR color space option, you will need to also set the scope scales to HDR with the control in the lower right corner of the Scopes panel.

Export Color Management
To export in HLG or PQ, anything other than Rec.709, you should scroll down through the Preset list for your desired Format to select the HDR options, for either HLG or PQ. They now do have the presets, and it makes exporting in an HDR format much easier and more reliable.
But you do need to SELECT the HDR presets to get a proper HDR export.
SDR Exports from HLG/PQ Media*
To get "standard dynamic range" or SDR exports from sequences or clips that are HLG/PQ, you need to set your format/preset in the Export dialog, but also go to the Export Dialog Effects tab and select the "SDR Conform" option.
The default settings for Brightness, Contrast, and Soft Knee may work to at least get the image within usable values. To get an exact result, you would need to test those settings yourself.
Making SDR Proxies from HDR/HLG/PQ Media*
To make proxies from HLG/PQ media that can be used in an SDR/Rec.709 timeline, you need to (as above) go to the Effects tab of the Export dialog, and select the SDR Conform option.
Why did things change?
The nature of the business and the gear is changing rapidly. As of this date, 26 November of 2022, most of the many colorists I know have still not delivered a single HDR job professionally. A few others have done quite a number. But the vast majority of content being produced at the moment is still Rec.709's "SDR" ... standard dynamic range.
So why are changes being implemented in Premiere Pro at this time?
Because first, the cameras are changing rapidly. Many prosumer and pro cameras are now able to set a CM for a clip to either HLG or PQ. Camera operators are frequently selecting those settings because they want the widest dynamic range possible. So for many editors, the HLG or PQ or other wide dynamic range media is what they are getting handed to work with.
Even though many of the other visual assets of a job, and the final output, will still be in Rec.709.
Second, many phones and "devices" are now defaulting to recording in HLG/PQ, and so many prosumer users have media that is in those wider color spaces. Many of the clips that have been posted on this forum since the 2022 release are phone media with HLG or PQ 'tags'.
And third, more content is being produced or delivered as HDR, and the percentage of content produced as HDR is going to go up perhaps fairly rapidly over the next year. The users need an app that can accomodate the new dynamic range and tonal range needs.
What are SDR, HDR, and Rec.709 versus "wide gamut color"?
There are two differences between Rec.709 media and most HDR media, whether P3, HLG or PQ.
The first is the tonal range difference. Total image brightness, or contrast range. Rec.709 is now referred to as SDR, or standard dynamic range. It has a far narrower tonal range limitation for the visual data. It is designed to be used compressing the visual tonal range into a 100 nit total brightness range. It is what we've been using all along. The broadcast TV standard.
HDR media, whether HLG or PQ, is non-limited for tonal range values. And may vary up to several "stops" of tonal difference past what SDR allowed.
The second difference between HDR and Rec.709/SDR is the color space and gamut difference.
Rec.709 specifies the color space using the sRGB color primaries. It is also a fairly "shallow" color gamut.
HDR can be one of several wider color gamuts such as P3/D65 or Rec.2100HLG/PQ or Rec.2020. The difference is not only that the color space is "wider", the gamut ... think of this as the 'depth' of color hues available ... is also "deeper". (Currently Premiere handles all wide-gamut media in a Rec.2020 or Rec.2100 "container".)
To demonstrate the difference, this Sony S-log-3 MXF clip shows dramatic dynamic range and color space/gamut differences in the Lumetri scopes and Program monitor, depending on how it is "managed". As imported, it was interpreted as an HLG clip in the bin. Creating a sequence from the clip, Premiere made a Rec.709 color space timeline.
But when this HLG clip is placed on a Rec.709 timline, the scopes and the image will be completely blown out.
That HLG-interpreted clip will not be displayed in a usable fashion on a Rec.709 sequence. This shows the scopes of the Rec.709 sequence, scopes set to Rec.709, but the clip properties set by Premiere to HLG.

Note how note only is this clip totally 'blown out' to whites for much of the image, but the Vectorscope YUV color data is way outside of allowable range.
This next graphic shows the same clip. I went into the bin, using Modify/Interpret Footage, and selecting the CM option to Override to Rec.709. Now Premiere showed it in visual "log" manner within the Rec.709/SDR range, with tonal values from 18 to 85 nits.

Just to get it to the full 0-100 nits of SDR took expansion of the image via contrast controls. And after a slight contrast expansion, it was a very nice image. This is the behavior we have expected in the past.
But the same clip, using the "original" Sony S-log-3 Interpretation in the clip properties, but with a change in the Sequence Settings and the Scope color management settings to HLG/HDR, is shown here:

The only clipping is the whites of an outside window, and there are no color excursions. You would need an HDR capable monitor set properly between the OS and Premiere to see the image correctly in the Program monitor, of course. And note those nit values on the left-side scale! In excess of 4,000 nits!
By simply adjusting the Exposure slider down, and lifting the Color Wheels 'shadow' tonal slider, I was able to get a very good HDR image displayed with very little clipping anywhere. This on my little 358 nit monitor in its "HDR Emulation" mode.
That is a massive difference in the display of the same image: from a 69 nit tonal range in SDR, to a 4,000 nit tonal range in HDR! And both images are quite nice images when the entire color management 'chain' is set properly. The image can be used either Rec.709 or HLG.
How usable are HDR videos at the moment?
Very few current consumer devices can even sustain 1,000 nits. The only displays fully capable of 4,000 nits and up that I know of currently in use, are the high-end Grade 1 Reference monitors by FSI and Sony. Those monitors sell for above $20,000 USD.
Relatively few screens can actually show brightnesses above 400 nits. And most colorists consider an absolute minimum of 600 nits as necessary to allow for a 'base' feel of HDR-ness to the content. It is coming yes, but ... fully HDR capable screens of the 800 or better nits for consumer use are still spendy and not that common.
Previous Behavior for LOG/RAW Media
In 2021 and prior releases, the log and RAW media types, where PrPro had any 'default' behavior, it was to apply a manufacturer's transform process to conform the clip to a Rec.709 "view". Most users were unaware of this process. There were only a few formats where Premiere applied a default transform.
And if Premiere applied a default transform, any changes the user made in the Lumetri color panel were applied after the default transform process. If the transform process clipped whites or crushed blacks, that image data was simply gone.
Many other log media types were simply displayed as "log" images, but with an assumption of Premiere Pro within the Rec.709 standards. And showed in the monitor with the narrow or compressed 'native' tonal range we are all used to seeing for Log media. The user needed to manually 'normalize' the contrast to a full Rec.709 tonal range.
There were (and are) several formats where there is a special panel on a sequence for Source settings. Such as for RED, Arri's ArriRAW, and BlackMagic BRAW camera media. Those haven't changed.
Changes in Premiere 2022
The Log and RAW media types that had a default transform to Rec.709 in previous versions may not do so anymore. Premiere Pro 2022 also does recognize many more of the Sony, Canon, and Panasonic log formats on import. And then may or may not apply a transform to Rec.709 when those images are applied to a timeline.
We users understand and expect that a Log image, displayed on a Rec.709 timeline, looks very "log-ish". That grayed-out look, no blacks, whites, or saturated colors.
But take that same clip, without any transform process, and drop it on an HDR sequence. The image will show as the full range image from the camera. In fact, with a very high dynamic range from blacks to whites, and full color. Yet again, this is without any "interpretation" or transform on the part of the program.
HLG is 'Hybrid LOG Gamma"
And that is what it seems we are all seeing with Premiere Pro 2022 and some log media formats. Log media is at times simply displayed at full image values as if on an HDR timeline set to HLG, unless the user overrides the new display default. And those values are typically well above the 100 nits max of an SDR/Rec.709 timeline.
Again, until and unless the user changes the clip properties.
The old default: transform to Rec.709. The new default at this time seems to be:: no transform unless the user chooses to do so.
That is a massive difference in how the same file is 'interpreted'. How it is displayed.
Processing changes: bringing back clipped White values
The processing 'chain' has also been changed. For "clipped" data due to any auto-tranform, the Lumetri panel tonal controls may all be used to bring down too-bright values. The Exposure slider in the Basic tab has by far the widest capablitity for White tonal value changes so that should be your 'default' control to bring back blown out whites.
If additional control is needed, the Basic Whites control, the RGB Curves tool, and the Color Wheels tonal slider can provide additional changes. Clearly, the default transform is applied after the Lumetri controls.
Both the Rec.709 and HDR/HLG images will be useful and valid for certain workflows. But the user MUST know how to manage the color management within Premiere Pro to get the desired result for each job.
R. Neil Haugen
(image used by permission, and courtesy user " maRedlich ")
[Edited 7 December 2021]
[* Edits added 5 January 2022]


 104
Replies
104
104
Replies
104

Copy link to clipboard
Copied
Thanks a lot! Then let's wait for more codecs implemented 🙂
I'll stick to my previous process of manual adjustments within lumetri.
Thanks again from Germany!
Copy link to clipboard
Copied
You're most welcome.
I'm still rather surprised that a lot more of the 'heavy' pro formats/codecs aren't "color managed" yet within Premiere. I'd expected that to be a process of adding more monthly.
Ah well.
Neil

Copy link to clipboard
Copied
I agree with Neil. I'm working on this process.
But, I wanted to clarify, if there is a difference if we apply LUt through the Modify panel or through Lumetri Color? Crossman wrote about this that in some cases the necessary information is cut off when using LUT. What is the correct sequence when working with color, so that we can work with a wide dynamic range, and then use LUT for styling. We all do it differently, we need some kind of rule so that people understand the professional process when working with color. At DaVinci, everything is perfect with this and extremely consistent. We display the material in the correct color space, without using LUT, and perform all the initial color correction. And then, after these stages, we proceed to the grading process that follows, so we do not have a violation of compression and deterioration of quality.
Why don't Adobe developers implement such an opportunity (to see the material on the timeline in the correct color space without LUT), which is necessary for flexible work with the balance, normalization and matching of the source?
Copy link to clipboard
Copied
Baffy,
Not everyhing applied in "Adobe" is a LUT ... just like in Resolve, some of the in-built processes are technically a transform, some do use LUTs. I've got a few answers on a couple of the questions I've had from their chief color scientist, as to whether X process is a LUT or transform. There are both in use.
And from personal use, and the rather expansive experience over several years of both in-person and online colorist discussions of color management through the entire pipeline, color management of media isn't always clear and obvious and perfect in Resolve.
Depending on whether your Resolve project is "manually" color managed, Davinci CM, or ACES, you have completely different processes for Input, Media, Timeline, Display, and Export color management. There are places to set program defaults and user-selected defaults. And of course, you can override the clips in the Media pool or via LUTs/transforms applied in nodes on the Color Page.
Some of those internal processes use LUTs, and some use tranforms. And just like dealing with LUTs, not all of the transforms in Resolve work perfectly or even usably with all clips
Go to both LGG forum and the BlackMagic forums ... you will see queries and LONG threads on how to handle all sorts of CM issues ... from people with vastly more experience there than you or I.
On MixingLight.com, where I'm a "contributing author", the Insights on how to manage CM in Resolve through the entire process ... including multiple changes from/to color spaces in various nodes within a grade on a clip! ... are heavily viewed. With at times long discussions/comments.
There are certain types of workflows where ACES is a good fit, even though they'll have nodes in the tree that can take the clip out of ACES to do X operation because they prefer the math/image from that other CM for that operation. And of course, the next node takes the clip back to ACES.
There are times that ACES is simply not a good fit for a job, and Davinci Color Managed is better. I typically work in DCM myself.
And of course, some colorists are used to "rolling their own" and do all their CM in the node tree for their grades.
It is not uncommon for colorists to have an Input default for certain media, but on a job, apply a modifying color space for the timeline. Then on certain clips, in their node tree, they have CM changes to go from the 'current' space of the clip to another prior to doing certain parts of the grade.
Then there's another node with CM changes for the next part of the work ... and another node with CM changes to get the clip back to the 'regular' timeline CM. Yea, those discussions and node trees are pretty complex in underlying actions and implications.
That's actually why the Premiere manager prior to Mr. Palmer wanted to avoid giving users CM controls ... it gets very complicated very fast. The problem is we users weren't going to be living in a Rec.709 "multiverse" anymore. And so Premiere has had to go through this massive change. (Not to say it's been a perfect trip ... so far, even ... )
Some LUTs and transforms are better built to handle wider ranges of data than others. So they can be used with most of the user's clips without troubles, that is, without clipped/crushed and therefore lost data. But you won't know until you test them, and yes, that can and willI vary by camera and camera settings.
So not only job-to-job, but within the same job, from either two different bodies of the same camera, or just different setups with one camera body.
This is a very common thing for colorists ... say, most of the S-log3-cine clips in a job are fine on 'default' handling on import, but a couple are way off. And so they have to puzzle out how to handle those specific clips to get them to blend in with the project. Very few colorist projects do not have at least a few problematic or odd clips/media.
Which is why of course many colorists who work projects from certain production facilities over and over learn to LOVE some DPs, and well ... wish to educate a few others. Ahem.
One thing that Resolve handles that i would like to see implemented in Premiere are the complex LUTs that have both a 1D and 3D LUT included. That's why some LUTs from Resolve's folders don't work well or at all in Premiere. The complex LUTs do allow for more careful handling of pixels.
(Although I saw a comment somewhere from someone who said that if you modified the file header for those LUTs, changing one line of text, you could get them to work at least mostly in Premiere. Still trying to figure that one out.)
Personally, when I build a 'normalization' or a 'transform' operation and save as a LUT, the first step I take is to lift the black point a bit (8-bit numbers in this post) to maybe 3-5, and drop the white point a bit to maybe 252. Which means that on application it moves the data a bit more 'centered' so if there are over-whites or under-blacks, they are probably brought within 'normal' values by the LUT. Thus avoiding crushing/clipping.
And while that LUT will do a general 'normalization' of say a log-encoded clip, I do NOT assume it is at final 'look'. It will need tweaking for optimal contrast and saturation plus white/black points.
Any LUT designed from X media clips, intended to make them fully 'finished' with correct final black/white points and contrast ... will of course clip/crush other clips that are slightly different in exposure/contrast.
But it comes back to ... the user, just like in Resolve, will have to make choices. We need the ability to set defaults ourselves like Resolve has, and we will get that at some point. I would rather sooner than later, but well ... I am not all-powerful, much as that fact pains me at times.
And at this time, the user still has to make choices in Premiere. There are ways to work most media in Premiere at this time, though some are more painful than others. And the defaults of the app and the choices the user needs to make are certainly not obvious to most users.
Most unfortunately.
Neil
Copy link to clipboard
Copied
@R Neil Haugen - One thing that Resolve handles that i would like to see implemented in Premiere are the complex LUTs that have both a 1D and 3D LUT included. That's why some LUTs from Resolve's folders don't work well or at all in Premiere. The complex LUTs do allow for more careful handling of pixels.
@Baffy19 - Good article, Neil.
Good article, Neil. It would be great to have such an opportunity to work with 3D LUt in Premiere. Color is generally an important component to set the mood. However, the science of color is a complicated thing, I agree. But, despite this, Adobe engineers need to try to improve the grading tools. Now all this is necessary and required for the flexibility of painting in projects. Here in the new version 22.6.2, PrPro drew attention to the faster operation of masks during tracking, which I very often use in projects to correct certain areas. Masks have become more responsive and resistant to tracking. I was surprised compared to the previous version up to 22. It's noticeable. That's what engineers can do when they put their whole soul into it and it's nice to feel their contribution. Of course, it is not yet possible to compare the speed of working with masks with DaVinci, but I want to say there is progress. That's how I want to be able to work with time masks in the color page panel in PrPro. Maybe that day will come. We need tools there on the color panel, all in one space. So, we need to develop further and not stop.
Copy link to clipboard
Copied
Oh, for certain, ALL of the above!
I want that full Color Management Panel that this UserVoice links to.
I want the option to "turn off the training wheels" in Lumetri ... the ways it keeps us from breaking our media ... because if I WANT to push things farther, I should be able to. That is one thing I know Jarle always harps on, and for good reason.
I want to be able to move the Lumetri tabs around within the panel. Or to be able to have mulitple sections of the same tool if I want.
And be able to pic-whip the input for a tab from and earlier tab. So we could 'grab' the input for the HSL Secondary tab from any tab's output above ... or from the 'input' of the clip.
And ... well, it's a long list ...
Neil
Copy link to clipboard
Copied
Neil, your thoughts are on the right track. Here's what you said, taking the raw data for HLS and other tools to work with the original source is extremely extremely important. That's exactly what I always talk about. To work with the source data without compression. There will be more flexibility in color correction. That's only when such an opportunity is realized.
Copy link to clipboard
Copied
Do you know what is missing for comparing several frames? Neil noted this in conversations with Adobe engineers that it is necessary to be able to group clips and place them together sequentially one after another on the timeline so as not to get lost with color matching. And also be able to hide clips from the timeline that are not marked in the group, so as not to be distracted. Such an opportunity will improve the process of evaluating personnel among themselves. As soon as we have finished painting, we proceed to another group of clips collected according to other parameters. You get the idea. That's what I want. I am faced with the lack of such an opportunity in every average project and constantly jump and move along the timeline to match frames. It's not convenient. What do you think, Neil?
Copy link to clipboard
Copied
I would appreciate an easier "group" process also.
Now, if you have "grouped" clips you can copy a clip, select the group, I think and I think "paste attributes" can work.
Or if you use a color label to group clips.
But neither process is "obvious" nor intuitive.
Neil
Copy link to clipboard
Copied
I am in favor of isolating clips and calmly, without distraction, working with color correction on a group of clips. Then switch to the second group. This is extremely necessary, believe me. It wouldn't just be you and me. If you don't forget, give the engineers a hint about this idea.

Copy link to clipboard
Copied
Hi Neil - thanks for details in the Premiere world. I'm having this issue when trying to run a batch of transcodes from .mxf (Sont FX9, SLOG3, etc) in Media Encoder. Unlike Premiere, i'm not aware of a way to bypass colourspace in ME?
I'm runnign the latest version of ME s of the date of this message. Any insight i'd be hugely grateful to hear!
Copy link to clipboard
Copied
In Me, in the queue, if your right-click the file name (not the export preset line below it) you do get the options to set the Interpret Footage color space. You should be able to select a bunch of clips in the queue, and do this.
This would include setting the Override-to option to the log form of those clips.
And in the Presets options for say MXF-Op1a files, there is a spot to select export color space when creating the preset between Rec.709 and Rec.2100/HLG.
Would either of those help?
Neil
Copy link to clipboard
Copied
Neil, noticed that when Premiere uses the "replace clip with AE composition" function, an icon appears after the path of saving the composition with a request to specify the location of LUTs. It's wild. I use manual color correction in conjunction with LUTs. Unfortunately, it is inconvenient to use this method every time when working. Does AE not pick up the LUTs placed in the Common folder, which Kevin pointed out? What kind of double standards in work?
Copy link to clipboard
Copied
So far, Ae has been able to see LUTs when used in Lumetri for me ... and I use the:
Program files (package on Mac)/Adobe/Common/LUTs/ and then folders for the Input (clip color management) and Technical (Basic tab), Creative (Creative tab).
I haven't done a comp from Pr in the newest version yet, but I was just working a project in Ae 2023, and the Lumetri drop-downs all showed the LUTs I would see in Pr.
Neil
Copy link to clipboard
Copied
I explain, if you apply color correction to a clip in Premiere, and then send it to AE, it will require linking the applied LUT again. Utter nonsense. The LUT I have is where you have it. I don't understand what's going on.
Who has such a problem that LUT is not picked up when you use the function from Premiere "Replace clip with AE composition"?
Copy link to clipboard
Copied
Just tested on my laptop ... and you're right, it's not seeing the LUT on first opening the comp in Ae. I can cancel, go to the Lumetri effect within the comp, which is showing as applied to the clip ... but ... the LUT isn't.
I can select the LUT from the Ae Lumetri creative tab dropdown, it sees it in the list ... and apply.
But it should simply apply that LUT ...
Not correct.
Neil
Copy link to clipboard
Copied
I'm glad we understood each other. It's annoying when AE can't pick up Lut's from Adobe's shared folder.
Copy link to clipboard
Copied
Oh, it is seeing them ... it just isn't applying them. As noted, that LUT shows in the Lumetri Creative tab's dropdown within Ae. No searching necessary, it's right there at the top.
It just didn't apply the LUT.
Copy link to clipboard
Copied
It's disturbing. You often have to turn from Pr to AE. And here is such a misunderstanding. Engineers should pay attention to this. Another question I have is why from the timeline I can't replace several clips with a Proxy prefix with one click at once. He replaces them one by one. If I make a proxy from the trash, then it creates a proxy successfully. I'm talking about the second case when I need to link the same files, only with a lower resolution for editing not from the trash, but created using a Media Encoder with a lower bitrate. In early versions, it seems this was possible.

Copy link to clipboard
Copied
Neil, I agree. This should be escalated to Adobe's engineers.
Copy link to clipboard
Copied
Yep, Richard ... I've contacted them. But that was LATE Friday, we'll see if I can get a response this week.
Neil

Copy link to clipboard
Copied
Hi Neil
Thanks very much for this. I don't think the issue I'm having has been addressed, but I may have missed it, so my spologies if so.
I get the option for color space override on my macbook pro in both premiere 22 and 23.
But on my imac it's no longer there in the panel, on anything from 22 first release onwards.
Both machines are currently on Big Sur
If i double click on the media to bring it up in preview, on the macbook it's 'log-y' and on the imac it's blown out and saturated
Again my apologies if I've missed the solution to this, a terse link will suffice, but otherwise could you help me please?
Many thanks indeed, some ref images to show you
Copy link to clipboard
Copied
Asking if @Kevin-Monahan or @Warren Heaton are around, they're both pretty Mac savvy. Or @Richard van den Boogaard I think too.
Neil
Copy link to clipboard
Copied
Thanks @R Neil Haugen, although I love apple for their gadgets (iPhone, Apple Watch, iPad), my production workstation is actually Windows... not prepared to pay the hefty premium that Apple charges for that, but that's my personal choice ;-).

Copy link to clipboard
Copied
Brilliant! Thank you for the thorough examination of 22's CM.

 AdChoices