 Adobe Community
- Home
- Premiere Pro
- Discussions
- Re: "Why does my footage look darker in Premiere?"...
- Re: "Why does my footage look darker in Premiere?"...

Copy link to clipboard
Copied
Courageous community member Matt Johnson made a video based on this document. Watch here for a visualization of the solution, and read on to understand why the color shift is happening in the first place.
1. What's the issue?
a. "My exports look washed out when I view them in QuickTime player"
b. "When I post my video on YouTube it looks less saturated and the blacks are raised"
c. Footage appears darker after imported into Premiere Pro
d. Help!! Premiere Pro CC is changing the color of my imported footage
When importing footage into Premiere Pro, the display of the video looks more saturated than when it is played back on other apps such as VLC, QuickTime, After Effects, or a number of web browsers like Safari or Google Chrome. When played back on YouTube through those web browsers, the video also appears less saturated than it does in Premiere. As far as we know, this is a Mac-only issue. If you're experiencing this behavior and you're on a Windows machine, please send me a private message!

Side by side, you can see that video in Premiere (left) is displayed with more saturation than the video displayed in QuickTime (right).
(Screenshots provided from this forum post)

Quicktime on top, Premiere on bottom
(Screenshots from Boots Riley's "Sorry to Bother You")
2. Why is it happening?
a. Premiere displays video based on the assumption that your monitor is set to Rec709 color space and that your footage was recorded in reference to gamma 2.4, because that's the gamma standard for broadcast television. Gamma 2.4 displays with higher contrast — blacker blacks and whiter whites. It was chosen for broadcast television because the people who were deciding playback standards figured that people were watching TV in their dark living rooms, and they thought increased contrast levels looks prettier in that setting.
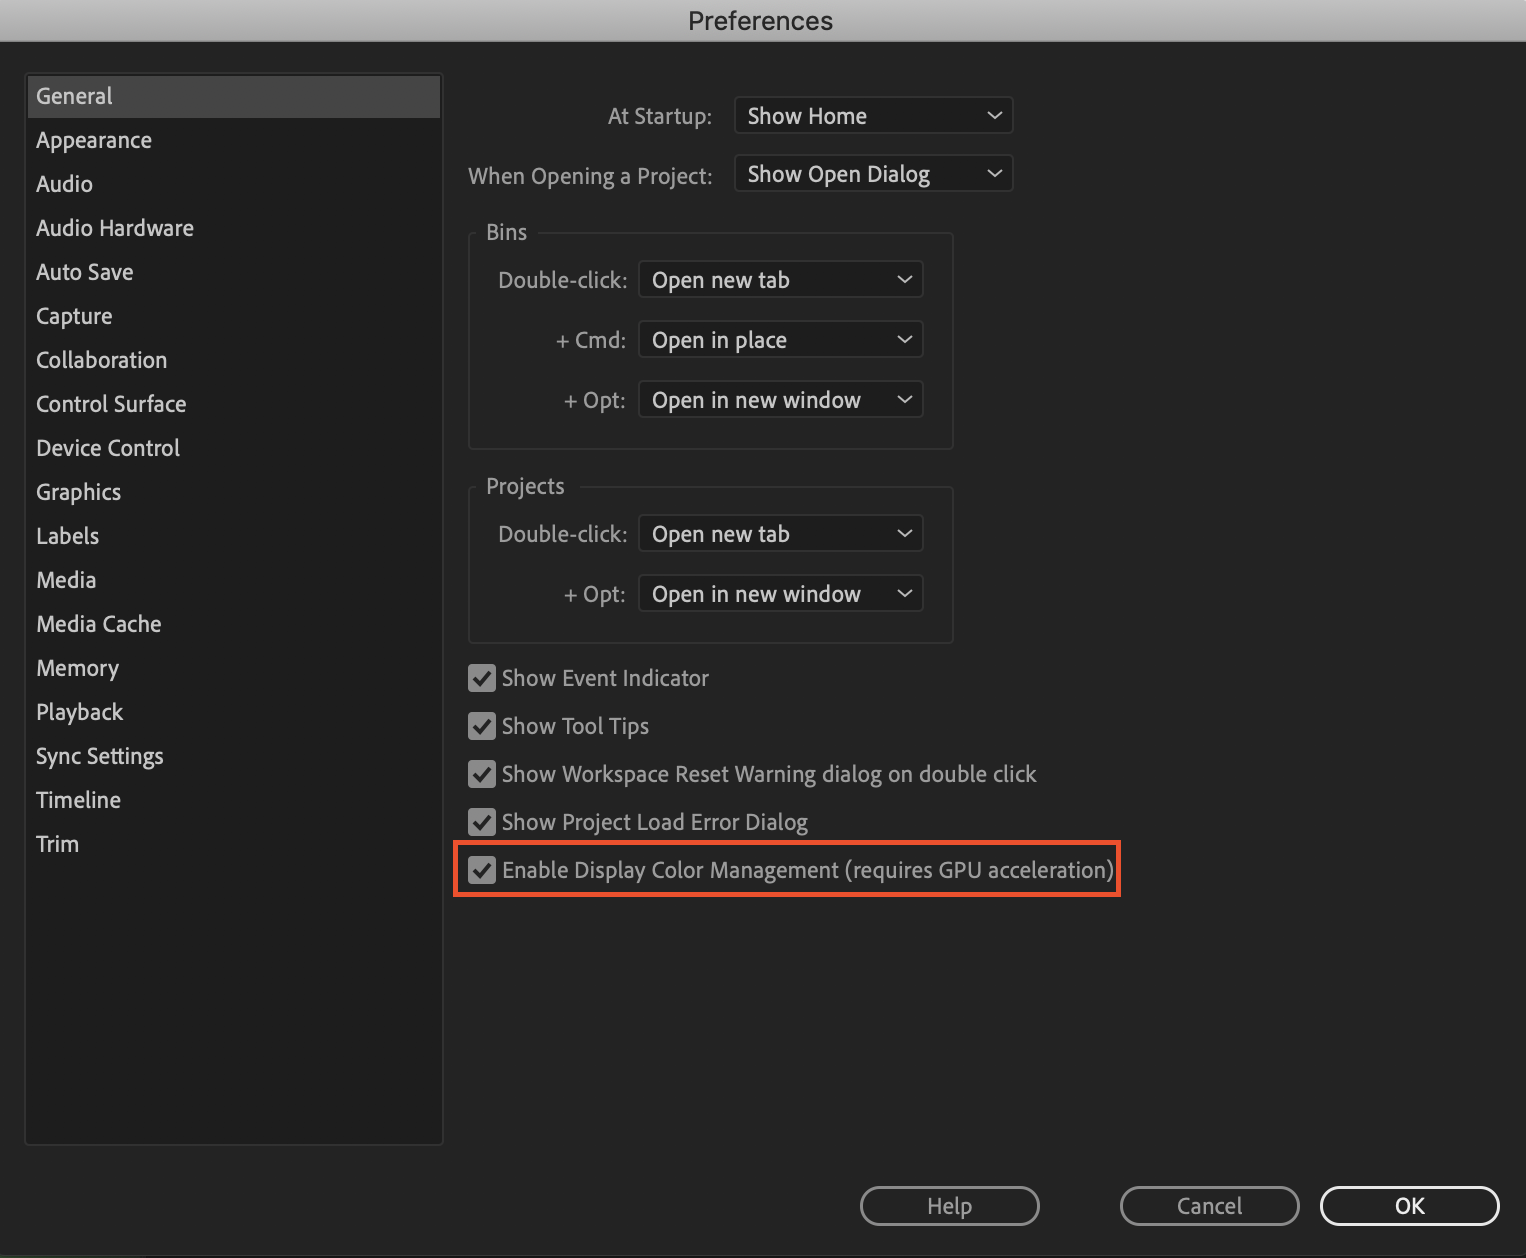
i. Premiere has a feature called "Display Color Management" that will coordinate with your monitor's display settings in order to correctly display in a Rec709, gamma 2.4 profile.
Premiere Pro > Preferences > General > "Enable Display Color Management (requires GPU acceleration)"
It's the last box on the list and it should always be enabled! For more detailed instructions, go here.
b. Monitors have become fairly standardized over the years, but apps haven't. Other apps like QuickTime, Final Cut Pro, and web browsers like Chrome and Safari display video in a scene-referred gamma 1.96 profile despite what your monitor is set to. Gamma 1.96 profiles play video back in a way that looks closer to what you see in real life — lighter blacks and softer whites.
c. This gamma shift is completely dependent on what app you play your video back in, as most users have figured out on their own. FCP 10, QuickTime, and certain web browsers all play video back in the same way, so people assume that they're displaying the video "correctly" when in reality, it's just that they're displaying the video under similar standards. Your video files are fine! The actual color codes within the pixels of your video are not changing in between apps. The miscommunication is happening between the apps and the monitor they're being displayed on.
TL;DR Premiere uses the same display standards as broadcast television does. Other video playback apps like QuickTime have begun to adhere to different video playback standards. This is what causes videos to display differently in between each app.
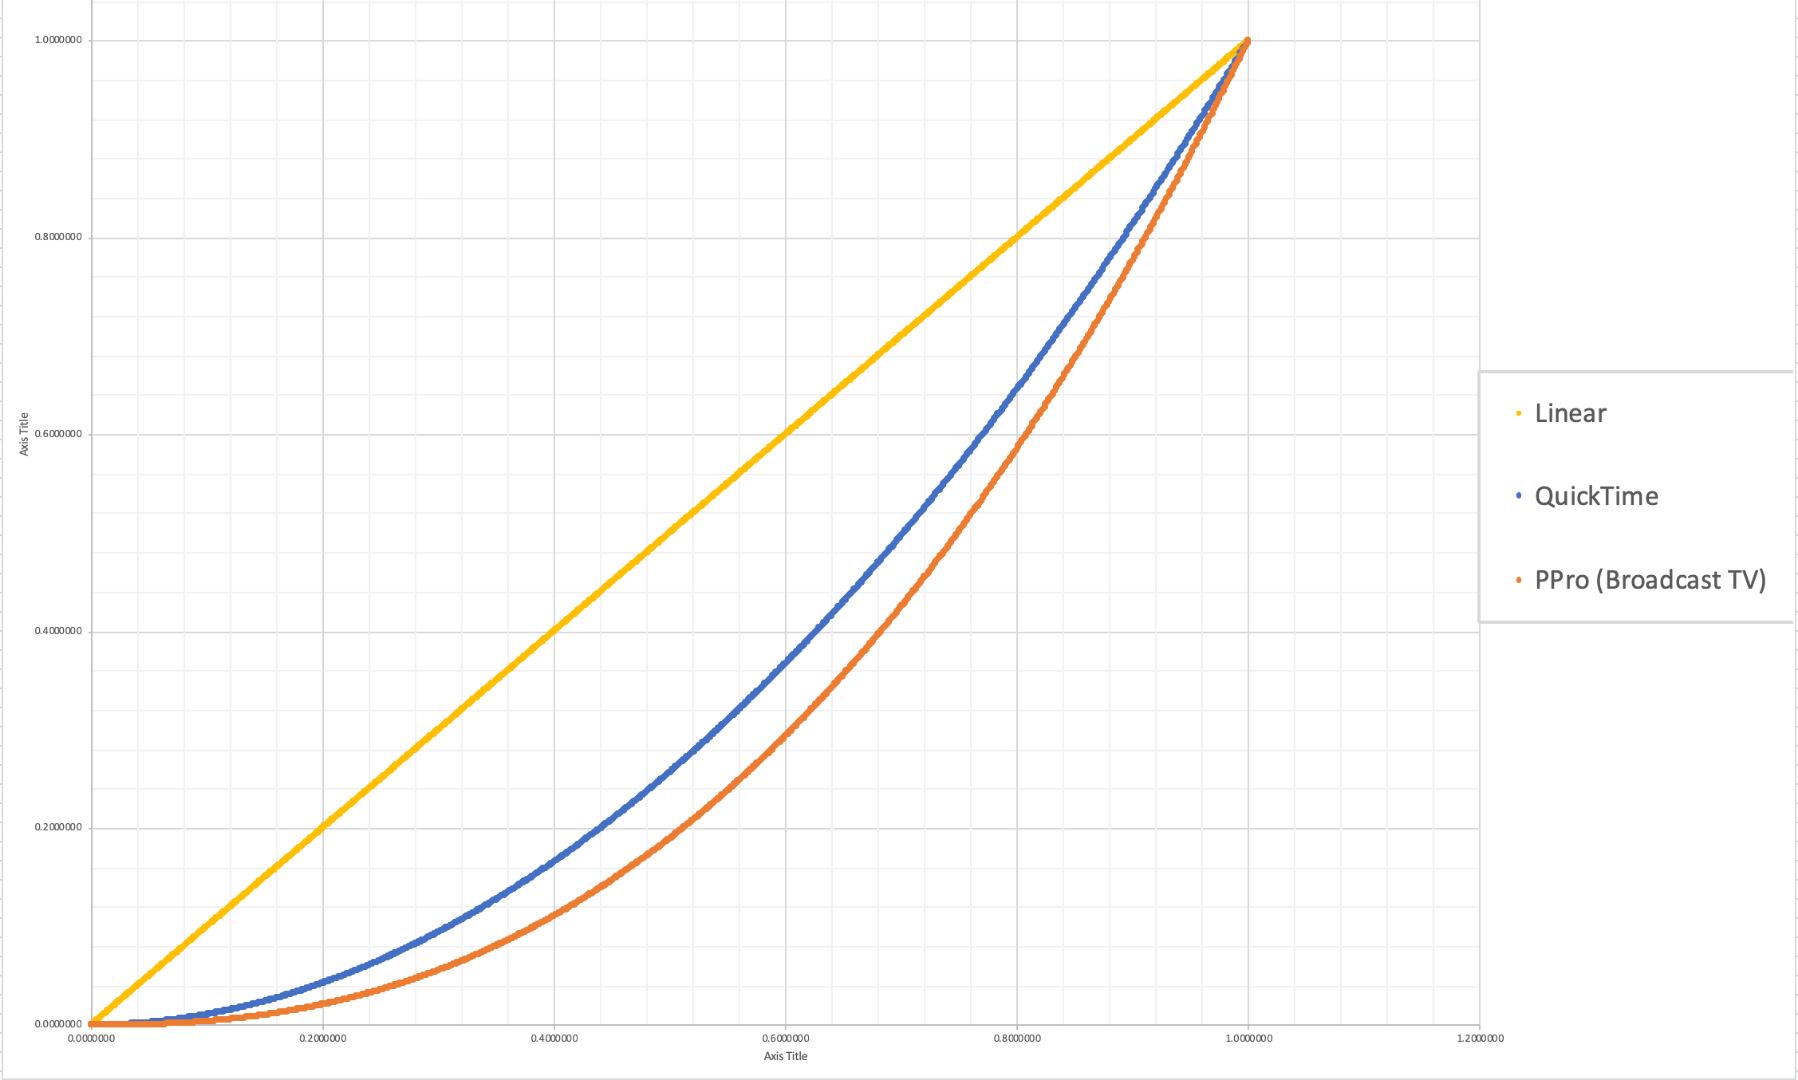
The graph above is a visual representation of the gamma display standards of Premiere Pro (orange), which dips into the darker end of the spectrum, compared to the gamma display standards of QuickTime (blue), which don't have the capability to display those dark colors and therefore QuickTime displays video with less saturation which gives it that "washed out" appearance.
(Graph and data by franciscrossman-J6rJng)
3. But why is it worse on my new iMac monitor?
a. Newer Mac displays are wide color gamut (close to P3) and can display more vibrant colors than Rec709 is capable of reproducing. Without any conversion, your Rec709 colors will be displayed as if they were P3 and will appear much more saturated than intended. Display color management is designed to fix this. It maps the Rec709 values to the appropriate P3 values so that the colors look the same.
i. Scroll up for instructions on how to enable Display Color Management, or go here.
b. Again, this is a matter of display and playback. Your actual video file is fine and if it's played back on a different monitor, it'll display correctly!
4. Is there a way to get all my playback apps on the same page?
a. Yes! One of our engineers created a LUT that will darken your video the appropriate amount so that when you play it back in a different app, it will look as it did in Premiere. Technically speaking, the LUT will correct the mathematical difference between gamma 1.96 and 2.4.
i. Download the Gamma Compensation LUT here!
ii. After downloading the LUT (.cube file) and saving it somewhere accessible, prepare to export your sequence!
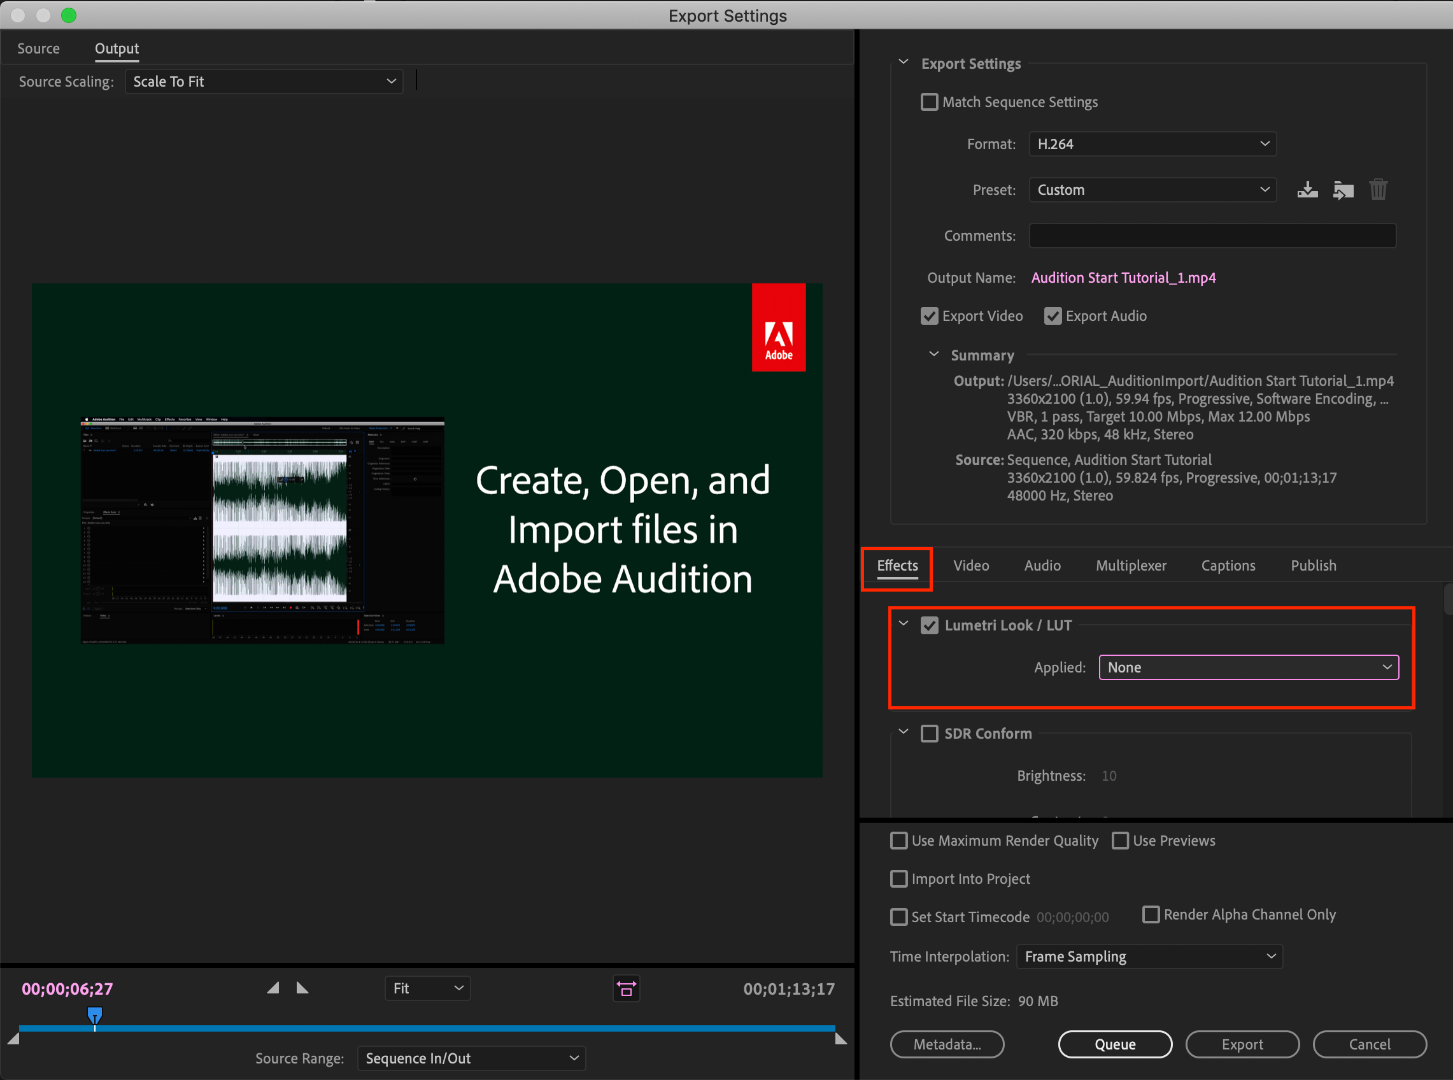
File > Export (Command+M or CNTRL+M) will pull up the Export Settings window, pictured below.
About halfway down the window, there's a few tabs to adjust encoding settings. Go to the tab marked "Effects" and you'll see an option to enable a Lumetri Look/LUT. Check that box, open the drop-down menu, and click "Select..." to navigate to the space you saved the LUT in.
iii. After you've selected the LUT, Premiere may display that there is "None" selected. That's a common glitch, the LUT has been applied. Sorry for the confusion!
b. However, this needs to be the last thing you do to your video! Either that or you need to save a backup of your video without this LUT on it. Because this LUT is darkening the color code of the video, in some cases, it will darken to the point where you can't get the detail back.
c. If you want to take the LUT off and you don't have a LUT-less backup, you can apply this reversal LUT that will return your video to the color levels you had before you applied the LUT. Perform the same steps listed above with the "Undo Gamma Compensation" LUT!
If you have any other questions about this issue, feel free to send me a private message.
For other support issues, you can check out our company contact options here! Contact us | Adobe
Thank you all for your collaboration and discussion so we could better investigate this issue! You help us to help you.
-Caroline
[DOWNLOAD LINKS]


 1 Correct answer
Hi all!
Thank you so much for your patience! We have a new solution for this available in Premiere 24.0. You can follow the workflow in this YouTube video to accommodate the QuickTime gamma shift between operating systems. Your image will look the same in QuickTime as it does in Premiere.
 262
Replies
262
262
Replies
262

Copy link to clipboard
Copied
I'm not in Premiere, rather in Avid, but my question pertains to how Quicktime might be contributing to a an issue I'm grappling with, thanks if anyone can help clarify. I bring Rec 709 footage in unchanged, without calibrating my monitor, Avid seems to remap the 16-235 footage to 0-255 within the program on this monitor. When I export, if I leave it unchanged on export, encoded same as source (DnxHD in .mov) it will appear washed out on this same monitor when I encode to h.264 and open in Quicktime OR uploaded to Vimeo and play on this same monitor or another computer/monitor, which I expect, as these RGB monitors expect RGB levels, 0-255. If instead I export enabling Expand Levels to Full Range and view the same h.264 encoded clips both ways, I see the Vimeo version looks spot on as expected on both monitors, same shadow and highlight detail, but in Quicktime my blacks are crushed, less sure about highlights, but seems loss of detail there too. This is not expected, any thoughts? Many thanks for your assistance!

Copy link to clipboard
Copied
Ok If you want to upload to Youtube or create a final clip.
But what if you are making videos for Adobe stock? In this case you are ruining information for a buyer who wants to edit clip after he downloaded it from Adobe stock? But if not exporting LUT, preview on Adobe stock will be washed out and maybe not atractive to buyer.
What to do in this case?

Copy link to clipboard
Copied
The post I think you were responding to ... had some issues because of the apps involved.
Avid correctly was sending a full range image to the monitor but working in limited range. The person's Qt player was not working correctly with the media involved.
As all colorists talk about, you cannot possibly control the odd and wrong ways things behave Out In The Wild. All you can do is work within specifications for the applicable standards ... in the vast majority of cases still Rec.709/100 nits brightness, with gamma 2.2 for web and 2.4 for most other work including broadcast. There's little enough difference between 2.2 and 2.4 most I know simply work in 2.4.
And most media format/codec specs are set for video (limited) range which is of course 16-235, and proper color management in players then displays such media as full range on the screen.
A few formats are full-range, but that is pretty much only the 12-bit 4:4:4:4 of things like DPX files. Everthing else should always be handled within video/limited range to comply with the only standards "we" still have.
Unless you've got a ton of money to setup properly for HDR, which ... well ... most consumer monitors and telly's simply don't handle all that well yet. Some telly's, but none of the monitors really.
Neil

Copy link to clipboard
Copied
The problem with this solution is, it will make you're videos look decent on an unmanaged color browser like Chrome, but for people using color managed browsers like Firefox, your grade will look crazy saturated. Using this LUT on export doesn't allow you too split the difference. So accurate on one browser, but insane in another.
Copy link to clipboard
Copied
This is the problem that faces all professional colorists. Out "in the wild" ... you have no control whatever over the viewing hardware and environment of the end users.
So ... what do you do? The only thing that results in a "stable" work ... across the most viewing environments.
Setup a system that has solid, proper, by-the-book color management and carefully calibrated and profiled monitors. In a proper professional viewing environment. And do your corrections to look appropriate on that system in that environment.
As, if you do, then your work will look relatively the same as other professionally produced work on any one viewing device/environment. Which is NOT to say ... the same as you see it when grading in that perfect gear/environment. You have no way on this planet to accomplish that miracle. (You can't fix Gramma's green TV ... )
I know (and work with) a number of colorists of fair note, who also teach other colorists. I'm also a contributing author at MixingLight.com, a subscription website for teaching colorists how to work in a variety of applications and media/workflow issues. This is something discussed among colorists all the time. As a large part of their typical workflow is counseling clients on how to view and evaluate color correction. Or ... more commonly, how not to view color corrections critically.
It ain't easy, and there ain't no "good" solution for all situations. PC users have tended to assume more that they have to take control as ... well ... who wanted Microsoft to control your color? They clearly didn't do a high-end job of it.
Apple users tended to assume that Apple would provide them the exact best color management out of the box, so they don't seem to think they should pay attention to color management. But Apple has made some decisions that go directly against being able to comply with pro video standards on "stock" Apple gear. And that's been a shock to a lot of dedicated Mac users.
Your frustration that there is no one solution that works for all situations, so that others see exactly what you saw ... what you want them to see ... is totally valid. But given that color management is neither consistently nor properly handled on almost any particular gear ... it's a frustration that isn't going away.
Neil

Copy link to clipboard
Copied
This is the exact opposite issue I am having. My raw footage viewed on VLC looks great. The second I import that footage into Premier Pro the contrast is insane and it ets crazy dark. I also seem to be loosing a ton of quality. The first screen shot I attached is my raw footage. The 2nd image is the same footage. All I have done is import it into PrPro. The 3rd image is the same footage exported from premier pro.


Copy link to clipboard
Copied
What monitor settings do you have? I presume you're using a Mac with a Retina in Apple's very unique Display-P3 color space?
Please provide full details. And whether you're using the Display Color Management option.
Understand, that can only give you a better shot at a correct view of your image inside Premiere. Outside ... the ColorSync utility as noted does not correctly apply Rec.709 standards to video media, so ... it's a crud-shoot as to how accurate anything you see is being represented.
Neil

Copy link to clipboard
Copied
How is creating a lut a solution to the problem? I'm glad there is a work around but now I have to remmber to add it to every single export at the end, instead there being a "apply coulour correction on export to all" as it has to be applied to all files, just so the exported file looks just like id does on the timeline. This is ridiculous...
Copy link to clipboard
Copied
Kornel,
You seem to still misaprehend the real problem, which is your computer is not applying correct treatment to Rec.709 media to begin with.
If you're using a Mac with a Retina, the monitor is built to run in Apple's entirely unique and self-created color space of "Display-P3" which has nothing to do with any previous recognized video standard. Neither the color primaries, the brightness, nor the built-in gamma have anything whatever to do with Rec.709.
Next ... the Mac OS ColorSync utility mis-applies the Rec.709 standards when it sees Rec.709 media ... among many other things, applying only the camera transform function specified in Rec.709, but not the also specified and required display transform function ... plus an odd gamma which they specify as "sRGB" but isn't, it's been discussed by color management professionals as "similar but not actually the same as a gamma-1.96, but with an odd flat shape near the bottom".
So the LUTs Adobe provides are merely to get around the limitations of viewing the export on your machine. And as noted with them, they are not intended to be used on exports seen across computers/TVs, as if you do ... that media will look "off" on anything that does properly treat Rec.709 media.
As the user, we all need to provide an actual, verified and correctly color-managed system to see media accurately.
I am a contributing author for a pro colorist's subscription website. Many of the others there are of course complete Mac/Apple people. And none of them would ever, ever color correct media on a Retina monitor, though they all think they are beautiful as a UI for their grading apps.
Neil

Copy link to clipboard
Copied
Hey Neil,
Would you recommend or at least encourage the use of an external non retina monitor connected to my iMAC pro as a solution to grading accurate colors? Maybe something like a benq or dell?
-AK

Copy link to clipboard
Copied
The LUT corrects saturation but the blacks still appear much darker on the exported video than on the film the coloutist supplied, making some of the daker shots hard to make out. Unfortunately the film has been delivered, but very keen to understand nonetheless.
QuickTime the colourist supplied.

QuickTime that I exported from PP using the Gamma compensation LUT.

As you can see the blacks look darker on the delivered QuickTime than the QuickTime the colourist supplied to me. Is there further compensation that needs to be done in the settings to keep the blacks the same? Or should I just try to compensate manually. Possibly by lifting the shadows.
Using an iMac Pro. 10.14.5 with Premier Pro 14.0 (Latest update doesnt work properly with Metal or Open CL).
- Will
Copy link to clipboard
Copied
Will,
Oh my ... unless you have a full reference monitor there, I would never suggest you mess with the settings of the media made by the colorist ... especially by applying a LUT that only designed to get past the improper Rec.709 application on a Mac with a Retina monitor ... for viewing that media on that computer but outside of Premiere.
I would export that without that LUT or any other adjustments made on your computer. And have the colorist check things on their properly calibrated/profiled machine. Yours is not set up to give a proper view of the image.
Neil
Copy link to clipboard
Copied
Thanks Neil,
Looks like ive missundertood the full purpose of the LUT.
Ill check in with the colourist and get his view.
Cheers,
Will
Copy link to clipboard
Copied
Hi Neil,
After further digging I found that my problem seems to be the delivered Quicktimes' colourspace that is embeded into the Quicktime.
The colourist used Davinci Resolve, so he exported from Davinci.
For some reason Davnici embeds a differnt colourspace into its Quicktime exports than Premier Pro.
This is the reason that the original graded Quicktime and the Premier re-export of the same graded Quicktime looked very different on the SAME monitor (Apple Retina Display).
So instead I used Davinci to do the final deliverables, which made them look exactly the same as the colouist's Quicktime. BUT little did I know that was all in vein as Youtube and Vimeo seem to remove the embeded Davinci colouspace from the uploaded Quicktime and makes them look the same as the Premiere exports.
This whole thing is very confusing, but essentially im not going to adjust anything unless I have a calibrated reference monitor in future.
Im going to assume that the Davinci Quicktime and the Premier Quicktime would look identical on a properly calibrated reference moitor. And that its the calibration of the Apple screen interpreting the two Quicktimes differently that is the problem. But essentially the two Quicktimes are the same.
Copy link to clipboard
Copied
Yea you got that right. Resolve adds a tag that some of the players on a Mac running through the ColorSync OS utility will "read" and then apply full Rec.709 standards to the media. However ... not all players even on a Mac system will follow that, as you found.
Premiere doesn't add that one tag because their chief color scientist says Apple's implementation (the reason that tag 'helps') is simply wrong. And they are not going to mess up Premiere's files to work in some situations on some Macs.
I have suggested following the Resolve option, which doesn't seem to hurt anywhere but does help on some players on some Macs. Not successfully, note.
But you second bit ... that not all browsers/players even then play along nicely is also correct. Which is maddening, but ... it's Life.
Neil

Copy link to clipboard
Copied
nope, unfuturnately the lut is not helpful for washed out color.. thanks for the attempt though
Copy link to clipboard
Copied
Good lord this thing drives me crazy. I've been using the LUT lately, but I do notice that the footage looks pretty dark on my iphone 11. Kinda similar to how the colors look in the premiere export window after applying the lut but before exporting.
I'm less interested in that however and more interested in this. If I were to connect an affordable external color grading monitor (such as a dell or benq) to my iMAC pro which is a retina display and apprarently responsible for this mess. Would that, in theory, also allow me to grade accurately WITHOUT applying this lut at the end? If so, it's worth the money for me to buy another monitor.
Copy link to clipboard
Copied
Andrew,
From a complete perfect down to hmmm status ... with corresponding decreasing costs.
Perfect is having an output device like a BlackMagic or AJA card in your machine that takes the signal from Premeire without any interference from the OS, and delivers that to a high-level "grade 1 reference broadcast monitor" such as Flanders or Eizo with high-level calibration and LUT storage within the monitor. The pro colorist's setup of choice.
Next ... using the above setup to 'feed' a lower quality computer monitor, typically including an external 'box' from again BlackMagic or AJA that can store a 3d LUT or two. This saves several grand for the cost of the b-cast monitor, you drop the quality of the image primarily in the uniformity across the screen expected in all reference b-cast monitors. Some other things, but ... that's the biggie. This may be able to use an i1 Display Pro puck, but would need software like LightSpace for the calibration and preparation of the display LUT.
Next ... using a computer monitor that is capable of more color breadth than the color primaries you need for the media involved, and also has enough contrast to exceed the minimum black-to-white range needed, so that after calibration with a puck/software setup like the i1 Display Pro, which will correct things by pulling things within standards ... you have as correct a screen for the needed color space/profile as possible. This needs a decent computer monitor that exceeds 100% of sRGB primaries, and the i1 Display Pro puck & software.
The latter setup is what most editors probably will choose to use and get by with. Perfect? No. Usable? Yes, especially if you're not sending any deliverables direct to broadcast.
So getting the monitors you are talking about, as long as they exceed the sRGB primaries completely, would be feasible. Undo all the "auto" and "we'll improve your viewing experience!" options for variable blacks and such, and set the monitor for widest space it can handle. Working with i1 Display Pro software, back the color & contrast controls to close to Rec.709/gamma 2.4/100 nits/D65 white point, then run a the process to create an ICC profile for the Rec.709 data I just listed.
Use that for your transmit out monitor for viewing color accurately.
Now ... that will not 'fix' the problem of media looking differently within Premiere on your Mac system from outside Premiere. It may look a lot less different on that monitor.
Maybe someday there will be an actual color standard applied by all apps and OSs ...
Neil

Copy link to clipboard
Copied
Hi Neil,
This reply was quite useful for me. Thank you for taking the time to write it.
I am in a similar situation with an iMac pro at my work - but I have gotten an EIZO CG279x colour managed monitor (without an external display adaptor card from AJA or Black Magic) with the aim of getting accurate colour for editing and grading.
If I enable the option for Display Colour Management in Premiere Pro, will that alter the colour space of the EIZO monitor as well?
I am worried that because the EIZO is connected without the display adaptor card, OSX is still changing the gamut and colour space for that monitor too?
Any advice would be greatly appreciated, and thanks again for all your contributions and time on this topic.
Kind regards,
Andrew
Copy link to clipboard
Copied
Those Eizo's are nice ... I'm going to ask a couple people I know who 1) have Macs 2) are pro colorists and 3) know all the connections for Macs to Eizo's ... and how is that connected to the iMac now?
My suggestion to start is to put a color bars & tone from the Project Panel/New Item icon onto a sequence, and see which way works best.
Neil
Copy link to clipboard
Copied
I am wondering the same thing. I've asked this on multiple forums. Haven't gotten a good response
Copy link to clipboard
Copied
I think a BlackMagic UltraStudioMonitor 3G would work with a USBC/Thunderbolt output of the computer to get a clean stream to that Eizo or other monitor. "Only" $115USD.
If so, that would guarantee bypassing any OS issues.
Neil
Copy link to clipboard
Copied
I just got a response from a colorist with knowledge of both the Eizo, Premiere, and well he's been a major Mac person.
His comment was to use the Eizo's Rec.709 setting, that's pretty solid. And didn't disagree with using the Display Color Management option in Premiere. So that's the starting point.
I would also suggest looking at the Eizo with a bars & tone clip on the sequence ... in the Project panel, New Item/Bars & Tone ... drop that on the sequence, and check your white and deep shadow/black bars. See how well those are shown.
Neil

Copy link to clipboard
Copied
Hello!
This is a bit urgent. I've applied the Gamma Compensation LUT, following advice here to fix the washed-out colour on my film. I was not happy with the results and now I want to remove the LUT but I CAN'T. I don't know where it is, and I've checked everywhere. I've read that I could apply the 'Undo Gamma Compensation LUT' but it's confusing as I applied the LUT when I was exporting my film.
Also, I've tried opening previous Projects from my backup folder, hoping the LUT won't be there but, it's there as well. No way to go back.
Any suggestions?
Thank you !!!
T.

Copy link to clipboard
Copied
When you open your Export window (not using Encoder), to the left of Video
(Audio is on the right), there is an Effects tab. Make sure the Lumetri
Look/Lut box is unchecked...
[Moderator note: personal information removed as per the policies of these Adobe forums.]

 AdChoices