

- Home
- After Effects
- Discussions
- Re: Animating Kerning (not tracking) in After Effe...
- Re: Animating Kerning (not tracking) in After Effe...

Copy link to clipboard
Copied
Hi all,
This is my first post here so not sure where it belongs... anyway.
Is there a way to animate Kerning in AE? I realise that you can animate tracking but I was hoping to illustrate the difference between metrically and optically kerned type by having the spacing animate between the two?
Thanks in advance!


 1 Correct answer

There is no way to individually smoothly animate kerning between letters but you can set a keyframe for Source Text, move down a couple of frames and then use the character panel to adjust the Tracking between one or more letters. Because Source Text can only take hold keyframes the tracking that looks like kerning would snap from one setting to another.

A much easier option would be to create two text layers each with the kerning set the way you want it to be set in Illustrator, convert those te
... 8
Replies
8
8
Replies
8

Copy link to clipboard
Copied
Kerning methods are a choice, not a continuum. You cannot "animate" between them in any conventional sense.
If it's for a tutorial then you can create two text layers, optical and metrics, then manually add individual characters on top, align them with one layer and keyframe their positions to align with the other one - then remove the original text.
Copy link to clipboard
Copied
Thanks for the response!
I get that there may not be an example for metrics and optical, but if I created a layer kerning each character in place manually would there be a way to animate between manual kerning at point 1 to manual kerning at point 2? Just in the interest of not having to animate the position of 20 odd separate layers.

Copy link to clipboard
Copied
A work around solution - that might be quicker than animating each individual letter:
Set up your type in it's two kerned states in Illustrator. Create outlines, blend them, expand the blend and import the result as an image sequence into After Effects. There are a few steps involved in this, but it's pretty quick once you understand the method. I refer you to this quick tutorial from Rick Gerrard that shows it in action:
Copy link to clipboard
Copied
elliotl85881744 wrote
would there be a way to animate between manual kerning at point 1 to manual kerning at point 2?
Unfortunately no. Unlike other software in Creative Cloud, After Effects only has a very rudimentary text engine. The only handle into the contents of a text layer is the mysterious "Source Text" control, which for all practical purposes is just a plain text string of everything on the layer. If you keyframe it (by changing the text, or the fonts/size/kerning) then it always creates a "hold" keyframe that instantly switches to the new value. You cannot change it to interpolated.
The per-character stuff like kerning, caps, underlines etc. are completely hidden from access through the layer dropdowns or the scripting API (or for that matter even with a plug-in) so there's no way to set interpolated keyframes on them, or animate them through expressions.

Copy link to clipboard
Copied
Just in the interest of not having to animate the position of 20 odd separate layers.
You may not have to. Depending on what exactly you are looking for you could always convert the text to masks/ paths and paste the different states of each shape into different keyframes. Visually it would make no difference, it may just not be an adequate hack for what you may be after. and of course the more complex the shapes, the more convoluted the procedures get.
Mylenium
Copy link to clipboard
Copied
There is no way to individually smoothly animate kerning between letters but you can set a keyframe for Source Text, move down a couple of frames and then use the character panel to adjust the Tracking between one or more letters. Because Source Text can only take hold keyframes the tracking that looks like kerning would snap from one setting to another.
A much easier option would be to create two text layers each with the kerning set the way you want it to be set in Illustrator, convert those text layers to outlines, then expand the blend to 20 or 30 steps, release to layers, move them all above the original layer, then import the AI file as a composition, set the in and out point to one frame, then sequence the layers.
Did you follow that? Start with two overlapping layers in AI that have different kerning adjustments:

Convert to outlines, I changed the color of each layer so you could see the difference and the blended layers.

Expand the blend

and get this:

That's a group with a bunch of groups below, then as it shows above, select the TOP GROUP and Release To Layers Sequence and you get this:
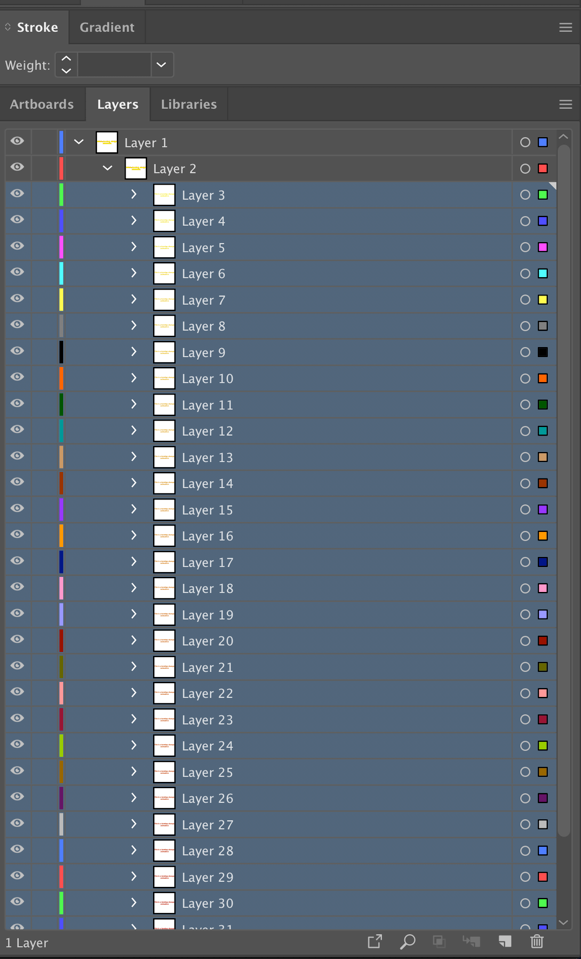
Then drag all of the layers under Layer 2 above Layer 1, delete layer 1 which contains layer 2 and end up with this:

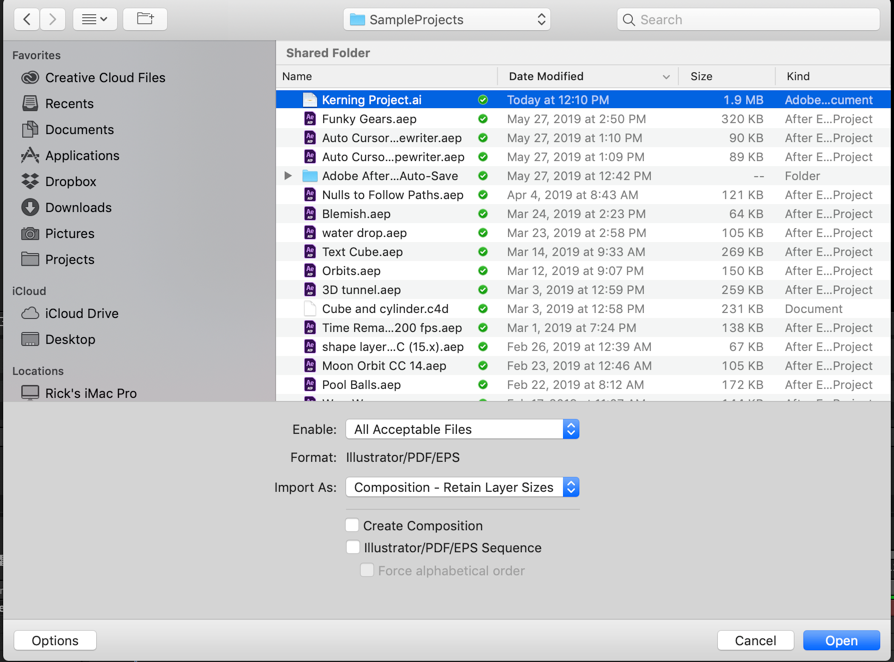
Now import into AE as a Composition Retaining layer sizes.
Open the comp, set in and out points for all layers and sequence layers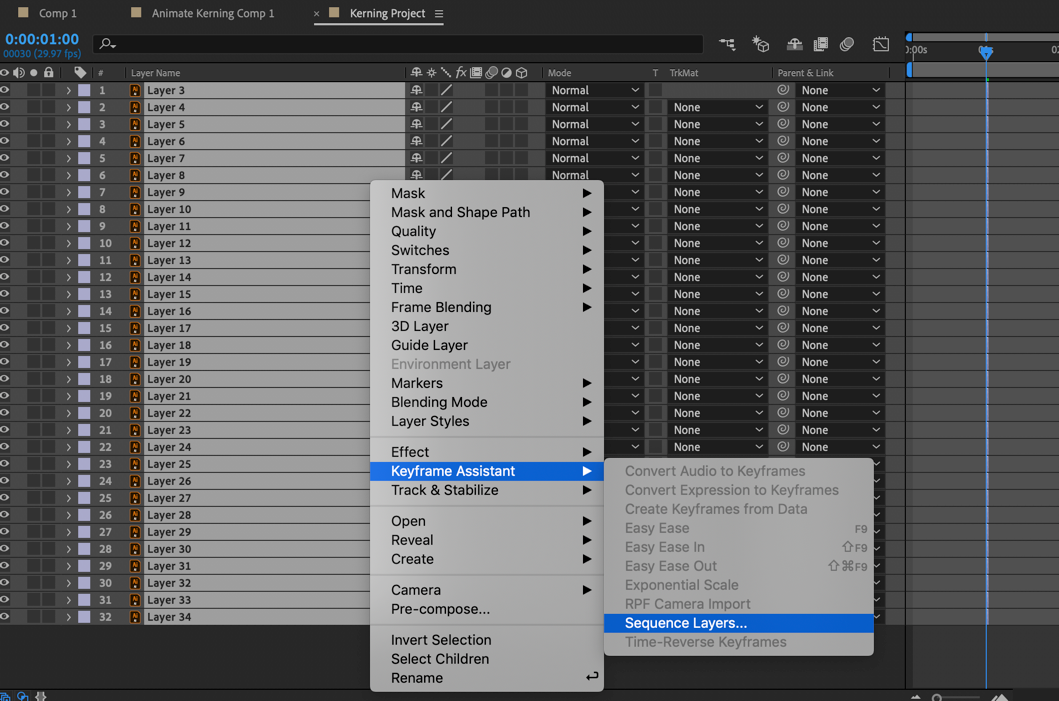
extend the in and out point of the top and bottom layer, Pre-compose, enable time remapping and end up with something like this:

It will only take a few minutes and it will give you exactly what you want as a movie you can cut into your project.
If you want to see exactly how that was done here's a project file and an illustrator file: Dropbox - Animate Kerning Project.zip
Copy link to clipboard
Copied
Thanks for this! I'd definitely use this method for larger bodies of copy.
It really is a shame that there's no straightforward way to do this in AE but I appreciate the effort you've gone to, thanks again!
Copy link to clipboard
Copied
another workaround is to use the tracking parameter set this way:
choose animate and add a tracking parameter

I changed the name to 01 it's not necessary. set the parameters this way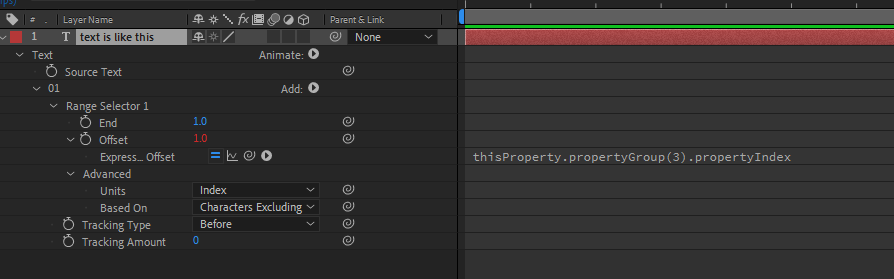
next step is duplicate the group (01)

now reveal the tracking parameter
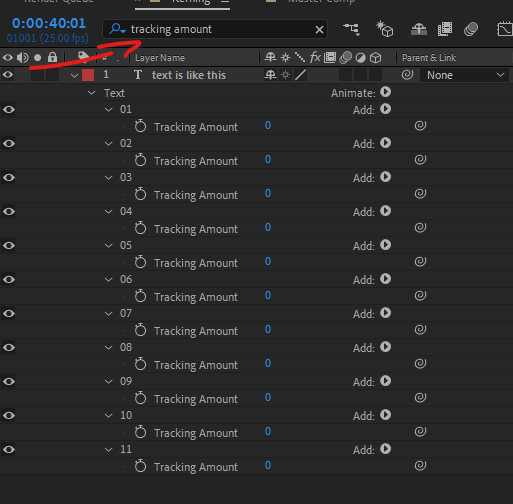
now simply choose the right one and animate it

here's the project file:

Find more inspiration, events, and resources on the new Adobe Community
Explore Now
 AdChoices