

- Home
- After Effects
- Discussions
- Re: Dots to follow paths on a map - Use After Effe...
- Re: Dots to follow paths on a map - Use After Effe...
Dots to follow paths on a map - Use After Effects or Animate?

Copy link to clipboard
Copied
I have a map in the background and want dots from all the states to follow paths to, say, California. I tried AE using particle generators and not enough control. I want the dots to be different colors for the states. Then I tried a null object with a whippic from the dot. But not sure how to make the dots keep flowing on the same path and how to group the path and the dot. So was wondering if I should be using Animate instead. Then I want a little image where all the dots have congregated to, to blow up big and then the background fade away. Please help, I have done many tutorials. I just want advise for the best app to use for that purpose so I dont spend the next month learning the wrong app.
thanks!


 55
Replies
55
55
Replies
55

Copy link to clipboard
Copied
Create paths using shape layers or masks and use strokes or dingbat fonts on them. then you can have all the kinds of regulalrly spaced dotty lines you want/ need. The transition will simply have to be a separate animation. Nobody would make things endlessly complicated by trying to do everything with the same layers and compositions.
Mylenium
Copy link to clipboard
Copied
Which app should I use? My question has to do with which app and how to animate the dots on the paths and group the layers together.
Copy link to clipboard
Copied
... and I am not wanting to make dotty lines.
Copy link to clipboard
Copied
These should be floating animated dots flowing one after the other on multiple paths. So in after effects I am not seeing a way to group the dot and the path, because there will be tons of them. The only way I see is a precompose which, I read, will change the color of the dots for all if I change the dot color in one of the precompositions and I dont want that.

Copy link to clipboard
Copied
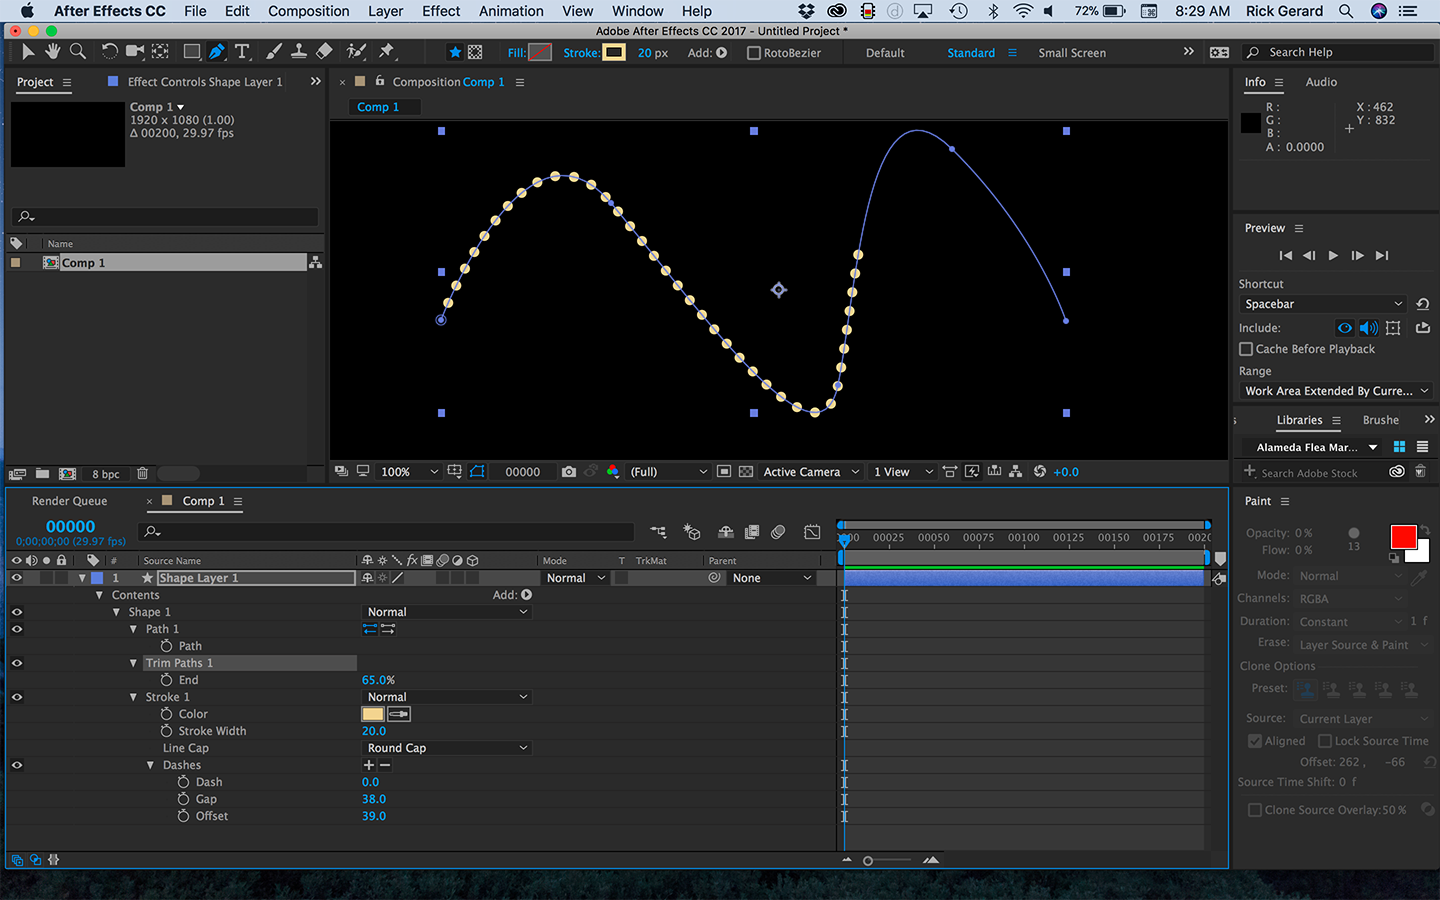
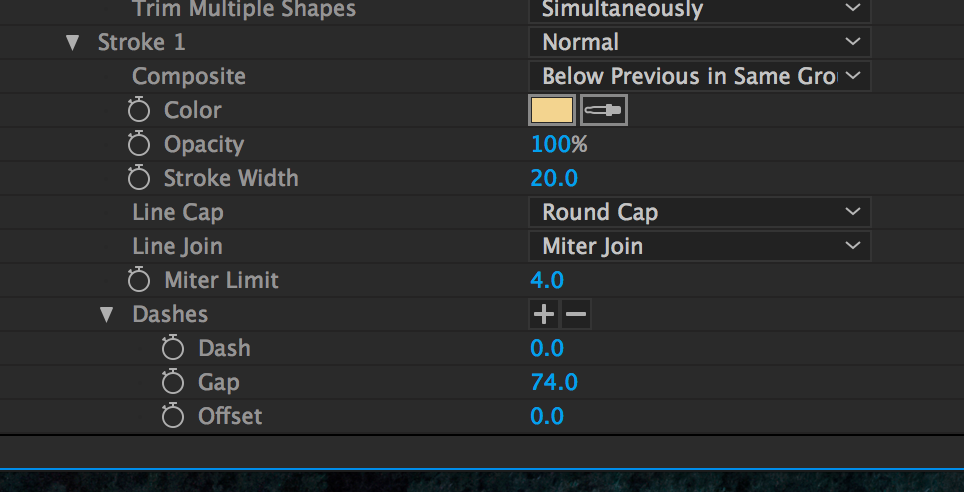
Unless I am completely misunderstanding your design idea I would use a shape layer path with only stroke applied. You can set the end caps to round, enable dashes and even adjust the gaps. You can make the lines appear to be drawn on with trim paths and you can make the dots march with offset.
The other option is a text layer with type on a path and punctuation. Adjust the kerning and baseline and you should have something you can use. You can also animate the offset the margins in the Path Options and you can make the line appear to be drawn on by adding an opacity text animator.
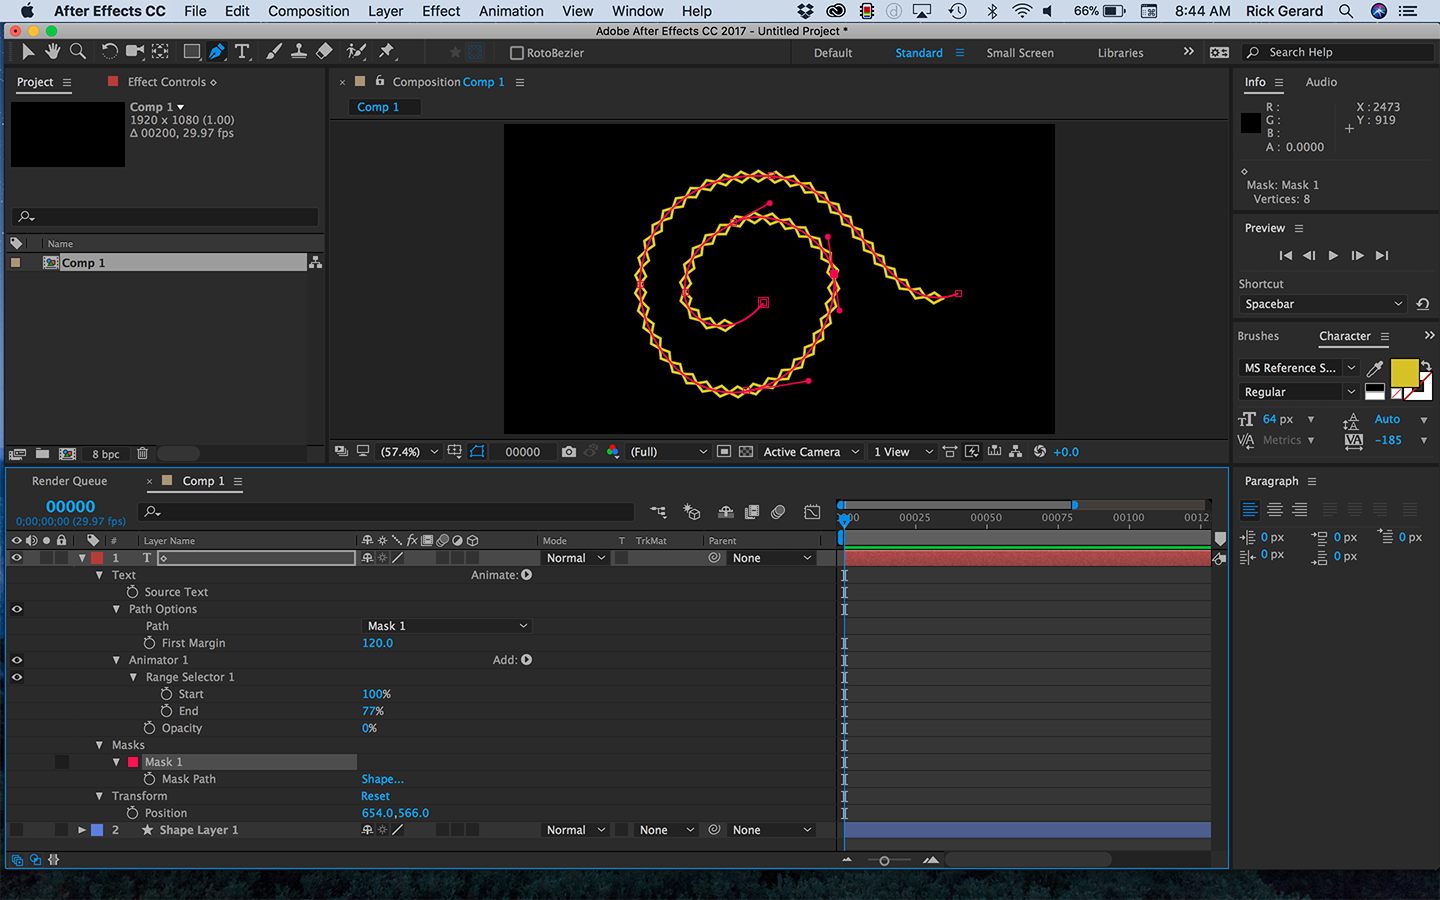
Text on a path gives you more shape options for your dots.
I hope this helps.
Copy link to clipboard
Copied
Thanks for your reply, but this does not apply to my question. I don't want a line or dotty lines.
Copy link to clipboard
Copied
Sorry, I I am really confused. While I was writing my post more discussions going on. You said dots to follow a path. I gave you a path and dots. You can make them move along the path with either technique. If you only want one or if you want them to draw on or if you want them to move like marching ants. Either technique will work. Carefully read my explanation and match the modified properties on the layers and mess with the offsets or margins.
You can have as many paths on a shape layer as you want and individually animate the offset with each one. You can only have one line of text following a path on a text layer so each path you want your dots to follow must be a separate layer.
You'll have to draw the paths and then do the animation.
If you are creating a video then use After Effects. If you are creating a web page use Animate.
Copy link to clipboard
Copied
I do not see how you are making the dots travel across the screen in your first example and I don't understand your second example at all.
Copy link to clipboard
Copied
Please try and put your comments in a single post.
Ok, so if you want one ball and that ball needs to be something that looks like a ball and that object is just a dot you can use text on a path. Create a new text layer with a period, draw a mask path on the text layer, enable text on a path and animate the margin.
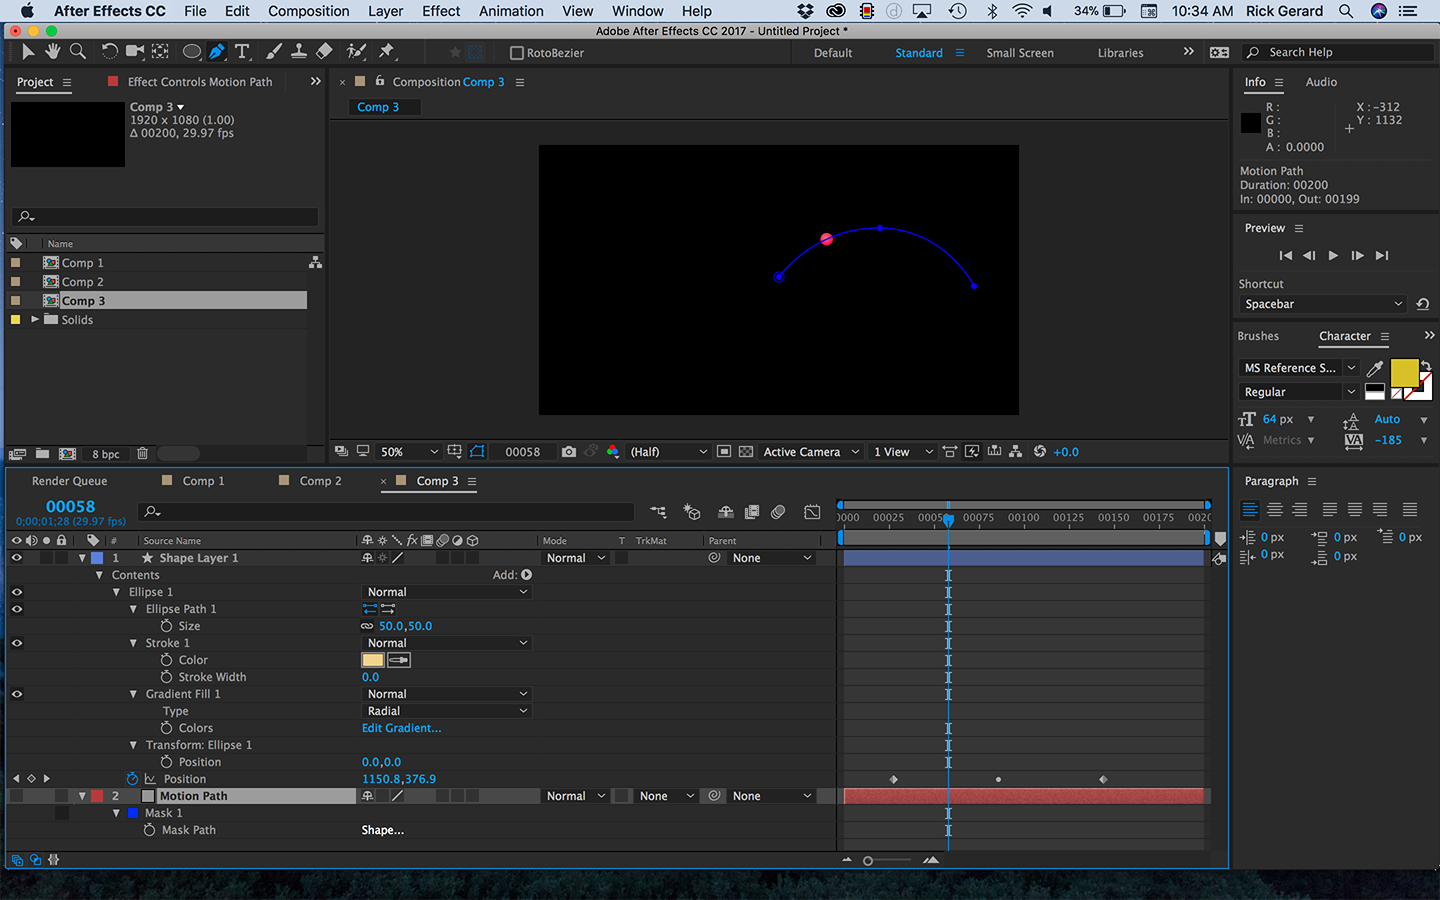
If you want to draw something then create your ball in Illustrator or Photoshop or use a Shape layer, then draw a mask path using the pen tool or a shape layer path using the pen tool, then set a keyframe for the path, then Cut the keyframe (Ctrl/Cmnd + x) then, after you have made sure the anchor point of the image you want to animate is in the exact center and the CTI (current time indicator) is where you want the motion to start press Alt/Option + p to set a position keyframe and then Paste (Ctrl/Cmnd + v) to turn the vector path into a motion path. Your layer will immediately snap to the starting point of the mask and you will have a bunch of rove over time keyframes applied to position. You can grab the last keyframe and adjust the timing of the move. You do this for each ball you want to animate along the path.
Copy link to clipboard
Copied
Int he first example you set keyframes for the offset in the Path1>Stroke>Dashes>Offset to make the dots move along the line and you set keyframes for Trim Paths to make the line of dots draw on.
In the second example you set keyframes for Text>Source Text>Path Options for margin to make the line move and you set keyframes for Text>Animator 1>First Margin to make the line draw on..
Both these techniques are really basic first grade level After Effects Skills. If you recreated the settings in my screenshots and fiddled with any of the controls you would see the lines move, but you need to know where the ADD button is to add Trim Paths or Text Animators.
Copy link to clipboard
Copied
I don't understand, can you just give step by step from after drawing the line on a comp 1? Where do you find the settings? They are not on the right side of my panels like yours.
Copy link to clipboard
Copied
There are no instructions on anything you have said so far.
Copy link to clipboard
Copied
How do I do this? ... shape layer path with only stroke applied. You can set the end caps to round, enable dashes and even adjust the gaps. You can make the lines appear to be drawn on with trim paths and you can make the dots march with offset.
Copy link to clipboard
Copied
You keep changing ships. If you want to draw a dotted line using a shape layer then:
- Select the pen tool (keyboard shortcut g) and make sure fill is turned off and stroke is set to 20 or so pixels
- Click and drag to make curves and click to draw exactly like you do in Illustrator
- When the line is done press the U key twice to reveal the modified properties of the layer and you will see Path1 and Stroke 1
- Click the twirly right next to Stroke to close up stroke then click it again and you will see the rest of the stroke options
- Change the But Cap to round
- Click the plus sign to the right of Dashes twice to add a dash and a gap
- Adjust the dash to zero and the gap to a value that gives you the kind of line you want
- Adjust the offset to make the dots move along the line. Set keyframes to keep them moving
- Find the ADD button in the Switches Column of the timeline to the right of Contents
- Click the Add button and add trim paths
- Spin down trim paths and add keyframes to the Start or the End to reveal the line
- Experiment with the offset to see what that does - it can make gaps in the trim paths move along the path
If that doesn't help you get started then use the Search Help field to find some tutorials and check out the help files.
Copy link to clipboard
Copied
It sounds to me like you are not at all familiar with the After Effects user interface. The add buttons and the path options are right there on the very first page of the help files about shape layers. Please tell us your experience level. It takes several hours if not several days to get proficient in navigating the timeline and control panels in AE. If you don't know what you are doing please spend some time here: Basic AE. and check out the User Guide.
Copy link to clipboard
Copied
I am super familiar with Illustrator and photoshop so if I could just find the panel, I could change the settings. I have done many totally complicated tutorials in AE. but they give you each step. So I am stuck at your first step trying to find the box that lets me turn off fill color. If I click on the red box at the top it just lets me change the fill color not remove it to no fill. I need the panel.
Copy link to clipboard
Copied
Yeah I did those. And some very complex ones.

Copy link to clipboard
Copied
Copy link to clipboard
Copied
Everything I gave you was for a line of dots - which is what I though you originally wanted. I never said you can get a bouncing ball form a line, I said you can move balls along a line.
If you want a bouncing ball along a line and you want something simpler than a particle system you can:
- Create a ball using a shape layer and make it pretty with a gradient fill or multiple fills just like you would in Illlustrator
- Draw a path that you want the ball to follow using the pen tool on another layer - any layer will do as long as it is in the default position and has not been scaled or rotated, just create a mask path
- Set a keyframe for that new mask path by pressing Alt/Optin + m then cut it by pressing Ctrl/Cmnd + x
- Add a null to your timeline by pressing Shift + Alt/Option + Ctrl/Cmnd + y and name it Ball 1 Null or something appropriate
- With the null layer selected press Alt/Option + p to set a keyframe for position
- With the new position keyframe still selected press Ctrl/Cmnd + v to paste the vector path you have drawn as a motion path
- The null should now follow the path you drew perfectly
- Here comes the bouncing part:
Animate the ball so that it bounces the way you want it to bounce. You can simply set a couple of keyframes and add a loopOut("pingpong") expression if you want the bounce to be even all the time, or if you want the bounce to start and decay you'll need to set a bunch more keyframes or explore Dan Ebbert's motionsctipt.com and explore some advanced expressions like Realistic Bounce and Overshoot technique he describes. When you have the ball bouncing the way you want to it's time to attach the ball to the null - Hold down the shift key and parent the ball to the null that is following the path to snap the ball to the null's position
- Adjust the last position keyframe for the null's position to set the timing of your animated ball
That will do it and it can be a lot easier to do and than messing with particle systems because once you put a particle in motion you can't make further adjustments to the particle. It is either going to bounce or run into something that slows it down, but it is not 100% controllable on a path without a ton of fussing.
When you are seeking help it is really helpful if you completely and accurately describe your problem to us and give us some hint about your experience level. It's also important to realize that there are literally hundreds of tutorials on After Effects out there that are presented by folks that don't really know what they are doing and they present inefficient techniques that can lead you down dead end paths. You must vet your trainers and make sure they know what they are talking about.
When you are troubleshooting or trying to find things to animate pressing the u key twice is the first place you should start. This will show you everything on the layer that has been modified form the default settings. Spinning up the twirly's will also show you options that may be hidden. If you are using an Effect then the Effects Control Panel is very useful but many of them, especially complex effects, have lots of things that need to be spun down and opened up and carefully read to understand. Any time you have a question about an Effect just type the name of the effect in the search help field at the top right corner and you'll be directed to the appropriate help files and some vetted tutorials on the subject.
Copy link to clipboard
Copied
I guess I should be writing one line posts.
Please can someone help me find the panel?
It is not a panel. Just spin down the stroke twirly:
I gave you details here
Copy link to clipboard
Copied
I don't think you are understanding. Please let me try to explain.
Copy link to clipboard
Copied
Please write your explanation in a single post. Can you find an example in a video somewhere?
Copy link to clipboard
Copied
I do want to move a ball along a line. Picture a slightly arced path. One ball goes across the screen from one end to the other. All you see is a ball start at one side of the screen and it travels to another. You did say you can move a ball along a line.
Copy link to clipboard
Copied
I gave you complete instruction for creating a path and attaching a ball to the the path. I also gave you options to make the ball bounce along a path.
I'll keep this simple:
- Create a new comp
- Select the Ellipse tool to create a ball the size you want and keep it round by holding down the shift key.
- Press the U key twice to reveal the modified properties of the shape layer and look for

Ellipse Path 1 size and set it to the exact size you want and Transform Ellipse 1>Position and set it to zero, zero to center the anchor point on the ball - Add a new solid to the composition (Ctrl/Cmnd + y)
- Draw a simple mask path on the solid using the pen tool (g) and create a simple arc
- With the solid layer selected press Alt/Option + m to set a mask path keyframe and then press Ctrl/Cmnd + x to cut the path keyframe
- Turn off the solid layer or move it below the ball shape layer
- Move the CTI (current time indicator) to the point in the timeline where you wan the ball to start moving
- Select the Ball shape layer and press Ctrl/Cmnd + V to paste the vector path to the the position property
- The ball will now follow the path exactly and you can adjust the timing by dragging the last keyframe to the new ending time
- To set the in point of the layer move the CTI to the point in the timeline where you want the ball to appear and use Alt/Option + {
- You can make the ball appear using a couple of scale keyframes from zero to 100% or with a pair of Opacity keyframes.
There you go. I've already given you this step by step and a detailed explanation of using dashes and gaps.
If you can't figure it out from there let you need to go through some basic AE training.

Find more inspiration, events, and resources on the new Adobe Community
Explore Now
 AdChoices