Graph Without Handle
Copy link to clipboard
Copied
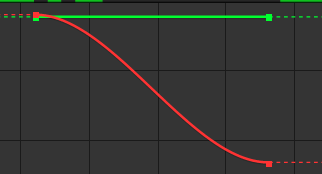
Hello! I am brand new to after effects and, I was using the effect mirror and I added key frames and went to the easy ease graphs and it showed me a graph with a grreen line above it with no handles. I watched a few youtube totorials and they did not help beacuse they said to add another dimention, which it wont let me do. I aprrichate you taking the time to read this and I would greatly value a responce back!
Image of my graph:
Copy link to clipboard
Copied
When you get two colored lines on one property you are looking at a property like position or scale that has two values in the array. The red is X, the green is Y, and if the layer is 3D, the blue is Z. Your graph shows easy ease has been applied to a layer that has no change in Y and change in X.
If you are animating position you don't want to be editing the value graph, you want to be editing the speed graph and controlling the path in the Composition Panel using the pen tool with modifier keys or the selection tool. It is nearly impossible to accurately animate position using the Graph editor, even for folks like me that have been using the graph editor since it was made available. You might want to edit the value graph for rotation, but generally, the most useful property to edit is the speed graph. The Mirror effect has only one property with two values and if you check you'll see the same value for 'Y' on both keyframes.
Maybe this tutorial I prepared will help.
If you want to see the path for the reflection center you can select the layer with Mirror applied, go to the Layer/Open Layer menu, select Mirror and Render and you'll be able to see and edit the motion path using the pen tool. You'll have to be very careful clicking and dragging to change the path but it can be done.
Find more inspiration, events, and resources on the new Adobe Community
Explore Now
