- Home
- After Effects
- Discussions
- Re: Help - Gradient Ramp Affecting everything
- Re: Help - Gradient Ramp Affecting everything
Copy link to clipboard
Copied
Hi everyone,
I've been using Photoshop and Premiere Pro for a while, but After Effects is something new for me, yet some things are still familiar enough to work with.
My issue is as follows: I've created a Shape Layer, and given it a form, as well filled it with a color and added a stroke. When I add a Gradient Ramp on it, it covers the entire Fill and Stroke and I don't want that.
How do I make the gradient affect only the fill and leave the stroke be? I can't seem to be able to find a simple tutorial where it explains this so I'm here because of that.
I appreciate the support!
 1 Correct answer
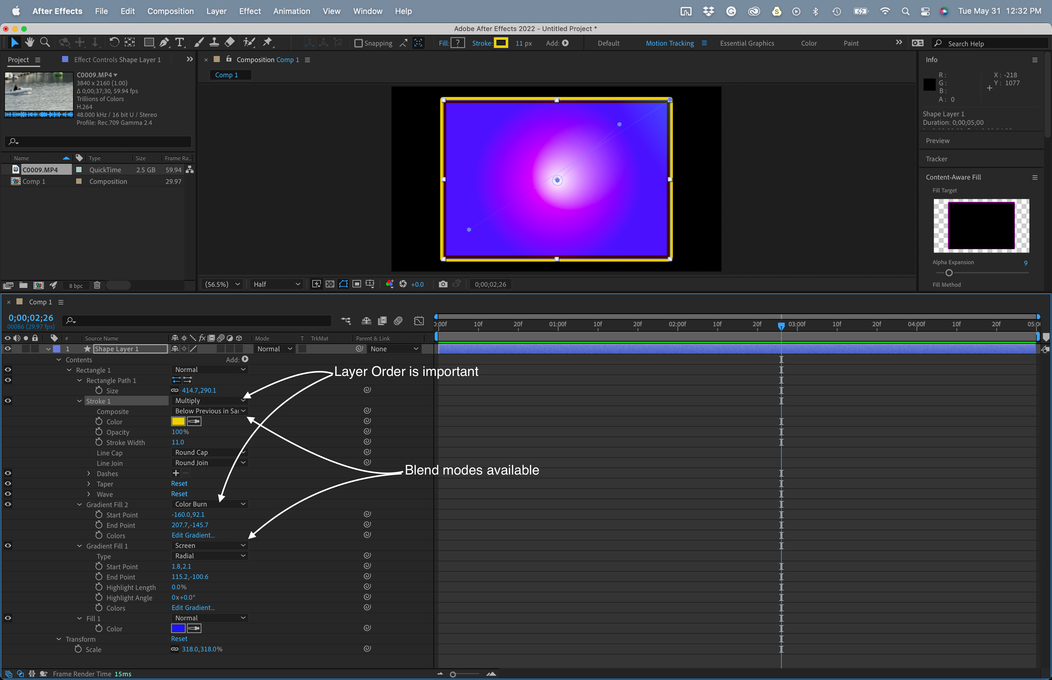
When you use the Add menu to add a new Fill, Stroke, Gradient Fill, Gradient Stroke it adds it to the top of the stack. A stroke expends beyond the shape boundary by half of the stroke width. If a 20-pixel stroke is on the top of the stack of fills it will expand the size of the shape layer by 10 pixels and overlap the fills below by 10 pixels.
There are also blend modes available. You have to open up the Rectangle properties by spinning down the twirly (the > becomes a V). A quick way to get
...Copy link to clipboard
Copied
When you use the Add menu to add a new Fill, Stroke, Gradient Fill, Gradient Stroke it adds it to the top of the stack. A stroke expends beyond the shape boundary by half of the stroke width. If a 20-pixel stroke is on the top of the stack of fills it will expand the size of the shape layer by 10 pixels and overlap the fills below by 10 pixels.
There are also blend modes available. You have to open up the Rectangle properties by spinning down the twirly (the > becomes a V). A quick way to get there is to press the 'u' key twice immediately after you create your first shape, then expand as needed.
If you add a shape layer animator like Merge Paths to multiple shapes a new fill and stroke will be created under the Merge Paths operator. You have the same options for arranging and stacking here. Merge Paths effectively turns off all fill and stroke properties above it. I usually delete them to clean up the timeline.
Maybe this screenshot will help. I have shown all modified properties on this shape layer (uu). You should do that when embedding screenshots. Please don't use the Drag & Drop here or browse files to attach. Just drag the screenshots to the reply field or copy and paste them, then size them up to fill the screen. It makes it a lot easier for us to see what you are talking about.
Copy link to clipboard
Copied
Thank you for your help! I will try what you've said and let you know how it went.
Get ready! An upgraded Adobe Community experience is coming in January.
Learn more
