Copy link to clipboard
Copied
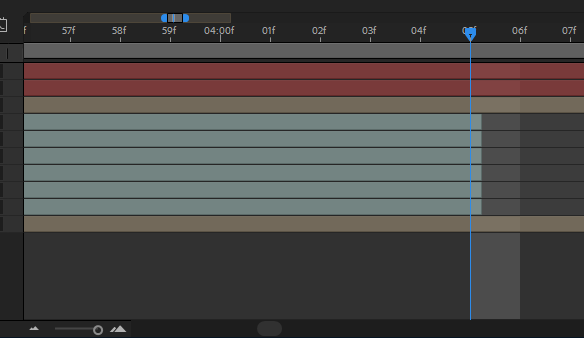
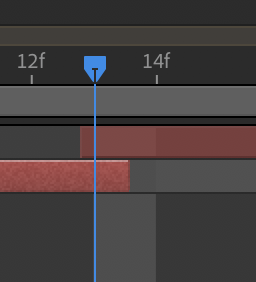
When I changed composition frame rate from 23,976 to 60 I found out that all layers moved a bit. Is there anything I can do with it?
 1 Correct answer
It is not that there is nothing else you can do, it is that there is nothing else that you need to do. Your animation will all be accurate to time and time is only as accurate as frame duration. Nothing will be fouled up. You can adjust or add keyframes anywhere you like in the timeline without problems.
Unless you are obsessive compulsive and having a keyframe not precisely lined up with the start of a frame is driving you crazy, you do not need to do any fixing to clean up a comp when you chan
...Copy link to clipboard
Copied
If you have a keyframes that is a problem, but if you just have the layers without keyframes, just select it all of them and put your cursor at the end of the layers and drag to the right to enlarge they time to the end of the composition.
That’s why it highly recommended set up the composition with the correct framerate at start a project.
Good luck!
Copy link to clipboard
Copied
Keyframes and layer in and out points are based on time. You have pushed in on the timeline so far that you are seeing the individual frames. The time is still accurate, keyframe timing is still accurate, they just do not precisely line up with the frames. In most cases, this is not a problem. You'll never see the timing errors. Motion blur may be effected a bit on the first or last frame, and you may see a blended frame if you pause exactly on the start of a frame that has a layer that ends after the frame starts, but the blended frame or timing error in most cases is completely invisible. If you really want to you can move the CTI to the desired in or out point frame and reset the in or out points. On the rare occasion where the timing of a keyframe presents a problem you can see when the movie is playing back at full speed you can grab the errant keyframe and snap it to the CTI using the shift key, but most of the time it's not a problem at all.
I hope you are aware of all of the visual changes and potential problems you may run into building comps at 60fps. They don't look like movies, they look more like video games. Unless you have a specific purpose in mind it is always better to work at standard frame rates.
Copy link to clipboard
Copied
I consciously choose 60fps and I absolutely understand why it is happening. I don't understand why Adobe doesn't offer automatic shift to the nearest frame option for these cases. On some clips I can't even drag them exactly to the frame or put in point there.
Copy link to clipboard
Copied
On video footage, the keyframe goes on the video fame. You are mixing frame rates. Thus, you can't put a keyframe wherever you want.
Copy link to clipboard
Copied
In most cases, you would not to automatically shift keyframes to the start of a frame because this would foul up the timing. Think about editing sound. You set an out point at 00:00:22:10 comp in a 30 fps comp so that is 22.3 seconds and exactly where you want the sound to cut because it is exactly at the end of an actors line. At 00:00:22:11 there is an awful pop you want to eliminate.
Now you have to change your comp to 24 fps and the out point of the audio layer snaps to the nearest full frame. That shift in time is going to either cut off the last work or reveal the pop you were trying to eliminate. That is why keyframes and out points are based on time, not frames. It just so happens that the smallest increment you can have in a timeline is a frame so editing accuracy is limited to the number of frames in a second.
When you change the frame rate of a comp you may end up with some hanging frames or ones that end before the frame is over but it will not make any perceptible change in the playback of the action or the cuts.
Try this, set up a 29.87 comp that is 5 seconds long, Add a solid, move to frame 16 add a different colored solid and position it so you can see both at the same time. Now set the in point for the second solid at 16 frames, move the CTI to 17 frames and set the out point of the second solid at 17 frames. You should now have one frame where both solids are visible. Now nest your test comp in a comp with the same frame rate.
Now go back to the original comp and change the frame rate to 23.976, expand the timeline so you see individual frames and you'll see that the in and out points do not match up with the frames. Step through the comp one frame at a time and you'll see that you still have one frame where you can see both solids. If you go back to the original comp you'll also see one frame where you can see both solids. Both frames happen at exactly the same time, not the same frame number, but the same time. The animation is not fouled up, nothing is wrong, and nothing is fouled up. The only difference is that the one frame where you can see both solids lasts a little longer in the comp with the lower frame rate but since there is no such a thing as part of a frame the timing, the animation, and everything else remains aligned to time.

My point is that you do not need to go back and realign the keyframes or the in and out points. Everything will still be as accurate as it can be to time.
Copy link to clipboard
Copied
There's nothing else I can do, then, except this.
Thank you.
Copy link to clipboard
Copied
It is not that there is nothing else you can do, it is that there is nothing else that you need to do. Your animation will all be accurate to time and time is only as accurate as frame duration. Nothing will be fouled up. You can adjust or add keyframes anywhere you like in the timeline without problems.
Unless you are obsessive compulsive and having a keyframe not precisely lined up with the start of a frame is driving you crazy, you do not need to do any fixing to clean up a comp when you change the frame rate. I did some more testing and I was not able to create a situation actions or cuts overlap and you need to shift a keyframe or in and out point.
Copy link to clipboard
Copied
The only one very inconvenient thing happens in this case: when you are switching between comps CTI shows neighboring frame.
