- Home
- After Effects
- Discussions
- Re: Light sources become darker depending on the l...
- Re: Light sources become darker depending on the l...
Light sources become darker depending on the location of the light and camera
Copy link to clipboard
Copied
I'm attempting to animate a light source within the adobe 3d workflow. What I want to do is light a cube, by moving a spot light from one side of the cube to the other, but I have noticed that when I move my spot light to relatively the same angle as my camera, the intensity of the light becomes significantly lower. Not the intensity setting, but rather the visual bright-ness. Here's an example:
This is when the light is on the opposite end of the plane from the camera
This is when the light is on the same side as the camera.
Looking into it, there isn't any piece of geometry in front of the light causing this, no settings are changed besides light position, and I can consistently recreate it, even without my specific camera. With the light currently where it is, if I rotate my preview to the other side, the image is lit up as I would expect:
Am I missing anything? Maybe possibly a setting that I overlooked when setting this up? Any help is much appreciated 🙂
Copy link to clipboard
Copied
Select your Light layer, press the "a" key twice, look for falloff, and set it to none.
Another workflow to solve the problem: Select the light, and press the 'u' key twice to reveal all modified properties. You should see Falloff under the Light Options group. Reset Falloff by right-clicking or just setting Falloff to none.
Another workflow. Double-click the light to bring up the Light Panel and set FallOff to None.
Copy link to clipboard
Copied
Thanks for your reply! Unfortunately Falloff is already turned off 😕
Copy link to clipboard
Copied
Try resetting the Material Options on the layer catching the light. "aa" will show them.
If that does not help post a screenshot with the modified properties of the problem layers revealed. "uu" will show all modified properties of a layer.
Copy link to clipboard
Copied
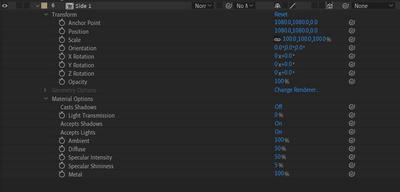
Unfortunately when I press "uu", nothing comes up on the layer. As well, the materieal options are set to default, I have also been able to recreate this issue with an unrelated and new solid. Here's a screenshot of all the properties of the layer.
Copy link to clipboard
Copied
Try uploading an AEP with only the solid, the lights, and the camera that shows the problem. I cannot replicate it.
Copy link to clipboard
Copied
Copy link to clipboard
Copied
There is nothing unexpected in the comp. The angle of the light to the blue solid is extreme, and the Specular Intensity is set to the default value of 50%. Lower Specular Intensity to 0%, and you get a completely matte surface that only reflects light using the angle of incidence = angle of reflection. Increase the Specular Intensity to 100%, and you get a surface that reflects light equally from any angle.
The only thing that is wrong with your comp is the position of the light. You are kind of duplicating the effect you would get if you put an open bulb to the right of a person and you moved it to the left in a straight line that passes only about 10 inches in front of their nose and ends up slightly behind them, but the light does not obey the inverse square rule for intensity vs. distance.
You can fix the problem by moving the light farther away from the layers or by adjusting the Material Options. The trick to setting up lighting in AE is to mimic the way you would set up lighting in a studio.
Copy link to clipboard
Copied
Tried changing the specular intensity, and no dice unfortunately, exhibiting the same problem. And unfortunately on this particular lighting scenario I need sharper shadows that you'd get from putting the light closer, along with moving the light quickly to get the shadows to change angle very noticeably. Is there a different way I should be setting up this shot to make that work? As even if I put the light really far away, its still exhibits similar problems, albeit to a lesser extent. But then also my shadows are less defined, and moving the light to change the angle of the shadows becomes quite combersome
Copy link to clipboard
Copied
You have the light pointed in the general direction of the center of the background layer at the start, with the point of interest in front of and below the text. The angle is quite severe, but most of the light is falling on the text and background layer.
At the end of the shot, the light is pointed in the general direction of the text layer but in front of it. Because the angle is so severe and the POI is in front of the text layer, most of the light is missing the background and text layer. The same thing would happen if you were shooting props on a stage.
You can try reducing the angle and moving the point of interest to the text layer position or the background position so more light falls on the background. The way you have it set up now, the shadow for the text layer almost completely misses the background layer at the end of the shot. If you want light to fall on the background, you need to point the light at the background, even if you use a parallel light.
Find more inspiration, events, and resources on the new Adobe Community
Explore Now


