- Home
- After Effects
- Discussions
- Re: Masks on shape created from vector layer
- Re: Masks on shape created from vector layer
Copy link to clipboard
Copied
Hi folks. So I will say I'm relatively inexperienced with After Effects so this may have a super obvious answer, but so far its totally alluding me.
I'm animating a logo. I took the 2D image into Illustrator, image traced it, and broke it into 4 layers I can manipulate later.
I then brought this .AI file into After Effects and dropped them into my composition, promoted them to 3D, then created a shape from vector layer. I have been able to animate all of the motion with no issue. However, I am trying to have two of these layers combine a vertical "wipe" type of animation with their horizontal movement. It seemed to me that it would be easiest to simply mask the layers and keyframe the mask making this move. Here is where the fun begins:
I can not add a mask to these layers. It simply won't let me. When I select the layer in the timeline then go up to the rectangle tool and draw, it adds a "rectangle" onto the layer instead of a mark.
So. I tried making a new shape, adding the masks where I want them, then copy pasting onto the new layer. Besides some weird keyframe jumps that I had to sort out (why AE can't handle copy pasting well with keyframes I will never understand) it seemed to work, but then when I went to set them up I discovered the copied masks no longer had a "Trkmat" dialogue box for me to use (on these shapes from vector layers).
Okay. So then I tried an adjustment layer with the masks on it above both of the layers I want affected. Nada.
Last I tried a full on solid layer, then adding a "Set Matte" to these shape from vector layers and setting it to reference the solid + inverting the alpha channel. And still, no effect.
Am I missing something super obvious? This is driving me up a freaking wall.
On a side note, I've tried using the linear wipe tool as well, but to be honest I can not get that tool to work ever. I must have watched a dozen youtube tutorials, and they all simply change that value from 0-100 and it wipes, and I can never get any change to happen to my layer when trying to use it. So if that's the best solution to my problems here... still help, please haha.
Thanks for the help,
- Nick
 1 Correct answer
you can only set track matte for layers, not hierarchies inside a shape layer.
if you want to reveal a shape path or group from within the shape layer you can use a merge path operator. see here about layer shapes Shape attributes, paint operations, and path operations for shape layers in After Effects
Copy link to clipboard
Copied
to create a mask on a shape, you need to select the tool creates mask option in the tools menu.
Seems you are expecting to intuitavly get how it's supposed to work. Ae is complicated, you need to first get the basics covered or you will get stuck for a long time. If there is a feature you want to explore, type its name in the upper right search field of your Ae interface and get the relavant help file. There are also free professional introductry tutorials in the Adobe page Of after effects so make sure you watch an practice before diving in.
Copy link to clipboard
Copied
Man that little button is hidden. Okay, so that solves why I can't draw them on, thanks, but I had already tried Layer -> Mask -> Create New Mask. So I could get masks onto the layer at least. The issues are arising once I have them there. The way I know/can find online in terms of how to reveal part of an image with a transparent mask is by using Track Matte etc etc, but no controls come up when I toggle switches with these layers shapes (aksa can't set track matte). What am I missing? In terms of how to use masks (transparent ones) for a reveal of the the shape layer itself? I can use them to reveal a normal layer no issue. Whats the step I'm missing to do it with shape layers?
Thanks,
Nick
Copy link to clipboard
Copied
you can only set track matte for layers, not hierarchies inside a shape layer.
if you want to reveal a shape path or group from within the shape layer you can use a merge path operator. see here about layer shapes Shape attributes, paint operations, and path operations for shape layers in After Effects
Copy link to clipboard
Copied
Thanks Roei, this definitely looks like the process I've been looking for. Sorry for the forum post on something like this, but I couldn't for the life of me find the exact terms to refer to what I was trying to do (which, yes, I know would come with getting the basics down pat better. I'm trying as I go. But sometimes client needs outweigh my current After Effects experience (I'm really an editor more than any animation stuff).
Thanks!
Nick
Copy link to clipboard
Copied
Glad to help. Ae is not an editor software and not nearly as intuitive. it takes a long time to get up to speed. the help files are quite easy to follow. there are also helpful tutorials in the Adobe page. if you do intend to do more work in Ae, make it a practice to exhaust all the training resources which are free in the Adobe page about Ae. from there, I would recommend taking an online course. being and editor with Ae skills will definitely get you more costumers so its worth your while. Good luck!
Copy link to clipboard
Copied
Here's a new good one. So I created two rectangles on the shape layer, and then tried to merge the paths and 'subtract' what the rectangles are covering. I'm under the impression that I add the 'merge layer' to the entire shape layer, and then select 'subtract'. But only one of the shapes disappears, and my image disappears with it - even the parts not covered by the rectangle. What am I doing wrong here? Applying 'merge paths' directly to the rectangles did not seem to have any effect at all.
Sidenote: I also tried the trim paths option from that same operation menu, and changing the start value from 0 to even 0.1 causes the entire line to disappear (aka the entire image on that layer). I can't find tutorials that deal with deeper controls with trim paths beyond how to unveil a normally-drawn solid shape. What I'm curious is if there is a basic AE tool that allows me to set parameters for anything I put onto a layer, such as a 'trim paths' operation, so as to tell it what it should consider the start and end of the path (not basic keyframing, I mean like telling the program where on my layer it should consider .01 on the path, so that I can then keyframe it properly).
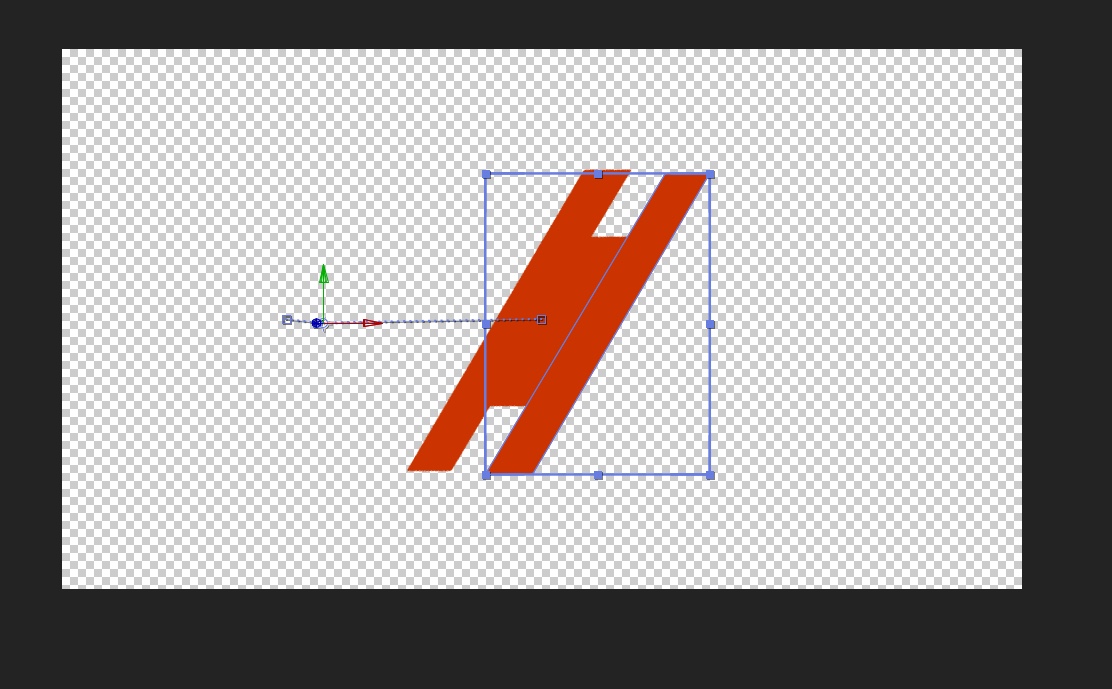
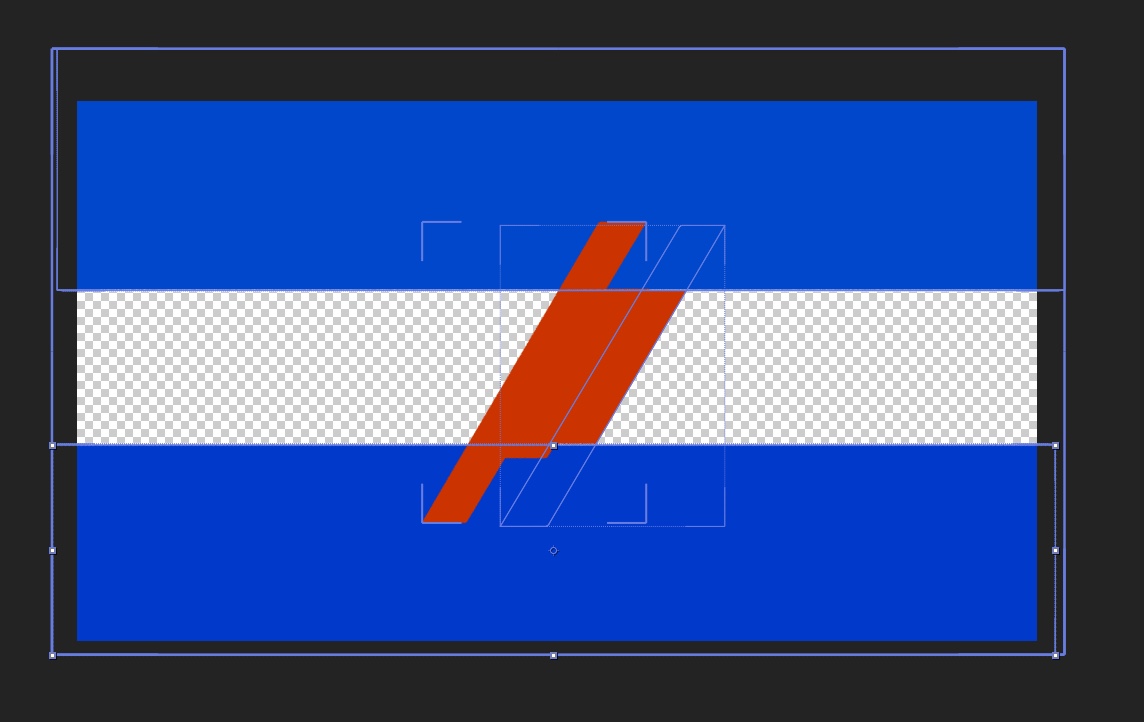
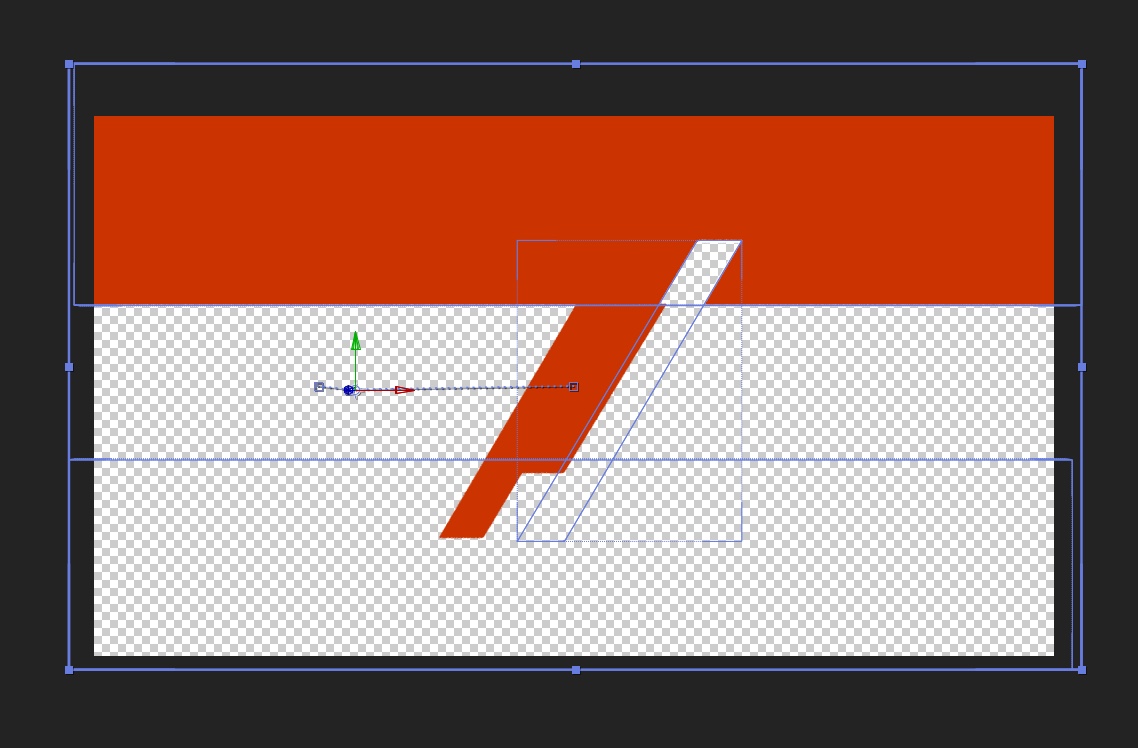
Photos below are:
1) the shape, each line is a separate layer. At the moment I'm applying things to the right line.
2) The rectangles added to that layer
3) What happens when I add a 'merge layer' to the entire shape layer, then select 'subtract'. None of the other settings got the effect I'm trying to achieve either.
Thanks!
Copy link to clipboard
Copied
It sounds like you might be misunderstanding what Merge Paths does but it could just be I'm misunderstanding you.
If you create a shape layer with multiple paths and add a merge path operator it will perform the operation above the merge operator on the path or paths below the top path.
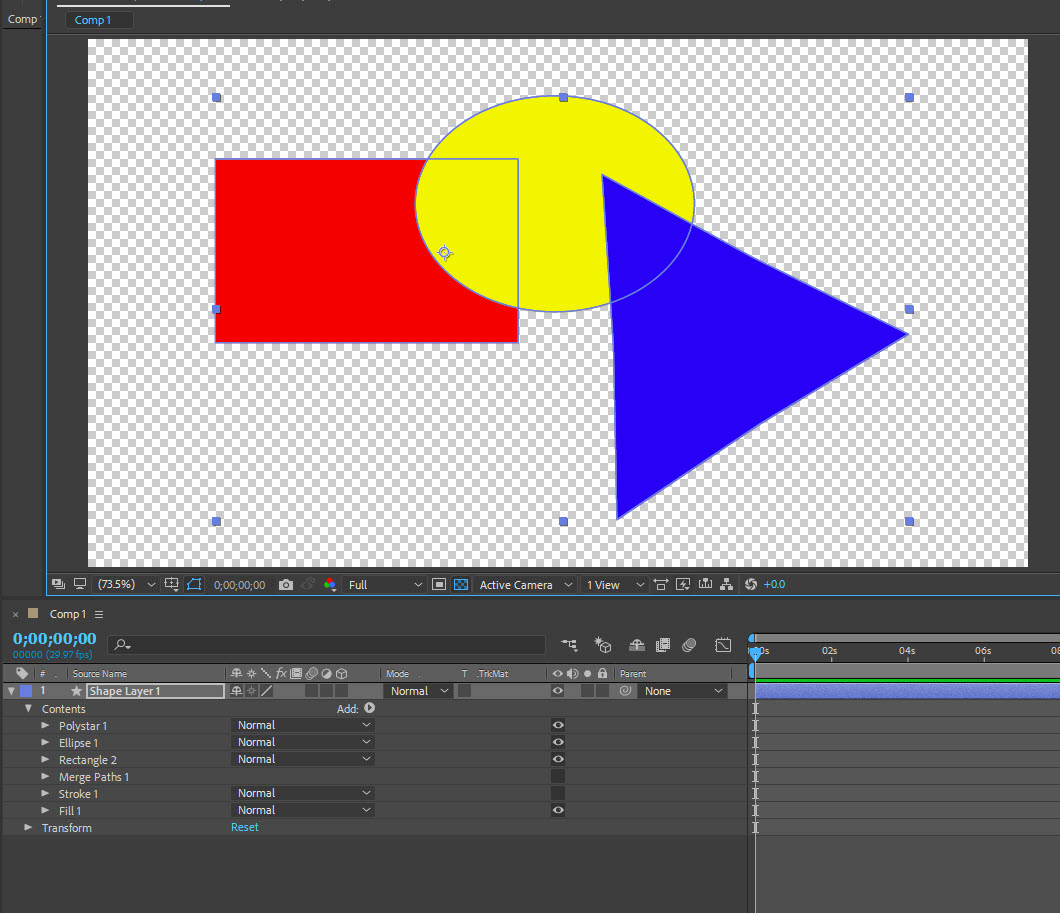
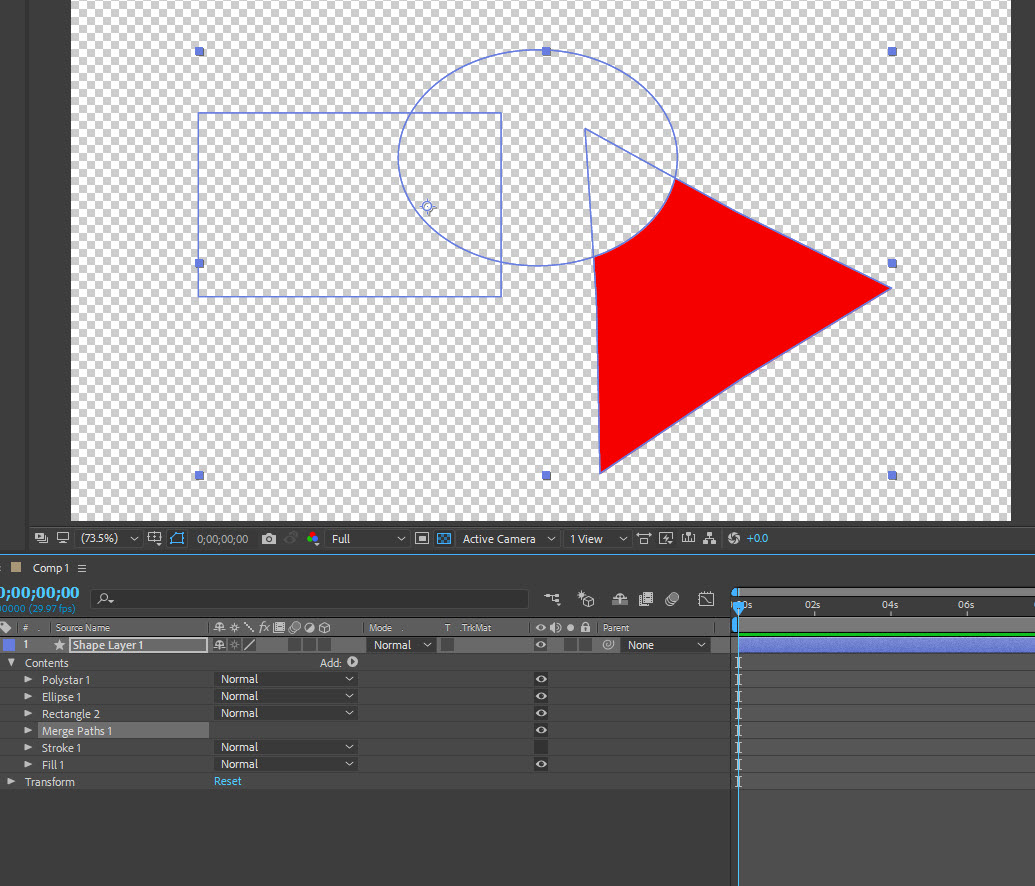
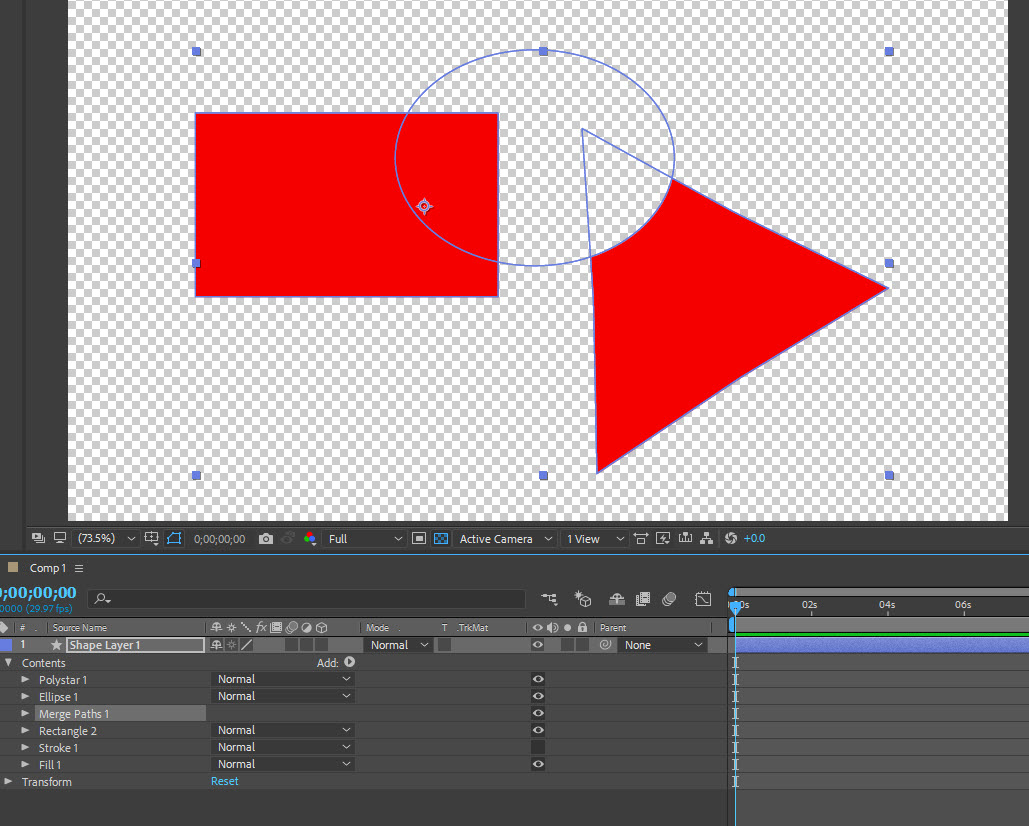
In the three images below the first has the merge operation turned off so you see all 3 paths of a single shape layer.
The second image has the merge operation under the three paths and as you can see it's subtracting the rectangle and the elipse from the polystar
The 3rd image I move the merge operator up so only the polystar & ellipse are above it and it subtracts the the ellipse from the polystar.
While the rectangle is uneffected because it's below the ,merge. If I moved ellipse above the polystar then the polystar would be subtracted from the ellipse.
So the merge path operator will perform the operation on the path or paths below the top path but only if they are above the merge operator.
Also merge paths only effects the paths within a single shape layer. If you're dealing with more than one layer you need to use the trackMatte function or preserve transparency either of which might require pre-composing.
Copy link to clipboard
Copied
Paul,
Thanks for the response. I was able to problem solve my issue based on your screenshots/explanation. So what I should have clarified was that this shape layer I'm working with was created from a vector image, based on an Illustrator project I brought in. So instead of two shapes covering a third shape on the layer, the thing I was trying to unveil was the layer itself. I ended up simply having to move the two 'rectangle' paths so that they were below the 'Stroke' and 'Fill' paths of the actual layer, and then add the merge layer to the bottom (thanks for clarifying how those apply and to what, nobody's videos mentioned that detail). Weird side effect was the shape layer created another 'stroke' and 'fill' below the merge paths when I created it, and my shape turned the blue of the rectangles - I just had to eyedrop it back to normal color, but I am curious why that would happen.
Anyway, thanks Paul!