- Home
- After Effects
- Discussions
- Motion Tracking, Picture Frame substitution, and r...
- Motion Tracking, Picture Frame substitution, and r...
Motion Tracking, Picture Frame substitution, and reflections - How?
Copy link to clipboard
Copied
Hi everyone,
I'm trying to replicate a scene that David Samber did on Annabelle Creation. I know it's very simple but I need help with this.
Example start at minute 3.37 with his explanation
I know he used Blender, which I have, but not many people use Blender for VFX therefore it is very hard to find help. I have the footage with the picture frame and marker in it which are very similar to David's example. Now I import it into After Effects, I select Motion track, and I position the tracking point onto two of the tracking markers in the picture frame and I track both forward and backward. Here I run into an issue. The camera pan starts when the picture frame is off-screen, which means it takes time for the motion tracker to pick up the first few frames. I did find a tutorial on how to fix this if the object that is tracked is in the frame and then goes off-screen but not the other way around like in my case. After I figure how to do that, I create a Null, edit the target on the tracker to target the null, and then parent the photograph to the Null. From there, what is the best way to change the photograph's perspective so that it actually looks like it is in a picture frame? I know that corner pin automatically changes the perspective but that would defeat the purpose of the markers, wouldn't it? After that, he mocks up a frame to act as the reflection and even further adds a person's reflection in one of the picture frames. Any ideas about that? I know I asked for a lot. Thank you all in advance.
Copy link to clipboard
Copied
Blender always tracks in 3D space, so this is likely a hybrid track with a faux 3D camera track and then the 2D tracks thrown on top. Not easily replicated in AE due to its inconsistent scene space. Other than that this would likely be a better job for mocha. The planar tracker already takes care of perspective issues and off-screen extrapolation to some degree and due to how it works the actual plane boundaries can easily be expanded after the track.
Mylenium
Copy link to clipboard
Copied
Thank you very much. I'll see how I can do it mocha. I appreciate it.
Copy link to clipboard
Copied
The Blender community is very powerful and there is a lot of help available right there. For help with the Blender part of your project, you can start here and we can probably point you to the resources that connect After Effects and Blender. I've been using Blender since about 1995 when I discovered it and integrating the animations and models I created there in After Effects projects ever since. If you do need that kind of help we need specific workflow details and samples of your shots.
There are three common workflows for tracking in After Effects. The most efficient workflow depends on the shot and the design requirements. I'll start with the most basic and move to the workflow that can handle the widest variety of shots and solve the widest variety of match move compositing problems.
The Motion Tracking workspace is where you find the options to use the Tracker Panel. Choosing the workspace is from the Window/Workspace menu or the Tool Bar sets up your workspace for the most efficient use of the tools available when using the Tracker Panel.
You will find Track Camera, Track Motion, Stabilize Motion, and Warp Stabilizer. If the layer has a mask and you select the mask in the timeline The Tracker Panel will change to the mask tracking tools. Mask Tracking happens in the Composition Panel. So Does Track Camera and Warp Stabilizer. Track Motion and Stabilize Motion use the Footage Panel. If you are in the Track Motion workspace and you select the Motion Source in the Tracker Panel, the Footage Panel will open up automatically and you will be able to select the Track Type and add the appropriate tracker to your project. The right options depend entirely on the shot and the design requirements. The shot you describe has a perspective shift so the only viable option is probably Perspective Corner Pin. None of the other trackers have the ability to calculate shifts in perspective. Perspective Corner Pin requires that all four corners be visible in the shot for the entire duration of the shot. If one of the corners goes out of frame, you may be able to manually adjust one or even two corners for a frame or two, but the workflow requires a lot of guessing, it is slow, and it is difficult to keep the track accurate. That does not sound like it fits your shot.
That leaves Track Camera. Depending on the shot, this may be a good option. Track camera requires a fair amount of detail in a fair amount of fixed geometry in the shot. If the shot has significant perspective and parallax shifts you can get a good solution using Track Camera, but if the shot is a simple camera pan over a mostly flat scene, you will not get any depth information and the track may be compromised. On the right kind of shot, Camera tracking does not care if things move in or out of frame. This may be the best solution for your specific shot. I would have to see your shot of the picture frames to be sure.
The most powerful tracking solution that comes with After Effects is the Mocha AE tracker. It is probably the solution that I would use for the kind of shot you are describing. There are dozens of possible workflows in Mocha AE, so I need to see the shot to give you my recommendation for the most efficient workflow. I can point you to a very good tutorial series on tracking in Mocha AE. The Mocha Essentials course from Boris FX is by far the best place to start learning about Mocha. As with most tutorials, going to a professional source is going to be better than searching YouTube because the web is full of poor workflows and recipes presented by well-meaning enthusiasts that often lead you down dead ends.
From what you explained I would probably use the Stabilized Power Pin workflow that I describe in the following tutorial. If there is more than one picture frame in the shot, you'll have to make a separate track for each frame you want to fill, but this is probably where I would start.
Think of the bench as the picture frame.
The other option would be Camera Tracking. Again, this depends on your shot. I don't have a specific camera tracking tutorial I can point you to but there are a couple of tutorials in the User Guide that will get you started with the Camera Tracker. You might want to check out the Animate Hoverboard tutorial. You can also search the User Guide for Track Camera and find some more info. If I find a really good Camera Tracking tutorial, I'll post it.
Copy link to clipboard
Copied
Hello,
Thank you so much for replying. The scene that I want to do is basically identical except for there is only one picture frame in my version. I haven't shot it yet although I have already pointed out the markers (same as the ones David has put in his picture frames).
The camera's only movement is a left to right pan that then slows down to a stop on the picture frame, showing the reflection of someone walking by. I'm familiar with the 3D camera tracker but I'm not sure if it is the appropriate method which is why I greatly appreciate your assistance.
The step I need to approach are:
1)Decide what tracker I need to use to achieve the best results with the markers I put in the picture frame (even in Blender if that is more appropriate)
2)Depending on what tracker I use, fix the perspective of the photograph.
3)Add a reflection of the environment.
4)Add the reflection of someone walking past.
Do you think David used a corner pin in blender instead of other types of trackers?
Regarding the reflections - do you think he modeled glass, parented it to the tracking data, and then modeled a wall with a still applied to it so that it can reflect onto the 3d glass?
I know that if I master these VFX shots I can make so many more creative decisions for my shorts it's just that I haven't found the right workflow to learn. Thanks again.
Copy link to clipboard
Copied
*If you still need the footage I can shoot it and post it tomorrow.
Copy link to clipboard
Copied
David said he tracked the shot with Blender. That's just camera tracking. The camera tracker in After Effects would be able to do the same thing. You don't really need tracker marks anymore, just edge detail.
Reflections are just a high contrast image with a blend mode and position animated. You pull the mask from the added photos. You can use Set Matte to do that.
David's shot could have also been accurately corner pin tracked in Mocha AE. You would not have had to use Camera Tracker or use Blender. All you would end up with if you did the camera tracking in Blender is a shot with the photographs properly lined up with the picture frames. There is no need at all to render anything else for the composite.
The Mocha Essentials link I gave you goes over a lot of the basics in tracking in Mocha. I show you how to handle a surface going out of frame in the tutorial I posted. That is probably the technique that I would use. Camera tracking would be my second option because it would probably take longer and it would be more difficult to properly line up the reflections.
Another idea for adding the reflection is to put a black card in the picture frame, make sure the glass is clean, then light the scene so that you picked up the reflections you want in the shot. You can then do some color correction on just the black screen and set the blend mode of the replacement photograph to overlay or even screen and the reflections would come through naturally. I do that kind of stuff all the time.
Copy link to clipboard
Copied
I have watched your tutorial and others for three days straight trying to make it work. I did manage to track successfully using planar tracking in Mocha Ae after playing around with the splines and min % pixels used and using a ProRes file of the original BRAW which was too heavy for tracking. I noticed that in the computer monitor, right before it move off-screen, although stays glued to the screen, one of the vertices that have already gone off-screen is messing the entire perspective. This happens in both takes that I used to try out the tracking. In the first video, I also made everything a 3D layer and dollied into the last picture frame which in reality becomes a video (I froze the frame as I can't show that to the internet just yet). I noticed that when I dolly in, you can see a bit of the tracking markers in the picture frame. I'm guessing this is due to them all being separate 3d layers. Do you think this would work by precomping the BG video and the tracked elements together? In the second video, I just tracked the monitor and the picture frame (It looks like my camera pan is much more stable in this take). Do you think any of this is salvageable, or do think I would need to re-shoot?
Video 1 take 1 with 3D Camera and Layers
Video 2 Take 2 with no 3D layers - Only Tracking
Copy link to clipboard
Copied
If the shot has not been color graded yet I would do some serious color correction first to help with the tracking. You may have to manually adjust the track for a few frames. I was able to get a decent track on the computer screen with just a few keyframes in the Adjust Track panel. The picture frame tracked almost perfectly. Here's the pre-comp and the final:
If I did not color correct your original shot to get some range in the color values the tracking was terrible.
Copy link to clipboard
Copied
Thank you for replying. I shoot in Raw but I saw that Mocha Ae uses Rec 709 making it darker. I tried again and it now works. Thank you so much for trying it out.
When the camera pans to the picture frame and stops, I want it to move into the picture in the frame that in reality is the next scene. What I tried is to make all the layers 3D and make add a 3D Camera. This way I could dolly into the picture frame. but when I fill the screen with the picture in the frame, I'm not actually using the original 6k clip (the next scene). How would you transition from the still frame track onto the picture frame to the actual 6k clip?
Copy link to clipboard
Copied
*I did a light color grade just as you said.
Copy link to clipboard
Copied
I also mostly work with Raw footage. I almost always add color correction and pre-compose before tracking with the camera or using Mocha or any other tracker. I need to add as much detail as I can most of the time. When I am ready to render the CC is turned off.
If all you are replacing is the picture frame I would use the Stabilized Power Pin method to replace the picture in the frame with footage. I would use the footage and apply time remapping to the footage so it could be frozen until you do the transition.
If the shot of the desk and picture frame does not push in to fill the frame with the picture I would just do a simple camera move or a scale on the final composite to transition to the moving shot. I would not try camera tracking on that shot. I don't think it would work very well.
It would help me work out a workflow if I saw the original footage without color grading. I'd even be happy to show you how I would set up and track that shot. I do not need replacement footage, I have that.
I would probably budget about an hour to do the tracking and replace the photo with an image. If you would like to share a compressed and/or scaled down copy of the original (it could easily be an MP4) with no color correction I'll try and take a look later this afternoon.
Copy link to clipboard
Copied
I'm uploading the files to the cloud in a .rar archive and will send you the link in a private message. It will be in ProRes because the original was way too heavy (over 4GB).
I also mostly work with Raw footage. I almost always add color correction and pre-compose before tracking with the camera or using Mocha or any other tracker. I need to add as much detail as I can most of the time. When I am ready to render the CC is turned off.
Do you use Rec 709 to color grade or do you simply bump up contrast and saturation to bring back detail?
Thanks again!
Copy link to clipboard
Copied
I will try and take a look later today.
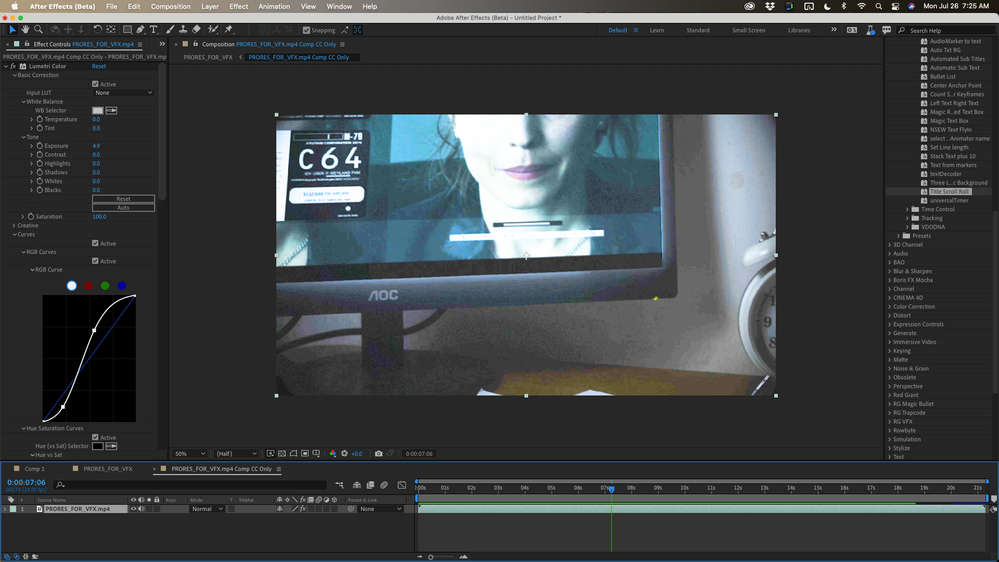
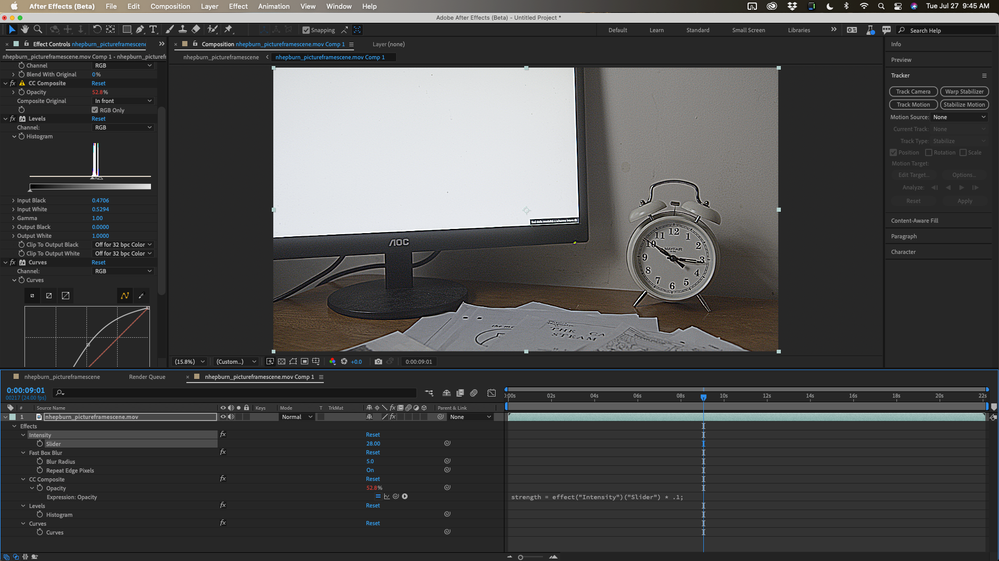
On the color grade, I have no set standard workflow. When I'm color grading for tracking I often do some strange things to the video that look like this:
When the tracking is done I remove the effects. Then I color grade the final composite to match the edit or the client's requirements.
Copy link to clipboard
Copied
I took a look at the footage you gave me and created a comp to try and figure out the best tracking solution. I'll give you an overview of my workflow and share a file at the end that uses the footage you supplied.
Step 1: Create a comp from the trimmed footage you supplied, added an adjustment layer and color corrected using Lumetri to give me the best color and most detail that I could get from the shot. The reason for the color correction is to provide as much information as possible in my 32-bit project.
Step 2: Pre-compose to create nested comp that I could use for Motion Tracking naming the pre-comp Nested Footage.
Step 3: To provide a comp for testing the tracking and figure out the best method I duplicated the master comp, named the copy Test comp, reset the composition frame size to 1080 X 1920, scaled the CC footage layer (nested comp) to fit horizontally, pre-composed the CC footage comp and named the new comp for Tracking Test comp. If I do not collapse transformations this gives me a much smaller frame size to experiment with the tracking methods that will analyze, track, and render faster.
Step 4: I ran tests with Mocha AE and Camera Tracker. There is just not enough edge detail in the Monitor that is on the left to get a good track. If you had put up any kind of an image with some detail on the monitor screen. If you were using the monitor for a light source you needed some detail on the monitor frame that could be tracked. Not just tracking markers, but something like a checkerboard patterned tape on the edges that could be easily tracked and replaced. Mocha also had some problems with the Picture frame on the right side of the frame. They were not as bad, but Mocha was not going to be a good solution to this shot because of the lack of detail in the monitor and the edges of the picture frame.
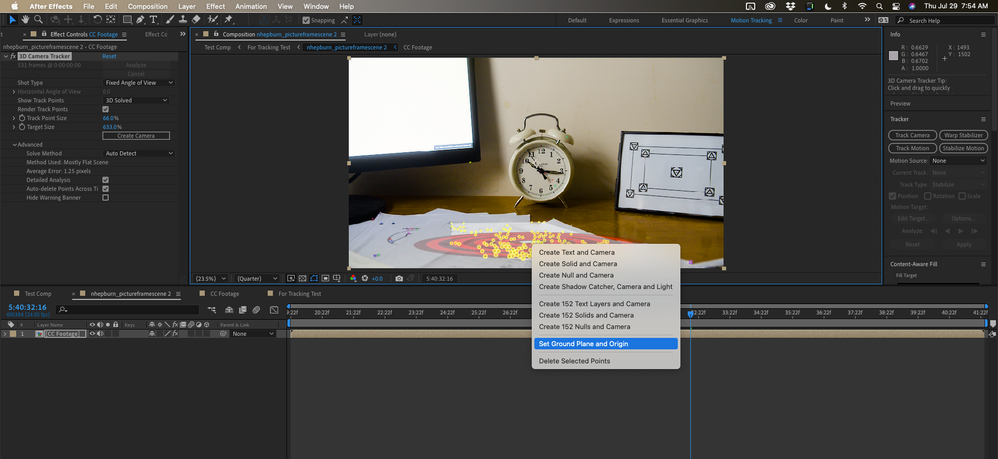
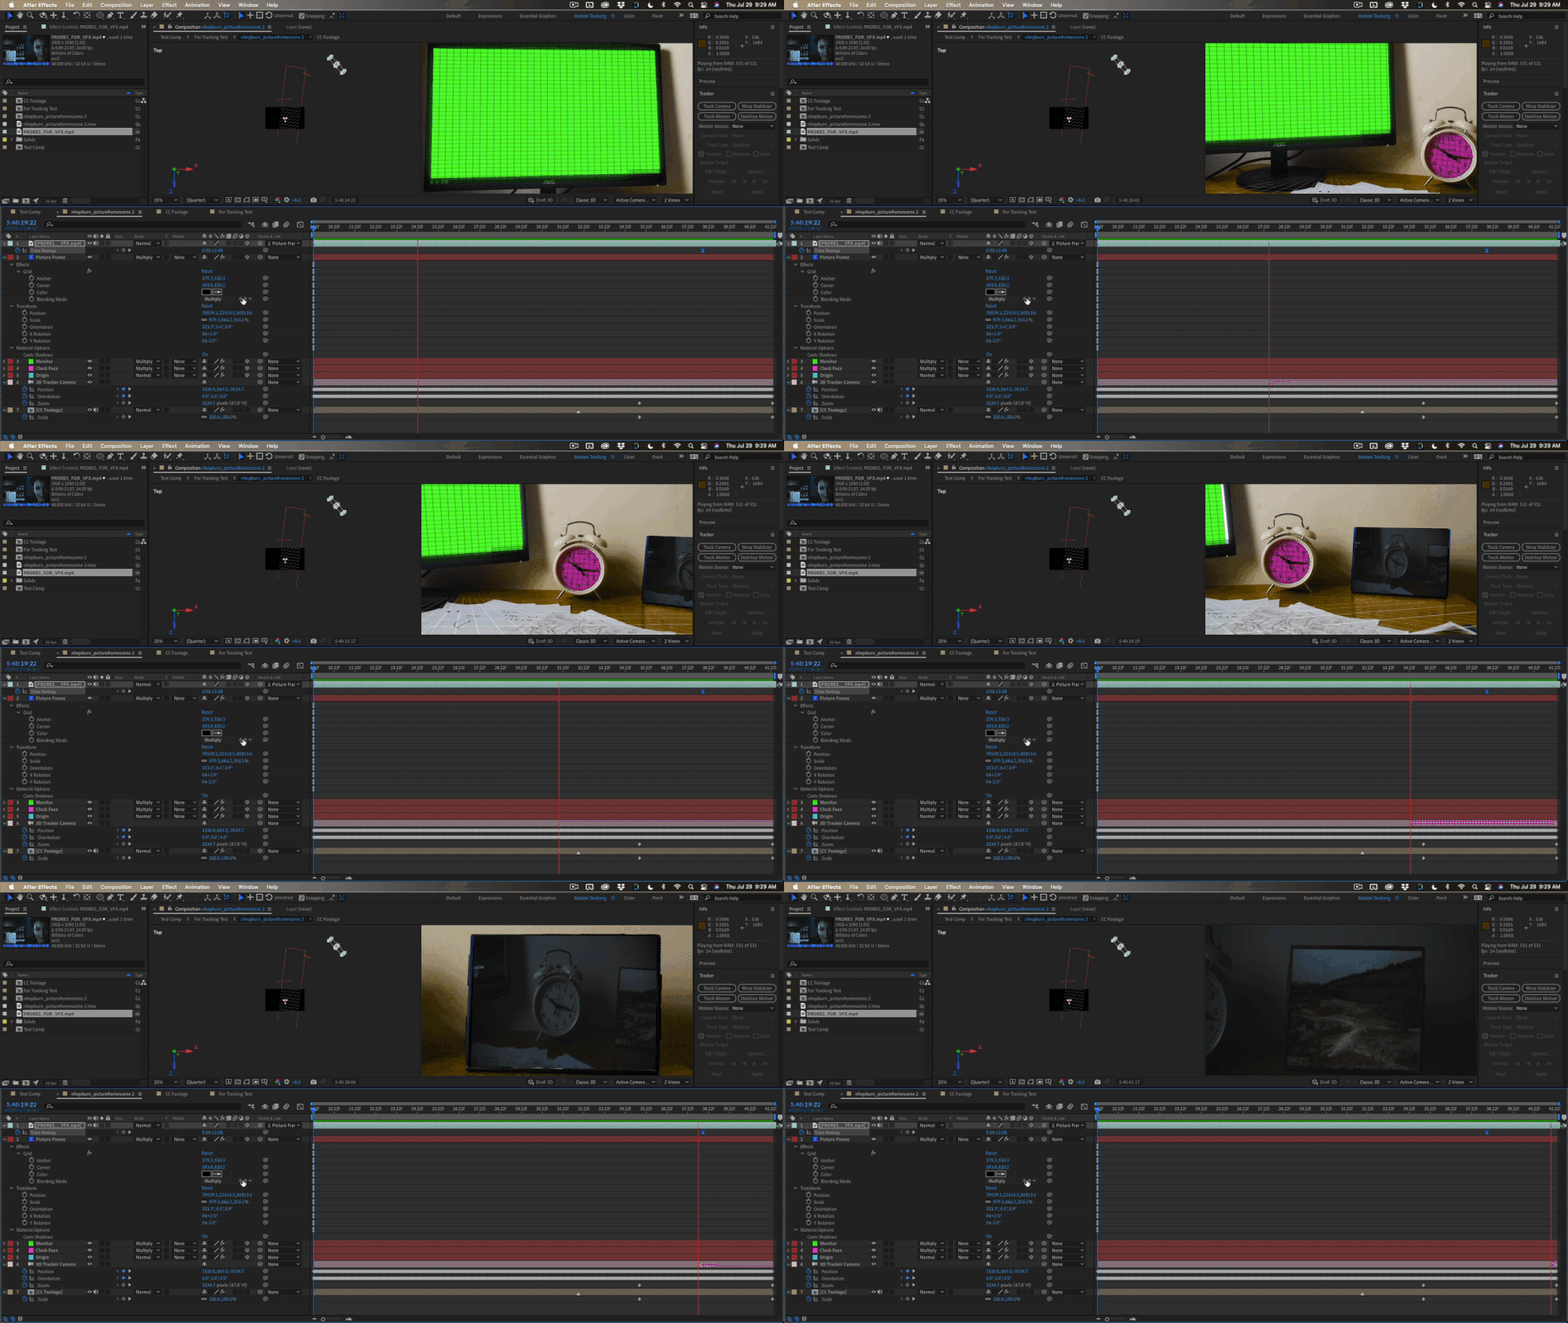
Camera tracking worked much better if I turned on Detailed Analysis in the Advanced section. I got a tracking average error of about 1.25 pixels. Now it is time to Camera Track the full resolution copy. The total time so far is about 20 minutes.
Step 4: Camera Track the main full resolution comp. This is self-explanatory. I just turned on Advanced analysis, made sure that the process had started the track. On my basic M1 Mac Mini I'm using for testing right now the estimate for the tracking to complete was about 40 minutes. It's about what I expected from this 6K footage. I had dinner and came back to the project to set up the camera and some track solids.
Step 5: Establish an origin and ground plane. I picked a time where I had a decent number of trackers on the desktop, set a layer marker, then established an origin and ground plane when the selection I drew around the trackers looked correct.
I added a camera and solid using the same tracker selection. A little rotation and scaling of the Track Solid completed this part of the project. I added the Grid effect and checked the track. It was good.
Step 6: I then selected track points on the monitor. There were not very many, and I could not get the target to line up with the surface very well, but I could adjust orientation later, add a grid, scale and use the multiply blend mode to get the grid to line up with the monitor frame precisely, then check to see if I got it right. This is the most frustrating and time-consuming part of the project. On the second try, I got everything lined up and the track appeared to be good.
Step 7: Repeated the process for the clock and the picture frame. The clock was the easiest, the surface was perfectly aligned the first time. The picture frame was easier than the monitor but it still required manipulation of the orientation and some scaling to make it work.
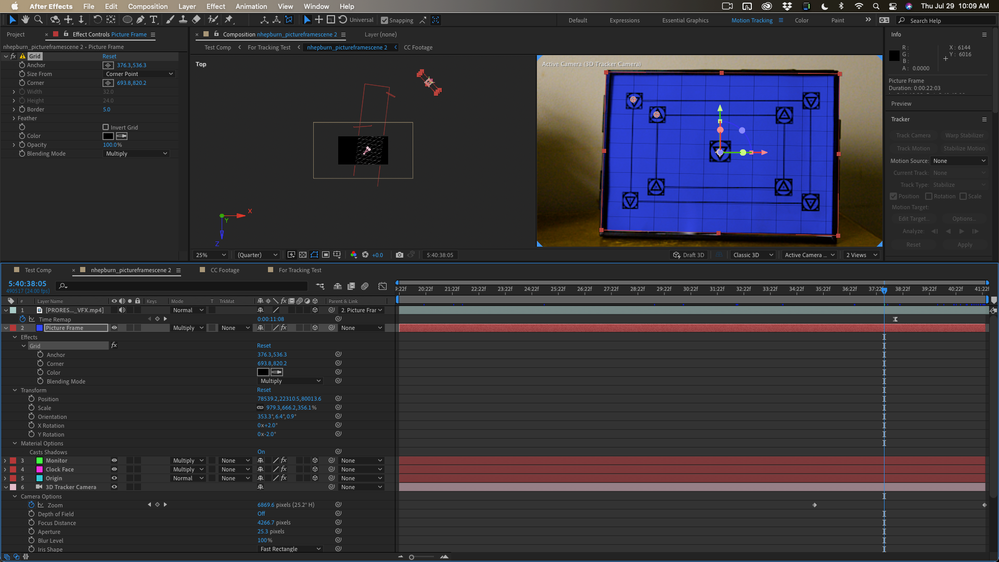
Step 8: Add some footage for the picture frame to the comp, make the footage layer 3D, then shift + parent the footage to the picture frame to snap it into the same position orientation and scale. The footage was then scaled to match the picture frame.
Step 9: Enable time remapping on the replacement footage, pick a frame that I wanted to freeze and set a new time remapping keyframe, delete the first time remapping keyframe, then select Time remapping to select all time remapping keyframes and grab the first keyframe in the timeline and slide it down the comp to pick a place where the picture turns into the movie.
Step 10: Set up the push-in on the picture frame. Because perspective is controlled by camera position and framing by focal length you want to animate the zoom value (press aa with the camera selected) and scale on the replacement footage. If you need to reframe the shot as you zoom in you also can animate the orientation and rotation of the camera. I picked a point where I wanted to start the push-in and set a keyframe for scale on the replacement footage and zoom on the camera, then I moved down the timeline and adjusted both values to carefully match up the shot. I had adjusted the grid on the tracker solid for the picture frame so that the grid was perfectly lined up with the markers in the picture frame. This is what that looked like:
This is the result so far:
Sorry about the small size and low frame rate of the gif but you get the idea.
All that is left is to set the tracker solids to guide layers, replace the footage on the screen. add some reflections to the replaced footage by matching the new footage on 3D layers using Shift + Parent in the same way that the footage was matched up to the picture frame.
When all of that is done I would also set the footage layer (Layer 7 "CC for Tracking") as a guide layer, then render a Lossless with Alpha copy of this footage that you could overlay in the final edit. That way you have complete control over the color correction on the original footage and on the overlays. I might even consider rendering a computer screen overlay and Picture frame overlay separately. For most of my clients, those renders would be EXR sequences or ProRez 444.
The total time on the project was just over an hour and a half. Here's my sample comp for you to take a look at.
I hope this helps. This would be a good project for a tutorial. Especially good if you shot the same original footage two ways. One with more detail in the shot and one the way you did.
Copy link to clipboard
Copied
Hi Rick,
Thank you so much for such an in-depth explanation. I made a perfect track using mocha Ae planar tracker and fixing very few key-frames. It is now perfect. I'm still having issues exporting and am currently trying to debug my project to understand what is happening. I will make two videos with the same scenario so that we can make a nice tutorial that people can follow and execute. That would be very cool!

