Copy link to clipboard
Copied
I am trying to accomplish a complex pan and zoom effect along a curve. In other words, a complex motion path as a type of close-up tour of a painting. I would like the key frames to be auto-spaced. I am looking for a simple solution using After Effects. I will be creating a video for 50+ painting images. I have a vector version of the exact curves but I'm also okay with recreating them or tracing from a template image.
An example of the effect I am looking for is shown at the link below. I created this with CSS3 animation, but I'd like to recreate this in Adobe After Effects for the sake of time and simplicity.
http://whatdavedoes.com/works/painting/natura_app.html
I have tried other video editing software and they all involve a ton of key frames that make it difficult to get the timing right. Is Adobe After Effects the right video editing software for this?
If so, what is a good process for achieving the desired result?
 1 Correct answer
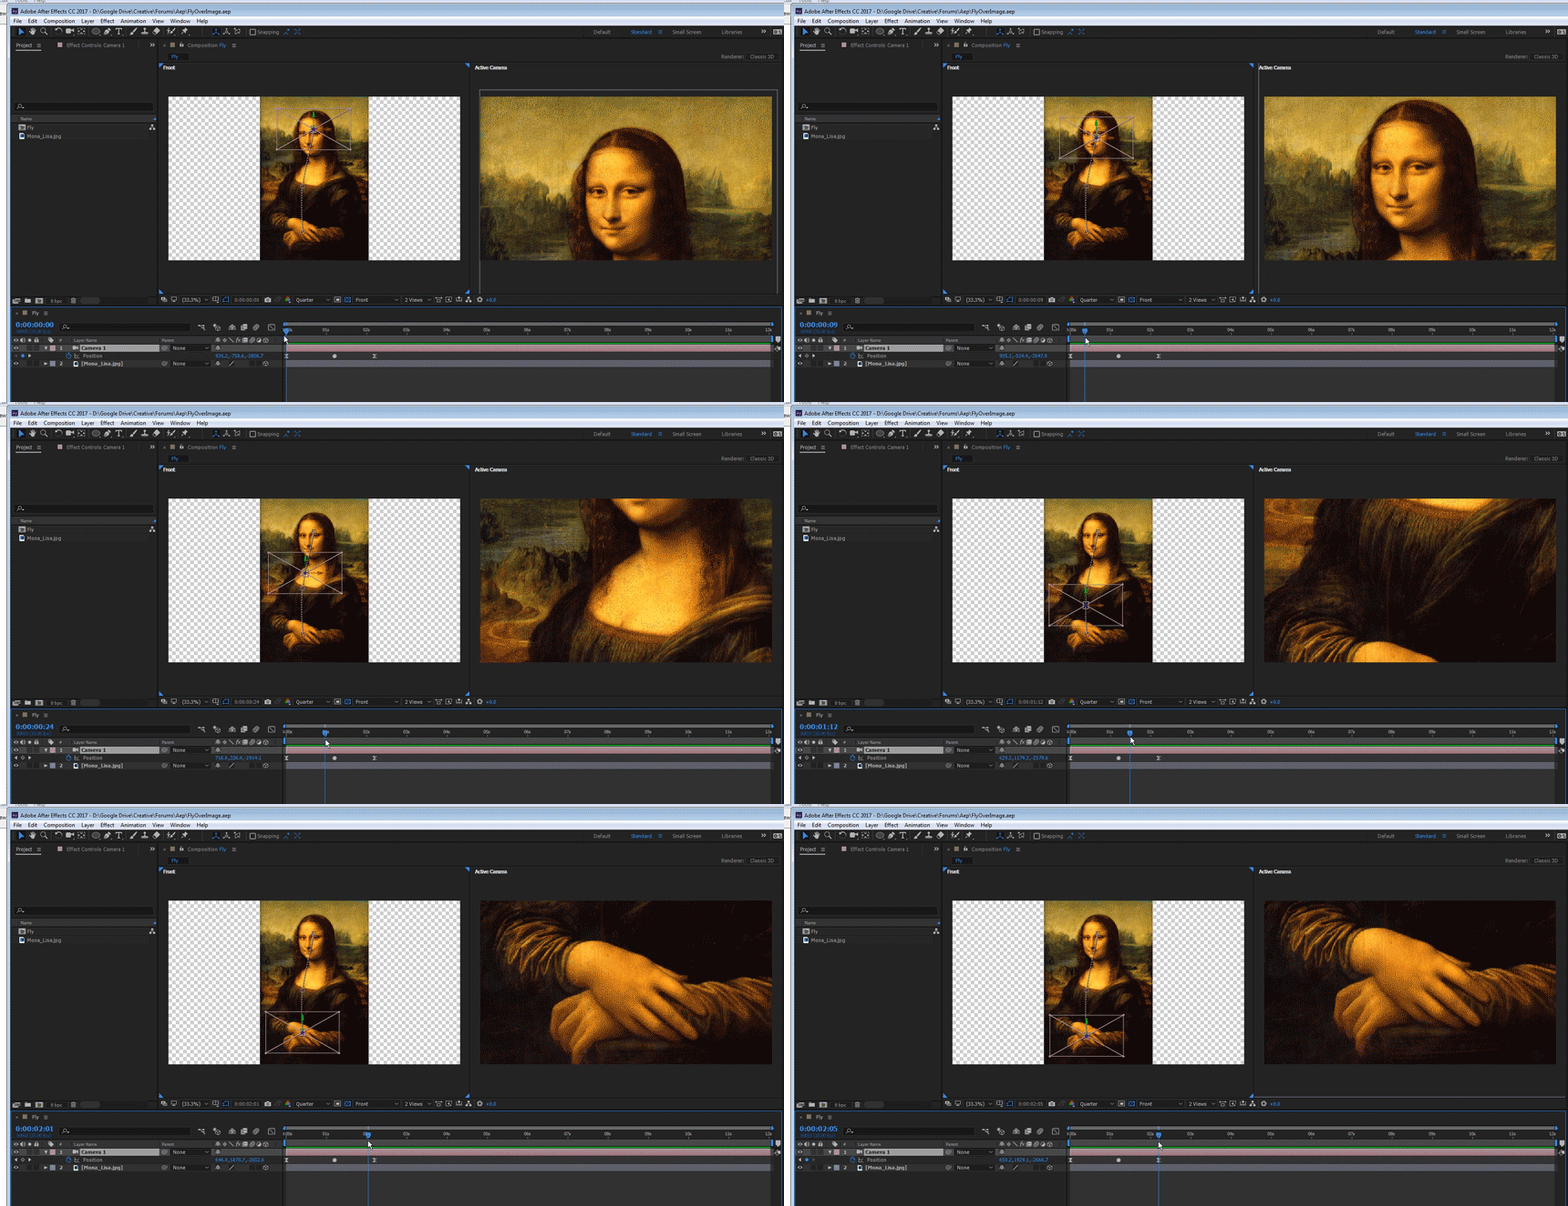
what you want to do is called "motion control". when it comes to fly over high resolution images, I always recommend working in 3D and not the typical position+scale setup. I would recommend setting up your project this way:
1. set you layer as a 3D layer by toggling the 3D switch for the layer
2. create a virtual camera (layer->new->camera), set it to be one node camera, 50mm preset, make sure DOF is off.
3. choose 2 views setup in the composition window. one set to "active camera" and the other s
...Copy link to clipboard
Copied
what you want to do is called "motion control". when it comes to fly over high resolution images, I always recommend working in 3D and not the typical position+scale setup. I would recommend setting up your project this way:
1. set you layer as a 3D layer by toggling the 3D switch for the layer
2. create a virtual camera (layer->new->camera), set it to be one node camera, 50mm preset, make sure DOF is off.
3. choose 2 views setup in the composition window. one set to "active camera" and the other set to "front"
4. click on the front view windows and choose view->look at all layers so all your layer will be visible in the scene.
this is how it's supposed to look:

5. use the position of the camera to create your movements.

by setting up your project this way, you get full control over how your motion path is interpolated because you see the whole view, and you can use the bezier handles to change the spatial path as you wish. for the temporal keyframes you can use auto bezier keyframes or the graph editor. now you just need to practice manipulating keyframes and movement correctly...
here is the project file:
this is the image I used.
Copy link to clipboard
Copied
It's really easy to turn a vector path into a motion path. Here's the steps.
- Use the pen tool to draw a path or copy a path in Illustrator, click anywhere in the frame with the pen tool and paste
- Press Alt/Option + m to set a mask path keyframe
- Ctrl/Cmnd + c to copy
- Add a null to the comp
- Press Alt/Option + P to add a position keyframe
- Ctrl/Cmnd + V to paste
You'll get rove over time keyframes. You can grab the last keyframe and drag to adjust the timing. EZ as pie.
Now you can parent the null to the camera (see the video below) or you can use an expression generated by simply dragging from the Camera Point Of Interest (a), to the position property of the null. These are really basic AE animation skills. If you want you can also leave the camera stationary and parent the image to the null and it will move. You then just adjust the position of the image to frame it ip for the start and end position. The advantage of using the pen tool to create your move is that you can draw the path directly on the image and as long as the image is at the default position, rotation and scale, the move will perfectly match the path.
Copy link to clipboard
Copied
Rick Gerard, excellent as always. Btw, it's not required to set a keyframe on the mask path to copy it; it can be copied by selecting the path property itself and then Ctrl/Cmd+c
Copy link to clipboard
Copied
Hi,
Just thought I'd offer another alternative (not suggesting it's any better but variety helps us all learn ![]() )
)
Have you tried (had the option to try) Cinema 4D ?
You can easily position "screens" with the artwork on them and then set multiple cameras at different viewpoints... these can then be navigated between quite simply - (automated if required).
You can also add camera movement (shake or footsteps) if that's the look you need.
If you decide / are able to try this option then I can give more detailed information.
I have no affiliation to Maxon (C4D developers) but love using the software - all-be-it in a semi-professional fashion !
My enthusiasm has, in part, been increased by the helpful tutorials from greyscalegorilla.com who have loads of amazing tutorials.
I'm trying to learn as much as I can and my assumption is that everyone else wants to too - hence the info about the other tutorials.
I hope you are/were successful, and would love to see your results.
Ringoroo
I forgot to add that when I've tried doing something similar in C4D I've been able to do it with little or no keyframes (in answer to part of your earlier question).
I also have an After Effects camera rig scene that might help...