

- Home
- After Effects
- Discussions
- Re: Problem with a mask and "easy ease"
- Re: Problem with a mask and "easy ease"
Problem with a mask and "easy ease"

Copy link to clipboard
Copied
Hello everyone,
I'm working on a tutorial you can view here: After Effects Kinetic Typography Tutorial - Kinetic Typography Basics - Create a Basic Typography! -...
Unfortunately, I'm having an issue when applying a mask. I'm using a method shown in 5:45.
It's working fairly well until I'm trying to apply "easy ease" to it and play with the curves on the speed graph. When I'm tweaking the curves to like that:I'm getting the fo:
Can I ask for assistance please? I need it to stay in one place
Many thanks 🙂


 9
Replies
9
9
Replies
9

Copy link to clipboard
Copied
Make sure that you dont have extra keyframes form the mask. Sometimes it is hard to see unless you zoom in quite a bit. Sometimes the keyframe is way off in the distance too. If your mask is moving, there is a keyframe somewhere. If you cannot find it, you might unclick the stopwatch to remove all keyframes and reset it.
- Let me know how it goes.
Dax
Copy link to clipboard
Copied
Hi maxwithdax,
Thank you for your suggestions 
I'm not sure if I fully understand your suggestions, as I have two keyframes added to my mask animation.
My goal is to achieve a smooth animation, where an object comes in fast but it slows down until reaching a full stop.
I'm able to achieve that with "animate > position" method for text objects in AE. In this method, mask is not moving.
But in my scenario I'm using imported from Photoshop layer and I can't see "animate" button for it. So I'm trying to understand why mask is behaving the way it does.
Here's what I'm doing:
1. I'm clicking on a layer and I'm adding a mask to it by using a rectangle tool.
2. The mask is somehow linked to an animated object. It moves together with it (I didn't add any keyframes to the mask)
3. I'm trying to fix mask position by clicking on the layers bounding box twice and:
a) I'm going back in time to adjust its position, now I'm clicking stopwatch (If I don't the mask will move)
b) I'm going further in time (when the object behind the mask is supposed to be revealed), I'm adjusting its position
and adding a keyframe. (I'm doing my best to have a mask in the same position at the start of the animation and at the end)
4. Here's the weird moment. I'm not sure what I'm doing wrong, but sometimes even without applying easy ease I'm getting mask movement, sometimes it's a very small one. I thought that this is related to the mask position being different at the start of animation and at the end, it seems it's not the case.
Even when the mask is not moving, after applying "easy ease" I'm still getting mask movement in the end.
I'm not sure if the information I wrote is useful 
Thank you for your help

Copy link to clipboard
Copied
Set spatial interpolations to linear.
select both keyframes -> right click and choose keyframe interpolation
Copy link to clipboard
Copied
Agreed +1

Copy link to clipboard
Copied
-- OR --
Do an Easy Ease in, get it right, then right-click on the keyframe and use Toggle Hold Keyframe. The animation holds rock-steady until it encounters the next keyframe.
Copy link to clipboard
Copied
Dave yes also agreed. But if his keyframe interpolation is bezier he will still get a curve
Copy link to clipboard
Copied
Hi,
Thank you for your suggestions, that didn't help, unfortunately. The mask is still moving

Copy link to clipboard
Copied
The tutorial you are watching is teaching a workflow that is only just above fair. There are several more efficient ways to animate and control that animated mask. You could duplicate that entire project with a lot less fiddling, fewer keyframes, and a lot less work.
In his technique both the position and the mask path are moving, then the speed of the enter and exit speed of the position move is modified so it's kind of a miracle that the animation on the mask does not get fouled up. If your mask does not behave as you expect before you modify the keyframes for Position then you have a workflow problem. You did things in the wrong order. If the mask does not keep up with the position change then the problem is caused by the difference in timing.
It would be highly unusual for me to animate a mask on a layer that was also moving if I wanted to reveal that layer. If I was doing that kind of a reveal I would just create a rectangle shape over the hero position of the layer then set that rectangle as an Alpha track matte for the layer. It would look like this:
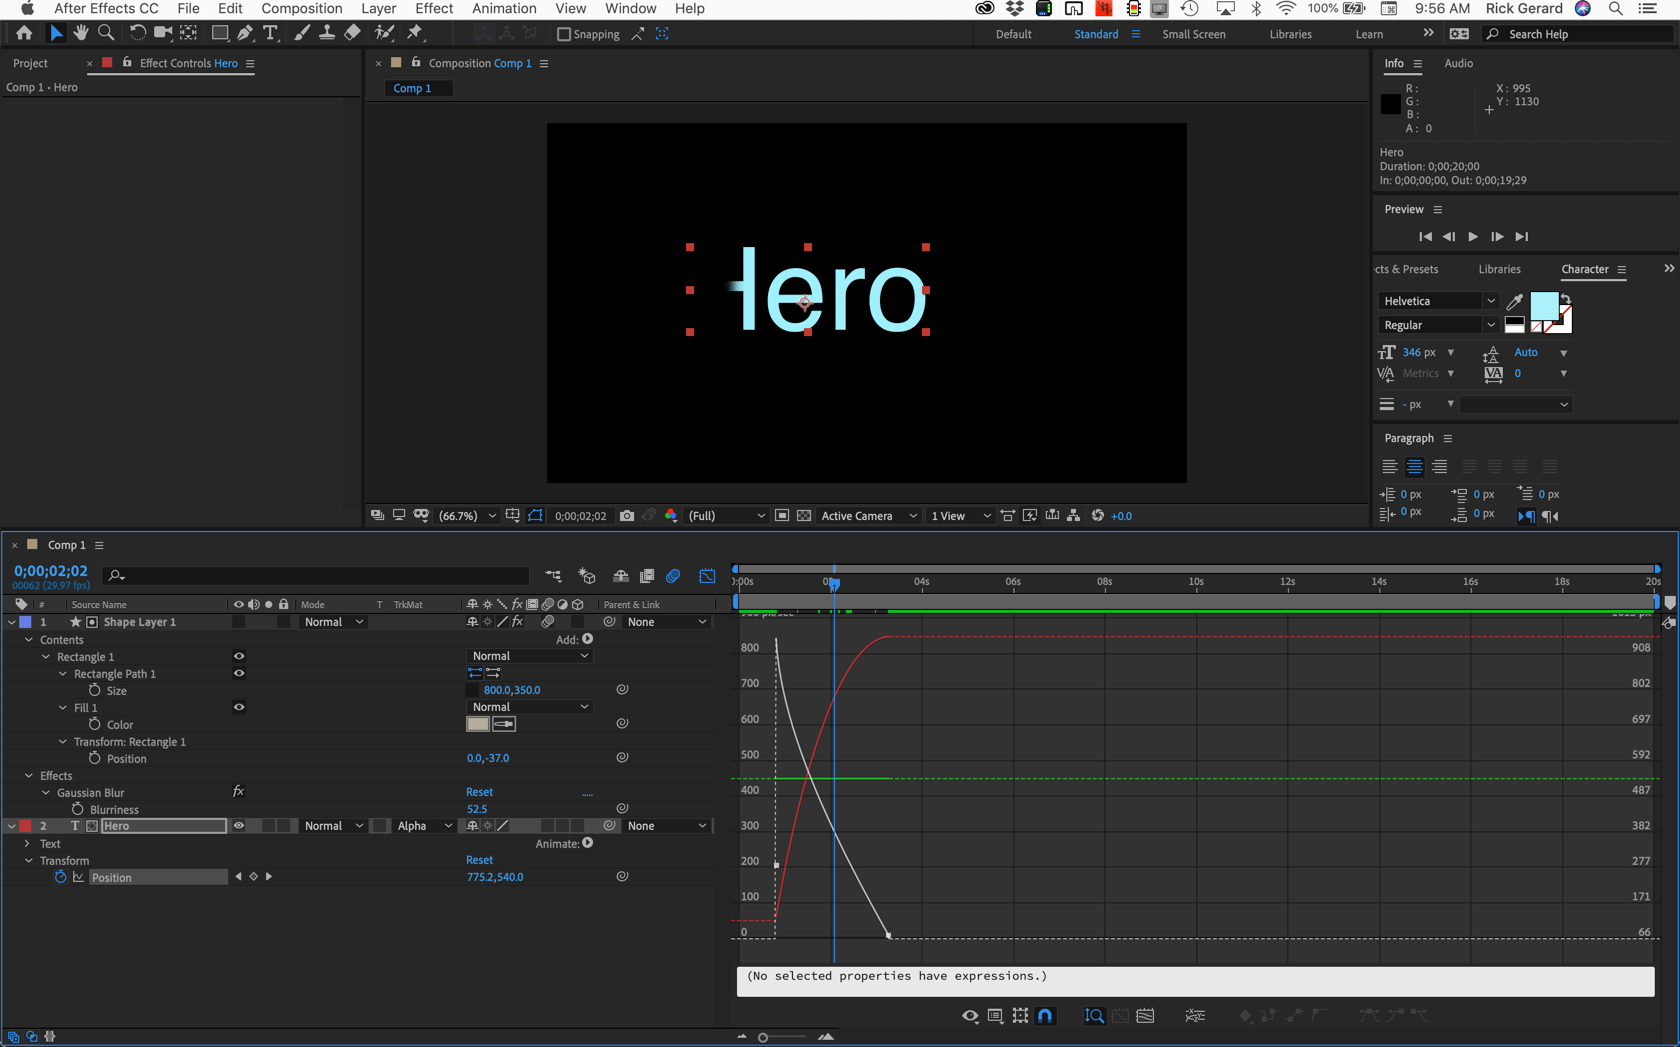
No keyframes for the track matte, a little Gaussian blur added to soften the edge and a more efficient way to see what editing the speed graph for Position is doing to the move by showing the reference graph make that part of the project much easier.
When you get all of the elements into their hero position you can just add a null, make that null the parent of all of the other layers and fly the entire animation into the shot in 2D or 3D space.
If you still can't figure out what is wrong, post a screenshot with the modified properties of all the layers giving you problems revealed. Just select the layers, press UU, PrintScreen and Paste or drag a screenshot to the reply field on the forum and we should be able to help you figure it out.
Copy link to clipboard
Copied
Hi Rick,
Thank you for your message. I was able to replicate your method, it does seem much easier and better than the one from tutorial I've pasted in.

Find more inspiration, events, and resources on the new Adobe Community
Explore Now
 AdChoices