

- Home
- After Effects
- Discussions
- Re: Progress bar with constant stroke width
- Re: Progress bar with constant stroke width
Progress bar with constant stroke width

Copy link to clipboard
Copied
Hi,
I am running Adobe After Effects CC 2019 on a Windows machine.
I'm trying to make a progress bar with a pointer showing the current value as the progress bar scales up. Importantly, I am trying to keep a constant stroke width on the progress bar. To avoid the stroke width scaling, I am resizing the bar instead of scaling it. The pointer is linked to a null object which is tracking the progress bar.
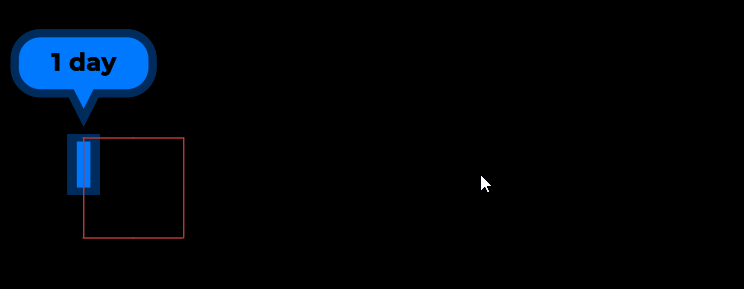
Here is the start keyframe:
Here is the end keyframe:
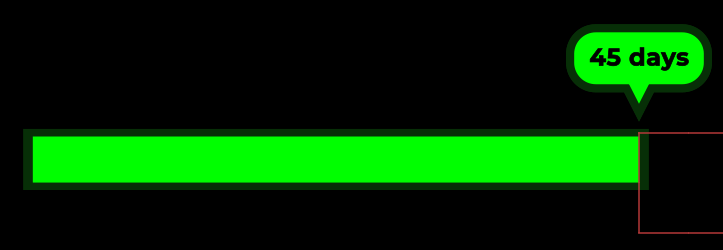
It works okay, but if you look closely, you'll see that the null object is moving slightly faster than the progress bar resizing. You can see the left side of the null object is further away from the stroke in the first image compared to the second image.
Below is a screenshot of the expressions. I am using the slider control from the null object to create a proportional resizing of the progress bar. In my mind, this should ensure that both move at the same pace, but they do not.
Could anyone help explain why this is happening?
Any further information needed, please let me know.


 7
Replies
7
7
Replies
7

Copy link to clipboard
Copied
Would this be easier with trace path as in this video?
How To Create Animated Arrows In After Effects - YouTube
Or even simpler with an animated solid as a mask?
Copy link to clipboard
Copied
I watched the video and tried to replicate with a rectangle. You can't trace the path, unless the rectangle is a bezier shape. If it's a bezier shape, you can't resize it, you can only scale it. That would mean the stroke width would no longer be constant.
I am not sure what you mean by using an animated solid as a mask. Perhaps you could elaborate?

Copy link to clipboard
Copied
Use a layer style stroke instead of the shape's stroke. That will solve the variable width problem.
I can't tell you why the null is off slightly. I would guess it's somehow related to the math in your expression.
If I were you I would simply create a two point shape using the pen tool with a stroke. That will be your bar.
Then apply a Layer Style stroke to the Shape stroke. That Layer Style's stroke width will remain constant.
Then animate shape's stroke using a trim paths operator.
Copy the shapes path information to the position attribute of your pointer and...there you go.
Copy link to clipboard
Copied
I agree completely. This is a far easier solution that what the OP is using and also far less tedious.
Copy link to clipboard
Copied
Hi both,
Thanks for your responses. I can follow along and animate the progress bar with the layer style stroke. However, I run into trouble at the last part "Copy the shapes path information to the position attribute of your pointer". I tried copying to the Position below (1) highlighted in red. This moves the Bubble Pointer below the progress bar (2) and creates two keyframes on the Position whereby the pointer moves slightly to the right over time. It does not respond to any change in the Trim Path.
Could you please explain the last instruction with a little more detail? I'm probably doing something wrong.
1.

2.

Copy link to clipboard
Copied
I think you are making this much too complicated. I would do the entire bar using one Shape Layer and add a Text layer that was parented to the bar.
Step 1 Create a progress bar shape layer
- Draw a rectangle with a fill and stroke anywhere in the Comp Panel, press UU to reveal all modified properties, unlock the Rectangle Path 1 size constraint, set the Y height, zero out Rectangle 1 Transform Position property an
- Add a Slider Control to the Shape Layer and name it Progress
- Add this expression to Rectangle 1>Rectangle Path>Size:
[effect("Progress")("Slider"), value[1]] - Add this expression to Transform Rectangle 1>Anchor Point:
[-content("Rectangle 1").content("Rectangle Path 1").size[0]/2, 0] - Add a shape to the progress bar for the bubble, don't worry about the position now
- Press the U key twice again to reveal the bubble shape's transform properties and zero them out so the shape is at layer center
- Add this expression to your bubble's Transform Shape>Anchor Point property (in my example I used a polystar):
[- content("Rectangle 1").content("Rectangle Path 1").size[0], value[1]] - Adjust the Transform Shape> Position property to center the point over the top right corner of the Rectangle
- Animate the Progress slider to make the bar grow and the bubble will follow
- Add an empty text layer
- Press UU to reveal all modified properties
- Add this expression to Source Text:
Math.round(thisComp.layer("Progress Bar").effect("Progress")("Slider") / 22.222) - Add this expression to the text layer's position property
[value[0] + thisComp.layer("Progress Bar").content("Rectangle 1").content("Rectangle Path 1").size[0], value[1]] - Move the text layer into position
- Parent the text layer to the Progress Bar layer
- Move the Progress bar layer into position
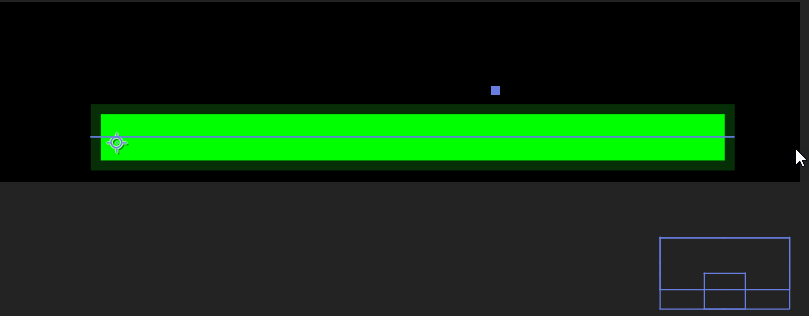
Here's a screenshot. Very simple, completely editable, and the whole thing can be saved as an animation preset. If you want to use multiple shapes to create the bubble you can add a Merge Paths just above the Rectangle layer set to add. To get the counter to represent the right number of days just do a little division. Divide the bar's maximum length by the maximum value. The expression I posted is for a bar that is 1000 pixels long.
Here's an animation preset that creates a progress bar: Dropbox - Progress Bar.ffx I've been using it for years. Just run it with no layers selected and you'll get this without the text layer.

If you need motion blur then it will work for the text layer but you'll need to add CC force Motion Blur to the Shape Layer:

Copy link to clipboard
Copied
Thank you, Rick. I am just learning and following along with tutorials, that's how I ended up with the solution I had.
I managed to implement your solution and it is working correctly. I will read up on expressions a bit more, so I can fully understand it.
I just wish I could figure out what was wrong with my original expressions.
Thanks again.

Get ready! An upgraded Adobe Community experience is coming in January.
Learn more
 AdChoices