Copy link to clipboard
Copied
Hello!
I'm fairly new to After Effects and I'm using the most recent update [16.1.1 (build 4)]
I'm trying to create a neon light that begins inactive, then flickers with increasing frequency, until it becomes 100% active.
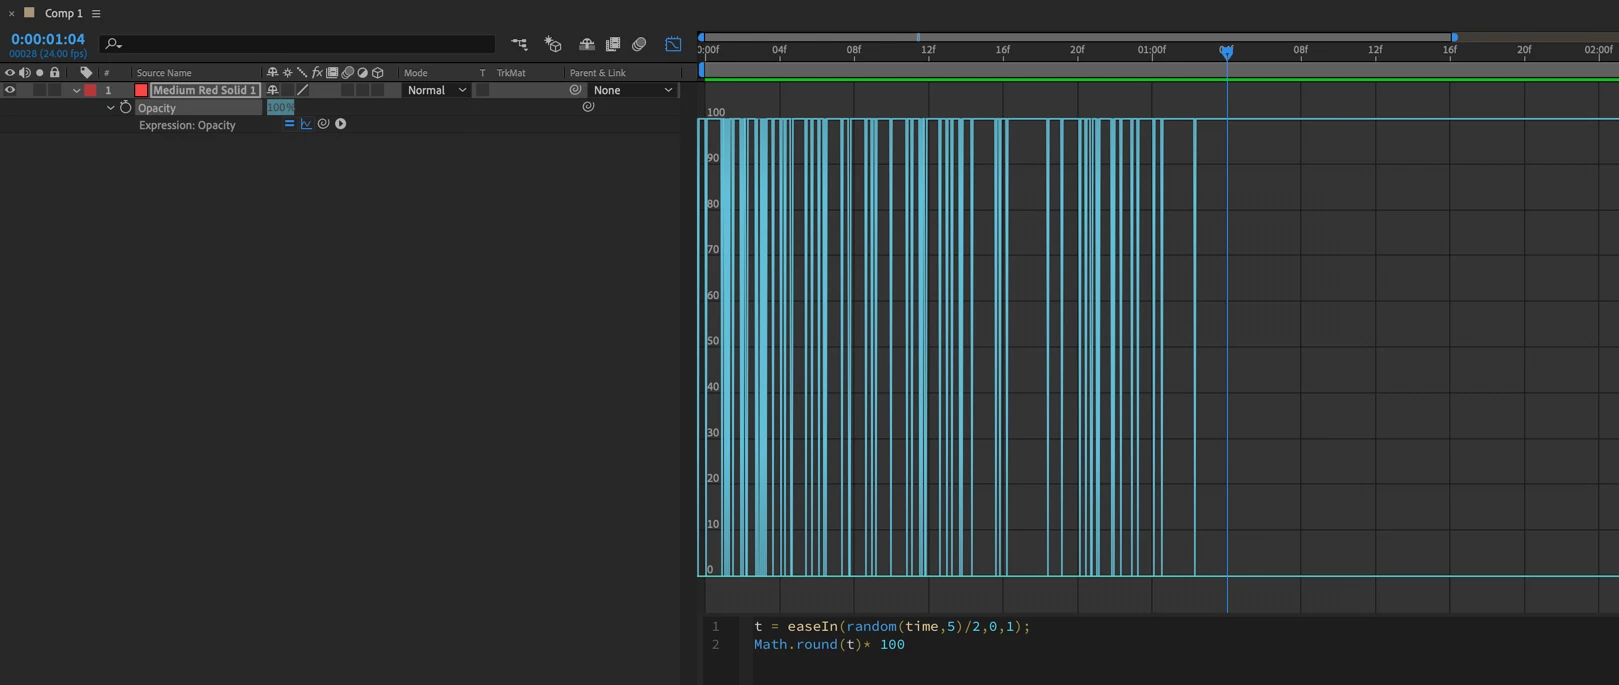
I could animate each key frame, but I know there has to be a more efficient method. I know I can use the wiggle expression, but I can't find a way to animate the parameters to achieve this effect. I tried using the Slider Control, but that didn't work because I couldn't figure out how to make the effect go from inactive, to increasingly active, to 100% active.
I've seen several tutorials, but none of them show a way to do what I'm picturing. I considered clipping the layer and pasting an "off" version at the beginning, and an "on" version at the end, but I would genuinely love to learn and know if there's a way to accomplish my vision with a single layer.
Thank you for taking the time to read and respond.
1 Correct answer
If you want to get absolutely accurate about a neon animation there would be just a couple of frames where the start and end of the tube would have a different intensity and color as the AC voltage is applied. Neon light flickers all the time at the same frequency as the current. Try shooting a neon sigh at 100 fps and see what you get. When designing a visual effect it is always a really good idea to look at some actual footage of the thing you want to create. There is lots of footage of neon
...Copy link to clipboard
Copied
There's definitely value in learning how to do things with expressions, but this example is short enough that keyframes are probably the best route.
Copy link to clipboard
Copied
Thank you for taking the time to respond
That's fair, but I would really like to know how to do this for my own knowledge. I just learned about the random() expression, so I'm going to give that a try.
Copy link to clipboard
Copied
Hi. Have a look at the Strobe Light effect. Add it to an "off" version of your image, then place an "on" version on the layer underneath(without the effect). Set "Strobe" to "Makes Layer Transparent" and set and keyframe the Duration and Period. Set the Random to a high setting to get variety.
Copy link to clipboard
Copied
random and wiggle would both be good potential routes here.
Bonus points for using expression controls (sliders, most likely) to make keyframe-able variables for your expression.
Copy link to clipboard
Copied
Random and Wiggle will be hard to control and time. If it were my project I would first create an audio track with using stock audio FX of a neon light turning on and flickering. Then I would convert use the keyframe assistant to convert the Audio to Keyframes, select both channels and apply a linear(t, tmin, tmax, value1, value2) expression to the properties that would drive the flickering. You can use the Graph editor to examine the values of Both Channels and then pick the point where you want the flicker to start. Here's a typical section of one some stock footage of neon lights I have in my library:
Hovering over any point in the graph will tell you the exact values. Here's a project that I did in about 3 minutes:
Nothing more than Fill with opacity controlled the expression + Bevil Alpha + Glow applied to a Text layer pre-comp. I actually did not need to pre-compose the text layer. It's just two copies of the same text with one set to a white fill and a black stroke used as a Luma track matte for the other dark red text layer with fill only so I could make the font look more like a tube.
A little more work on lighting effects and maybe some subtle lens flare and I'd be happy to deliver it to a client.
I picked values for tmin and tmax that were close together because neon lights don't do much dimming as they turn on. You could change the value2 to 1 then add Math.round() to the expression if you wanted a turn on and tun off, but I think this looks better.
Here's the expression I used for the values in my audio file:
t = thisComp.layer("Audio Amplitude").effect("Both Channels")("Slider");
linear(t, 1.3, 1.5, 0, 100);
Anytime the audio level goes above 1.3 the light starts to turn on, by the time the audio gets to 1.5 the light is fully on, and it never takes more than two or three frames for the tube to light up.
The advantage of this workflow is that you make the effect more believable by reinforcing the flickering neon effect with audio, you don't have to worry about sync, you can precisely control the audio level that will turn on the lights, and if needed, you can slide the Audio Amplitude layer a little to the left or right to give the light a little time to react to the sound.
I hope this helps. Random and wiggle will give you a flickering neon tube, but this will give you one that is far more realistic.
Copy link to clipboard
Copied
First, I would like to thank you; thank you so much!
Second, oof. Okay. Most of this is new information. I understand the idea––which is very clever––but I'm still quite new to After Effects, so I don't understand how most of these elements function independently, much less together.
I don't want to just copy what you've provided without understanding how and/or why it works, but I think your reply will give me enough information to get through the process and learn some fundamentals along the way
Cheers
Copy link to clipboard
Copied
Okay, so (after watching a bunch of videos) I came up with this expression, and it works! I feel pretty confident that this expression has redundancies and/or isn't the most efficient way to do it, but it works. If anyone has any corrections or pointers, I would love to hear them. Thanks again for your help!
easeIn(random(time,2)/2,0,100)
Copy link to clipboard
Copied
Nice lookin' graph there!
Copy link to clipboard
Copied
Bear in mind that neon is either on or off. It doesn't "fade" up and down, which is what all the various suggestions are doing.
Copy link to clipboard
Copied
If you want to get absolutely accurate about a neon animation there would be just a couple of frames where the start and end of the tube would have a different intensity and color as the AC voltage is applied. Neon light flickers all the time at the same frequency as the current. Try shooting a neon sigh at 100 fps and see what you get. When designing a visual effect it is always a really good idea to look at some actual footage of the thing you want to create. There is lots of footage of neon tubes available.
My point is that a realistic startup always involves an arc pulsing at the start and end of the tube to get the ionized gas to light up. If the power supply is tired the arc will start and stop causing the light to flicker on and off as the arc starts and stops, but there is no difference in the intensity. The arc always makes noise, and the transformers handling the load almost always also make a little noise and that sound reinforces the visual effect of the startup flicker.
This video has a closeup of the electrode energizing the neon.
Unfortunately, the random time expression would not give you anything that actually looks like a neon tube flickering as it turns on. A similar approach to the expression I already posted would give you the on and off startup required to create a fairly realistic neon light startup. Modifying value1 and value2 to zero and 1, then multiplying the result by 100 would do the trick. Something like this:
If I wanted a one-second random startup for a neon tube without the other nuances that would sell the effect I might use this expression:
t = easeIn(random(time,5)/2,0,1);
Math.round(t)* 100
But the effect would be much more believable if you synced it to an audio effects track.
Copy link to clipboard
Copied
Oooh. That's much better. And I actually (mostly) understand the code this time! I thank you so much for your advise, Rick!
Copy link to clipboard
Copied
All I did was set the minimum and maximum values of the easeIn method to zero and 1. this gives me a decimal value between zero and one. Any value below .5 will be rounded down to zero, any value above .1 will be rounded up to 1 by the Math.round function, then I multiplied the result by 100 so the opacity value would be either zero or 100. Pretty simple.
If you want to play with expressions it would be a great idea to spend some time learning the basic JavaScript math methods first, then concentrate on the other counting functions. Combine these with an understanding of the specific After Effects keywords and functions like layer and Effect and an understanding of how the properties in AE use arrays and you are on your way to becoming an expression guru.
The Expression Language Menu has almost all of the reserved words and a fair amount of Java math, and the new auto-complete expression editor will make the learning process much easier.
Copy link to clipboard
Copied
Yeah, I understand this function you've helped me create, but I'm already asking myself how I could make it terminate to zero after a given period of time. I know that I could just clip the layer (which is what I've done in my comp), but I'm still curious because I know that knowledge would come in handy some other way.
I was pretty intimated at first, but I'm beginning to understand the basics after watching guides and tutorials on YouTube for a few hours. I will take your advice and look into the basic JavaScript math methods before doing anything else with AE.
Cheers!
Copy link to clipboard
Copied
the easiest thing to do is to split the layer where you want the light to turn off, remove the expression from the new layer and animate the property that is turning the light on and off. Don't waste an hour creating an expression when 1 or 2 keyframes will do the trick. If you plan on making money as a filmmaker you have to value every second of your time. I could modify the expression and test it. It would probably take me 20 or 30 minutes, or I could set the CTI to where I want the neon light to turn off, press Shift + Ctrl/Cmnd + d, then press uu to reveal all modified properties of the new neon layer, delete or turn off the expression and set the property that turns the light on and off to zero and I'd be done in less than a minute. 30 minutes, even for a newbie, is worth at least $35 so unless I had about a hundred of these layers to do in the next three weeks, working out an expression and saving an animation preset is a complete waste of money and time.
On the other hand, every hour you spend studying techniques and methods when the author is a professional that has good workflow habits and creative approaches to solving problems will save you hundreds or even thousands of hours over a career. That study time can be worth tens of thousands of dollars per hour when you look at a career in the film making business. Please take the time to vet your trainers, make sure they know what they are talking about, and only spend time with tutorials and articles produced by professionals with good workflow habits. Unfortunately, more than half of the new tutorials and articles I see these days are presented by amateurs and they usually leave out critical information or propose inefficient or dead-end workflows. Bad habits are very hard to break so please, vet your trainers...

