Exit
  • Global community
    • Language:
      • Deutsch
      • English
      • Español
      • Français
      • Português
  • 日本語コミュニティ
  • 한국 커뮤니티
0

Rotoscoping long clip

Contributor ,
Nov 05, 2019 Nov 05, 2019

Hi guys, this might be a newbie quiestion: I am rotoscoping a 2 minute long clip with a person in front a a white wall. The colors and luminance makes it impossible with keylight or luma key. So I have to you use rotoscope. I have seen a few tutorials and I have now spent 2 hours going frame by frame and I am not even half way through the clip. Is there a way to do this quicker? To "play" through the whole clip and then go back and correct? As for now I am doing frame by frame like I said and I hope there is a quicker way through this... Thanks for any tips.

I have a 2019 5k iMac retina, so the computer should be powerful enough..

TOPICS
How to
4.0K
Translate
Report
Community guidelines
Be kind and respectful, give credit to the original source of content, and search for duplicates before posting. Learn more
community guidelines

correct answers 2 Correct answers

Community Expert , Nov 05, 2019 Nov 05, 2019

There are a lot more ways to create a procedural matte than Keylight or Luma Key. Show us a screenshot and we can probably point you in the right direction. I'm working on a shot right now where I am cutting out the trees in the foreground almost entirely with Colorama.


Rotoscope by hand is NEVER done frame by frame because it is almost impossible to get smooth edges and it takes forever. Automated rotoscoping by using Motion Tracking or AE's Rotobrush is also almost always a better first choi

...
Translate
Community Expert , Nov 05, 2019 Nov 05, 2019

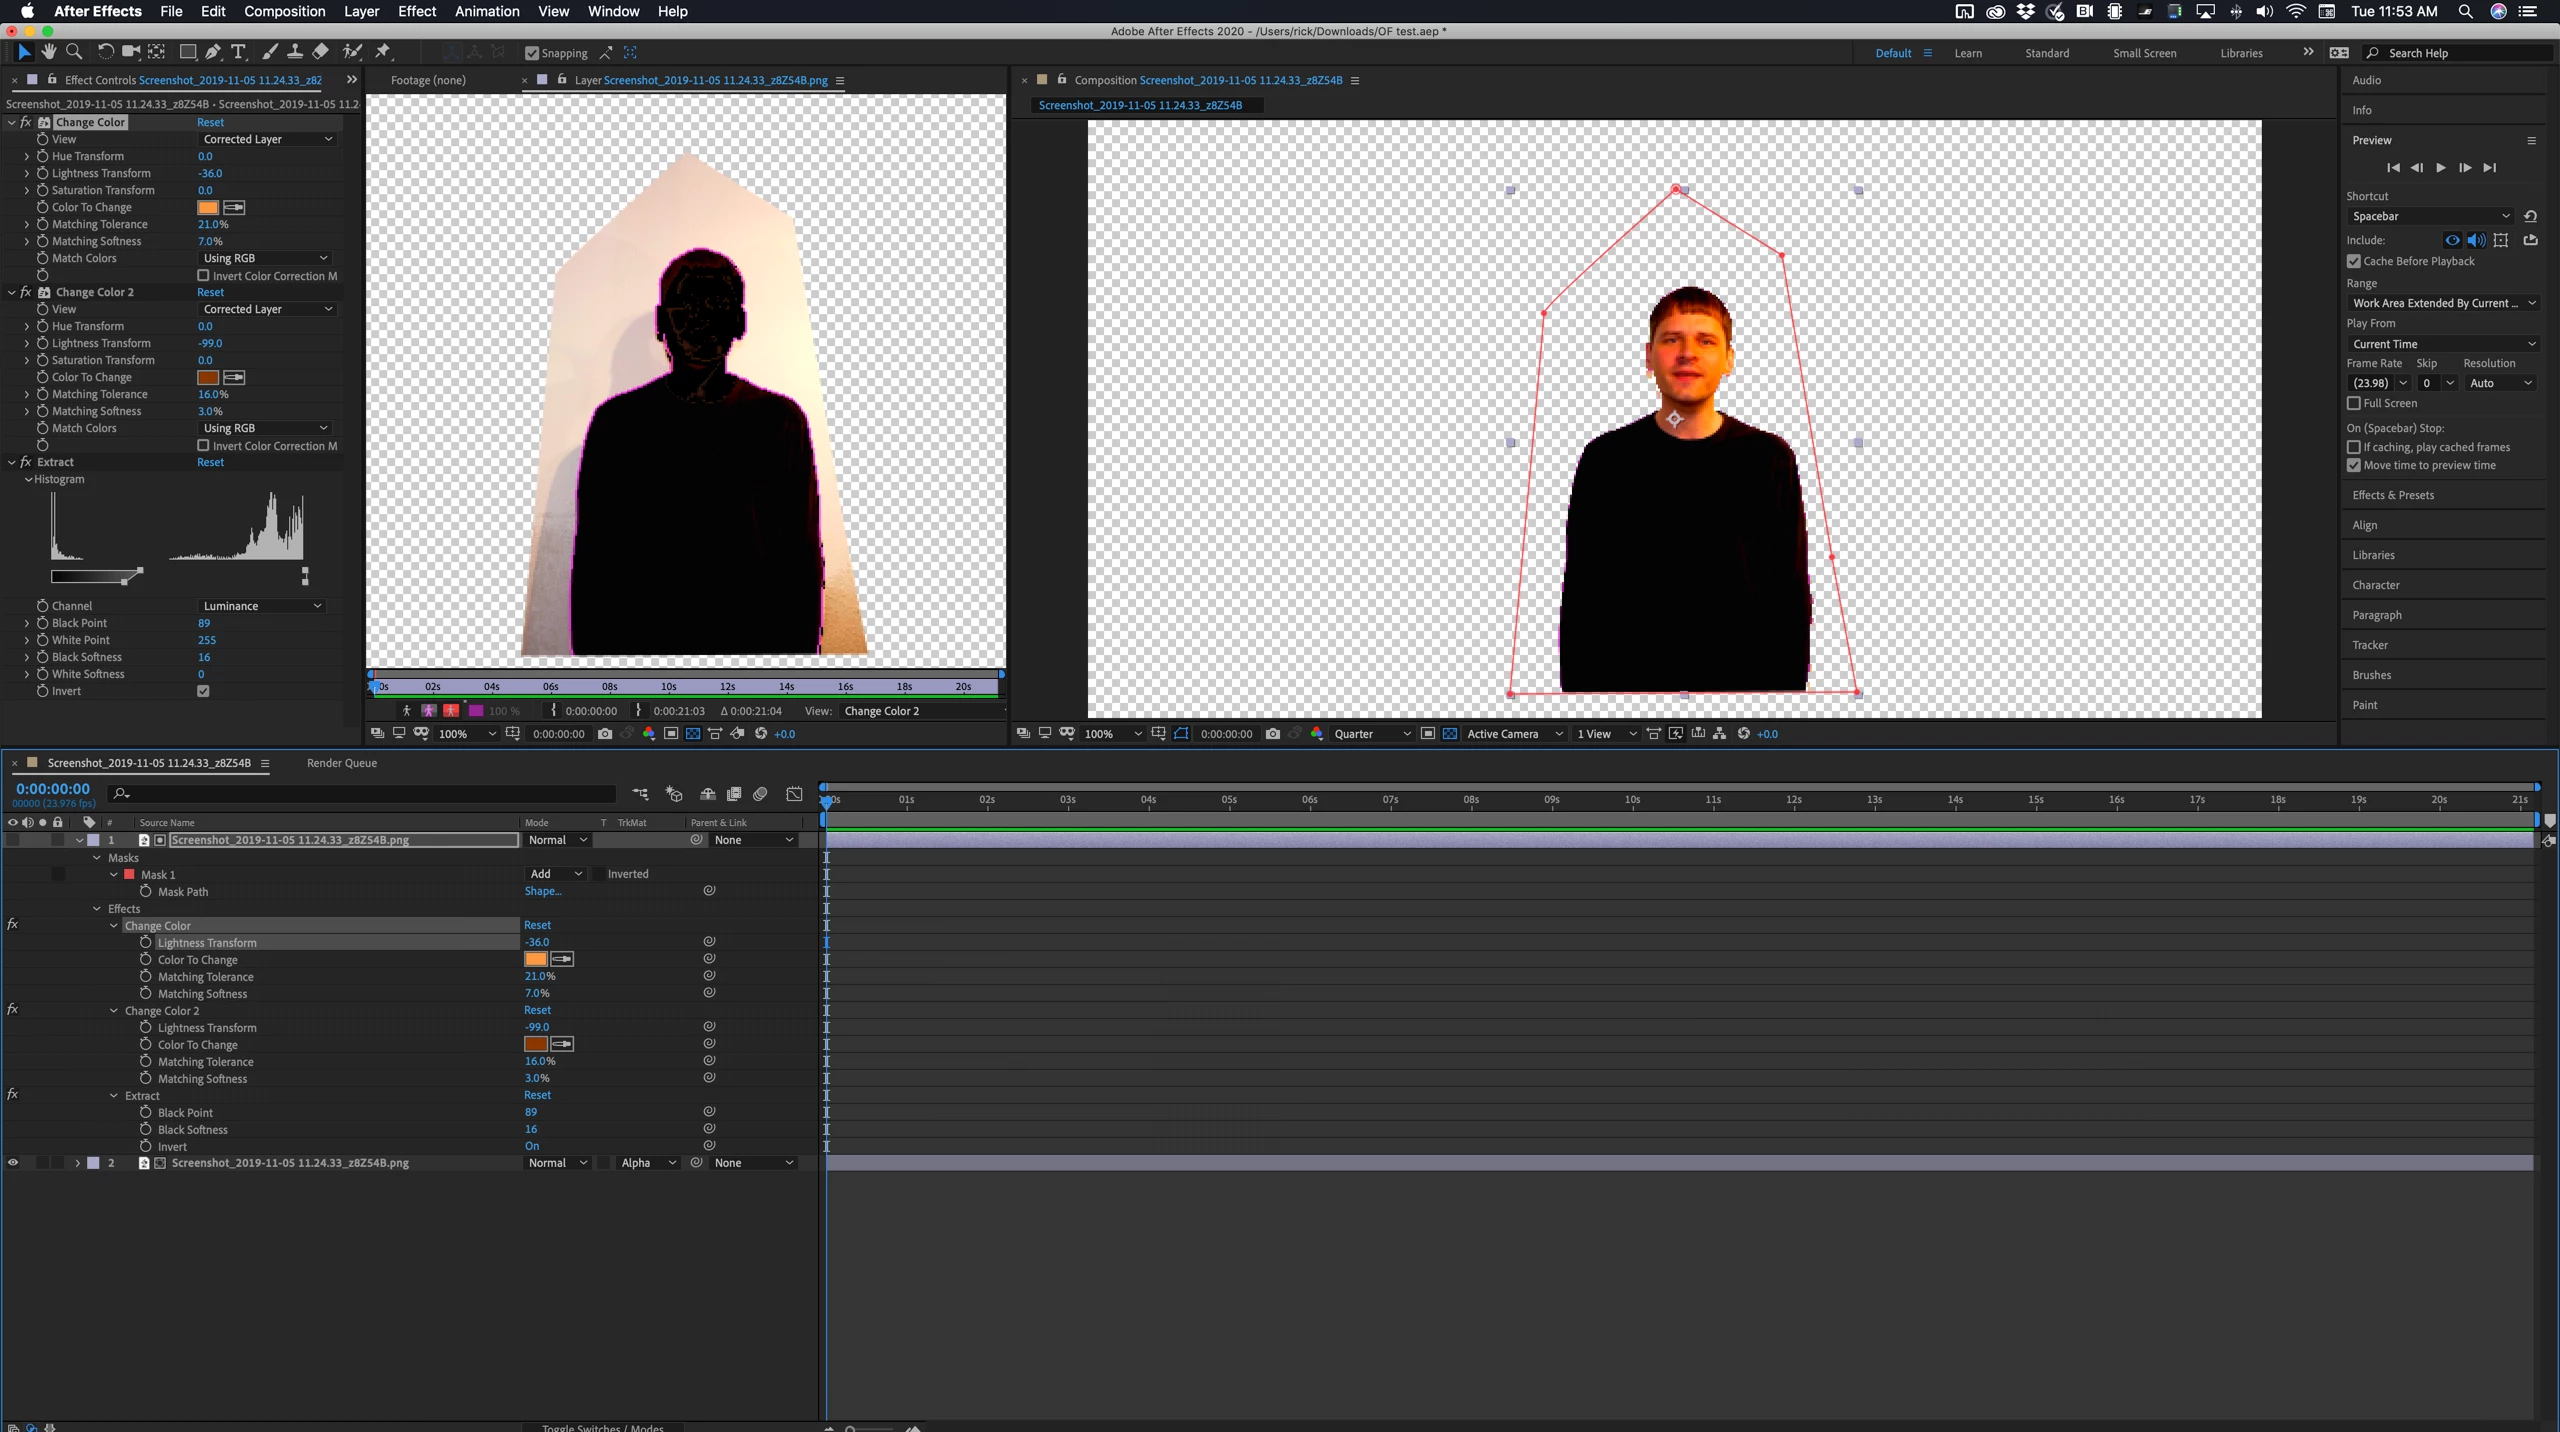
I took a screenshot of your screenshot, created a comp, duplicated the footage layer and drew a quick garbage matte. Then I applied Change color and sampled the face and darkened it until the shadows at the bottom of the screen started to block up, then I added Change color again and sampled the most saturated parts of the face and darkened it again until the actor was completely black. Then I added extract, inverted it, and adjusted the black levels to extract this matte. This is everything tha

...
Translate
LEGEND ,
Nov 05, 2019 Nov 05, 2019

Not really. Seasoned artists tend to do this non-linearly, though, i.e. mask out a few key frames that are very typical of a given segemnt and then moving back and forth to fill in the blanks with smaller tweaks and keyframes. that way, if you are lucky, on some segemnts the automatic interpolation will already be pretty close to the actual motion plus after a while of working you get enough "poses" to be able to use lots of copy & paste of keyframes, also only requiring minor tweaks thereafter.


Mylenium

Translate
Report
Community guidelines
Be kind and respectful, give credit to the original source of content, and search for duplicates before posting. Learn more
community guidelines
Community Expert ,
Nov 05, 2019 Nov 05, 2019

There are a lot more ways to create a procedural matte than Keylight or Luma Key. Show us a screenshot and we can probably point you in the right direction. I'm working on a shot right now where I am cutting out the trees in the foreground almost entirely with Colorama.


Rotoscope by hand is NEVER done frame by frame because it is almost impossible to get smooth edges and it takes forever. Automated rotoscoping by using Motion Tracking or AE's Rotobrush is also almost always a better first choice than Roto by hand if the shot is at all complex or long.


If you do have to roto by hand, and the object you want to isolate is a person in front of a white wall you also would not want to use a single mask for the whole thing. You would create one mask for the body, one for the head, one for each arm. You should take a look at this post: Rotoscoping - The Basics - Effects Corner by one of the masters of effects work Scott Squires. He isn't using AE but the principals are the same. Make sure you study both parts.


Often Motion Stabilizing a shot will help. Also, using a solid or a shape layer as a track matte is almost always a better idea than doing the roto directly on the footage because you can see through the matte if you use blend modes. Here's a quick tutorial I did on that a long time ago that may help.


Because you are new you should also spend a significant amount of time using the Learn resources on the AE Home Screen right inside AE. Here's where that will take you: Learn AE


You should also always post screenshots of your problem layers that show the entire UI and the modified properties of the layer you are having problems with. Select the layer, press "uu" to show us what you have done, then put the whole thing on the forum so we know what you are trying to do. If you want further help with this shot at least show us a frame from the shot so we can help you do the roto in a very efficient way. Here's a matte I made from a very difficult shot using Colorama, Gaussian Blur, and Extract. I will use the layer as a track matte to replace the mountains on the left side of the screen:

Screenshot_2019-11-05 10.43.59_Ace3Qo.png

You can see the original Log footage on the left and the matte I have made on the right. If I can knock out most of the mountains in this shot only using a simple 4 point shape layer with 3 keyframes to cover the road and a few effects there is a very good chance you can remove the white wall using the same basic techniques.

Translate
Report
Community guidelines
Be kind and respectful, give credit to the original source of content, and search for duplicates before posting. Learn more
community guidelines
Contributor ,
Nov 05, 2019 Nov 05, 2019

Screenshot 2019-11-05 at 20.18.04.png

Thank you for your answer. Here is a screenshot. The resolution preview is set on to a quarter. If I set it higher it just keeps loading and I can't work..

Translate
Report
Community guidelines
Be kind and respectful, give credit to the original source of content, and search for duplicates before posting. Learn more
community guidelines
Community Expert ,
Nov 05, 2019 Nov 05, 2019

I took a screenshot of your screenshot, created a comp, duplicated the footage layer and drew a quick garbage matte. Then I applied Change color and sampled the face and darkened it until the shadows at the bottom of the screen started to block up, then I added Change color again and sampled the most saturated parts of the face and darkened it again until the actor was completely black. Then I added extract, inverted it, and adjusted the black levels to extract this matte. This is everything that I did to the layer. With your original footage, you should be able to get very close to removing the background in just a few steps. You'll only have a few keyframes for the mask unless the actor moves around a lot. This is what the comp looks like. It took less than 3 minutes:

Screenshot_2019-11-05 11.53.45_o1afyH.png

If you post a full-resolution frame of the footage I can give you the exact settings that should work. Even if you have to do a bit of hand roto, this will be way faster than trying to use Rotobrush. 

Translate
Report
Community guidelines
Be kind and respectful, give credit to the original source of content, and search for duplicates before posting. Learn more
community guidelines
Contributor ,
Nov 06, 2019 Nov 06, 2019

Rick, this was very helpful! My result isn't to far from yours I would say. The person doesn't move very much other than shaking his head (he is dubbing a vocal for a music video), so the garbage mask is fine. What remains to be fixed is that little part under his left ear. You would suggest that I do this with hand roto? Doesn't that make me have to go through every frame again?

Screenshot 2019-11-06 at 17.33.24.png

Translate
Report
Community guidelines
Be kind and respectful, give credit to the original source of content, and search for duplicates before posting. Learn more
community guidelines
Community Expert ,
Nov 06, 2019 Nov 06, 2019

I would throw a bunch of color correction on the copy of the footage and then pre-compose before I started messing with extract or other techniques. If I could see a full resolution frame of the original video I might be able to give you a better starting point.

Translate
Report
Community guidelines
Be kind and respectful, give credit to the original source of content, and search for duplicates before posting. Learn more
community guidelines
Contributor ,
Nov 06, 2019 Nov 06, 2019
LATEST

Here is a full res photo:
Screenshot 2019-11-06 at 19.35.33.png

Why would you pre-comp before using extract? To save ram?

Translate
Report
Community guidelines
Be kind and respectful, give credit to the original source of content, and search for duplicates before posting. Learn more
community guidelines