• Global community
    • Language:
      • Deutsch
      • English
      • Español
      • Français
      • Português
  • 日本語コミュニティ
    Dedicated community for Japanese speakers
  • 한국 커뮤니티
    Dedicated community for Korean speakers
Exit
1

Tell camera to follow an object?

Participant ,
Dec 19, 2016 Dec 19, 2016

Copy link to clipboard

Copied

I have a wide shot of my dad cutting grass with his lawn mower. I want to zoom in on him and let the camera follow my dad. I have watched tutorials on camera tracking and motion tracking. But I can't figure out how I can follow the lawn mower when zoomed in. Any tutorials you can link to?

I'm new to this, and the lessons on adobe didn't tell me how to do it. Just point me in the right directions. I'm out of words on how to search for the right tutorial.

Views

18.0K

Translate

Translate

Report

Report
Community guidelines
Be kind and respectful, give credit to the original source of content, and search for duplicates before posting. Learn more
community guidelines

correct answers 1 Correct answer

Community Expert , Dec 23, 2016 Dec 23, 2016

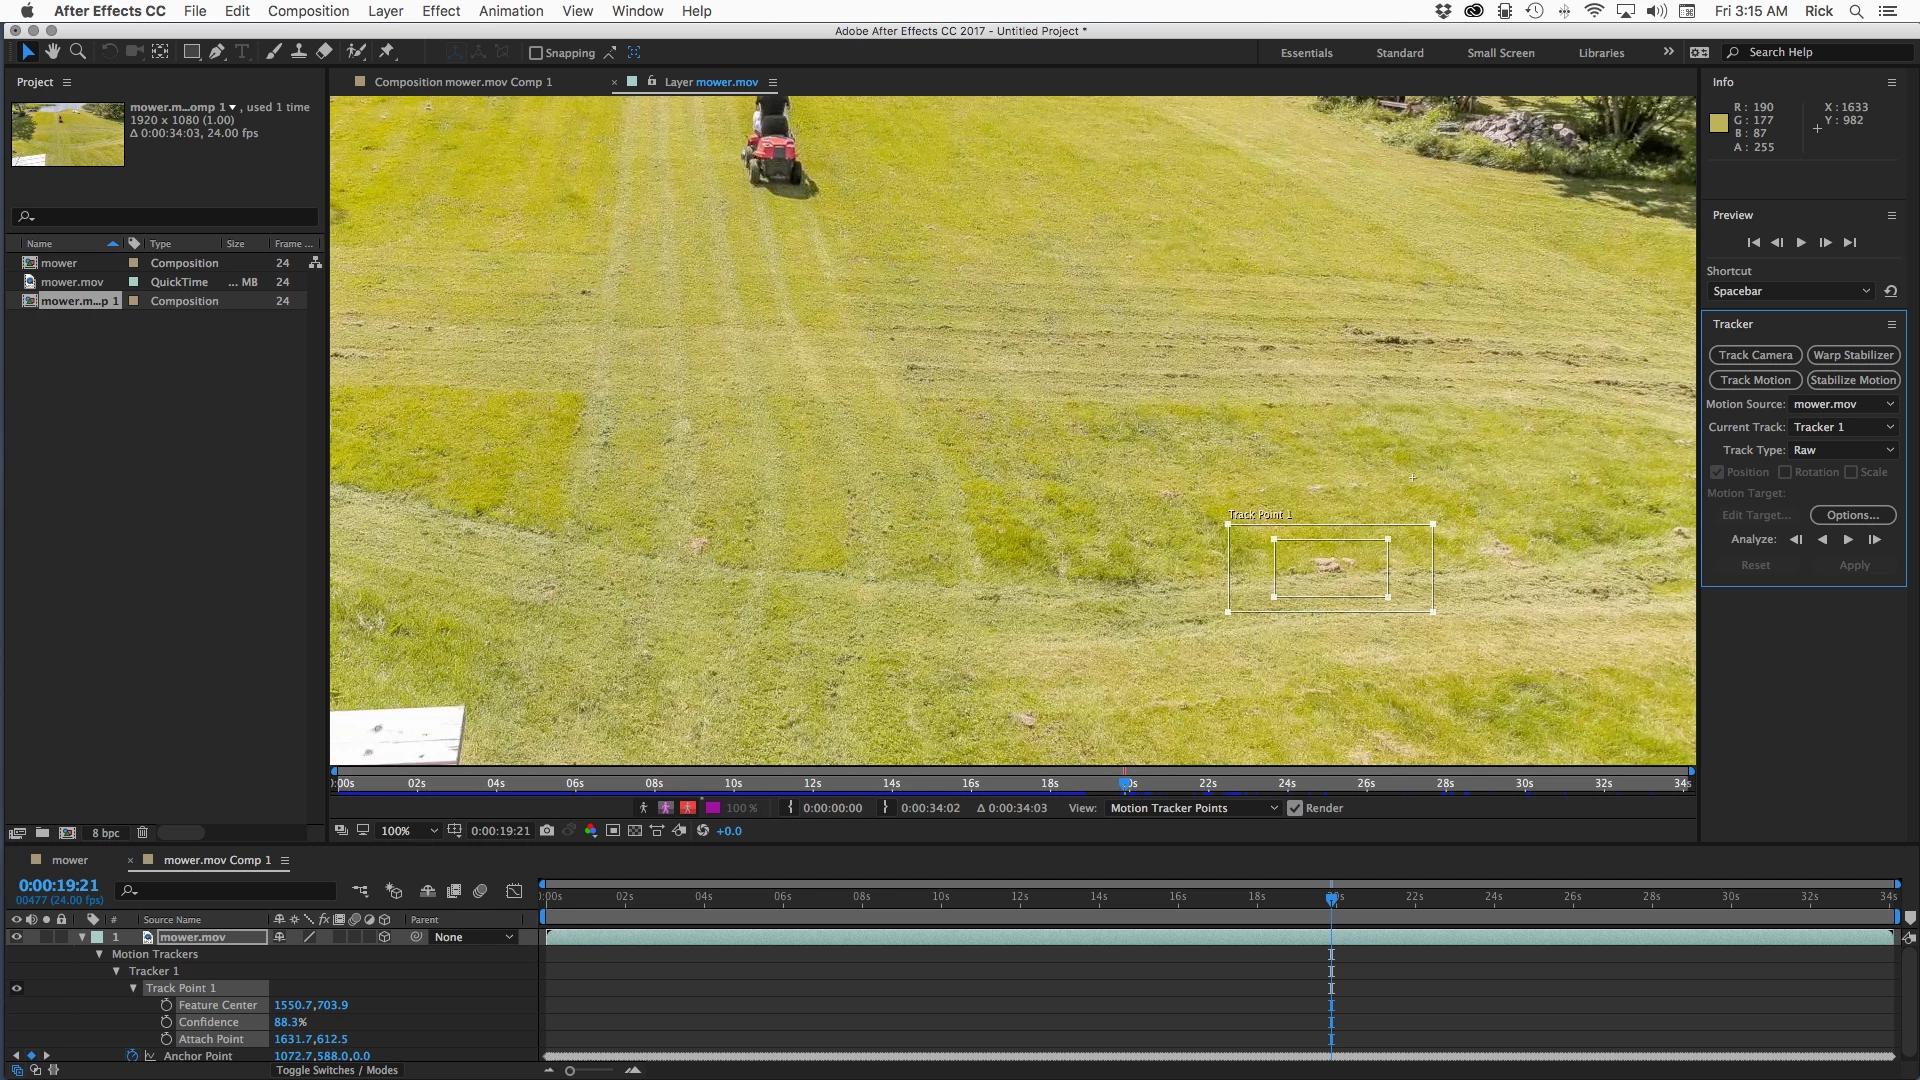
I would use a similar approach. It took just a minute or two to find a feature in the frame that stayed in the frame for the entire shot. It's just a little pile of debris. I resized the search and detail areas so I could have enough detail to get a good track:

Screen Shot 2016-12-23 at 3.39.27 AM.png

Here it is in the full frame:

Screen Shot 2016-12-23 at 3.15.57 AM.png

On the first attempt at tracking starting from this frame I got to about 26 seconds before the track slipped and I had to go back a few frames and start tracking. Most of the time, if you loos your detail area

...

Votes

Translate

Translate
LEGEND ,
Dec 19, 2016 Dec 19, 2016

Copy link to clipboard

Copied

You don't HAVE to track it.  You don't even need 3D.  Just Scale up the layer and animate the position property.  It ought to work pretty well.

Votes

Translate

Translate

Report

Report
Community guidelines
Be kind and respectful, give credit to the original source of content, and search for duplicates before posting. Learn more
community guidelines
Participant ,
Dec 19, 2016 Dec 19, 2016

Copy link to clipboard

Copied

It's a hyperlapse, with 700 images. Do you mean I need to keyframe every movement? I want to keep the lawn mower in the center all the time.

Votes

Translate

Translate

Report

Report
Community guidelines
Be kind and respectful, give credit to the original source of content, and search for duplicates before posting. Learn more
community guidelines
LEGEND ,
Dec 19, 2016 Dec 19, 2016

Copy link to clipboard

Copied

You imported this as a image sequence, right?

So it sits in a comp as one layer, right?

Scale it up.  Animate horizontal position.  If it takes you any more than 10 minutes to get it right, write back.

Votes

Translate

Translate

Report

Report
Community guidelines
Be kind and respectful, give credit to the original source of content, and search for duplicates before posting. Learn more
community guidelines
Participant ,
Dec 19, 2016 Dec 19, 2016

Copy link to clipboard

Copied

I really, really don't get it. Either it's to easy or I'm to dumb to understand. It's so frustrating. I keyframed camera movements. But since I want the object in dead center the manually movement is not accurate and not so smooth.

I understand the scaling up. But I don't know what you mean by animate horizontal position.

It's yes on both your questions.

Votes

Translate

Translate

Report

Report
Community guidelines
Be kind and respectful, give credit to the original source of content, and search for duplicates before posting. Learn more
community guidelines
LEGEND ,
Dec 19, 2016 Dec 19, 2016

Copy link to clipboard

Copied

Here it is, step-by-step.

  • Work ONLY in 2D.  Use NO cameras.  Forget about them.
  • Place the footage in a comp.
  • Find the spot in the footage where you want the zoom to begin.  Make a Scale and a Position keyframe.
  • Go to the spot in the timeline where you want the zoom to end.  Increase the Scale value; a Scale keyframe appears.  Move the layer horizontally until the subject is centered; a position keyframe appears.
  • Go to the end of the shot.  Check to see if the subject is still centered.  Adjust horizontal position if necessary -- look, another keyframe.
  • Scrub through the timeline backwards to find the spot where the subject is most un-centered.  Adjust horizontal position, creating more position keyframes.
  • Repeat the process until the subject is centered throughout.

That's all there is to it.  Nothing fancy.  People have been doing it this way in AE for years.  It's dead simple.  Once you get your AE chops up to speed, this is something that takes just a couple-three minutes.

Votes

Translate

Translate

Report

Report
Community guidelines
Be kind and respectful, give credit to the original source of content, and search for duplicates before posting. Learn more
community guidelines
LEGEND ,
Dec 19, 2016 Dec 19, 2016

Copy link to clipboard

Copied

it appears you want to stabilize the shot (whice requires tracking to be executed accurately) around your dad. Is that correct? Can you show us the footage and also a frame of the result you had in mind?

Votes

Translate

Translate

Report

Report
Community guidelines
Be kind and respectful, give credit to the original source of content, and search for duplicates before posting. Learn more
community guidelines
Participant ,
Dec 19, 2016 Dec 19, 2016

Copy link to clipboard

Copied

Don't have much time now, but will show you the footage later. On another computer. But, yes. I think I need a tracker. I was hoping AE had a tracker that I could put on the lawn mower, and then let AE track the mowers movement. And when I assign the AE camera to the tracking, it will follow the mower perfectly.

Votes

Translate

Translate

Report

Report
Community guidelines
Be kind and respectful, give credit to the original source of content, and search for duplicates before posting. Learn more
community guidelines
LEGEND ,
Dec 19, 2016 Dec 19, 2016

Copy link to clipboard

Copied

You can stabilize your footage. How complicated this should be is dependent upon the specific shot. The basic setup is this:

1. Highlight the footage

2. Open the tracker window and select stabilize motion

3. Select a feature region to track and adjust the search region and track the footage

4. hit Apply

if the attach point had no special problems, you now have a stabilized shot around the attach point. You can scale the footage if you want.

more about it here: Tracking and stabilization motion workflows in After Effects

Votes

Translate

Translate

Report

Report
Community guidelines
Be kind and respectful, give credit to the original source of content, and search for duplicates before posting. Learn more
community guidelines
Participant ,
Dec 20, 2016 Dec 20, 2016

Copy link to clipboard

Copied

I got no idea why this isn't working. The clip is 2D. I click stabilize motion, place the tracker on my dads head. Click apply, and then analyze. After it has analyzed, I zoom in to my tast, making sure my dad is in the center of the frame. But guess what. He drives out of the frame. The frame won't follow him as I want to. What am I doing wrong here?

Votes

Translate

Translate

Report

Report
Community guidelines
Be kind and respectful, give credit to the original source of content, and search for duplicates before posting. Learn more
community guidelines
People's Champ ,
Dec 20, 2016 Dec 20, 2016

Copy link to clipboard

Copied

You're not doing anything wrong. You just don't know what you're doing.

Maybe the one mistake you made was assuming you could just open After Effects and start using it.

Also not knowing good animating techniques like working backwards then keying your in-betweens.

All you want to do is keep your dads head in the center of the window as you zoom.

All you need to do is set a few keyframes on the video layer's position (or anchor point) and scale.

There's no need for a camera.

There's no need for tracking or stabilization.

Dave gave you essentially the correct advice.

1) Start over.  Import your video to a new scene. No camera. One layer of either your video

    or a precomp of your sequence.

2) Use the Pan Behind Tool to position the layers anchor point on your dads head (or the point you want centered)

3) Set keyframes on the anchor point and scale at frame one. Then move the CTI to the end,  set the scale and anchor point to where

    you want it to be at the end (you want to keep the anchor point on your dad's head).  The keyframes be set automatically.


4) Move the CTI to the point in time where you want the scaling to begin then drag the keyframe you set at frame one to that point.

5) Move the CTI to the point where you want the zoom to complete and drag the keyframe you set at the end to THAT point.

    (because the anchor point is on your dads head it will keep your dads head in the center).

6) scrub back & forth setting keyframes to keep the anchor point on your dads head in between the existing frames only

     if necessary meaning only if your dad's head is not where you want it at the in-between point.

Try to set as few keyframes as possible.

This is pretty much as simple as keyframe animation gets.

Of course, that is not operating from the assumption that keyframe animation is simple.

~Gutterfish

Votes

Translate

Translate

Report

Report
Community guidelines
Be kind and respectful, give credit to the original source of content, and search for duplicates before posting. Learn more
community guidelines
Participant ,
Dec 20, 2016 Dec 20, 2016

Copy link to clipboard

Copied

Am I on the right track here? But the tracker keep losing its position, so I need to reposition a lot!
Skjermbilde 2016-12-20 kl. 22.42.27.pngSkjermbilde 2016-12-20 kl. 22.42.34.pngSkjermbilde 2016-12-20 kl. 22.42.44.pngSkjermbilde 2016-12-20 kl. 22.42.53.png

Votes

Translate

Translate

Report

Report
Community guidelines
Be kind and respectful, give credit to the original source of content, and search for duplicates before posting. Learn more
community guidelines
LEGEND ,
Dec 20, 2016 Dec 20, 2016

Copy link to clipboard

Copied

Seems there are 2 approaches in this thread: one suggesting you should do this manually, and the other - using tracking techniques. let's see who nails it eventually.

First, lose the camera. You don't need it, although I see why you think you do. To stabilize a part of a video You don't need to tell a camera to follow it, you only need the anchor point of the footage to move exactly as your object which will result in a counter movement to the one your object is making causing it to stand still = this is how stabilizing works. So no 3D, no Camera.

Second, performing a matchmove sometimes takes more then just selecting a feature and track it. if the feature region is not easy to follow it will lose the track. sometimes setting the feature to "adapt feature when confidence is below _%" (in the options) is good enough. Sometimes you need a better feature region, sometimes you switch in the middle while keeping your attach point, sometimes you use Mocha to track it.

The main process is this: you first Analyse and then you apply. You analyze the tracking after you set a proper feature region and search region and use the options carefully. While analyzing you can stop and correct your options and continue until you are done. When it's all done you hit apply.

Lastly, looks like you got some training to do to get this to stick. as suggested before, you can send us the footage and we can guide you through it as we sometimes do. as said before, you need to read up on the proper resources because this is not an intuitive process at all. This takes practice and dedication and a lot of training as most vfx shots do Eventually.

Votes

Translate

Translate

Report

Report
Community guidelines
Be kind and respectful, give credit to the original source of content, and search for duplicates before posting. Learn more
community guidelines
Community Expert ,
Dec 20, 2016 Dec 20, 2016

Copy link to clipboard

Copied

If this footage is hyper lapse - time lapse, then it's going to be hard to track because that kind of footage is always hard to track. I'd guess that you are sampling too small an area.  I am also guessing that the images came from a still camera because none of the dimensions I see in your screenshots look like they match a standard video format.

Screen Shot 2016-12-20 at 11.10.00 PM.png

Here's what I would do, and in this order:

  1. Decide what size you want your rendered movie to be by picking one of the standard presets for comp settings. Unlike photographs video has a specific set of standards that you must follow if you are going to be successful. Only folks with expert knowledge should have compositions that say Custom in the composition settings.
  2. Figure out how much of the frame you want to see in your composition. If you intend to push in on 1/4 of the image then the image needs to be twice as wide as the composition. Say you were working in HD @ 1920 X  1080. This means that if you wanted to fill the screen with your footage that you should resize the image sequence to about 2000 pixels wide. If you wanted to push in on the image to show 1/4 of the frame then you would resize the image to approximately 4000 pixels wide. The goal here is to have your footage at or near 100% scale at some point in your composition.
  3. When you decide on the size of your movie (HD, 4K - but realize that most folks won't be able to playback a 4K video) then use a batch process to resize your image sequence. Lightroom or Bridge or even actions in Photoshop are great for this.
  4. Once you have properly sized your footage and imported it into After Effects and you have made sure that the footage frame rate matches the comp frame rate and that it is one of the standard frame rates then it's time to add the footage to a comp and start tracking. 
  5. To use the Track Motion feature to track the lawnmower I would make sure that you are including enough detail in the area you are tracking. The mower is going to turn and change direction so you will probably have to reset the tracker each time the mower turns. I'd use something like this:
    Screen Shot 2016-12-20 at 11.26.03 PM.pngScreen Shot 2016-12-20 at 11.26.21 PM.png
    Note how I've included a big portion of the lawnmower that isn't going to change shape as long as it is moving in the same direction and I've put the track point on an area of detail that I can carefully examine.
  6. When you start tracking, and it's going to be slower with a large detail area to track, you have to watch the track very carefully and stop it, fix it and sometimes back up to get the track to be solid. When the mower changes direction you have to decide where your new track point is and you may have to manually adjust frame by frame as it turns to keep the track accurate.
  7. When you have completed and checked your track it's time to apply the tracking info to a null. The null can be used as a parent for another layer or you can tie the position of the null to any kind of position property with a simple expression.
  8. The last step is to add your graphic to the shot and see how it looks. Usually, if there are just a couple of frames of bad data I just fix them by either deleting some keyframes or by animating the position of the layer I've parented to the null. You'll get the hang if it pretty quickly.

Here comes the best advice I can give you based on my understanding of the shot and your project. If your track falls apart very quickly because of the nature of time-lapse footage, then resize the track target. Just in case you missed it, the tract target is the entire set of pixels inside the center search area of the tracker. It is NOT the attach point. The AE Track Motion tool tracks details and it needs enough detail that does not change shape to perform well. If, after 10 minutes or so you are still having problems try tracking your footage in Mocha and use that tracking info to apply to the null.

There is one other thing to consider. If you want to also Motion track scale and rotation you have to have two areas on the mower you can track. The only option I see in the screenshot is to track the two wheels. This is going to add a lot of complexity to the project and it's going to be such a nightmare when the mower changes direction that you would probably be better off using multiple trackers for each part of the journey.

Here's my last point. If the speed of the tractor is relatively constant and your time lapse is making it nearly impossible to get a good track then Dave's initial suggestion of simply animating the track by hand may be the easiest option.

Votes

Translate

Translate

Report

Report
Community guidelines
Be kind and respectful, give credit to the original source of content, and search for duplicates before posting. Learn more
community guidelines
LEGEND ,
Dec 21, 2016 Dec 21, 2016

Copy link to clipboard

Copied

Great advice from Rick on preparing your footage if it's too big And of course work from within the presets (usually it's HDTV1080).

Rick demonstrated how to track motion which is what you want to do if you want to attach an element to your shot like a CG. you want to stabilize so you should apply the same technique suggestions when stabilizing only you Don't choose "Track Motion" but "Stabilize Motion" which results in applying the data to the layer's anchor point and not to a null - which creates stabilization.

Votes

Translate

Translate

Report

Report
Community guidelines
Be kind and respectful, give credit to the original source of content, and search for duplicates before posting. Learn more
community guidelines
Community Expert ,
Dec 21, 2016 Dec 21, 2016

Copy link to clipboard

Copied

I should also mention that if you want to zoom in on the mower then you can attach a camera's point of interest to the null with a simple expression and then position the camera so that it frames the shot the way you want it to be framed. You could also parent the camera to the null attached to the mower and use a single node camera to follow the mower around. I have not seen the footage, only a still frame, but from what I think the footage really looks like I think the easiest option would be to drop your footage in an HD comp and then just animate the position with a few keyframes so you get a smooth move over the footage. As big as the footage appears to be I don't think you would be very pleased if you tried to push in to anything close to what I have shown in the second screenshot because that wouldn't look very good.

Votes

Translate

Translate

Report

Report
Community guidelines
Be kind and respectful, give credit to the original source of content, and search for duplicates before posting. Learn more
community guidelines
Participant ,
Dec 22, 2016 Dec 22, 2016

Copy link to clipboard

Copied

Ok, I got this to work. Not 100%, but I'm getting there. I think I need to to try this technique with another clip. Easier clip. Because I messed up this shot because I'm moving the camera during the time-lapse.

After the tracking I applied a null. I got this rectangular marker which followed the mower. But when I wanted to apply the zoom with the camera, it didn't work that good. It kind of followed, but the mower kept disappearing out of the frame. Bottom line. The movement of the camera was to slow. I'm uploading the comp as we speak. Will give to the dropbox link later today. Don't think it will be ready before I have to leave for work.

I guess this is an easier way to do what I'm trying to do? Camera pan and zoom with Null object: After Effects Tutorial - YouTube​

Think it's going to be here when it's done uploading: Dropbox - Mower

Votes

Translate

Translate

Report

Report
Community guidelines
Be kind and respectful, give credit to the original source of content, and search for duplicates before posting. Learn more
community guidelines
LEGEND ,
Dec 23, 2016 Dec 23, 2016

Copy link to clipboard

Copied

we should have insisted on getting the shot earlier this would save a lot of time here. there is a lot of movement here, the camera is moving and also the mower - doing this manually could be a nightmare. I think the solution is in between both approaches offered to you here: use the tracking for the anchor point to stabilize almost all the X and Y, and correct just a tad and zoom using Z position to only what you need - only a few key-frames, I am assuming it's not important to have a constant scale in the frame because this can look unnatural as well.

I can try showing you in more detail later but just wanted to see if it works

track the footage using stabilize motion and set a feature region. set it to adapt motion on every frame and if confidence is below 80%. when he gets to the tree there is some manual adjusting going on. you may have to move the feature region and attach point together or in separate on occasion.
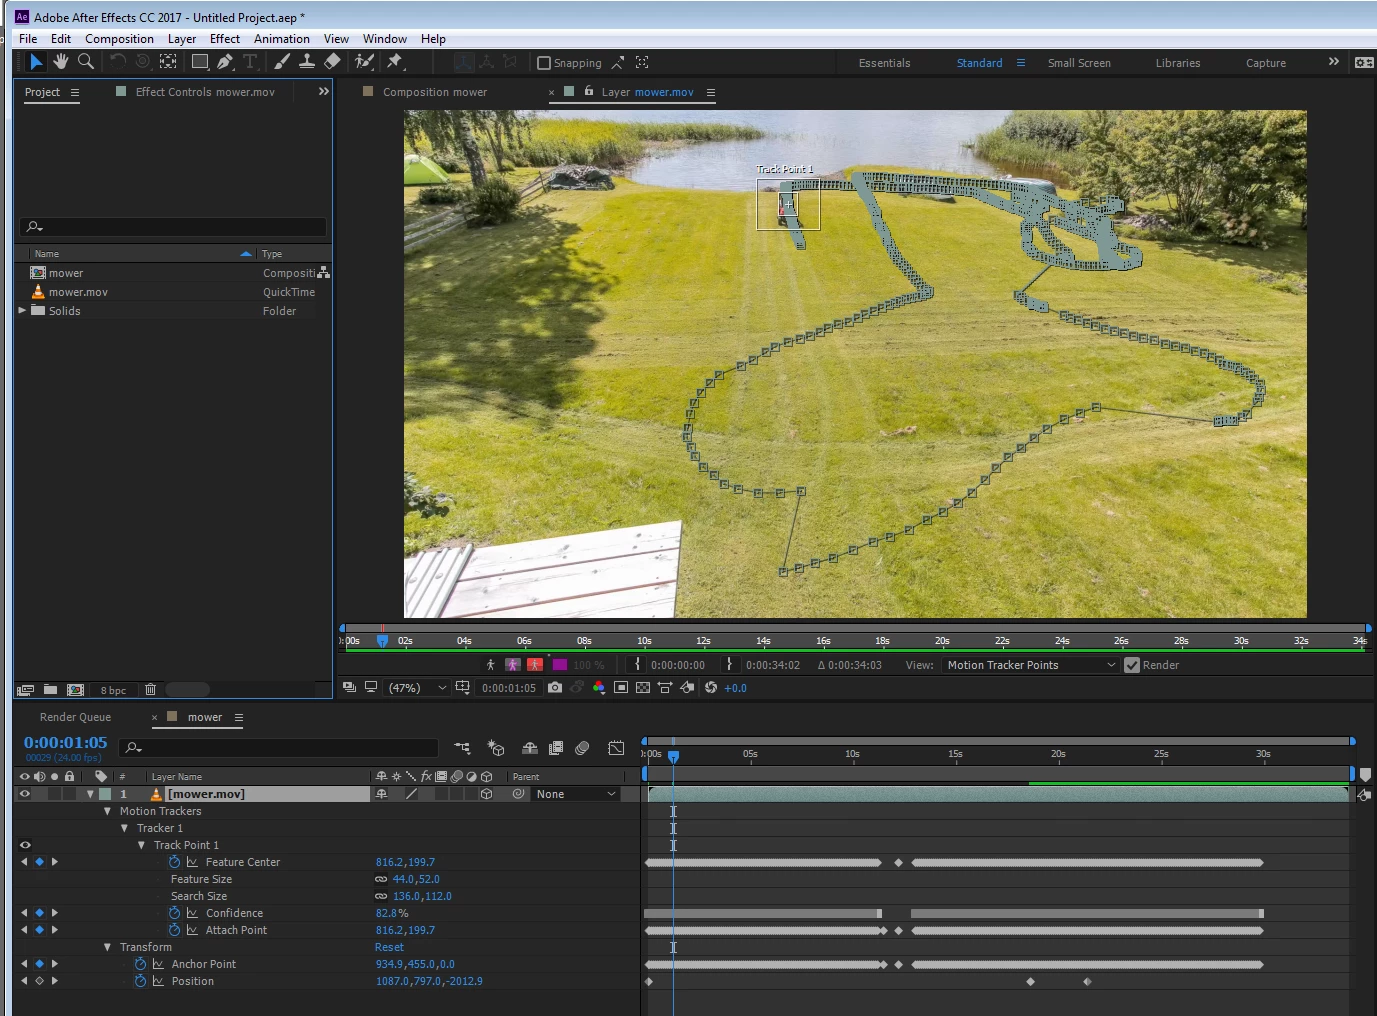
apply, set the layer as 3D so it will be easier to hover over it with just position, set the title safe markers so I can have a cross-hair right in the middle
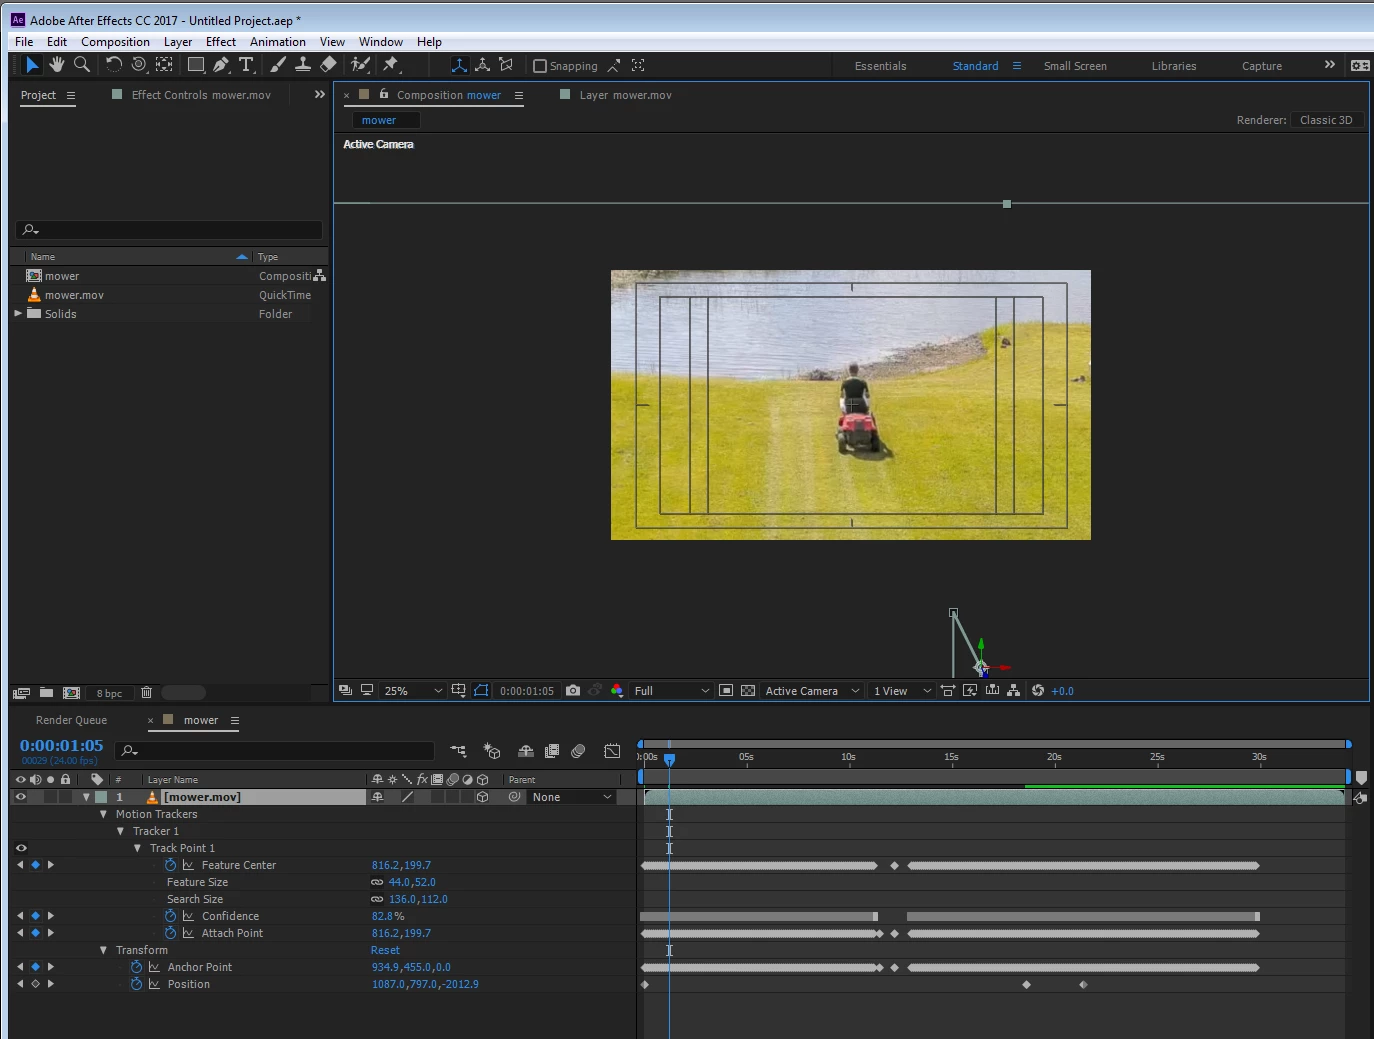
adjust the Z position to zoom in and set keyframes when I need to adjust (only a few)

and there you go in only a few minutes as my girlfriend's giving me a frown face because we need to go:
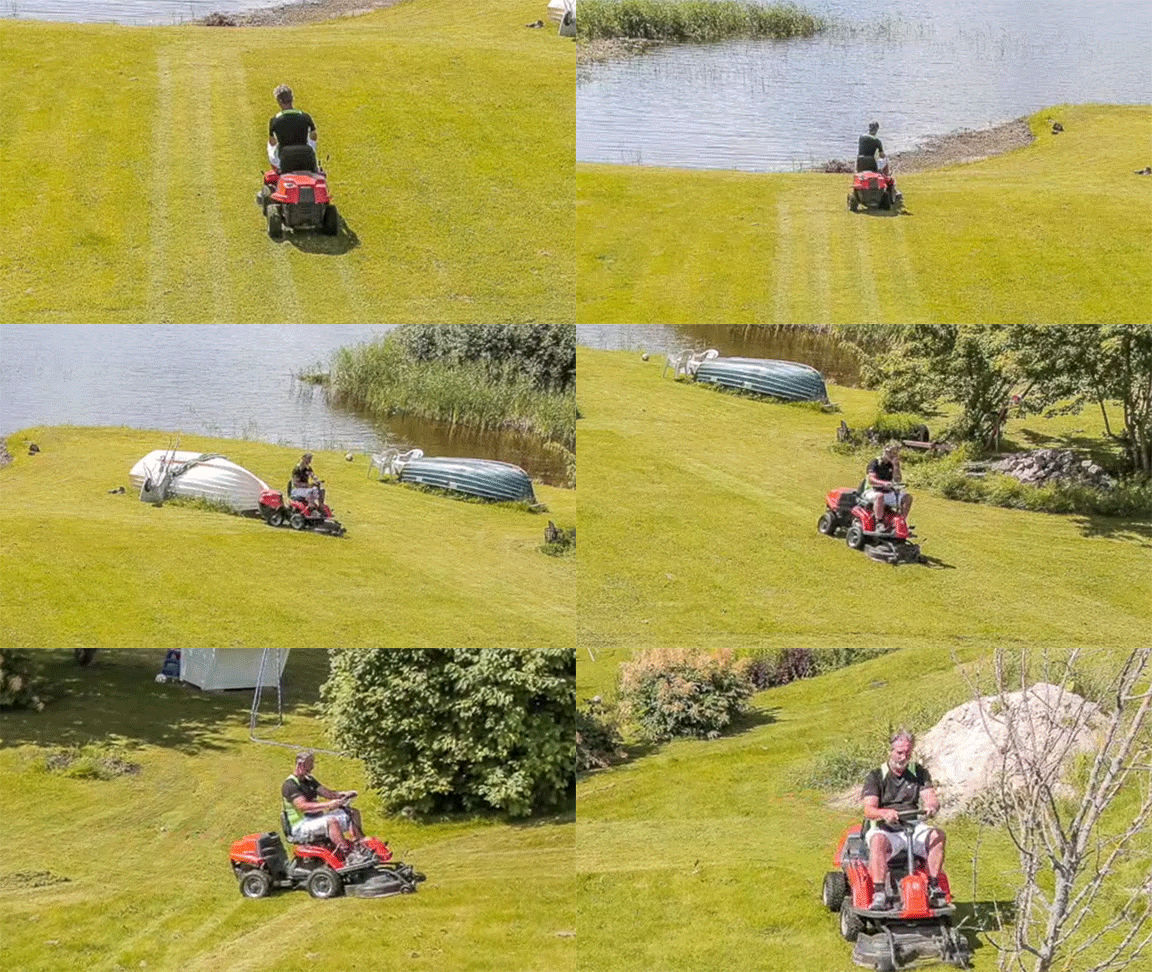
001.gif

as I said, will try later to show you in more detail. curious to see how others may approach this too!

Votes

Translate

Translate

Report

Report
Community guidelines
Be kind and respectful, give credit to the original source of content, and search for duplicates before posting. Learn more
community guidelines
Community Expert ,
Dec 23, 2016 Dec 23, 2016

Copy link to clipboard

Copied

I would use a similar approach. It took just a minute or two to find a feature in the frame that stayed in the frame for the entire shot. It's just a little pile of debris. I resized the search and detail areas so I could have enough detail to get a good track:
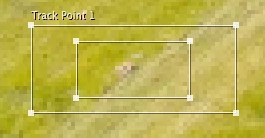
Screen Shot 2016-12-23 at 3.39.27 AM.png

Here it is in the full frame:

Screen Shot 2016-12-23 at 3.15.57 AM.png

On the first attempt at tracking starting from this frame I got to about 26 seconds before the track slipped and I had to go back a few frames and start tracking. Most of the time, if you loos your detail area and you go back to the last good frame you can just track forward one frame at a time using the far icon on the right for one or two frames and then go back to automated tracking and everything will be fine. When I got to the end of the clip I pressed the U key to reveal the keyframes, moved the CTI to the left of the first keyframe and pressed the K key to select the next keyframe. I then tracked backwards to the start of the clip. I had to stop and repeat the fix the lost track trick twice. With the track locked down perfectly I applied motion stabilize to X and Y. You get a comp that looks like this:
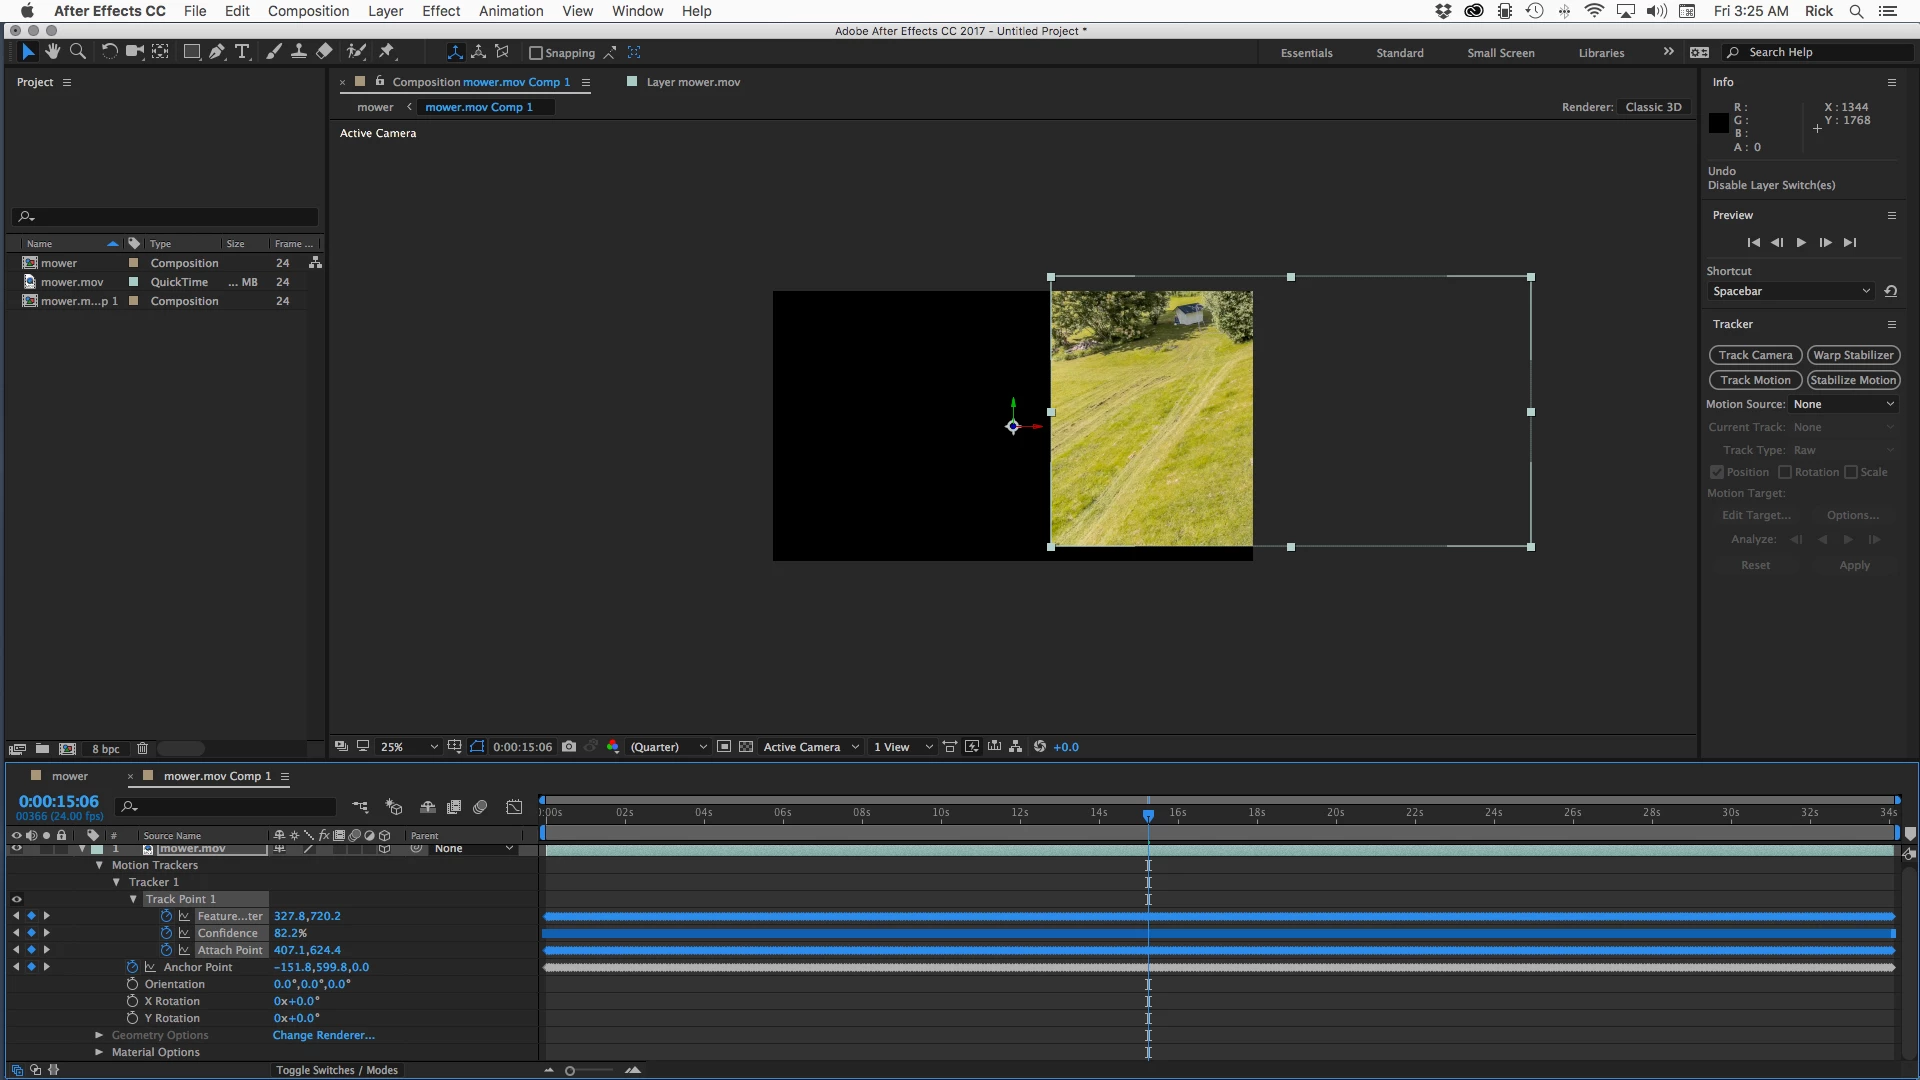
Screen Shot 2016-12-23 at 3.25.25 AM.png

The shot moves out of frame, but that's OK, I'll fix that in the next step.

The first thing to do is change the tracked footage layer to 3D. This comp is pre-composed and a One Node camera is added. A one node camera is the easiest type of camera to control in this specific situation. If the shot was just slightly different you might be better off with a 2 node camera. Collapse transformations for the footage layer is enabled so that the nested comp (pre-comp) is treated like the 3D layer that it is and the camera can see beyond the edges of the comp frame.

To maintain the resolution of the footage so that the effective scale stays at 100% I resized the comp to a smaller size so that I framed up dad to close to the maximum size I wanted him in the frame and then adjusted the X and Y position of the camera to compose the shot. I choose the NTSC DV Widescreen Square Pixel preset because that's a standard frame size that will work in a movie player. If your footage was 4D or bigger I would have picked HD 1080 square pixels. I would not make up my own frame size.

Now I just quickly scrubbed through the footage and set a few X Y and Z position keyframes to keep dad in the shot by just scrubbing through the comp until the footage moved out of frame and then started moving back again. I then selected all of the camera position keyframes and pressed F9 to Easy Ease all of them and checked the shot. I had to go back and adjust about 3 of the keyframes to smooth out the 'camera moves' and everything was done. Total time about 10 minutes. Here's the final timeline:
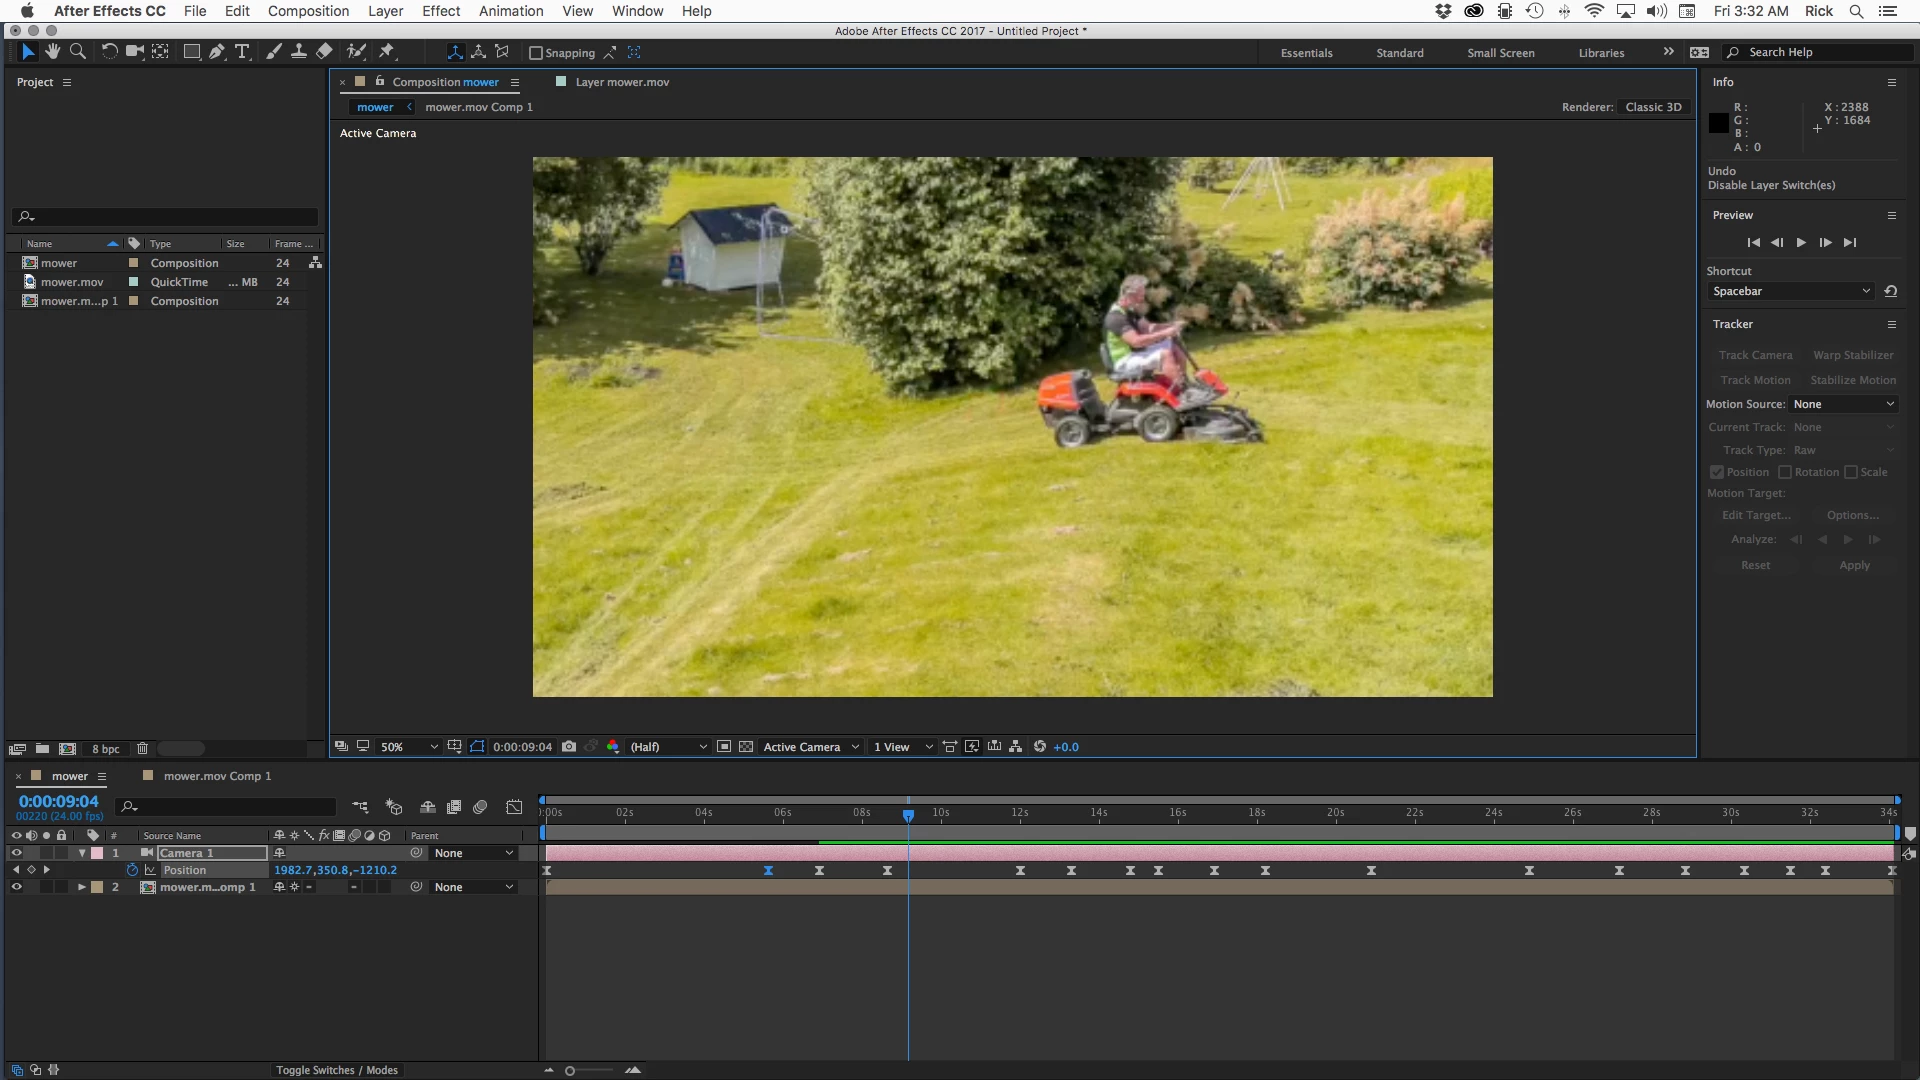
Screen Shot 2016-12-23 at 3.32.42 AM.png

The final animation project had a natural look to it and you would never suspect that there were problems that needed to be fixed.

Tracking the mower and stabilizing that part of the shot would not be a viable option because of the way dad moves almost out of the shot up by the tree. This was the easiest way for me to get to where I needed to be in the least amount of time while maintaining the maximum quality of the video. I I had the original full size video in hand I would have probably just resized the main comp to standard HD and used that for the maximum close up so that the camera moved only back in Z space when I animated it to change the framing.

Either of these methods will give you a satisfactory result. The important lesson to learn here is not in the specific technique but in how to think about the problem. Your problem is solved by stopping as much of the camera movement as possible in the most effective way possible then by adding a virtual camera to the shot or by animating scale and position (harder to make look natural with only a few keyframes, but you would only know that after you had a bunch of experience).

Good luck with the project. Here's my completed project for you to take a look at:Dropbox - dadMowing.aep​. All you'll have to do is point to your dropbox footage and you should be good to go. (note: your browser may add a .txt extension to the AEP file when it downloads. Just delete the .txt and the project should open.)

Votes

Translate

Translate

Report

Report
Community guidelines
Be kind and respectful, give credit to the original source of content, and search for duplicates before posting. Learn more
community guidelines
LEGEND ,
Dec 23, 2016 Dec 23, 2016

Copy link to clipboard

Copied

I guess this is an easier way to do what I'm trying to do? Camera pan and zoom with Null object: After Effects Tutorial - YouTube

the thing about this tutorial is that it is about a hovering over a STATIC image. you have a video with object moving, camera moving, and jumps!. btw I would add to this tutorial opening another view set to front so I can easily manipulate my camera's motion path seeing all the scene in frame.

as for your track - you can decide which approach you find more suitable for your purpose, or the one you feel more comfortable with. for me, adding a camera to this shot is unnecessary. stabilizing the shot by tracking the mower using adapt feature gives a natural result. the way I see it, the big challenge here is not stabilizing your camera, but stabilizing your mower so that you can follow it. the track is not easy, you need to change the search region a few times and you need to adjust the attach point to come back to center since we are adapting the feature and there is a drift.

Here is the breakdown:

click on the footage twice and open the tracker panel and click Stabilize Motion

this is not that easy for a beginner. for starters there is a camera move, an object move and there are occasions where there's a jump in the sequence. in addition your dad just had to be obscured by the tree right? but we will make do!

now, I will do this step by step, but things may very well, most likely be different for you as you track. the only thing you need to learn here is how to apply the principles of how point tracking works in this scenario where we want to follow and object and the organic continuous motion is more important than being dead on target. the specific frame when I had to adjust a region or move an attach point is less important.

a few things to know

1. we will change and move the feature region and search region from time to time because even if we adapt the feature, it's changing a lot.

2. we will only move the attach point sometimes to get it back to center

3. anytime you want to stop the tracker press spacebar (or any other key..)

4. you can delete the keyframes of the tracker if the track went astray from where it started to lose the track and try again from there.

5. this is not easy but certainly doable.

this is from the help files:

Tracking and stabilization motion workflows in After Effects

during the track when you want to adjust the search region as you go, you want to only move E and F. we will move L only when there is a jump in the frame or a big drift and this is to make it go back to center.

o.k let's do this:

we will Track using these options:

  • Feature Region is the inner rectangle - the sample you are looking on every frame
  • Search Region is the outer rectangle  -  where you look for the feature region
  • Adapt Feature means the feature will update on every frame and this is good for us because it is changing and all we need is for it to keep a consistent motion.
  • Stop Tracking if confidence is below 60% - we want the track to stop when it's really off.

this will give you a clean track until 12:00

on 12:01 were are moving only the search region (F in the diagram - notice your arrow needs to be white) to the center logo of the mower. adjust the rectangles accordingly. we are telling Ae to track this from now on but don't move the attach point.

on 15:20 we have a problem because we have a jump in the sequence. maybe you can fix the sequence and maybe you can't but this is what we have.

again moving only the search region to the shoulder

tracking goes fine but there's a drift in our attach point

let's go to the start of the drift at 17:03 and mark the attach points and delete them

we will move it manually to the center of the search region

continue tracking (take a break maybe...)

looks good

at 20:23 make the search region and feature region smaller

again the tree is obscuring so on 30:08

let's do this manually. we will move the attach point and let Ae interpolate the motion like with regular keyframes. we will move a few frames forward without tracking until 30:23

move entire track point (search region, feature region and attachpoint) with L (in the diagram) to here

it's almost over don't quit on me

continue tracking!

a little search region only fix at 31:16

continue tracking all the way home.

hit Apply X and Y. toggle the safety guide

set you layer to 3D and move the Z position by a generous amount

if you did a good job the cross hair will be at the center the whole time (a little drift is o.k, we can fix it)

now you need to see where there is a drift in the footage where your dad get's near the edge of the frame and compensate for it with some position keyframes. this is the manual part where Dave and Gutter-fish gave you good advice on how to keyframe it. it won't take much and that's a good thing because the movement will be more natural

hope you made it

mowe2.gif

there's a little unnatural movement when your dad is closer to the frame near the fence but with a bit of manual labour it can be made more natural.

here's benny hill music to go with this rapid GIF (because of disk space had to speed it up x4 in Photoshop)

Benny Hill Theme - YouTube

here's the project file:

Mower.aep - Google Drive

Votes

Translate

Translate

Report

Report
Community guidelines
Be kind and respectful, give credit to the original source of content, and search for duplicates before posting. Learn more
community guidelines
Participant ,
Dec 21, 2016 Dec 21, 2016

Copy link to clipboard

Copied

Oh wow, Rick, Roei and Gutter-Fish. Thank you so very much for you in detail description. I didn't expect this much help. This is much appreciated. Really, really thank you!

I have a really busy day today. I'm not able to try anything until tomorrow. But I know that AE is to much for me right now. I started with Final Cut Pro the way I starting to use AE. Doing stuff without knowing to much. That result in heavy googling and questions on communities. I will for sure pay back all the help I have gotten as soon as my knowledge is good enough to teach.

I will get back to you tomorrow when I have tried what you are telling me to do.
I can also render out an HD composition for you.

The thing is. This a timelapse - hyperlapse. I tried to follow my dad while pushing the shutter (continuous shooting). But I messed up, and couldn't keep him in the center. That's why I need to be able to zoom in to keep in dead center.

And yes, this is jpegs which I'm going to render out as ProRes, and then keep editing in Final Cut Pro. Color correction and sounds. And then render it as 1920x1080, 16:9.

Votes

Translate

Translate

Report

Report
Community guidelines
Be kind and respectful, give credit to the original source of content, and search for duplicates before posting. Learn more
community guidelines
LEGEND ,
Dec 21, 2016 Dec 21, 2016

Copy link to clipboard

Copied

Bottom line, Op: we need to see the footage. you can render an HD composition with the sequence (HDTV at the desired frame rate will do) to an mp4 file using AME and upload to dropbox or google drive. it's also worth describing again what exactly is the purpose here? is this important for this to be a totally locked shot on the lawn mower, or there's some wiggle room? without seeing the shot and trying some things it's really a guess work what will work best for you: manually (position/anchor point) or semi-automatically (stabilizing).

Votes

Translate

Translate

Report

Report
Community guidelines
Be kind and respectful, give credit to the original source of content, and search for duplicates before posting. Learn more
community guidelines
Community Expert ,
Dec 23, 2016 Dec 23, 2016

Copy link to clipboard

Copied

All of the monkeying around with the track area with the lawn mower as the target is the reason I chose to find that spot of grass that stayed in the frame. I then eyeballed camera move which is what a real camera operator would have done and even pot in a simulated camera on a crane move. I think it's a lot easier to get natural looking camera work this way.

Total time for my project 10 minutes. Check out the project I uploaded.

I always try to find the method that will give me the results that I need in least amount of time with least amount of fooling around.

Votes

Translate

Translate

Report

Report
Community guidelines
Be kind and respectful, give credit to the original source of content, and search for duplicates before posting. Learn more
community guidelines
LEGEND ,
Dec 23, 2016 Dec 23, 2016

Copy link to clipboard

Copied

Lesson learned. 

Yes, manually moving the camera on a stabilized shot proved natural and in far lesser time. good practice though. nice job and thanks for the lesson.

I would like to add to this technique if you don't mind. I would create a Rig for the camera (right click on the Camera->Create Orbit Null) and use a two window setup set to front and active camera. in front view with the null I would move only X and Y with my selection tool, and with the Camera I would only move the Z. now I can comfortably adjust my null to go where my mower is and adjust the motion path the way I want it.

Votes

Translate

Translate

Report

Report
Community guidelines
Be kind and respectful, give credit to the original source of content, and search for duplicates before posting. Learn more
community guidelines
Participant ,
Dec 25, 2016 Dec 25, 2016

Copy link to clipboard

Copied

So many thanks, guys! I'm out of words. Speechless! This must be the best christmas gift. You are so helpful. I'm diving into you tutorials, and I will give this a shot.

The jump is because of the tree. Dad got some trouble there, so I had to stop the time lapse for e minute or so. So it's unfixable.. But what you both achieved is what I want to achieve. And If I can't make it work now, I'm useless. Then I should go out and make a snowman instead.

I write back when I figured this one out.

Votes

Translate

Translate

Report

Report
Community guidelines
Be kind and respectful, give credit to the original source of content, and search for duplicates before posting. Learn more
community guidelines