christianb52134722
Participant
March 17, 2016
Answered

Editing full 360° panoramas and "protecting borders"

  • March 17, 2016
  • 7 replies
  • 32410 views

Hi there,

I'm trying to optimize 360° panoramas from my Ricoh Theta S panorama camera in Lightroom CC.

The problem with the developed images is a visible border/edge/line where the left and the right border of the plain jpg meet. This is of cause visible only, when displaying the processed pano in a software or on a website. It looks like this:

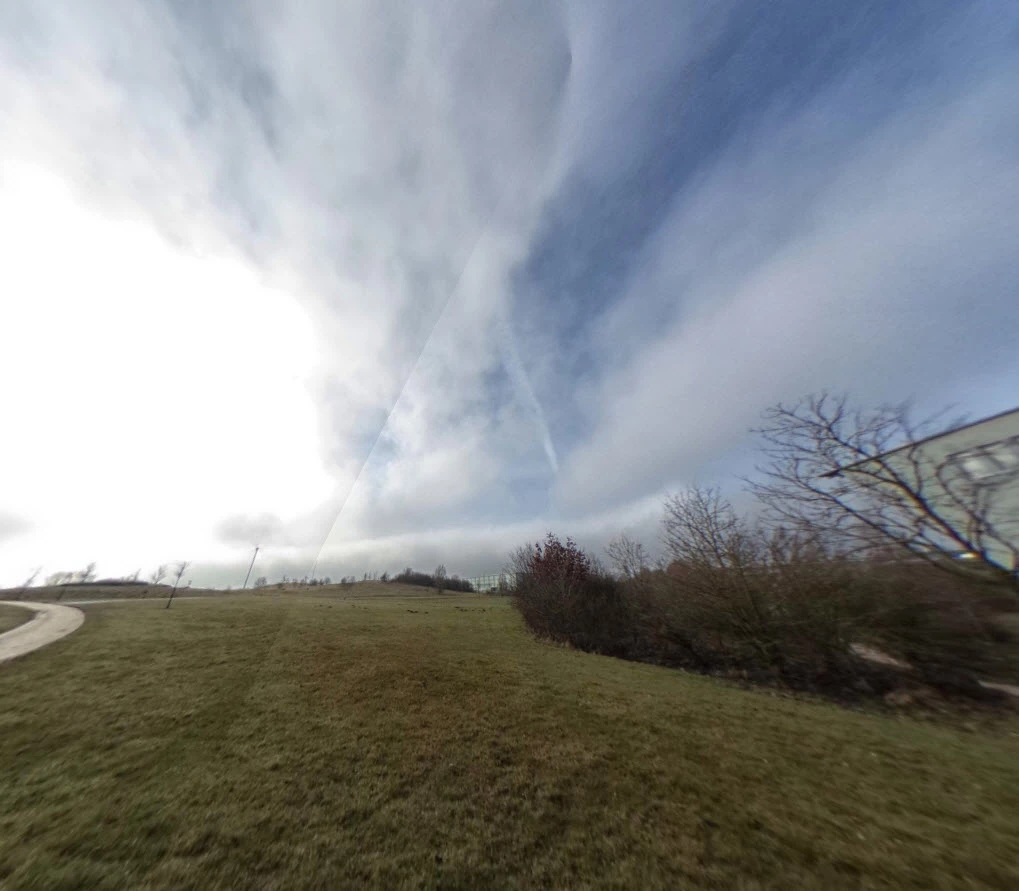
Is there a possibility to "protect" the borders in some way while editing? Or is there a way to tell Lightroom that it is handling a 360° panorama?

I could not find one answer in the web. You always get tutorials for merging images to a pano, but never for editing a already merged, full panorama.

Many thanks for your help

Christian

This topic has been closed for replies.
Correct answer Jao vdL

If you want to edit 360 degree panoramas (I do a lot of those and like to post them on google maps) in Lightroom the cardinal rule is to not touch highlights, shadows, whites, blacks, and Clarity. Those are HDR tools that do not know how to wrap themselves around. You can use the Tone curve. You can also do local edits as long as you don't edit at the left and right border. You can also do graduated filters as long as you make them perfectly horizontal. Here is an example of a spherical pano that I did final edits on in Lightroom: Google Maps. There is a graduated filter in the middle that I edited a bit using brushes. My workflow for these is quite involved but most of the edits happen in Lightroom after stitching.

7 replies

May 10, 2020

Thank You so much.

Community Expert
October 28, 2017

The way I do this and unfortunately that is still the fastest method is I shoot my image set (I use a nodal ninja rig), do some editing in Lightroom for sharpness and just a bit of light. Export them to 16-bit tiff in ppRGB or aRGB depending on the images. Stitch them in hugin (by far the best at this) and render in tiff. I take these into Lightroom and photoshop and edit them taking absolute care to not touch the seams in a way that would make them unseemly (pardon the pun). I do this by using graduated filters only perfectly horizontal and only brushing in the filters away from the left and right seems. At this point it would be great if I could directly edit the image in Photoshop using the new panoramic stuff but it is just too slow and unwieldy with the 16000x8000 16-bits originals on my not super modern machine. So then I export the image to 8-bit sRGB tiff and run it through a series of panotools scripts (erect2cubic) that generate 6 faces of a cube from the equirectangular original. I edit the nadir image in Photoshop to remove my tripod and add my info and usually brush the zenith image a bit as often there will be a bit of unseemliness there simply from clouds that moved during the taking of the panorama. Then I run cubic2erect and exiftool to get the metadata back into the image and open this in Photoshop in order to finally add the required metadata for a full spherical panorama to work on google maps and in facebook. I export from that to a jpeg file and upload that.

There should be a better way but I haven't found any that give as good results.

jefbak
Known Participant
October 19, 2017

In regards to color correction tools/filters, has anything changed now that Photoshop CC 2018 is out? I'm trying to apply the Camera Raw Filter, but still having problems with seams in 360 images and it gets really strange if you switch to the new Panoramic layer mode.... The only tutorials I've seen so far are for healing and clone replacement, not retouching support.

Community Expert
October 19, 2017

No. This is the first thing I looked at and you can't do things like adjustment layers and edit in the 3D environment. Only thing I've seen work is the cloning and brushing directly on the image, adding logos (which is nice as it saves me several steps) and you can dodge and burn directly on the image. So it is not a full solution yet unfortunately. At least I haven't discovered how to do it effectively.

jefbak
Known Participant
October 19, 2017

That is unfortunate. Color correction of 360 images has a higher priority for me than removing tripods....

TaylorJMcBride
Known Participant
August 21, 2017

I feel like I may be having the same issue. I'm considering (1) starting a new thread about it (2) continuing to search threads.

I also have a 360 LG camera which has two cameras and does the stitching inside the camera before the file is saved automatically. I import the files into photoshop to apply adjustments, and as long as I retain the metadata to the file, then when I upload it, Facebook and other viewers recognize it as a 360 pano and allow it to be viewed in VR. I've learned from research that there are specific HTML tags you can insert to the medadata (although I don't know what they are!) or sometimes the camera meta data will trigger the viewer. So I just keep the metadata as is (which means I have to edit the file as a JPEG and can not save it as a PSD and then export a JPEG, but I digress.

I found it very hard to locate tutorials on how to take such a file a flat JPEG, and then load it into Photoshops 3D mode to perform edits. Because I have the same issue, I often (especially if I apply very much adjustments) get those sharp lines where the photos are stitching, now if I had to the ability to use the close stamp tool in 3D mode, then I would be able to simply draw over the edge, but when I follow this process outlined in the following youtube video: (which is subtittled and in french) I'm not able to "grab" the image itself as he does in the video, I'm always forced to move my vantage point.

Create a 360° illustration from A to Z on Photoshop - YouTube

Ok so now I feel equally smart and stupid. I have managed to get inside of the 3d Space and look around inside my photograph, but when I try to apply brush or clone stamp to the stitching line, I can not. I have the sphereical panorama selected, but I can not even sample the colors on it.

How do I apply edits to the material?

Taylor J. McBride

Edited by Mod.

Community Expert
August 22, 2017

Taylor,

the metadata is described on this page: Photo Sphere XMP Metadata  |  Street View  |  Google Developers​.​ This works for Facebook, google maps, and many other places where you can view spherical panorama images. I usually insert this in Photoshop in the metadata file info thing by writing out the metadata to a xmp file, editing that file in a text editor and loading it back into the image. This metadata will then be retained by Lightroom and others.

TaylorJMcBride
Known Participant
August 22, 2017

Thank you that is very helpful

Taylor J McBride

[Personal info removed]

Participant
September 27, 2016

Jao, looks like you have some experiance with 360 panos. I am trying to stich 36 frames from a phantom drone ( 3 rows x 12 each) but cant get full horizontal sphere. If I go to PS filter/other/offset I can clearly see its not full. I tried many times on various sets but never get full circle. Do I do something wrong? Or there is a trick how to fill missing rows of pixels to overlap left and right side? Thanks

Community Expert
September 28, 2016

marco,

The issue is that you cannot stitch full 360 panoramas in Lightroom nor in Photoshop. They don't understand going around the 180 degrees borders. You have to use other software to do this. I use hugin, a free and open source piece of software. But this is very hard to install and use. There are many others that are commercial such as PTGui or AutoPano that are much easier to use. They all stitch around the boundaries and can create fully immersive spherical panos. The thread here was really about how to edit the output from such programs in Lightroom.

Jao vdLCommunity ExpertCorrect answer
Community Expert
March 18, 2016

If you want to edit 360 degree panoramas (I do a lot of those and like to post them on google maps) in Lightroom the cardinal rule is to not touch highlights, shadows, whites, blacks, and Clarity. Those are HDR tools that do not know how to wrap themselves around. You can use the Tone curve. You can also do local edits as long as you don't edit at the left and right border. You can also do graduated filters as long as you make them perfectly horizontal. Here is an example of a spherical pano that I did final edits on in Lightroom: Google Maps. There is a graduated filter in the middle that I edited a bit using brushes. My workflow for these is quite involved but most of the edits happen in Lightroom after stitching.

christianb52134722
Participant
March 18, 2016

Cool. Many thanks to both of you!

ssprengel
Inspiring
March 18, 2016

There is no special seamless mode for Lightroom that matches the two ends as you edit.  What I have done in the past is to use Photoshop and shift the image over and then heal/clone over the seam.

Photoshop also has a way to project the image into a spherical panorama 3D workspace, but I don't remember how to edit it, directly, to clone out the seam on the projected image, nor how to unwrap it, again.  If you want to play with it, here's how:

ftarnogol
Participant
December 30, 2016

How do you revert the spherical projection back to equirectangular?

Community Expert
December 30, 2016

The spherical panoramas I was referring to are stitched in hugin in equirectangular projection. I was using spherical in the sense of that it is a full sphere around you when projected in a panorama viewer. I share a lot of these on google maps. Here is an example of such a pano: Google Maps.