 Adobe Community
- Home
- Premiere Pro
- Discussions
- Re: "Why does my footage look darker in Premiere?"...
- Re: "Why does my footage look darker in Premiere?"...
Copy link to clipboard
Copied
Courageous community member Matt Johnson made a video based on this document. Watch here for a visualization of the solution, and read on to understand why the color shift is happening in the first place.
1. What's the issue?
a. "My exports look washed out when I view them in QuickTime player"
b. "When I post my video on YouTube it looks less saturated and the blacks are raised"
c. Footage appears darker after imported into Premiere Pro
d. Help!! Premiere Pro CC is changing the color of my imported footage
When importing footage into Premiere Pro, the display of the video looks more saturated than when it is played back on other apps such as VLC, QuickTime, After Effects, or a number of web browsers like Safari or Google Chrome. When played back on YouTube through those web browsers, the video also appears less saturated than it does in Premiere. As far as we know, this is a Mac-only issue. If you're experiencing this behavior and you're on a Windows machine, please send me a private message!

Side by side, you can see that video in Premiere (left) is displayed with more saturation than the video displayed in QuickTime (right).
(Screenshots provided from this forum post)

Quicktime on top, Premiere on bottom
(Screenshots from Boots Riley's "Sorry to Bother You")
2. Why is it happening?
a. Premiere displays video based on the assumption that your monitor is set to Rec709 color space and that your footage was recorded in reference to gamma 2.4, because that's the gamma standard for broadcast television. Gamma 2.4 displays with higher contrast — blacker blacks and whiter whites. It was chosen for broadcast television because the people who were deciding playback standards figured that people were watching TV in their dark living rooms, and they thought increased contrast levels looks prettier in that setting.
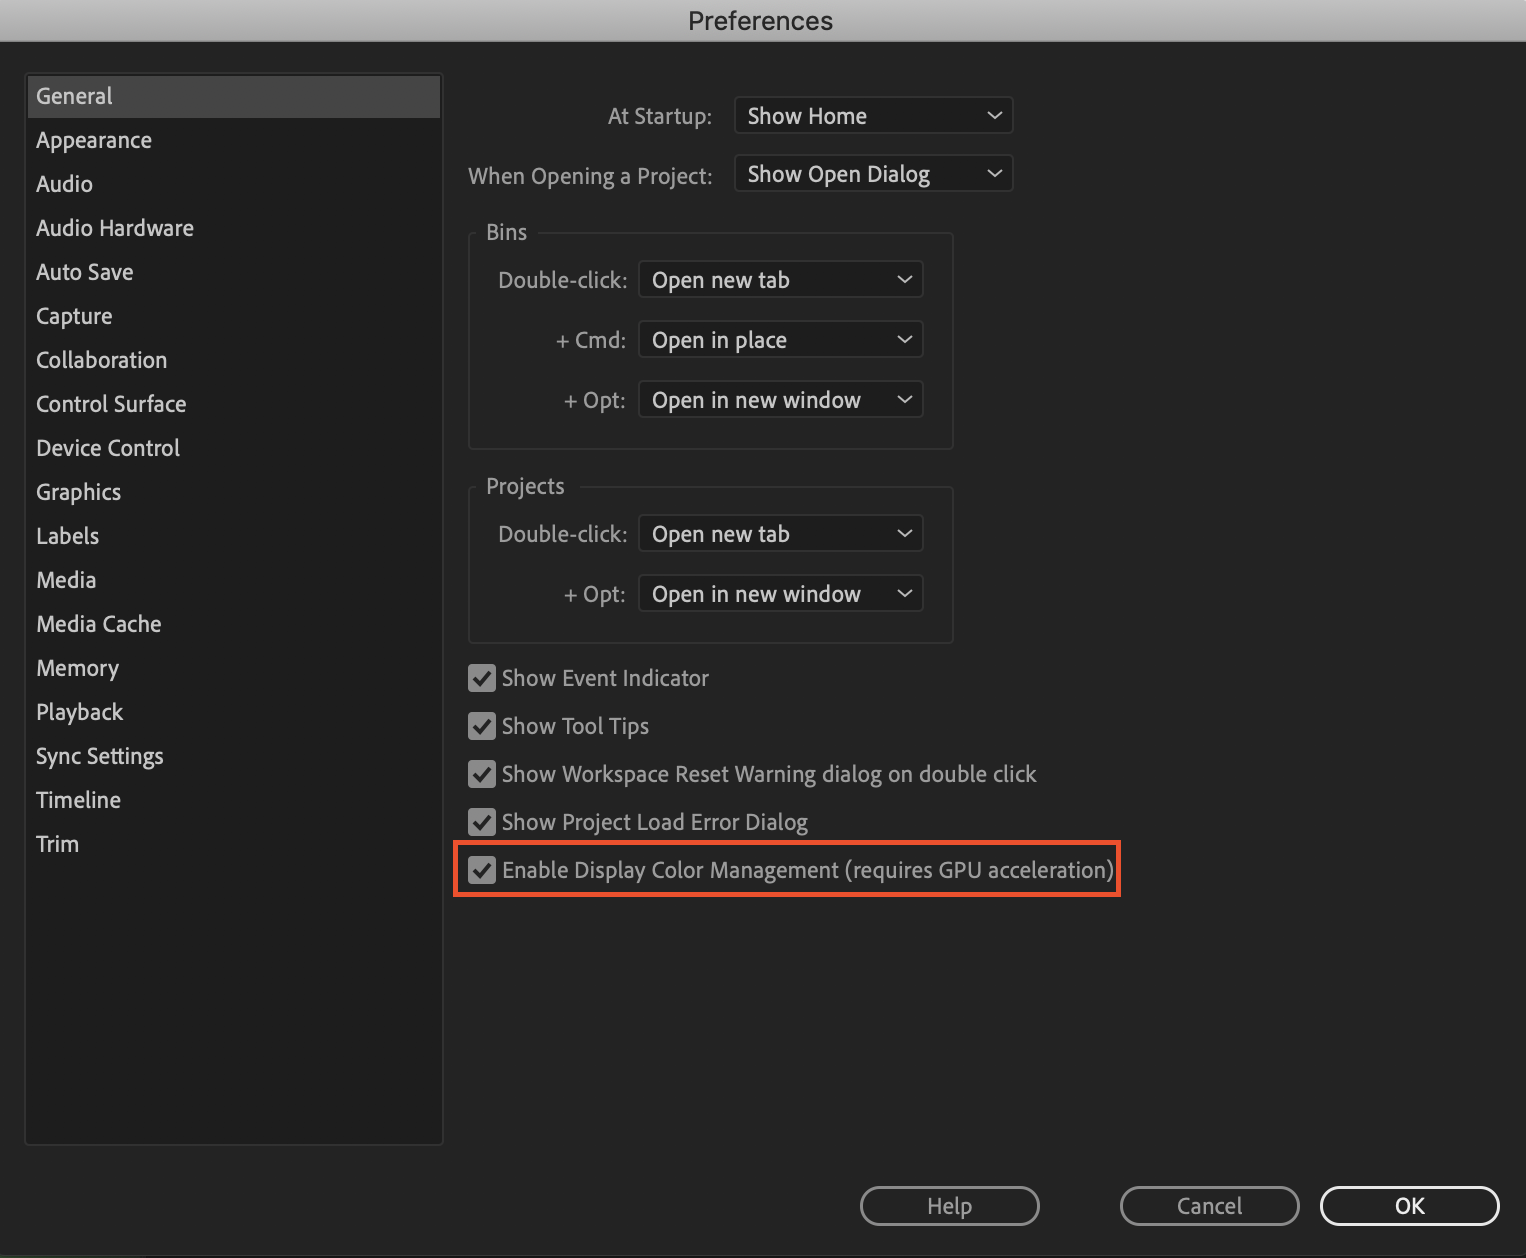
i. Premiere has a feature called "Display Color Management" that will coordinate with your monitor's display settings in order to correctly display in a Rec709, gamma 2.4 profile.
Premiere Pro > Preferences > General > "Enable Display Color Management (requires GPU acceleration)"
It's the last box on the list and it should always be enabled! For more detailed instructions, go here.
b. Monitors have become fairly standardized over the years, but apps haven't. Other apps like QuickTime, Final Cut Pro, and web browsers like Chrome and Safari display video in a scene-referred gamma 1.96 profile despite what your monitor is set to. Gamma 1.96 profiles play video back in a way that looks closer to what you see in real life — lighter blacks and softer whites.
c. This gamma shift is completely dependent on what app you play your video back in, as most users have figured out on their own. FCP 10, QuickTime, and certain web browsers all play video back in the same way, so people assume that they're displaying the video "correctly" when in reality, it's just that they're displaying the video under similar standards. Your video files are fine! The actual color codes within the pixels of your video are not changing in between apps. The miscommunication is happening between the apps and the monitor they're being displayed on.
TL;DR Premiere uses the same display standards as broadcast television does. Other video playback apps like QuickTime have begun to adhere to different video playback standards. This is what causes videos to display differently in between each app.
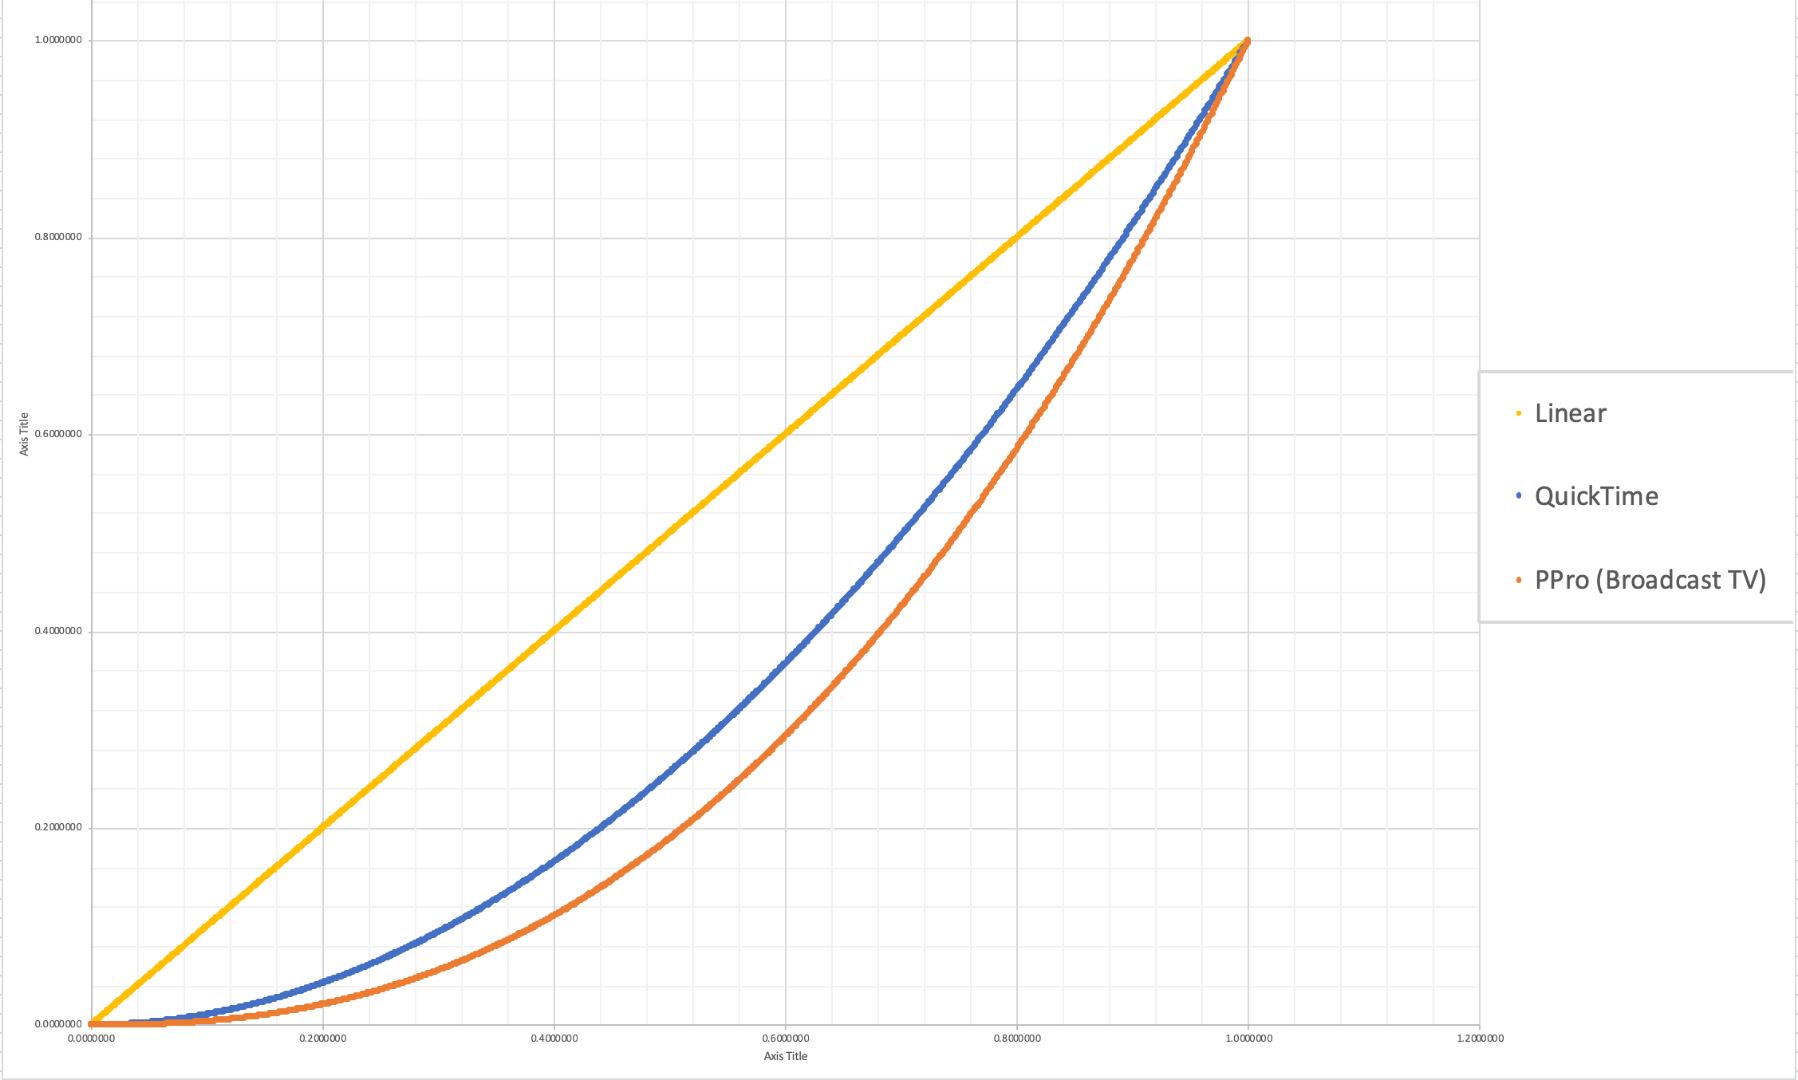
The graph above is a visual representation of the gamma display standards of Premiere Pro (orange), which dips into the darker end of the spectrum, compared to the gamma display standards of QuickTime (blue), which don't have the capability to display those dark colors and therefore QuickTime displays video with less saturation which gives it that "washed out" appearance.
(Graph and data by franciscrossman-J6rJng)
3. But why is it worse on my new iMac monitor?
a. Newer Mac displays are wide color gamut (close to P3) and can display more vibrant colors than Rec709 is capable of reproducing. Without any conversion, your Rec709 colors will be displayed as if they were P3 and will appear much more saturated than intended. Display color management is designed to fix this. It maps the Rec709 values to the appropriate P3 values so that the colors look the same.
i. Scroll up for instructions on how to enable Display Color Management, or go here.
b. Again, this is a matter of display and playback. Your actual video file is fine and if it's played back on a different monitor, it'll display correctly!
4. Is there a way to get all my playback apps on the same page?
a. Yes! One of our engineers created a LUT that will darken your video the appropriate amount so that when you play it back in a different app, it will look as it did in Premiere. Technically speaking, the LUT will correct the mathematical difference between gamma 1.96 and 2.4.
i. Download the Gamma Compensation LUT here!
ii. After downloading the LUT (.cube file) and saving it somewhere accessible, prepare to export your sequence!
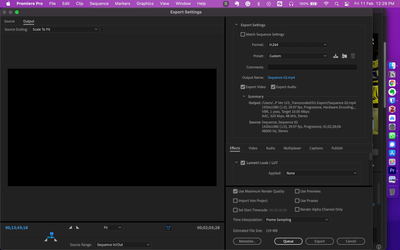
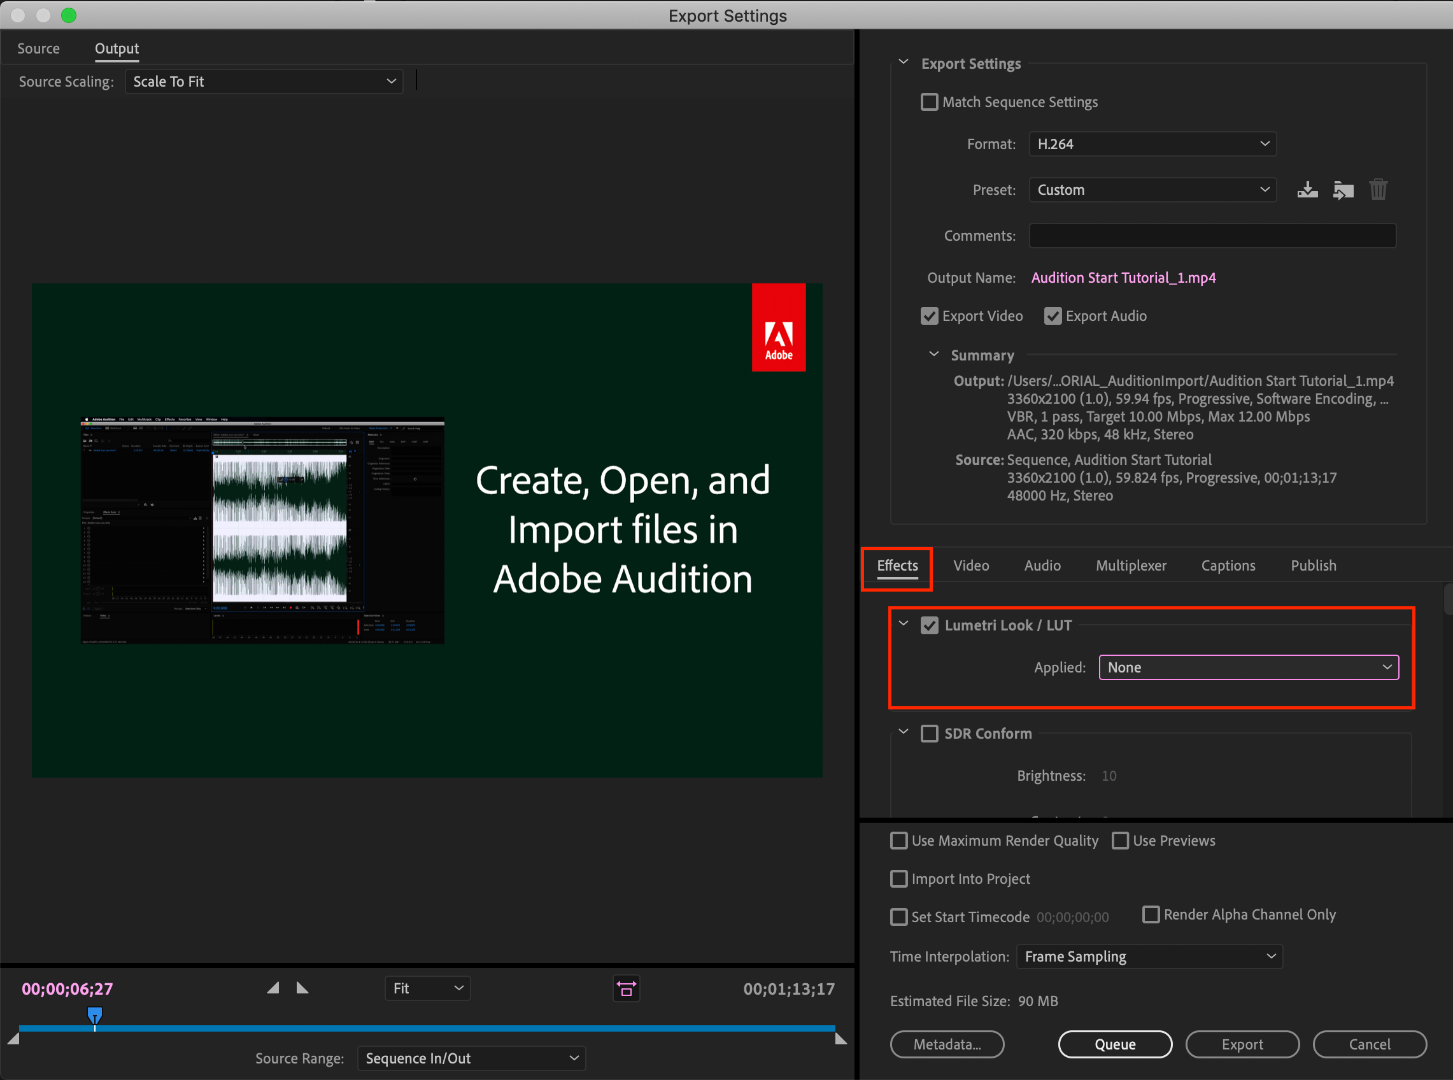
File > Export (Command+M or CNTRL+M) will pull up the Export Settings window, pictured below.
About halfway down the window, there's a few tabs to adjust encoding settings. Go to the tab marked "Effects" and you'll see an option to enable a Lumetri Look/LUT. Check that box, open the drop-down menu, and click "Select..." to navigate to the space you saved the LUT in.
iii. After you've selected the LUT, Premiere may display that there is "None" selected. That's a common glitch, the LUT has been applied. Sorry for the confusion!
b. However, this needs to be the last thing you do to your video! Either that or you need to save a backup of your video without this LUT on it. Because this LUT is darkening the color code of the video, in some cases, it will darken to the point where you can't get the detail back.
c. If you want to take the LUT off and you don't have a LUT-less backup, you can apply this reversal LUT that will return your video to the color levels you had before you applied the LUT. Perform the same steps listed above with the "Undo Gamma Compensation" LUT!
If you have any other questions about this issue, feel free to send me a private message.
For other support issues, you can check out our company contact options here! Contact us | Adobe
Thank you all for your collaboration and discussion so we could better investigate this issue! You help us to help you.
-Caroline
[DOWNLOAD LINKS]
 1 Correct answer
Hi all!
Thank you so much for your patience! We have a new solution for this available in Premiere 24.0. You can follow the workflow in this YouTube video to accommodate the QuickTime gamma shift between operating systems. Your image will look the same in QuickTime as it does in Premiere.
Copy link to clipboard
Copied
"So some people try to get in the middle between them ... the file is a bit dark/oversaturated on everything else, and a bit light and undersaturated on a Mac."
Yes, I've found that using the "QT Gamma Compensation LUT" at a 45-50% intensity is the best compromise. At 100% (the default) it looks way too dark on non-Apple devices, and unless the video was to be seen *ONLY* on Apple devices, I wouldn't advise anyone to use it as is at 100%.
Also, on a separate note, if your video is destined to be seen on the web, don't turn DCM to on, as only REC.709 devices use a 2.4 gamma. For web, calibrate your monitor to sRGB/100nits/2.2 gamma. For broadcast/TV - sRGB/100nits/2.4 gamma. DCM off in both cases.
Copy link to clipboard
Copied
But how do you bring the QT Gamma Compensation LUT down to a 45-50% ?
Since it is not anything you can actually apply to your timeline.
Thanks,
Nora
802-649-3242 (office)
802-356-7036 (mobile)
offthegridproductions.com
thehanjiboxmovie.com
thevermontmovie.com
Copy link to clipboard
Copied
Copy link to clipboard
Copied
This is an excellent suggestion, and as close to "elegant" as we'll get.
For everyone ... making a LUT accessible by simply scrolling the drop-down list in the Creative tab is easy.
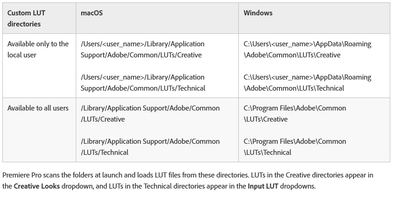
First, there's the chart of places to 'park' your LUTs on the computer shown below. For this sort of thing, I'd recommend adding them to this location:
Program (Package) files, Adobe/Common/LUTs/Creative (folder)
And for quick access, if you rename that Compensation LUT by adding say " 01 " to the beginning, it will be the first LUT to pop up in your list.
Neil
Copy link to clipboard
Copied
Just make sure to turn of the visibility of the video track that has that adjustment layer when working so it doesn't interefere and only turn it on when exporting.
Copy link to clipboard
Copied
After downloading and applying the LUT effect, my output screen(left side of the export dialogue box) went black and stated "rendering". It renders like forever. When clicking export, the video exported is only audio without any visual. Anyone having the same issue? Any alternative solution?
Copy link to clipboard
Copied
This kind of thing is typically caused by a graphics card driver issue ... have you tried setting your GPU preference in the Project settings dialog to Software Only, rather than (I'm assuming on a Mac) ... Metal?
Neil
Copy link to clipboard
Copied
Hello, I want to ask is there a way I can export the imported videos in adobe premiere as what it was before on my apple devices? Since the colors change after I export it even if I didn't color correct them.
Thanks a lot.
Copy link to clipboard
Copied
The problem isn't that the colors change. It's that your Apple devices use a totally non-standard system for displaying the images. I don't suppose you realize that no professionally produced media you watch on your Mac computer is shown to you even close to how the colorist graded it, do you?
Because it does the same thing to all that Rec.709 broadcast/streamed media too! But you haven't seen the image on the colorist's screen, so you think what your system does is "correct".
So when the Mac is set to display Rec.709/SDR media by one set of settings, and everything else in the world uses a different set of settings ... there isn't a "fix" available.
Frustrating? Oh, globelly gravel, yes!
Use the "Display Color Management" option in Premiere's preferences, so you see the best Rec.709 image withiin Premiere. And for outside Premiere, well ... understand your Mac will show that same file ... in fact, every video file ... very differently than the same file will show on my full-on Rec.709 standards system.
So ... if you don't care what the file looks like comparatively on a non-Mac system, take one of your files. Use Lumetri to drop the mids just a small amount, the shadows a bit more, and add a bit more saturation. Then save that as a .cube LUT from Lumetri.
Now, for any export, go to the Effects tab of the export dialog and click that add LUT option, and add that LUT. It will mod the file during the export to make it look similar outside Premiere to what inside looks like.
Of course, when I view that on my system, the blacks may be crushed and it's way over-saturated, but then, it's not a Mac, so who cares, right?
Neil
Copy link to clipboard
Copied
Apologies if this is a dumb comment / question, but I'm confused as to what the end result should be.
I understand that I adjusted my video in Premiere, and when I exported it was washed out when I view it on my Mac in Quicktime. I understand that if I export with this LUT that it will fix that and my video will look the same in Quicktime as in Premiere.
What I don't understand is: the end goal will be to publish for OTHER people to see, on Vimeo or YouTube, etc. In that context, I don't care what it looks like to ME, I care what it will ultimately look like for my audience.
In short: do I need to apply this LUT at ALL times, for publication, or just for my own local viewing?
Copy link to clipboard
Copied
I cut a tiny snippet of my video and uploaded to Vimeo, and the uncorrected version, i.e., without the LUT applied at export, seems to match Premiere. So my understanding is that applying this LUT at export is only for the purpose of viewing on my Mac in Quicktime, but when uploading to Vimeo or the like it is not necessary, in fact would be bad. Is that a correct understanding (and if so, might be useful to mention in the main article?)
Copy link to clipboard
Copied
Yes, that's correct.
Neil
Copy link to clipboard
Copied
So the photo comparison you showed with the 2 men in hoodies was my footage and screen shots, however this is not my issue and therefore you shouldn't be using my images without consulting me as an example for this post.
Still having the issue years later, still not fix on my $6,000 iMac Pro 2017 (currently running latest updates etc). On my iMac, anytime you look at a clip outside of premeire, it looks great, just as shot on my camera. Then bring it into premeire on the iMac and it's color is very saturated and contrasty. Anything exported (as shown in the photo I newly uploaded on the LEFT). these are screen shots of EXPORTED files from premeire BOTH. Same settings, no edits made in between. Just simply loaded the file onto my iMac and then to my Macbook Pro.
My Macbook Pro is completely fine, no color issues ever. Very strange. The screenshot on the RIGHT is how it is exported from premeire on my Macbook Pro.
Quicktime previews looks perfectly normal on both computers, so I KNOW it's not completely isolated to a Mac issue, it's obvious that premerie is changing the color on my iMac if I can view these files on my iMac perfectly fine in preview, quicktime, even online on a youtube video.
I have tried enabling and diabling color display management as you suggested and no fix. Also the Lut, no fix. My computers, both are set to the SAME color space, same settings etc. I have found NO information online on how to fix this, just a bunch of people explaing color settings probably are the culprate and I just don't find any truth to that, I have adjusted them both to the same color space and still get 2 different exports.
Copy link to clipboard
Copied
I'll ping @caroline_edits as to the issue about using your forum post as an example. (She's a staffer, I'm just another user here to be clear.)
So just to make sure, those are images from clips brought into Premiere and immediately exported, without any changes made within Premiere? And both images then come from the same screen on the same computer? (Not images from two different monitors or two different computers.)
Because if you take a file into Premiere on computer A, drop on a timeline and export without changing the file, and drop the same file into Premiere on computer B, and again without changing the file, export ... both a Mac ... and then look at the two files side by side on the same computer/monitor together, and they are not the same, that would be an issue.
But if the images are from two separate monitors or computers, then ... that's actually to be expected that there will be visual differences.
I know most people assume that the image they see on their camera and their computer system initially, is somehow "the correct image". So often, it's said that "It's the same image I saw on the camera!". As if that actually ... mattered.
But no camera I know of has an actually dead on accurate monitor. And I include all RED, Arri, and high-end Sonys in that statement. Which is why so most pro work is done with field monitors connected to the cameras, rather than using the camera's monitor.
I use one myself on my BMPCC4K all the time. But even then, I don't expect that field monitor to match what my in-suite reference monitor will show. Even though my field monitor is carefully set to be a lot more "correct" than the monitor on the BMPCC4K itself.
And I never expect my computer to show what my field monitor image showed. That field monitor ... and false color settings and a lot of tight metering (yes, I still use a meter) get me to where I know I will have solidly usable images. That's all they can do.
In-suite, I actually have four monitors attached to my computer, all calibrated to Rec.709, and ... all are slightly different. I trust the one that's my reference monitor as I've not only run a calibration on that monitor, I then ran a profile pass on it to get the charts that tell me how close that monitor comes to the Ideal. And as it comes close enough within pro-accepted tolerances, I accept the image on that monitor.
Of course, that's with additional verification from viewing the scopes of the image.
But I do NOT accept the images as 'accurate' on my other three. They're ... very, very close. But not dead-on. And yes, they vary as much as the images you showed. All connected to the same computer, all calibrated with the same system, and all ... visually different.
Every screen out there is different, that's the bane of the pro colorist trade. So one sets up a very tightly controlled system, calibrated and profiled to match the Rec.709 or HDR standards one is working under. And then grades to and for that system.
Outside that system, no one will ever see the exact same image. It isn't physically possible. No professional colorist can manage the feat. Not Walter Volpatto, not Mark Todd Osborne, not no one not no how.
Neil
Copy link to clipboard
Copied
Hi Neil,
Yes - both images then come from the same screen on the same computer. Not images from two different monitors or two different computers. Both exported immidiately, no edits done etc.
In your second paragraph - this is EXACTLY what is happening. It's hard to get across to anyone that it is indeed what is happening, but it's been happening for 2 years and I just simply stopped using my imac with adobe video editing programs because it doesn't worik.
Also - the footage is like this when editing within premeir, the color is visibly different when editing the footage within premeire on the imac before the export is even done. I can also save that file and open on the macbook pro and the colors are fine, and if I export on the macbook pro, totally fine.
Preview files on the imac of footage BEFORE EDITING outside of the premiere - on quicktime, preview, youtube etc. are COMPLETELY fine. But if you export on the imac - if you view on preview, quicktime, youtube etc. colors are bad. It's premiere that is changing it.
Just to address the last part of your comment, I am only talking about the 2 computers screens - no additional monitors, I know those can appear different and I am not comparing those. I am actually taking an export from both computers and looking at them side by side on the imac together on one screen and they are VERY different.
Everything calibrated to Rec.709.
Thank you for your help! I really am going crazy and I have been so frustrated and always in a hurry to get a project done so I haven't spent too much time on this and enough is enough.
Just so you know, I have also uninstalled CC and reinstalled and smae thing. I just feel like I can't be the only one who has these issues and you can see from the footage it's off. it's not me being picky. It's pretty bad.
Copy link to clipboard
Copied
Oh, man, that's ... nasty. And truthfully, I've never heard of this before. You got something going on there that's really outta line though.
@Kevin-Monahan ... you're the master of the Mac around here, Obi Wan you're our last hope!
Neil
Copy link to clipboard
Copied
Images for referrence to my reply
Copy link to clipboard
Copied
Thank you so much for this information.
I have macbook pro M1 Max in premier Disable Display Color Management Premiere is greay out?
How do i work around this.
Thank you.
Copy link to clipboard
Copied
Do we still need these correction Lut for the 22 version of PR ?
Has it been fixed for exporting video?
thanks
Copy link to clipboard
Copied
No, nothing's been 'fixed' as Apple hasn't changed their ColorSync color management app to more 'normally' treat Rec.709 media with the standard 2.4 gamma. And that's the cause of the troubles. Apple chose to apply a different gamma than the 'normal' gamma used for Rec.709 everywhere else. So it's a difference in how the different OS and systems display the same file.
And those LUTs are only a partial fix ... because of that difference in the way the Mac OS shows Rec.709 video and everything else. So ... you can sorta 'fix' the file if it's only going to be seen on a Mac. But if shown outside the Macosphere, then any file with that LUT applied will be too dark and contrasty.
This drives the colorists I work with absolutely around the bend nuts. And "fixing" it is approached by a marvelous array of workarounds. Some folks use a gamma of 2.0 to 2.2 to sort of fly in between the Mac view and the regular view. Some simply note that as all b-cast/streaming is normally in 2.4, and Mac people don't complain about it, they just output everything in 2.4 but are very careful not to get too dark.
Everyone's mileage always varies ... sigh.
Neil
Copy link to clipboard
Copied
Thank you!
just another question.
my monitor is calibrated to SRGB with a gamma 2.4
when color grading and editing exposure in Premiere, the rec 709 editing is correct in viewing? When you export it and play it in a QuickTime play the colors are washed out and bright. So the QT player throws the gamma off.
also uploading to YouTube does that throw off rec 709 gamma 2.4?
thanks again
Copy link to clipboard
Copied
Qt player on a Mac will show a much brighter image in the shadows as it will use gamma 1.96, which ... well, it's a pain. Yea, it's gonna be "brighter" and with apparently less saturation on a Mac via Qt player and Chrome/Safari browsers.
But ... VLC on a Mac for a player, and Firefox browser, will probably show much closer if not identical to what you'll see in Premiere.
Understand though ... the screens "out there" are all over the freaking place. No one will ever see that image exactly as you grade it.
Colorists have to understand and learn to live with that dictum. Ain't no way around it. You have never, ever, not even in a movie theater, seen exactly what the colorist saw on their reference monitor.
So yea, most PCs will see something maybe closer to what you graded to, most Macs may see something a bit lighter, but ain't no one gonna see the same image.
Neil
Copy link to clipboard
Copied
Thanks Neil !
I have a Nec Montior PA 241w and a PA 242.
its 14 or 12 bit monitor.
I am a photographer and do video
it supports Adobe 1998 - see 98% viewing color.
also SRGB viewing on monitor 100%
1080x1920 monitor
thanks
Copy link to clipboard
Copied
It's of course optimal to use the same reference display and in consistent lighting. Which adds difficulty for any user with no choice but to manipulate images on a laptop, in multiple environments.
BUT ESPECIALLY ON MACBOOKS. Keep True Tone turned off in System Preferences>Displays. The aggressive amount of color shift this feature makes just from room to room or from darkness to a single lamp (let alone from ambient daylight to indoor lighting) is dramatic. This feature is on iPhones as well and has good, healthy intentions for consumers' eyes--but not for keeping consistent color in any project.
Copy link to clipboard
Copied
Can you imagine if Excel was the like this, where every equation was a bit out, and you had to go to some obscure corner of the internet and download a correction file and then what a youtube video on how to apply it...
Adobe spends so much time bragging about Sensei and AI, wouldn't it be time well spent to use some of that effort on the basics - getting colours correct out of the box?

