Build better products with our product team
I really want to have the creative cloud sync and backup my workspaces and shortcuts.Logitech Options software does this for their keyboard and mouse devices.Currently, if you do not do a manual backup and need to reset all your photoshop preferences, all your workspaces and keyboard shortcuts are gone because they're only stored locally.
As soon as I use the generative fill in Photoshop, a credit is deducted after the presentation of the result - regardless of whether the result corresponds to what I need or whether it does absolutely nothing usefull. Couldn't an alternative be introduced? After generation, the user is asked (before he can use the result) whether he wants to use it? If he answers “No”, the result is discarded, if he answers “Yes”, he can use the result and the credits are deducted? If I take my car to the garage and I am not at all happy with the work carried out, the garage must also rework it. That's how it is for me as a photographer - if the customer is not satisfied, i have to rework and can't charge the customer extra for it.
Suppose you have 100 comps and you want to rename a comp in the "Project" section. So you select a comp, hit Enter, and type in the desired name. But when you press Enter to finalize the rename (or click away) then it will bump the "Project" scrollbar to the very top. When you're trying to rename a bunch of comps, this becomes very tedious to continually scroll down to where you were last located.
Es fände es sehr sinnvoll, ein bis vier Bilder pro Generierung einstellen zu können. Da manchmal schon das erste oder zweite Bild zufriedenstellend ist, ist bei keiner Anwendung möglich. Man verschwendet einige Bildgenerierungen und es verbraucht auch Rechnerkapazität, um vier Bilder zu generieren. 🙂 Es wäre erfreulich, von Anfang an, das Datei-Format und die Auflösung einstellen zu können, ist im Photoshop nur begrenzt möglich, aber so gar nicht auf der Adobe Firefly-Seite. Aber da alles noch in der Entwicklung ist, muss man geduldig warten, ist für mich kein Problem.
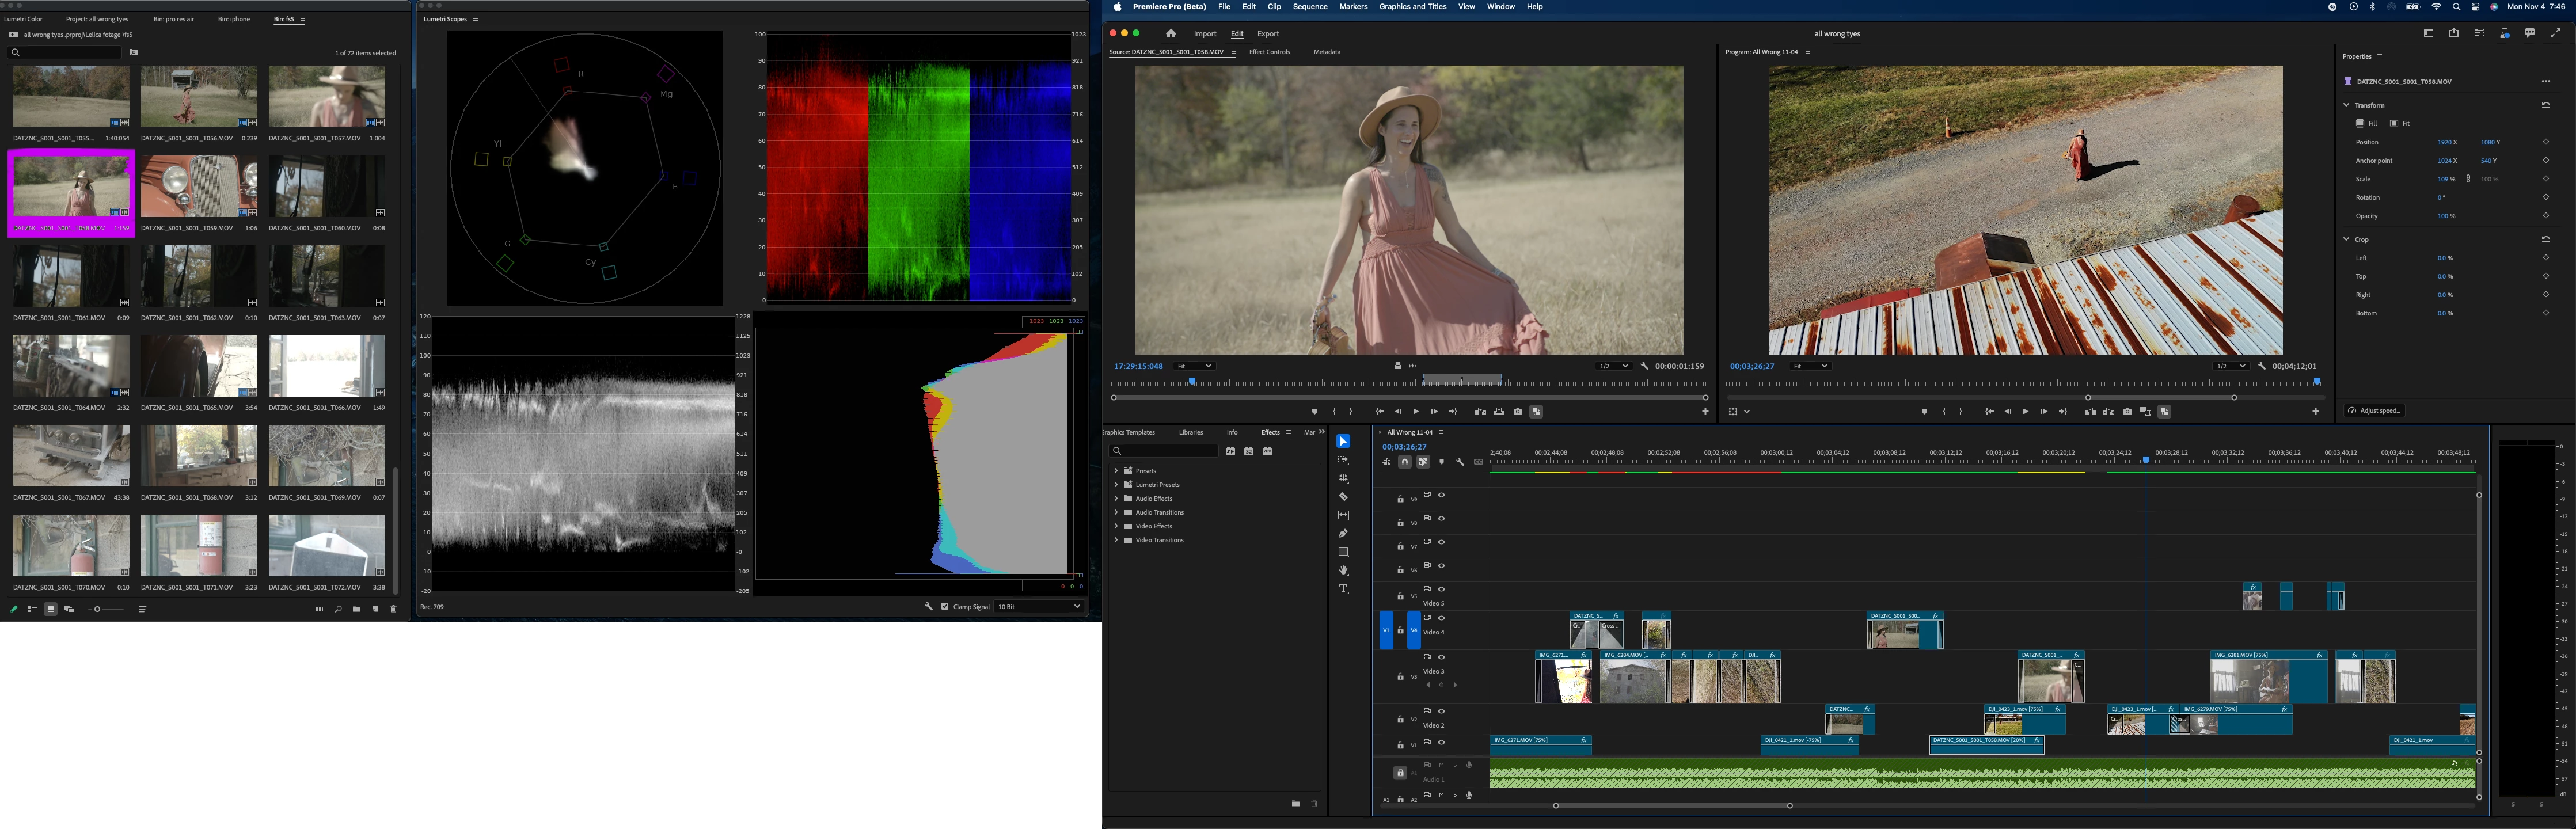
Happy Monday to all the other creatives making history as Adobe expands -I just wrapped a music video for Lelica Palecco - and I wanted to share a best practice that maybe some of the incredible team continuing to push and redefine our collective editing and content creating experience may implement -Here's the video, btw and thanks Adobe - NOT one crash during the editing process https://www.youtube.com/watch?v=36ZdxMmITCUso, when I'm dealing with dailies , especially if I shot those images, I prefer to work with thumbnails for quick reference as opposed to file name structure - I did this back in the AVID media composer 7 days lol -anyhow, here's my suggestion - when I select the clip to"find frame in bin"or "reveal in project" or "find clip in bin in project"', its not always easy to see the highlighted clip - my suggestion is allowing the user to customize the highlighted clip color - please see before and afterBEFORE - highlighted clip isn't easy to seeAFTER - my go to would be magenta and so this lets you identify the clip much faster - I like neon green also -anyway, thanks for reading and happy creating, everyone!
Set up basic cinematic shortcuts (prompt shortcuts) for example Close up portraitcrash zoom into close-up portrait. Shallow depth of field, with bokeh. In the style of [add style eg vibrate color pallete, magic hour, dramatic] Other ideas - Close up crane rising or lowering, dolly out. Thanks
I am posting this as a BUG. Not as a feature request. Why? Because, as you will see, the feature exists and seems to have been mistakenly forgotten in various areas in Lightroom Mobile and Desktop. PLEASE, EVERYONE, VOTE THIS ONE UP! WE ALL DESERVE TO BE ABLE TO FIND OUR PHOTOS! They will try to classify this as a feature request, but it is a BUG. Push this to the top as a BUG! Let's get movement on being able to FIND out PHOTOS! In Lightroom Desktop, in the INFO panel, there are clickable tags for which albums the photos reside in. If you click on them, they take you to the album. In Lightroom Mobile, the same info panel DOES NOT have the Album Tags. Obviously, this means you cannot click on them and get to an album quickly that contains that photo. I am submitting this as a BUG because there is no way it is intentionally left out! It is extremely difficult to find images in Lightroom Mobile because once you find one image by accident, or by some AI search, you can't get to the images that were shot on the same day.In Lightroom Desktop, you can do this by doing two things:1. You can open the info panel and then click on the Album Tags there, and that takes you to the Album that the image is in.2. You can right-click the image and choose to "show images that were taken on the same date.Lightroom Mobile (ipad and phone) does not have either of these options! HERE IS HOW IT SHOULD OPERATE IN LIGHTROOM BOTH LIGHTROOM MOBILE AND LIGHTROOM DESKTOP 1. You should be able to go to the info panel in Lightroom Mobile and see all the same options that are available in Desktop. And you should then be able to click on those album tags to go to the albums and it should highlight where that album is in the album panel.2. In Lightroom Mobile, you should be able to open the info panel and tap on the date and have it take you to all images shot on that date.3. Furthermore, you should be able to open the info panel and tap on anything that is visible there, like location or shutter speed and have Lightroom take you to a filter of images for the thing you tapped on. AND WHILE WE ARE TALKING ABOUT FINDING ALBUMS - WHY IS THERE NO SEARCH OPTION IN LR MOBILE OR LR DESKTOP? Many of us have hundreds of albums and if you are organized, you also have a ton of folders and subfolders. But can you remember exactly which folder the album is in? Sorting by name or date doesn't help find them because they are buried in a subfolder. In Lightroom Classic, the Collection Panel has a SEARCH BAR at the top. When you type in a word, it reveals all of the Collections (albums) that contain that word. WHY ON EARTH in the NEW STREAMLINED MODERN LIGHTROOM is there no search field to find albums? We should be able to find our albums.... without endless scrolling. Just put a search bar at the top of the Album Panel in LR Mobile and Lightroom Desktop. OH AND PLEASE STOP MAKING THE APPS DIFFERENT ON EACH DEVICE! And for the love of all that is Holy, put all of the features that you put into Mobile on the Phone into the iPad and into Desktop and make them all the same!!! Stop adding a critical feature to one and not to the other. The idea that we have album tags in the info panel in Desktop but there is just a big blank area with nothing in it in Mobil is just sad. It is like someone just forgot to do it. Oops! I just didn't copy and paste the code!!! Again, I put this in as a BUG because this has to be something that you just have not seen and you meant for it to work this way, but just have not seen or been made aware of. It needs to be fixed. Images are SO HARD TO FIND in the Mobile Applications because you have not made Mobile operate like LR Desktop. APP DETAILS: This is in the Latest versions of LR MOBILE iOS, LR DESKTOP MAC, as of November 2023.
Hi Adobe team, Thank you again for the opportunity to test the new video generation feature! I’m so excited to dive in and start exploring it today. One suggestion I have is the option to choose multiple aspect ratios for generating videos. My top pick would be a 9:16 portrait ratio, perfect for creating Instagram Reels, TikTok, and YouTube Shorts. I hope this is something you can add soon—it would be a fantastic addition!Seve
Hello Adobe Team,I’ve been thoroughly enjoying the creative possibilities offered by Firefly. However, I’d like to suggest a potential improvement for the tool. When creating images that include an element with a specific size or ratio, such as a poster or a greeting card, achieving the desired scale and proportions is challenging, especially in landscape format.I’ve tried numerous combinations of prompts in both French and English to describe my needs, but I haven’t been able to find a phrasing that Firefly understands to produce the desired result.Could this feature be enhanced to make scaling and ratio adjustments more intuitive and precise? This would greatly improve the workflow for users who need accurate dimensions for their creative projects.Thank you for considering this suggestion, and keep up the amazing work with Firefly!
You have to type a prompt and waste a credit just to get to the settings for Text to Image. If I already know the aspect ratio, the content type, etc. beforehand it's just creating another extra step to get to the full version of the web app.
Adjust the clips ancor point from where it was originally selected, to the in point when dragging to a new timeline. When dragging a clip from a selects timeline, to your sequential, it would be helpful if the mouse was tied to the in point of the clip rather than where the clips was grabbed with the mouse. Anytime I am dragging a clip, its to build forwards into the video, however if the timeline I am pulling from is zoomed in, when grabbing the clip, it will be selected at the 3 minute mark for example. Dropping this on the new timeline would either erase previous edits, or at least need to be repositioned. I can't think of a time where I would prefer the original method. CTRL rebuttle: No I dont want to shift the clips underneath.
In the newest Creative Cloud, under 'home,' there are recent files. My suggestion is to add an option where these recent files can be cleared, similar to how they can be in Photoshop. I've spent 2+ hours on a support chat trying to rectify this, only to find out that it's not currently possible to clear the recents.
I'm creating quite a few materials with exposed parameters using the Painter Filter (w/ additional mesh maps) template. This works great, as I can load a model in, bake the relevant maps (usually AO & curv), fine tune everything, then replace the baked images with my inputs and export to Painter. However, if I want to tweak anything after, I have to go through the process of swapping the links back to the bakes, editing, back to exposed parameters, export. Since all of these inputs are empty (black/trasnparent) by default, it would make a lot more sense for SD to default to your baked maps as an override to these inputs, or at least offer the option to.
I get why the offline material message is there and it's a useful feature (though could be way more useful if it gave you a list of timecodes where this material is). My issue is that I will often have a large timeline with random footage sitting on it that may/may not be online at the moment, but the final video that I will export which is sitting within the in/out points I've chosen that doesn't have any offline material still presents with this error when I go to export. The program is obviously just looking at the whole timeline and seeing some random offline clips but it makes me nervous that maybe my final video has offline material in it (even though it doesn't). You need to change how this works so that if in/out points are around a section that has no offline material, then there should be no error shown. In/out points should 'protect' it from errors even if the rest of the timeline is offline.
Hello Adobe Substance Painter Team and Community,I'm writing to request a feature that would simplify workflows for many of us working on game assets. As someone who creates simple models for games, I often only need one single material with all texture details baked into a single map for my models. Right now, while Substance Painter does an amazing job generating multiple maps (e.g., Normal, Base Color, Roughness, etc.), there’s no straightforward way to export the flattened 2D view directly as it appears in the 2D Viewer.This is what I’m envisioning:The ability to export exactly what I see in the 2D Viewer: a flattened map that includes all materials, lighting, and effects—into one single texture.This feature would save so much time, as the current workaround involves taking the exported maps back into Blender, re-baking them under different lighting conditions that may not match Substance Painter’s perfect environment, or resorting to screenshots of the 2D Viewer, which is less than ideal.Why is this so important for me and others who use SP for this purpose?For game asset creation, we often need only one combined texture for efficiency and simplicity. Having to recombine maps manually or bake them in a different tool adds unnecessary complexity and risks losing the high-quality results Substance Painter already achieves.The 2D Viewer already shows the exact result we want. This proves it’s possible to provide this functionality directly in the software.Many users in the community would benefit from this feature, as it aligns with the growing need for streamlined, optimized workflows.Right now, my process involves taking screenshots of the 2D Viewer and testing those out, which works..... But it's not professional and feels like an unnecessary workaround for something that Substance Painter is clearly capable of achieving.Feature Suggestion:Add an option in the File > Export menu to directly export the 2D View as a single flattened texture.Let users specify the resolution and format of the output (e.g., 1024x1024 PNG, 4096x4096 JPEG, etc.).Include baked lighting, materials, and other visible effects as part of the export.This feature would make Substance Painter an even more invaluable tool for independent creators. I hope this request resonates with others in the community, and I’m happy to clarify further if needed.Thank you for considering this!
Sometimes I would need to identify the people on the photos for tweaking and modification, but, the result has not been successful. Below are some suggestions: 1. Face idenifying related FiltersIt seems that "Camera Raw Filters", "Liquidify Filter", "Neural Filters" sometimes could not identify small faces and those that are not obviously seen, and, if I ran multiple passes of the filter, it might tag the faces not in consisent number in different passes. When there are many faces, I have to try them one by one to know who is being tweaked. Further, ACR AI Mask sometimes map the wrong parts (cloths, footwear...) of the body, e.g. face of A is mapped to clothes of B, yet without allowing users to correct them. My suggestion is that (1) the faces should be tagged with consistent numbering (e.g. from top to bottom, from left to right in order of 1,2,3, ... n) amongst different calls of the filter (& amongst the functions that support "face/people", i.e Face 2 tagged in neural filter is labelled Face 2 in Liquify filter, not 1 or 3), show a small number for users to easily see it on screen, and allow users to manage the tagged numbers. (2) UI should be to allow users to help it identify people faces and people's parts. (I have subscribed the Anthropics PortraitPro. The software allows users to help it recognize faces by pointing the face points, nose, eyes, mouth, etc. ) 2. Under the main menu "Select", add sub menu item to Select People, Select Faces, and Select Animals
As a teacher and professional I have used what I consider a very important filter, "Render: Lighting Effects. This filter still appears in the menu but has not worked on versions after 22.2. I will not update to 24.1. I am asking my students to download 22.2. I understand the 3D effects have been deleted with Render: Lighting Effects. I also understand the architecture is not the same as 3D effects. I urge Adobe to reconsider returning Render: Lighting Effects in updated versions. I do suspect it will but at additional costs like 3D effects. Lighting effects once introduced to Photoshop users becomes a valuable tool, it is perfect for concepting theatre environments and lighting. It is also valuable for digital painting and illustration. I have used it for several years with students and professionals.
I'm using Premiere 24.6.0 currently, so please forgive me if this was already implimented in version 25. In the Marker Panel, the In and Out points of all markers are shown, but not the Duration of the markers. For me, it would be extremely helpful if Duration was shown. I use the Duration of markers often because I use markers to lay out where my graphics will go and how long they should be on screen. As it is, the only way to see the Duration is to mouse over the marker itself in the timeline. Having Duration in the Marker Panel would be a huge time-saver! Thanks, and have a great day!
i would like to add a feature or hot key to quickly move objects with its key frames as whole from point to point without adding a new keyframe. like if i want to move an object that start moving from left to right, i can move it from down to up with the same keyframe configurations.
Thanks for wide gamut! Please add a qualifier tool for color changes. Fine color adjustments would help premiere compete with resolve color. RAW limitations on resolve are a huge bottleneck for workflow when editing in premiere and coloring on resolve. A Qualifier like Assimilate scratch would be game changer.
The new Adjustment Brush Tool should be listed in the drop down of Brush tool. Shortcut for both is (B), so it would make sense for it to be listed in the same directory. (on that note History brush can be grouped in there too). So, make it make sense Would've made sence to follow the same logic as Remove tool, it was added in with Healing Brush, Patch tool, etc. User can always customise their shortcuts (as I did) or cycle through options using + Shift
While I really like the ability to zoom in and out on the program/source windows, it's really annoying when it randomly zooms in or out with a slight touch of the mouse. I realize this is priimarily an Apple Magic Mouse issue, but it would be helpful if you could easily lock the window to keep this issue at bay. When I need to zoom in to adjust text or whatnot, I could just unlock with a keystroke or mouse click.I know this is a common issue for a lot of people and I'm hoping to get this upvoted.
Hello, Sometimes the generated pictures are not totally "Good" or totally "Bad" - We need a "Neutral" vote for those times when the pictures have both good and bad things in them. There should be a way to vote for both - 'things to keep' and 'things to improve' in one result.
Hi, I'd like to keep the Automatically keep Creative Cloud up to date option turned on while, at the same time, preventing my mobile data limit from being exhausted by these updates. Since Windows 8, there is an option to mark some internet connections as metered; typically, when connected to a mobile hotspot. I'd appreciate if you respect this flag and keep/pause downloads of updates through metered connection (unless specifically allowed so). Thanks.
Already have an account? Login
Enter your E-mail address. We'll send you an e-mail with instructions to reset your password.