Copy link to clipboard
Copied
Is there any way to resize/reposition an image that has had a mask drawn directly onto it *without* the mask being affected? So that I can alter what parts of the image are visible through the mask without needing to redraw it?
I used to do this a lot in Apple Motion, but I can't seem to see any obvious way of doing it in AfterEffects.
OK. Well while you can animate a mask independently of the layer it's applied to in AE unfortunately you can't animate the layer independently of the mask. So apart from trying to manually "counter-animate" the mask, which is fine way to waste time, the worlflow is to use a track matte which is pretty simple.
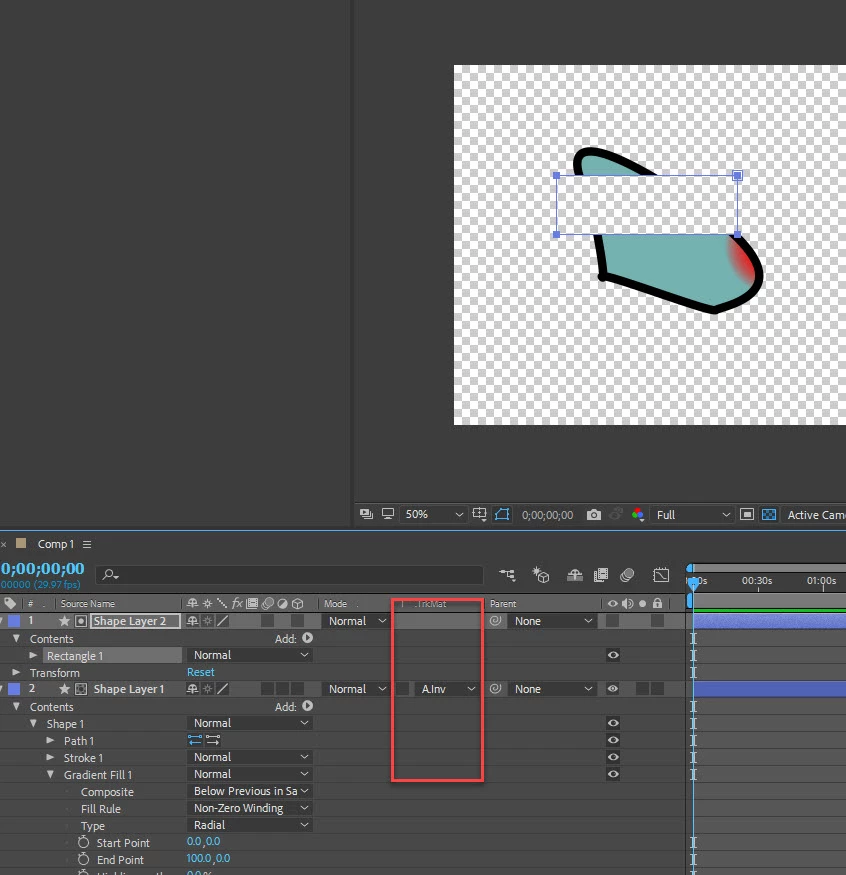
You just create a black or white (0 or 1, true or false) layer in the shape of the mask directly above the layer you want to mask and set the TrkMat drop down.
To avoid having to recreate
...Copy link to clipboard
Copied
Not in any sort of "automatic" way. Sounds like you might want to use a track matte rather than a mask.
If you gave more specifics about what exactly you're trying to do or exactly what your workflow in Motion used to be
then you might get a more specific solution.
Copy link to clipboard
Copied
I've drawn a fairly complex mask on an image using the pen tool. I would now like to be able to move the image around "behind" the mask while the mask isn't affected. Does that make sense? I want to be able to resize and reposition the image while the mask doesn't move. But it seems that any transformations applied to the image affect the mask too.
In Motion, once you've drawn a mask on an image, you have the option to transform both the image and mask together (which seems to be the only option in AE), or you can transform either of them separately - so you can transform the mask without affecting the image, or you can transform the image without affecting the mask.
Copy link to clipboard
Copied
OK. Well while you can animate a mask independently of the layer it's applied to in AE unfortunately you can't animate the layer independently of the mask. So apart from trying to manually "counter-animate" the mask, which is fine way to waste time, the worlflow is to use a track matte which is pretty simple.
You just create a black or white (0 or 1, true or false) layer in the shape of the mask directly above the layer you want to mask and set the TrkMat drop down.
To avoid having to recreate the mask you can duplicate the mask above the layer and use a fill effect on it or you can convert the mask to a shape using
"Masks to Shapes" script available here redefinery.com: rd: scripts
The matte needs to stay directly above the layer so if you run into problems due to the stacking order you'll have to pre-compose the layers.
Use alpha channels, masks, and mattes in After Effects
On the help page I linked look to the right where it lists links of what is on the page and down toward the bottom you should see the link for "track mattes & travelling mattes"
Copy link to clipboard
Copied
Thankyou!
I'm surprised at the lack of flexibility with masks, but then I'm using a 2015 version of AE that bizarrely doesn't allow changing keyboard shortcuts without manually finding and editing a prefs file, so maybe I shouldn't be surprised
Copy link to clipboard
Copied
GWR71 wrote
I'm surprised at the lack of flexibility with masks
Yah. I guess since there's other options like Track Mattes, preserve transparency and various blend modes.
And yah, you shouldn't be surprised.
Copy link to clipboard
Copied
Animating a layer independently of the mask is possible, on position property only, by using the pan behind tool (hence the name - pan behind the mask):
1. create a keyframe for position and mask path before you start.
2. move the playhead and Use the pan behind tool (shortcut Y) to move the layer.
although it is possible, I would not recommend using this tool for animation due to lack of flexibility.
using a track matte as Gutter suggested is the common approach. In your case, You could eliminate some suggested steps (and potential problem) by doing the minimal steps required:
1. duplicate the layer
2. delete/disable the mask from
the original layer and use its track matte options to set layer above (the duplicate) as alpha matte. Done.
Wasn't too bad right?
As for shortcuts, you can find them under help->keyboard shortcuts. Prior to cc2018, Changing some of them is available through the prefs as you figured out Or through this script if you can find it:
https://cgi.tutsplus.com/tutorials/enhance-your-workflow-keyed-up-a-shortcut-editor--ae-13079
Copy link to clipboard
Copied
amzing that this was years ago and Adobe still hasn't imporved the UI for users. Time to look for alternates idustry wide.
Copy link to clipboard
Copied
Bring up the image you are using behind the mask. Go to EFFECTS and add Search for TRANSFORM and use the one under VIDEO EFFECTS - DISTORT. Now use the transform to scale change location and rotate your image without affecting the mask.
Copy link to clipboard
Copied
If you have a layer with a mask and you need to keep the mask the same size but change the layer's size and/or position, duplicate the layer, set the top duplicate as an Alpha Track matte for the bottom layer, delete the mask on the bottom layer or turn it off, then resize the bottom copy. It will take about 10 seconds.
If the mask is not animated, try this:
Select the Mask, go to Window/Create Nulls From Paths/Points Follow Nulls, then animate any of the transform properties, and the mask will not change shape.
A third option:
Pre-compose the layer with the masks but do not move all attributes to the new composition. The mask will stay in the Main comp. Right-click in a blank part of the composition panel and select New Viewer, open the pre-comp, and edit the transform properties of the layer.
Copy link to clipboard
Copied
A free script called Create Nulls From Paths Extended will allow you to attach nulls to points and the handles of a mask path. If you select the Points Follow Nulls and add Handle Controls, you can scale any layer with a mask or shape layer path without changing the size of the mask path. This is the only easy solution to the problem.
Copy link to clipboard
Copied
Hey, super easy fix that I did was I just swapped the mask off to an empty layer, resized the image, and then swapped the mask back.