• Global community
    • Language:
      • Deutsch
      • English
      • Español
      • Français
      • Português
  • 日本語コミュニティ
    Dedicated community for Japanese speakers
  • 한국 커뮤니티
    Dedicated community for Korean speakers
Exit
0

Converting an extruded logo from Illustrator to an actual 3D object in After Effects

Community Beginner ,
Dec 30, 2020 Dec 30, 2020

Copy link to clipboard

Copied

Alright, so I have tried my very best to figure out a solution to my problem but I am at a loss.I will try to explain as good as I can because it can seem a bit complicated.
So I have made a logo in Illustrator using the "3D Extrude & Bevel" effect, and then mapped some text onto some of the sides of this object (it was a "side of a sofa" which I extruded and then had text on the back rest and seat, so get a picture of it).

Now I wanted to try to make a short video/loop with this logo seen as an actual 3D object in AE. I have manged to mimic the location of all the visible sides from the logo I made, even managed to position them correctly on the visible sides of the logo and parented them all to a null object so they all rotate and stay together the way they should.

My problem is that I can't seem to manage to get the same rotation/camera angle that will result in the same logo as the one I have in Illustrator. The only time I succeed is if I go totally isometric, and that just doesn't look very good.

If anyone has an idea of what to do, or perhaps another way to approach this I would really appriciate it!

TOPICS
How to , Import and export

Views

2.3K

Translate

Translate

Report

Report
Community guidelines
Be kind and respectful, give credit to the original source of content, and search for duplicates before posting. Learn more
community guidelines

correct answers 1 Correct answer

Community Expert , Jan 01, 2021 Jan 01, 2021

If I had this project and I wanted to stay with illustrator files and not do an extrusion and add texture maps I would start in Illustrator by creating the L shape that you are going to extrude first and make note of the dimensions. Then I would create a separate layer for each surface that I would see. It would be a very good idea to work with Pixel Preview and Snap To Pixel turned on in AI so things line up, and your artboard should be the same frame size as the final comp. The AI file would l

...

Votes

Translate

Translate
Valorous Hero ,
Dec 30, 2020 Dec 30, 2020

Copy link to clipboard

Copied

Adobe Illustrator's Extrude features do not carry over into AE.
Your workflow shoud entail importing or copy+paste into AE, an AI Path. Then, in AE, perform your extrusion and camera setups/animation.

Motion Graphics Brand Guidelines & Motion Graphics Responsive Design Toolkits

Votes

Translate

Translate

Report

Report
Community guidelines
Be kind and respectful, give credit to the original source of content, and search for duplicates before posting. Learn more
community guidelines
Community Beginner ,
Dec 30, 2020 Dec 30, 2020

Copy link to clipboard

Copied

Thank you for the quick reply!

Yeah, I understand that the extrude effect doesn't carry over, and that's why I manually set it up so it would be the same in AE. However, I don't seem to be able to get the rotation/camera angel correct to completely mimic the result (achiving an identical picture), unless I go for a total isometric POV (in both AI and AE), which just doesn't look very good.


So how do I translate the settings from the 3D Extrude & Bevel in AI to a camera setting and angel in AE? Is there some way to figure this out?

Votes

Translate

Translate

Report

Report
Community guidelines
Be kind and respectful, give credit to the original source of content, and search for duplicates before posting. Learn more
community guidelines
Community Expert ,
Dec 30, 2020 Dec 30, 2020

Copy link to clipboard

Copied

The values don't correlate to camera position and angle of view so the best you can do is guess.


When I have something in AI that I want to turn into a 3D model there are two simple approaches. The first is to put that basic shape on a single layer. If you have more than one plane that you want to extrude then each must be on a separate layer. You can then import that AI file into AE as a composition retaining layer size, convert the surface layers you want to extrude into shape layers, then make the surface layers 3D and save the comp as a Cinema 4D file using the File/Export menu. Import the C4D file, drop it into the timeline, and then use Cineware to open C4D Lite and work on the extrusion and the texturing of the extrusion. You can create some pretty complex shapes using this technique. You can also import AI paths directly into C4D Lite or Blender and start your extrusion there.


Once you have the shape extruded you can add a camera to the scene. Perspective is controlled by camera position, framing by focal length. If you have saved a reference 3D layer for AI you can use that as a guide to position the camera and adjust the focal length of the camera.  


If we could see a screenshot of the artwork and a better explanation of your design goals we could be of more help.

Votes

Translate

Translate

Report

Report
Community guidelines
Be kind and respectful, give credit to the original source of content, and search for duplicates before posting. Learn more
community guidelines
Community Beginner ,
Dec 31, 2020 Dec 31, 2020

Copy link to clipboard

Copied

Alright, so here's the results and the settings from AI. I took the side of the "sofa", extruded it, and then mapped the text and sides from the resulting "3D object".

aisettings.png

And here's my closest match in AE so far. I did this by importing the side of the sofa, as well as the text from the AI-file and then move them all their corresponding positions in a 3D space, link them all to a null object in the middle so they all stay together if I try to rotate it.

aeresults.png

So the "3D-model" looks correct, but I am trying to replicate the same "camera angle" as the extrude effect has in AI and I can't seem to figure it out. My goal is to have a camera angle to pan around the model from various angles and then end up at a point which makes the logo look identical as it does in the AI-file.

I could ofcourse try to go for as a close approximation as possible by gussing and trying my way to it, but been doing that for a few hours now and this is as close as I've got.

Votes

Translate

Translate

Report

Report
Community guidelines
Be kind and respectful, give credit to the original source of content, and search for duplicates before posting. Learn more
community guidelines
Community Beginner ,
Dec 31, 2020 Dec 31, 2020

Copy link to clipboard

Copied

Alright, so after some more searching and reading I think this whole endeavor is not worth the time. From what I have gathered the effect in AI is basing it's camera angle on the object itself, meaning it has no set or defined position. You could probably calculate it if you had the formula for it, but that doesn't seem to be available and even that might not help me in the end. Thank you all for trying to help atleast, and I wish you all a happy new year!

Votes

Translate

Translate

Report

Report
Community guidelines
Be kind and respectful, give credit to the original source of content, and search for duplicates before posting. Learn more
community guidelines
Community Expert ,
Jan 01, 2021 Jan 01, 2021

Copy link to clipboard

Copied

If I had this project and I wanted to stay with illustrator files and not do an extrusion and add texture maps I would start in Illustrator by creating the L shape that you are going to extrude first and make note of the dimensions. Then I would create a separate layer for each surface that I would see. It would be a very good idea to work with Pixel Preview and Snap To Pixel turned on in AI so things line up, and your artboard should be the same frame size as the final comp. The AI file would look something like this as you were creating the shapes for each surface:


Screenshot_2021-01-01 15.26.51_7h32Ax.png

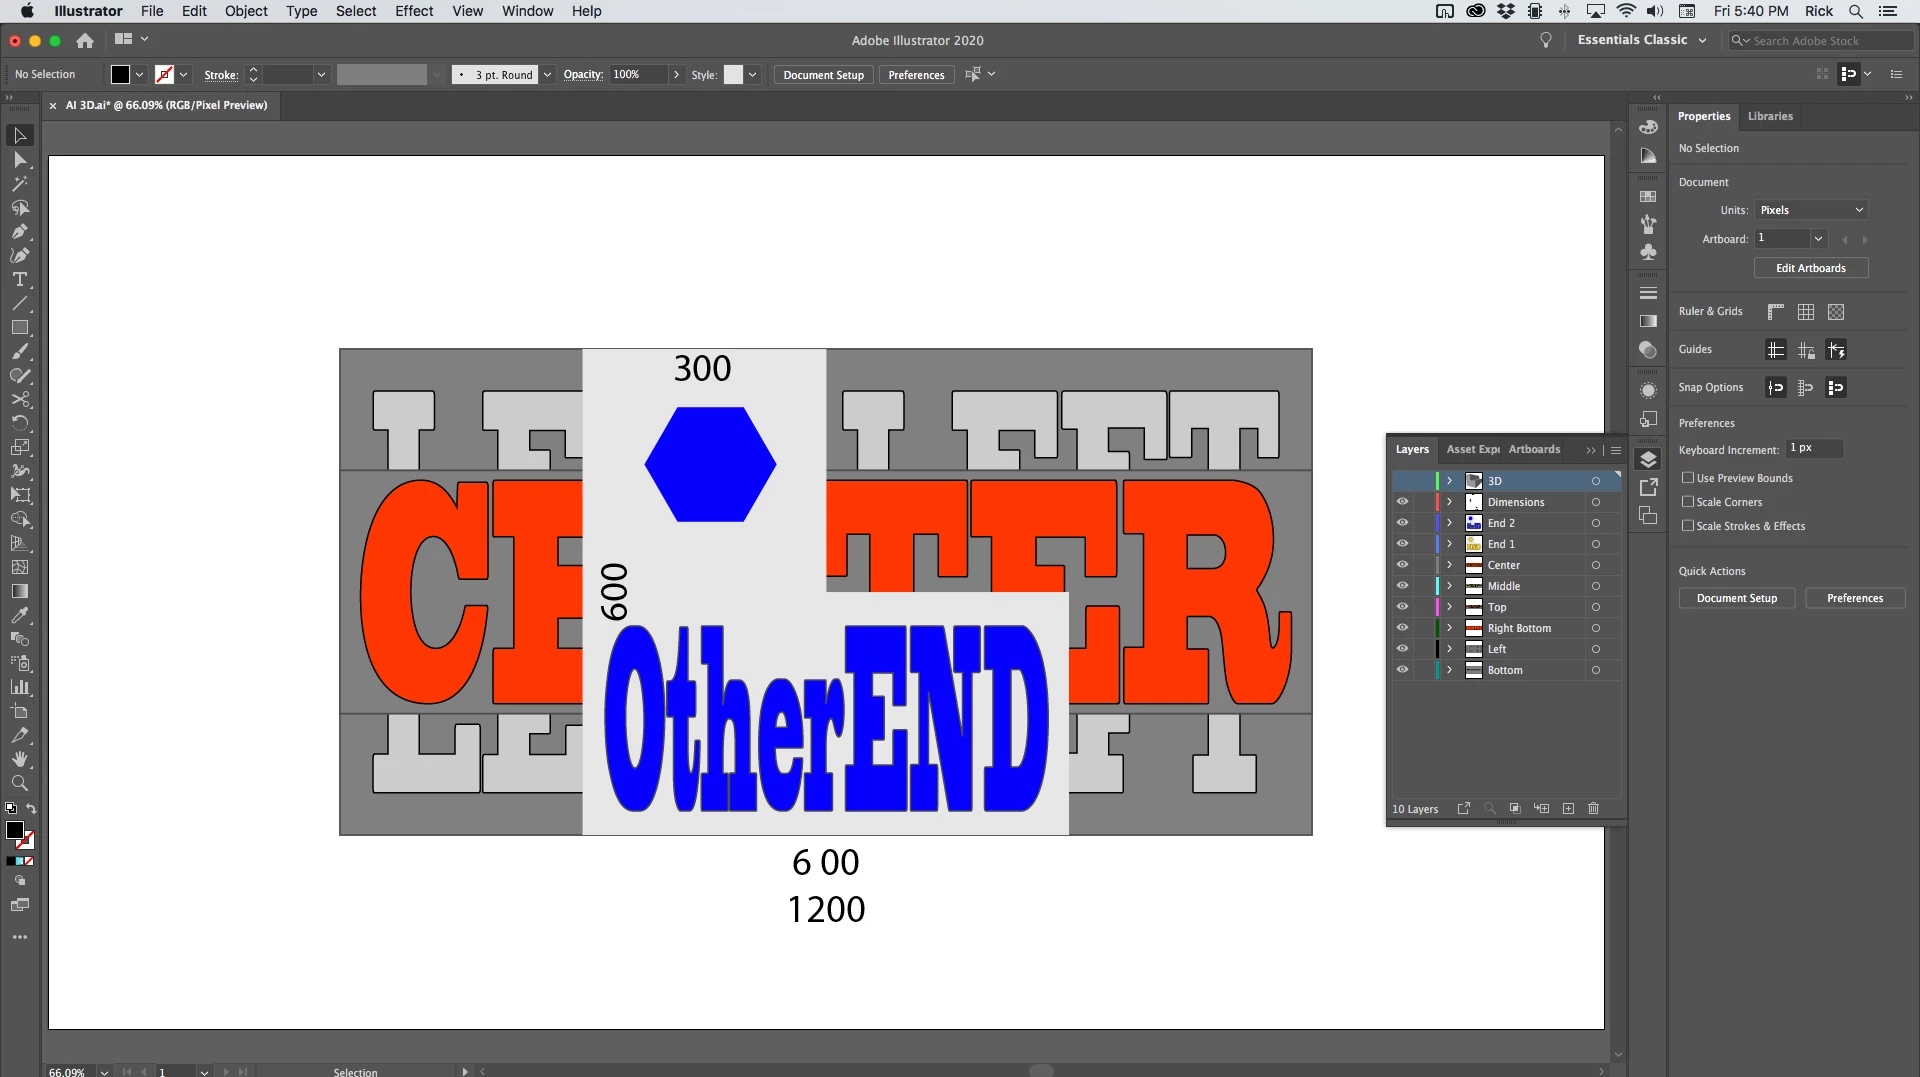
The Layer Panel would look something like this when the artwork was prepared and the 3D layer was ready to create. All of the surfaces are exactly at the center of the artboard.
Screenshot_2021-01-01 17.40.50_yiBo2B.png

In this case, my end layer is 600 X 600 with a 300 X 300 cutout. I plan to extrude the end of 1200 pixels. These are my extrusion settings:
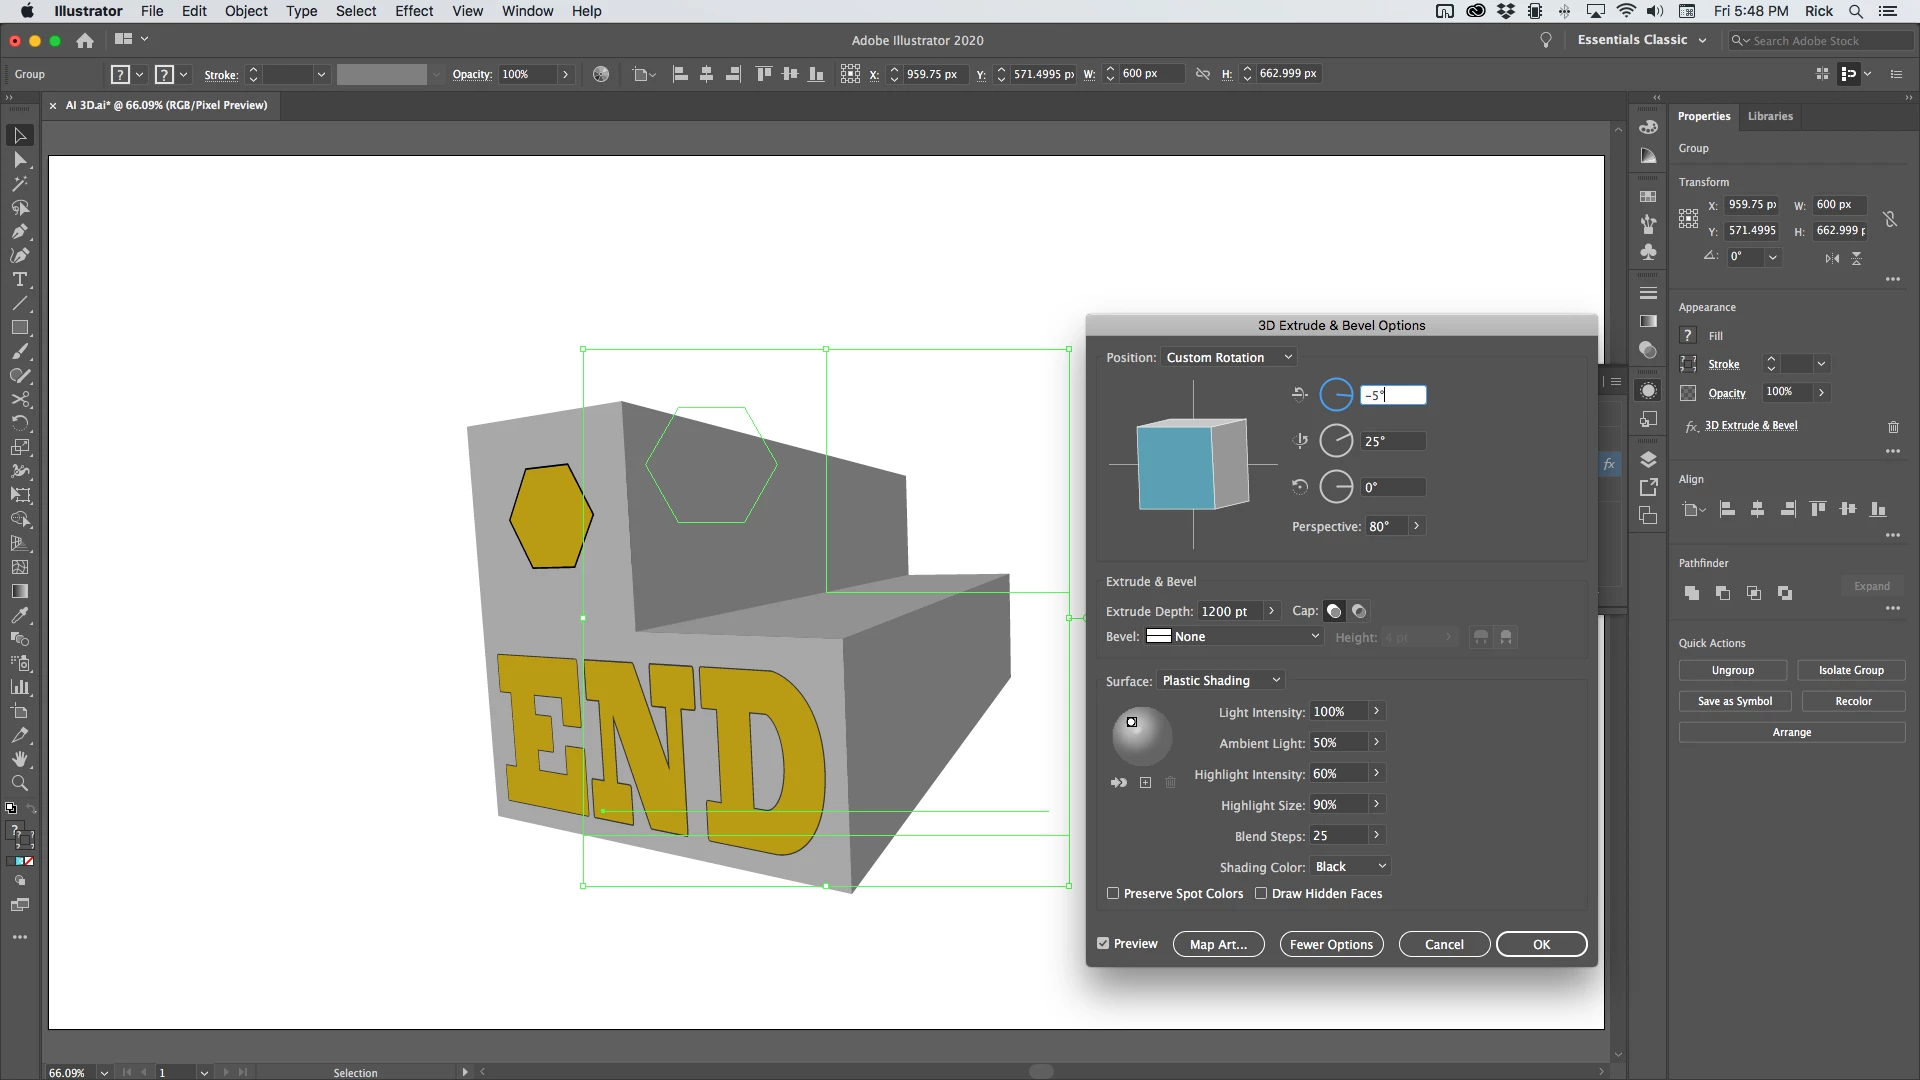
Screenshot_2021-01-01 17.48.23_tOj2W9.png

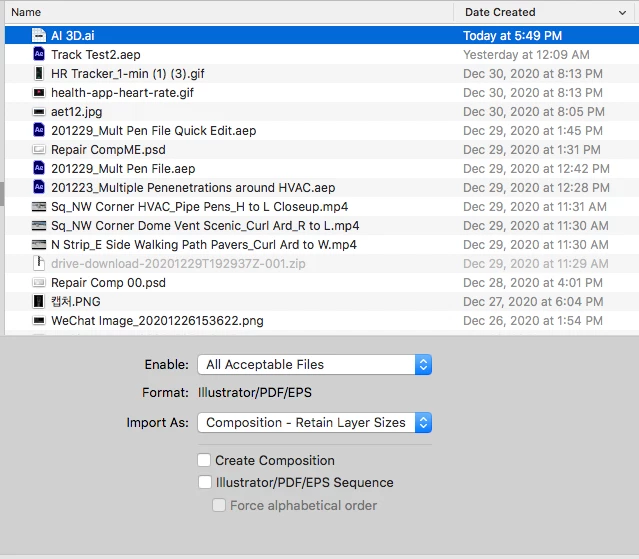
Make note of those settings, save the AI file, and import as a composition retaining layer size.
Screenshot_2021-01-01 17.49.52_IWZTo5.png

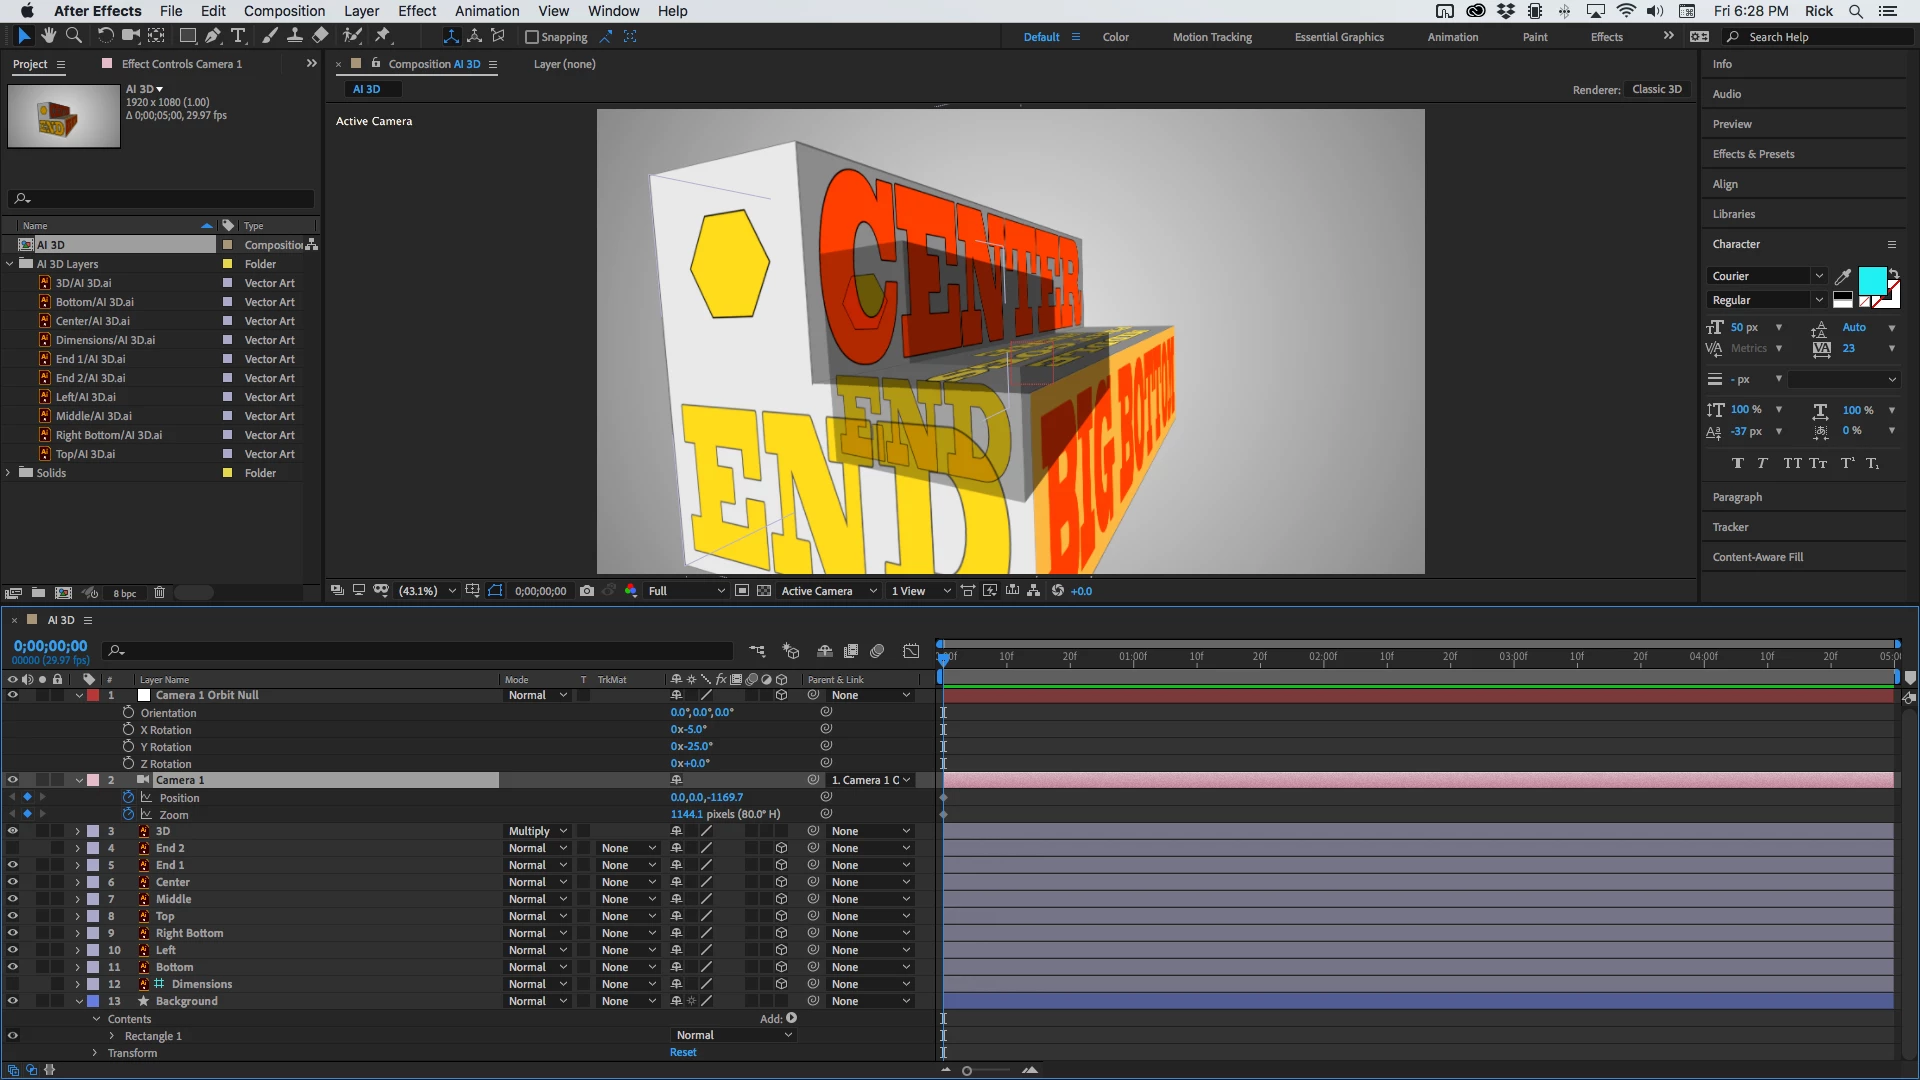
Inside AE you open up the comp that has been created, hide the 3D layer for later, then start assembling your 3D layers using Rotation and Anchor Point offsets until you get the shape assembled. It's all mathematical so lining up the surfaces accurately is just a matter of typing in the correct rotation and anchor point offsets for each layer. The next step is to add a camera. This kind of looks like the camera is pretty close to the shape so I'll pick a 35MM lens as a starting point. It's probably going to be way off but it's a good starting point. Then I add an Orbit Null to the comp using the Layer/Camera menu. The 3D settings in AI are -5, 25, and zero. You'll have to invert the angle for Y rotation so the Orbit Null should be set to -5 in X and -25 in Y. For this file, Z can stay at 0.


Perspective is controlled by Camera Position and framing is controlled by focal length or Zoom in AE's camera so I would press AA to open up the Camera settings and set a keyframe for Zoom, then press Alt/Option + p to set a keyframe for the position. The next step is to press U so you just have those two values to adjust. I ended up with something like this right after making a couple of adjustments to Zoom and just the Z position. That's the only value I want to adjust because the Orbit null is at the comp center and X and Y are controlled by the orbit null. 
Screenshot_2021-01-01 18.28.32_NlBsgc.png

I can tell that the camera is too far away because the angles are not steep enough and the zoom value is too big because the size of the 3D model is larger than the 3D AI layer. Forgot to mention that the 3D layer is only a placeholder, should be a guide layer so that it won't render, and I set the Blend mode to Multiply so I could easily see through it. A couple more tweaks of Zoom and Position and I've got things lined up. The keyframes at frame zero set the resting place so I can now animate the camera the way I like and get back to the right home position without any problems. Here's the comp with things set up and ready for animation:
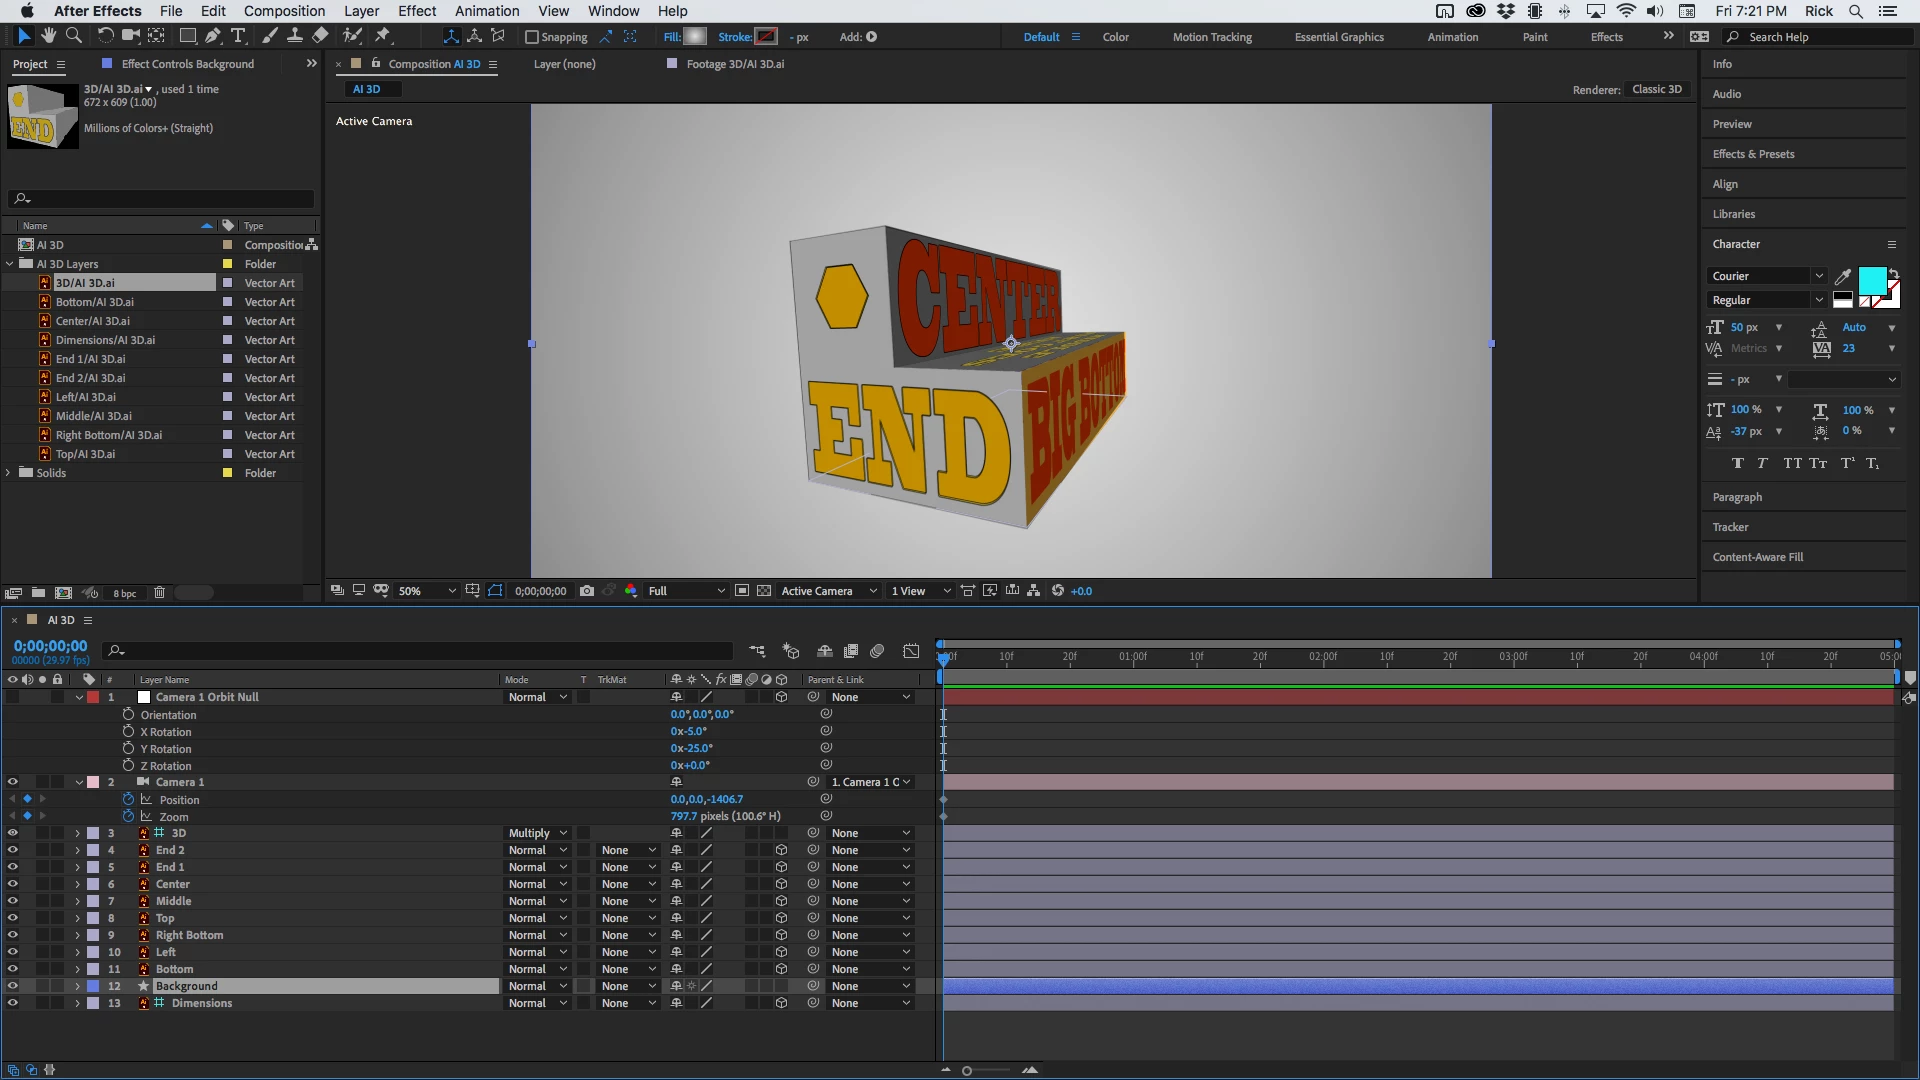
Screenshot_2021-01-01 19.21.03_JyjtRk.png

Here's a preview after adding a couple of keyframes with the original 3D Guide layer from AI showing the accuracy of the move:

AI 3D.gif

And if you want to take a deeper look here's the Project file.


Unfortunately, I cannot find a mathematical relationship between the Zoom value in Illustrator's 3D effect and focal length and zoom in After Effects. As long as you fully understand that framing is controlled by focal length (zoom) and perspective is camera position, you should be able to match up any 3D model created in AI with a 3D shape in After Effects or an extruded shape. 


Votes

Translate

Translate

Report

Report
Community guidelines
Be kind and respectful, give credit to the original source of content, and search for duplicates before posting. Learn more
community guidelines
Explorer ,
Mar 29, 2022 Mar 29, 2022

Copy link to clipboard

Copied

LATEST

Thank you @Rick Gerard 

You generously took the time to write a very clear guide for approaching this rather complex scenario and today it saved me from hours, if not days, or slowly connecting all the pieces of the puzzle.

Can't thank you enough!

Votes

Translate

Translate

Report

Report
Community guidelines
Be kind and respectful, give credit to the original source of content, and search for duplicates before posting. Learn more
community guidelines