• Global community
    • Language:
      • Deutsch
      • English
      • Español
      • Français
      • Português
  • 日本語コミュニティ
    Dedicated community for Japanese speakers
  • 한국 커뮤니티
    Dedicated community for Korean speakers
Exit
0

Frustrating issue with trim paths

New Here ,
Oct 30, 2024 Oct 30, 2024

Copy link to clipboard

Copied

I'm trying to apply the trim paths effect to quite a complex illustrator comp made up of multiple layers/objects.
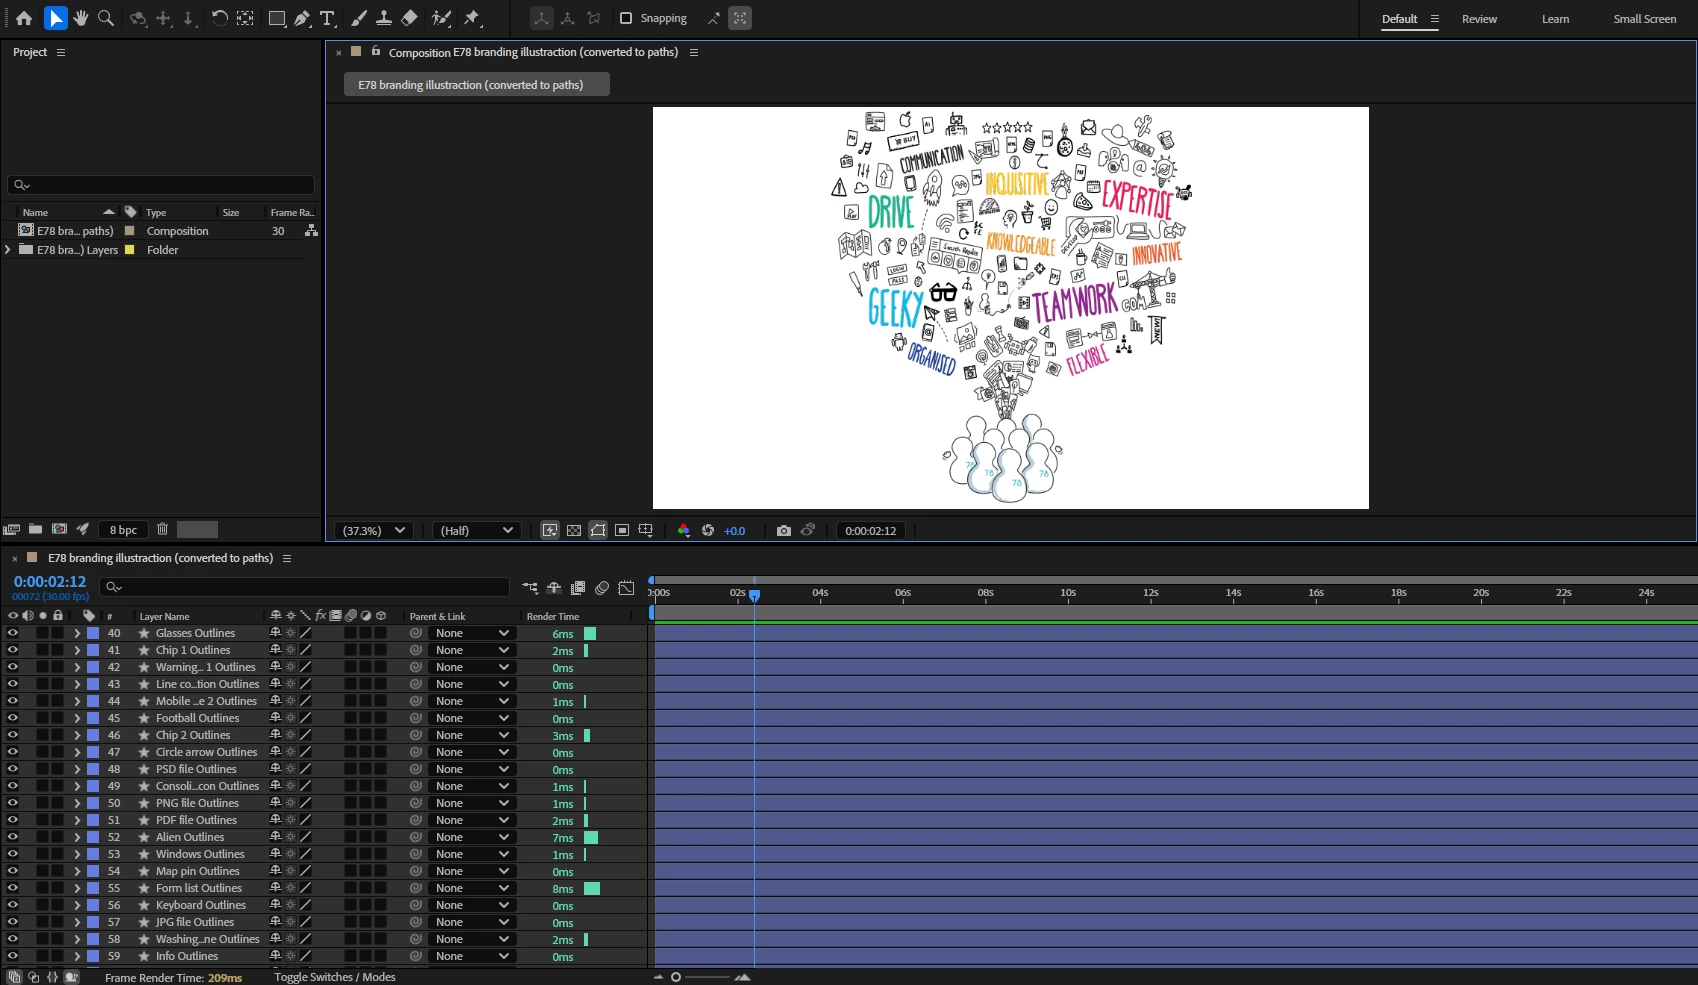
Screenshot 2024-10-30 103124.png

When I first gave it a go I experienced the issue many other people have faced of it trimming/revealing the fill of a layer. So, I went back to the illustrator comp and changed EVERY layer so it had no fill and just a stroke (this was a long process), only to discover that this did not resolve the issue once I took it back into AE and tried again.


Can anyone help as I'm invested in this now and don't want to give up!

TOPICS
Error or problem , How to

Views

233

Translate

Translate

Report

Report
Community guidelines
Be kind and respectful, give credit to the original source of content, and search for duplicates before posting. Learn more
community guidelines
Community Expert ,
Oct 30, 2024 Oct 30, 2024

Copy link to clipboard

Copied

First, Trim Paths only works with Shape Layers. Second, anything but a simple stroke in Illustrator will convert to a filled closed path, so you cannot use brushes or taper the paths in Illustrator.


It looks like you have converted all the vector layers to shape layers, but I cannot tell how cleanly the conversion worked. Select the layers, press "uu" to reveal all modified properties, and start digging into the shape of the layer structure.


Another option for working with complex Illustrator files would be to install Adobe XD. You can use XD to create a new file, then go to the File/Import menu and import your Illustrator file. Then, without doing anything else, create an After Effects project file using the File/Export/After Effects menu. Open the file, and the comp will be filled with much simpler and cleaner shape layers instead of embedded Illustrator layers. I use this workflow all the time.


Votes

Translate

Translate

Report

Report
Community guidelines
Be kind and respectful, give credit to the original source of content, and search for duplicates before posting. Learn more
community guidelines
New Here ,
Oct 31, 2024 Oct 31, 2024

Copy link to clipboard

Copied

Hi @Rick Gerard , thank you for your response. 


When you say "anything but a simple stroke", does that mean any closed paths i.e shapes will not work even if it has just a stroke and no fill? I actually did a test with a simple rectangle shape (stroke, no fill) imported from illustrator and the same issue occurred - see below: 


Screenshot 2024-10-31 164542.png


I was surprised that this didn't work as this is a very simple shape/stroke, so is there something fundamentally wrong that I'm doing with the process behind trim paths or importing?


Also, the Adobe XD route sounds like a useful one that I'd like to give a try, however when I hover over export there is no After Effects option - is this what you meant?


Screenshot 2024-10-31 162523.png

Votes

Translate

Translate

Report

Report
Community guidelines
Be kind and respectful, give credit to the original source of content, and search for duplicates before posting. Learn more
community guidelines
Community Expert ,
Oct 31, 2024 Oct 31, 2024

Copy link to clipboard

Copied

Your comp screenshot has a blue fill. Check the AI file. 

After you import your Illustrator file to XD, don't do anything but go directly to the File/Export menu, and After Effects should be available. Here's the workflow.

RickGerard_0-1730429987240.gif

Unless there is something funky in the Illustrator file, you should have access to every object as a separate shape layer. The After Effects Project file may contain nested comps, and it will have more layers than the original Illustrator file. 


If you can share the Illustrator file, I'll take a look. You could even DM me if you want.


Votes

Translate

Translate

Report

Report
Community guidelines
Be kind and respectful, give credit to the original source of content, and search for duplicates before posting. Learn more
community guidelines
New Here ,
Nov 01, 2024 Nov 01, 2024

Copy link to clipboard

Copied

Hi @Rick Gerard, yes for that test comp with the rectangle After Effects is saying it has a blue fill but I can assure you that in the original illustrator file it has no fill and only a blue stroke.


But for some reason, as far as After Effects is concerned, the shape has a fill and no stroke because when I try and change the stroke colour/px nothing happens - see below


Screenshot 2024-11-01 125311.png But After Effects clearly does recognise there being a stroke to a certain degree as when I select both Path 1 and Path 2 it highlights the stroke as per the illustrator file - see below

Screenshot 2024-11-01 125818.png


The only thing I can change is the fill which applies to both the stroke, as well as the "fill" which After Effects has essentially created itself

Screenshot 2024-11-01 125159.png


So there's clearly something lost in translation between Ai and Ae. Obviously this comp is just for testing purposes, it's the other one I actually want to make progress with - I just thought it would be interesting to see what happens with a simple shape layer.


As far as the Adobe XD workflow goes, I managed to export to AE (I just needed to double click on the artboard/document!), however it's done some weird things with the appearance of objects themselves, as well as the separation of paths/layers in the timeline, which I know you mentioned. See below.


Screenshot 2024-11-01 124916.pngScreenshot 2024-11-01 124937.png


So if possible I'd like to do any necessary tweaks to the original illustrator comp/any further steps in After Effects that I may have missed. Try and fix that way, so if I can take you up on your offer to look at the illustrator file that would be really helpful!

Votes

Translate

Translate

Report

Report
Community guidelines
Be kind and respectful, give credit to the original source of content, and search for duplicates before posting. Learn more
community guidelines
Participant ,
Nov 01, 2024 Nov 01, 2024

Copy link to clipboard

Copied

Your example shape is not just a single path with a Stroke, it’s two paths with a Fill. There may be a Merge shape modifier applied (perhaps hidden, or is just a quirk of how AE is compositing the paths—add a Merge shape modifier, play with the different Merge operations and the compositing process will make more sense). In any case, the Trim Paths modifier only works as you expect on a single path.


The good news: there is a workaround, which is easy enough for a single shape. The bad news: it’s tedious and repetitive for all of your 50+ shape layers:

  1. Disable one of the paths.
  2. Apply an Offset Paths shape modifier.
  3. Adjust the Offset to either a positive or negative value, depending on which of the 2 paths you disabled, to match the original look.
  4. Now add your Trim Path modifier, and it will trim the perimeter of the shape (which I assume is what you’re going for).


You can do this workaround in Illustrator, it’s still a bit tedious, but not as bad since Illustrator’s tools (direct selection tool? The white outlined one, not the solid black one) are better at picking single paths/objects inside groups, plus you can select multiple objects, turn them all off at once, and apply an Offset modifier to multiple objects at once, too. Then send the art back to AE for the trim paths/further animation.


In theory, Illustrator has ways to convert “double paths” with a fill into a single path with stroke. If your art was a bitmap/raster image, Image Trace claims to be able to create stroked path objects instead of objects with fills, but I’ve never gotten it to work.

Votes

Translate

Translate

Report

Report
Community guidelines
Be kind and respectful, give credit to the original source of content, and search for duplicates before posting. Learn more
community guidelines
Community Expert ,
Nov 01, 2024 Nov 01, 2024

Copy link to clipboard

Copied

If you share the AI file with me, I'll be happy to look at it. The screenshots show that most of those paths are brush strokes. 


You may need to create a series of track matte layers by duplicating all of the brush stroke layers, renaming them to make them easy to find, removing the brush strokes, and setting the stroke width to something big enough to cover the graphics. I do that kind of thing all the time and move all the track matte layers to the top of the stack in Illustrator. I always keep one path per layer.


With a complicated graphic like yours, breaking up the original file into smaller pieces might be a good idea. You could remove all but about ten layers from each copy of the original file. The original looks like it has about a hundred layers and a bunch of groups. Groups always complicate the animation process, especially if you use XD to create the AE Project file. If you keep the layers in the same position and eliminate as many groups as possible, it would be much easier to animate ten different 10-layer comps and then stack them all in a main comp to complete the shot. I also do that kind of thing all the time. 

Votes

Translate

Translate

Report

Report
Community guidelines
Be kind and respectful, give credit to the original source of content, and search for duplicates before posting. Learn more
community guidelines
New Here ,
Nov 01, 2024 Nov 01, 2024

Copy link to clipboard

Copied

Hi @Rick Gerard, I've just sent a link over to my illustrator file (let me know if I have to grant access), if you're able to take a look I'd be really grateful! 


Ungrouping layers sounds like a good shout 

Votes

Translate

Translate

Report

Report
Community guidelines
Be kind and respectful, give credit to the original source of content, and search for duplicates before posting. Learn more
community guidelines
Community Expert ,
Nov 01, 2024 Nov 01, 2024

Copy link to clipboard

Copied

LATEST

I looked at your original file. As I expected, there were Groups on every layer I checked. I suspect that there were Groups on every layer. I also checked the graphics using the View/Outlines menu and saw that every shape was a closed and filled path. All of the Groups fouled up the XD - After Effects workflow, and converting the vector paths to shape layers will not fix the problem either.


The simplest workflow is to select all layers, lock them all, turn them all off, and then turn on layer 1. Add a new Track Matte layer above Layer 1 and give it a name. Then, decide how you want to reveal that layer and use the pen tool to draw a path with a wide enough stroke to hide the original path. When I started, I was ungrouping the layers, but then I realized that nothing was being gained. 


Here's an animated gif of the workflow required to create track mattes for the first dozen layers. Unless you want to group several layers and reveal them all with one track matte, you only have about a hundred to go. I compressed about 30 or 40 minutes of work into about 40 seconds.

RickGerard_1-1730527138347.gif

When you have made all of the track mattes, open the AI file as a composition, retaining layer sizes, and then convert only the Track Matte layers to shape layers. 


It would probably take about the same time to create the shape layer track mattes in After Effects, but I think I'm a little faster at creating complex paths in Illustrator than in After Effects. Unfortunately, unless the artwork is remade with animating using After Effects in mind, the project will take a lot of time to set up.


Votes

Translate

Translate

Report

Report
Community guidelines
Be kind and respectful, give credit to the original source of content, and search for duplicates before posting. Learn more
community guidelines