Copy link to clipboard
Copied
This is probably a simple thing to do, but how can I make horizontal lines animate from bottom of the screen to the top and repeat in a seamless loop? I tried position keyframes on a single line (shape layer) with a time remap and a loopOut() expression, but I want the next line to start before the first gets all the way to the top of the screen. In otherwords, I want a continuous string of horizontal lines moving from bottom to top looping in the background.
Thanks
One way is to apply a Trim Paths operator to the line, adjust either the start or end or both so there's a gap.
And then put a time expression on the offset. You'll need to play with settings to your liking and multiply by positive or negative depending on the direction. Note the line I drew barely extends past the boundries of the composition. If you need longer lines with bigger gaps extend the line further past the comps borders
A more efficient method is required if you want a loopable sequence.
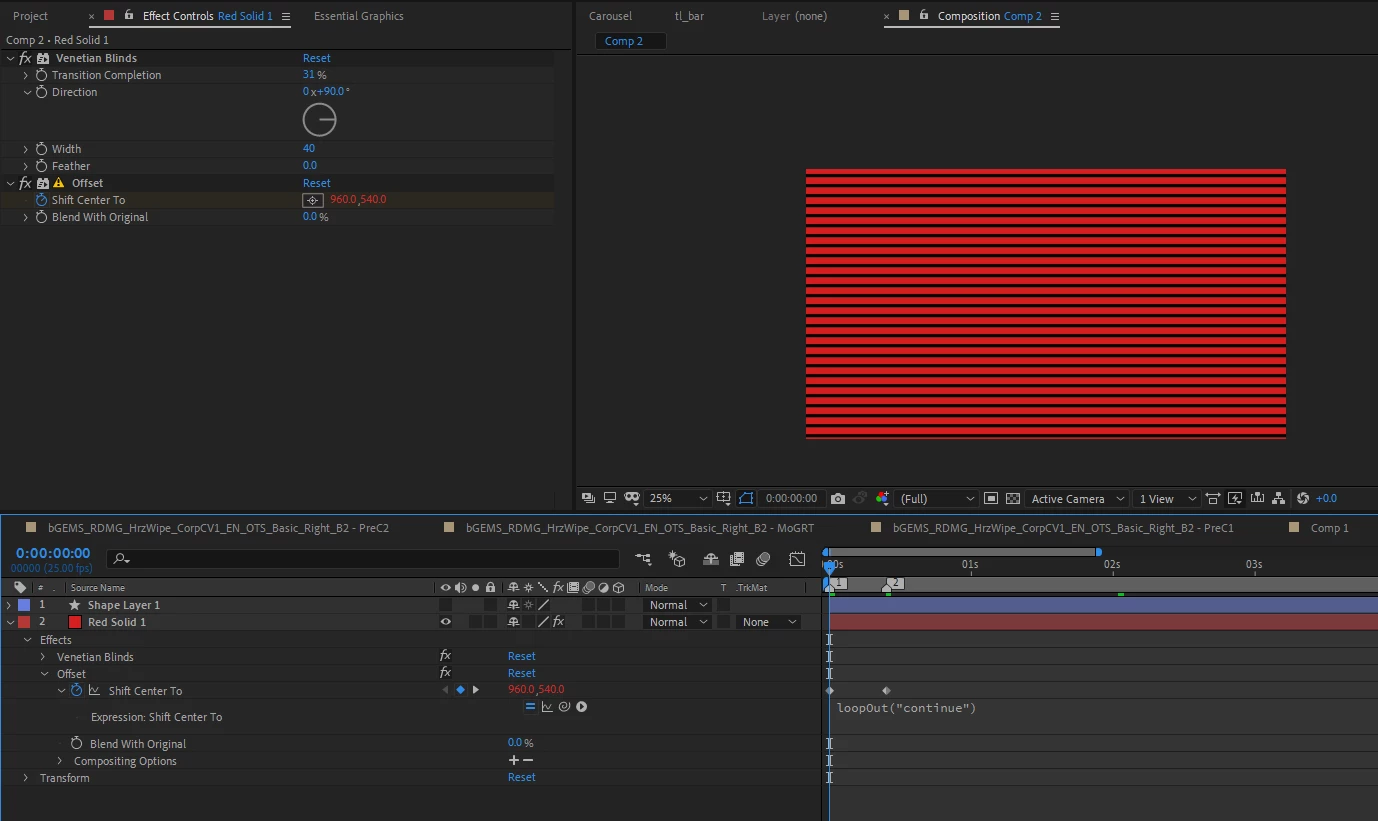
The Image Below shows the setup at the start of the loop. The second keyframe value for Shift Center To is [960,500]. This moves the lines upwars by forty pixels; and the two keyframes are 10 frames apart. You can adjust the time difference of the two keyframes to speed up or slow down the movement. The value change of 40 (going from 540 to 500 for the y-parameter) is based on the Width property of the Venetian Blind effect – w
...Copy link to clipboard
Copied
One way is to apply a Trim Paths operator to the line, adjust either the start or end or both so there's a gap.
And then put a time expression on the offset. You'll need to play with settings to your liking and multiply by positive or negative depending on the direction. Note the line I drew barely extends past the boundries of the composition. If you need longer lines with bigger gaps extend the line further past the comps borders
Copy link to clipboard
Copied
Sorry, I didn't explain very well what I was trying to do.
This is more of what I was wanting (see screen shot). Then I want those lines to continuously loop from bottom to top seamlessly.
Copy link to clipboard
Copied
Ah. You can use the Generate Grid effect on a solid and animate the
Y anchorpoint (in the effects settings, not the layer).
Actuallyit's the Grid effect under the sub-category Generate in the effects menu.
To get rid of the verticle grid lines just set the width slider to a very high number (youll have to enter it manually)
And then adjust the X Anchor position (again, in the effect settings) until the verticle lines are off screen.
To unlock the Width and Height sliders you'll need to set "Size From" to Width & Height Sliders.
That should do it. Then whatever effects and final touches for the look
Copy link to clipboard
Copied
Awesome, Thanks!
Copy link to clipboard
Copied
Effect>Transition>Venetian Blinds is what I used to use for creating such an effect. Then, to create the upward movement and the loop' apply Effect>Distort>Offset. It should be obvious you'll need to keyframe the Shift Center To (STC) property and only its y-parameter needs to change value between the two keyframes. What's not so obvious is with creating the looping feature.
To loop the offset, the x/y parameter needs to be change in 50% increments of its original dimension. If you right click on the STC property label, you can select Edit Value to invoke the dialog window to input your values. Here, you change the Units to "% of Source". As long as the value change between the two keyframes, for one or both parameters is a multiple of 50% of Source, you will obtain an animated loop.
HTH
Copy link to clipboard
Copied
Cool. that transition effect was the first thing i though of too but it never occurred to me to add the distortion to offset it.
Copy link to clipboard
Copied
Hi,
Everything works except the loop, so I guess I'm not understanding that last part with the 50% offset. When the time indicator hits the 2nd keyframe, then animation stops.
Copy link to clipboard
Copied
A more efficient method is required if you want a loopable sequence.
The Image Below shows the setup at the start of the loop. The second keyframe value for Shift Center To is [960,500]. This moves the lines upwars by forty pixels; and the two keyframes are 10 frames apart. You can adjust the time difference of the two keyframes to speed up or slow down the movement. The value change of 40 (going from 540 to 500 for the y-parameter) is based on the Width property of the Venetian Blind effect – with the y-movement set equal to the Width of the Venetian Blinds, we're ensured the two keyframes will provide identical visuals.
To complete the loop sequence, add the Expression,
loopOut("continue")
HTH
Copy link to clipboard
Copied
That's Awesome! It worked perfectly.
Thanks for your help on this.
Copy link to clipboard
Copied
The Create Nulls from Paths script that is pre-installed with AE has a Trace Path option which includes a Loop option via a checkbox.
Copy link to clipboard
Copied
This is cool, I just tried it out. Thanks!
Copy link to clipboard
Copied
My approach to this problem is a little different and extremely easy.
There you go. Takes about 1 minute.
The expression that makes the layer move exactly an even number of pixels per frame; very important to prevent judder, and it also works for title rolls. An expression slider controls the speed.
moveDistance = Math.floor(effect("Pixels Per Frame")("Slider")); //speed in whole numbers
t = inPoint - (time * thisComp.frameDuration);
y = - Math.round(moveDistance) * time;
[value[0], value[1] + y]
The screenshots - The animated lines comp:
The main comp; note how long it takes to render a speed change. Only the new frames then the whole timeline is ready to go.
The main advantage to this method:
Here's the project file: Rolling Scanlines.aep
 
 
Copy link to clipboard
Copied
Well I'm sure this is a much easier approach for an advanced user like you, but not so much for a beginner like me. lol
(Thanks for providing your file)
1. When I go to your shape layer, there's nothing on it, it's blank (see screenshot)
2. After I pasted in your expression, I got the error "Pixels Per Frame is missing or does not exits."
I see it on your file, but I can't find the Pixels Per Frame effect.
3. On your step #4, I'm not sure what you mean by set the out point. I'm not seeing where you did that on your file.
I do appreciate your attempt, but I probably should have stated that I'm just an AE beginner.
Thanks
Copy link to clipboard
Copied
You sir, are a wizard. Just wanted to say thank you for sharing your vast knowledge. It seems every issue I have in AE, you have an answer for.