  • 1333 Product updates
Create and edit anywhere with Photoshop Mobile on iPhone v.2
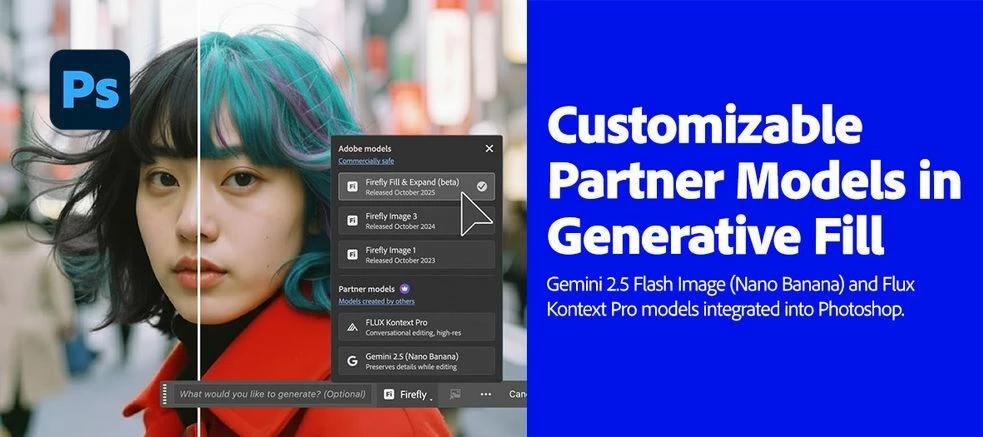
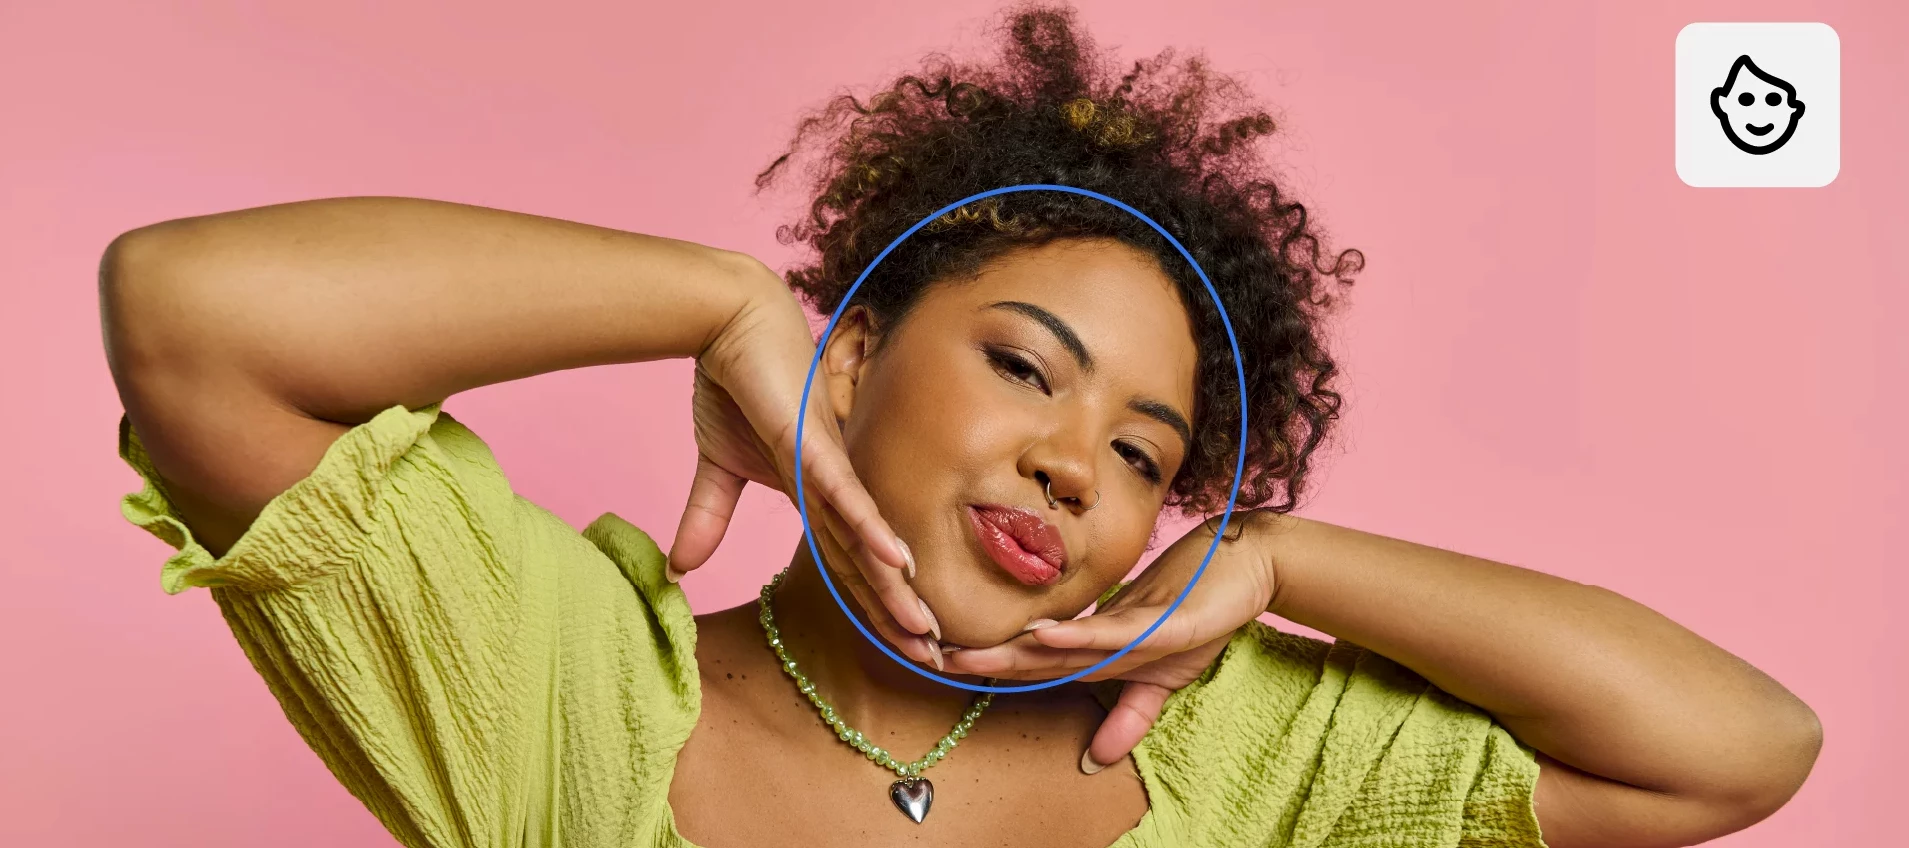
Cross-Product Creative Challenge #11: PSA Posters from an Alternate Timeline

Welcome to a new Cross-Product Creative Challenge! Thanks to everyone who participated in the temporal mash-up. This time, we're messing with history again, this time with a civic or propaganda poster from an impossible timeline. The Challenge:Design a civic poster—propaganda, safety warnings, or recruitment ads—for a world that runs by different rules. Maybe it's a world where air is a subscription service, or where silence is the local currency. Maybe it's“Join the Venus Terraforming Corps – 1939” “Steam Rail to the Moon – Great Western Aether Lines” “Vote for the AI Party – 1968”Go crazy. Start in Firefly or Boards or Express or Photoshop, but use at least two different tools to get to your final product. Guidelines:A prompt is not enough. Layer your assets and refine your composition. Treat Firefly as a collaborator, not a shortcut. Use prompts to generate characters. Try out partner models. Think like a director. What’s the story here? Who are the characters? What's happening in the scene? It’s a Cross-Product Challenge! Don't do it all in Firefly. Use Photoshop, Illustrator, Substance, Adobe Express, Fresco—whatever tools will help you build the scene. Share your process. Tell us how you created it. What tools did you use? How did you refine your idea? What choices did you make? My example is a PSA from the U.S. government Department of Gravity.The base is a typical 1950s American family scene generated with Nano Banana. The tie-downs and safety harnesses are Generative Fill using Firefly 3, adjusted and composited in Photoshop. The departmental logo was generated in Adobe Illustrator using the Gemini partner model. Because this is a thinly veiled threat, I generated a hapless golfer who didn't pay his license fee. Text added in Photoshop.

How to Use AI for Document Creation in Adobe Acrobat Studio

Create, design, and collaborate effortlessly in one of the best AI creative workspaces. SUMMARY Learn how to use one of the best all-in-one AI workspaces to simplify every stage of document formatting and creation—from brainstorming and drafting to design, editing, and collaboration. See how PDF Spaces, built-in AI Assistants, and Adobe Express – all brought together in Adobe Acrobat Studio – can help you build and refine content faster, and produce polished, professional documents in one creative workspace.  Today's business professionals, students, and consumers are looking for ways to work smarter and faster as they create content that stands out and attracts attention. But when you're juggling multiple tools for writing, designing, and collaborating on documents, productivity can stall.  Enter Adobe Acrobat Studio—the next generation of Acrobat, and one of the best all-in-one AI workspaces. Adobe invented the PDF and is trusted by millions of users at over 745,000 organizations worldwide. In fact, more than 400 billion PDFs were opened or created with Acrobat in the past year alone.   Now, Acrobat Studio is taking Acrobat's established history to the next level, integrating all the core PDF tools you know and love into a completely re-imagined smart document platform for boosting productivity, simplifying document formatting, and streamlining review processes.  With AI document assistance, Adobe Express design and creation tools, and seamless collaboration all in the same place, Acrobat Studio is designed to help you do your best work faster, with less stress, while creating your most impactful content. Here, we'll show you how you can use Acrobat Studio to concept, create, and share polished documents that stand out, all in one of the most trusted AI workspaces.   To learn more, see this article: Why Today's Users Need a Smarter, All-In-One Workspace.  

Presentations in Acrobat Studio

Explore how the Generate presentation tool in Adobe Acrobat transforms prompts, files, and entire PDF Spaces into professional, visually engaging presentations in minutes.  The Generate presentation tool in Adobe Acrobat uses generative AI and Adobe Express design capabilities to build structured, ready-to-edit presentations from simple prompts or existing documents. Whether you’re preparing a sales pitch, business proposal, or academic presentation, the tool helps you generate clear and visually consistent presentations. Try with the app - Generate Presentation  How the tool works The Generate presentation tool in Adobe Acrobat quickly turns your ideas or documents into polished, ready-to-edit slides. Simply provide a prompt or upload files, and the tool generates a structured presentation with intelligent layouts and visuals. No need to create slides manually. Describe what you need, then customize and refine. Learn how to create an AI-powered presentation.   Note:  Copyright compliance for AI features in Acrobat: Creating, uploading, or sharing content that infringes on third-party copyrights is prohibited. If you’re unsure whether your content violates copyright, seek legal advice before proceeding. Learn more about content usage and data handling.  Access and availability  Access points: The presentation tool is available in both web and desktop apps, but desktop access opens the web interface, as the generation runs on the web. You can access it from the homepage, the Create tab, PDF Spaces, and the document view.   Languages & regions: Available in English and French in countries where Adobe Acrobat is offered.  Availability: Available for Individual, Teams (Direct and VIP), and Enterprise (EVIP and ETLA) subscriptions.  Adobe is gradually adding support for more subscription types, languages, and regions.  Ways to begin   You can generate a presentation using:  Text prompts only: Set the audience, tone, and structure to start from scratch. You can use up to 1,000 words.  File uploads: Upload your content in multiple formats, such as PDF, Word, PowerPoint, Excel, images, and web links, and then describe the presentation you want to create. You can upload up to 10 documents (150 pages total).  PDF Spaces: Start a presentation from your PDF Space. The tool analyzes all files, extracts key insights, and creates customizable slide content.   To know more about:  Example Prompts  Key Element about Presentation  Images in the generated presentation  Please visit this article: https://helpx.adobe.com/acrobat/web/create-pdfs/create-presentations/overview.html    Check out Adobe’s official AI usage policy and limitations here:  Acrobat AI Overview  AI usage policy and limitations     Community Resources:   Try Acrobat GPT now  Meet Acrobat Studio   Work Smarter With Acrobat AI Assistant: Tools & Resources. 

Gemini (Nano Banana) and Flux Kontext Pro models now in Photoshop MAX update 27.0

Gemini (Nano Banana) and Flux Kontext Pro models now in Photoshop MAX update 27.0

Big news for Photoshop creators! We’re thrilled to announce that Gemini (Nano Banana) and Flux Kontext Pro models are now integrated into the Photoshop Desktop Generative Fill workflow! These models unlock advanced capabilities to help with your creative vision, including:Style transfer Text editing Object modification Quick or controlled edits Complex transformationsAll within a non-destructive, creative control environment.Here's how to use these Models in Photoshop's Generative Fill:Open a file → Create a selection (try Select All or Selection Brush) Click the Generative Fill button Tap the Model Picker icon Choose an AI model.  Enter a detailed prompt → Generate! Click here for more details.Pro-Tips for using Generative Fill:Use larger, loose selections with the Selection Brush. Avoid hard edges to prevent shifting or visible seams. Add clear prompts to guide the model’s output. Use Flux Kontext for seamless, context-aware backgrounds. It is conversational, helping maintain character consistency and precise edits. Use Nano Banana for stylistic fills. It is optimized for preserving details, making it ideal for creative transformations. Important Note About Generation Credits: Generative Fill and Generative Expand using Adobe Firefly models are standard features and will consume 1 credit per generation. Generative Fill and Generative Expand, powered by Firefly Fill & Expand (beta) model in Photoshop (beta) on desktop, deduct 1 credit per generation.   Generative Fill, powered by powered by partner AI models, are premium features: Gemini 3 (with Nano Banana Pro) = 40 credits Gemini 2.5 (Nano Banana) = 10 credits FLUX.2 pro = 20 credits FLUX.1 Kontext [pro] = 10 credits Learn more about premium features and generative credits in the generative credits FAQ. Are you ready to get started? Update Photoshop to the latest version and explore these LLM models and other new exciting features. More details can be found here.We’d love to hear from you!Try out these new models in Photoshop 27.0 and let us know your thoughts. Feel free to reach out if you have any questions or need more tips!

How to Report a Bug

If you're experiencing a problem with Premiere Pro, we want to hear from you! We'd also like to know if you've found errors or omissions in our documentation. The most critical information in a problem report is how to reproduce the issue. It is challenging for us to address a problem we cannot replicate. Please provide detailed steps for us to follow to observe the problem you're encountering.  Use the template below to provide us with information:   Issue – A short description of the problem.   Steps to reproduce – A numbered list of the exact steps needed to reproduce the problem.   Expected result – What should happen after completing the last step.  Actual result – What actually occurred after the previous step   Screen recording – If you think it might be helpful, include a recording of your screen, showing the issue.    Adobe Premiere Pro version – FAQ: How to find the exact version of Premiere Pro you're using?  Operating system – Specify Windows or macOS, along with the version  GPU driver version (Windows only) – If you're on Windows, please let us know what version of the video card (GPU) driver you are using.   Video format – If your issue is related to video playback or export, please let us know what format the video is in. Ideally, share with us a sample video.  Comparative information helps us understand more about when the issue occurs:   Does it affect all projects or only some projects?   Does it affect new projects?   When did the problem begin?    Provide us with the information above by going to the Bugs section of this forum and clicking on "Post to Community." Ensure the Bug conversation type is selected.  Why do problem reports have upvotes? We use the upvote feature to understand how many users are affected by a specific problem. Please upvote a problem only if you have experienced it yourself to ensure the upvote count accurately reflects the community's experiences.   Thank you for taking the time to report a problem – your input is invaluable to us!     

What information should I provide when asking a question on this forum?

When asking a question on the Premiere Pro user-to-user forums, you can make it easier for folks to help you by proactively providing the answers to the following questions:    What version of Premiere Pro? Include the minor version number (e.g., Premiere Pro 2025 (Version 25.6.3).  Have you installed the recent updates? (If not, you should. They fix a lot of problems.)  What operating system? This should include specific minor version numbers, such as "Mac OSX v26.0" - not just "Mac".  What kind(s) of source footage? When discussing your source footage, please specify the codecs, not just the container types. For example, "H.264 in a .mov container," not just "QuickTime".  If you are getting any error message(s), what is the full text of the error message(s)?  What were you doing when the problem occurred?  Has the same media with this computer system ever worked before?  Did you update your project from one major version of Premiere Pro to the next, and then saw problems in the project?  Tell us about your computer hardware. Be especially certain to tell us about your OS, CPU, RAM, GPU (make, model, driver version), any third-party I/O hardware (e.g., AJA, Blackmagic) and the type of media drives you are using.   Is the media playing back on a fast enough drive?  Is the drive connected to a high speed port on the computer?  Does the problem only happen with your final output, with previews, or both?  Do you have a crash log that you can upload (Creative Cloud or DropBox, etc.) so we can inspect it?   FAQ: Where do I find Premiere Pro crash logs on Windows or Mac?  Do you have a project file that you can upload (Creative Cloud or DropBox, etc.) so we can inspect it?  Do you have a sample video clip that you can upload (Creative Cloud or DropBox, etc.) so we can inspect it?  Can you provide a screenshot or sample movie?   Screenshots and sample movies are often very useful in showing exactly what you're seeing, and can thus make getting an answer faster and easier.  You can embed screenshots and YouTube movies directly in the post.  Also Helpful:   What other software are you running?  Do you have any third-party effects or codecs installed?    Also, please do a quick community search to see if your question has been addressed already in an existing thread. 

Snapping enhancements in Illustrator

Snapping enhancements in Illustrator

 Hey everyone!With the latest release, Illustrator’s engineering team has rolled out exciting snapping enhancements - shaped directly by your feedback. These updates bring faster setup, clearer canvas control, and export precision you can rely on.Explore the latest updates and enhancements in Illustrator. Update to Illustrator 30.3 using this link, or open the Creative Cloud desktop app and click Update next to Illustrator. For step-by-step guidance, check out the detailed update instructions. Enhancements in Illustrator 30.0 Use Snap to Tangent in Illustrator to draw or adjust lines that connect smoothly and precisely to curves. This feature ensures clean geometric accuracy by making lines touch curves at exactly one point—ideal for logos, technical drawings, and designs with circular or organic shapes.Use Snap to Perpendicular in Illustrator to align line endpoints at perfect right angles to straight paths—ensuring clean, precise geometric connections. Ideal for architectural layouts, technical drawings, and vector illustrations where accuracy is key.Enhancements in Illustrator 29.8.1Smart GuidesUsing Smart Guides, you can precisely snap to the endpoints, midpoints, and centers of any object, ensuring quicker, more consistent alignment throughout your design. Snap to GridThe enhanced Snap to Grid feature allows for flexible object placement within grid cells, while still enabling precise snapping to grid lines or intersections when needed. Newly added dotted guides offer clear visual feedback, making it easier than ever to achieve pixel-perfect alignment. Snap to PixelImproved Snap to Pixel ensures your artwork stays perfectly aligned to the pixel grid by removing half-pixel shifts and unclear alignment hints. Guides now appear only when objects are truly pixel-aligned, helping you create sharp, accurate designs ideal for screen use. Switch between Snap to Grid, Snap to Pixel, Snap to Point, and Smart GuidesEasily switch between Snap to Grid, Snap to Pixel, Snap to Point, and Smart Guides using the Snapping Quick Access panel located under the Control bar. Instantly adjust snapping preferences like Alignment Guides and Snap to Glyph for smoother, more precise alignment without interrupting your workflow. Precisely align shapesYou can now precisely align shapes and paths to the endpoint, midpoint, and center of any rotated object. Improved Smart Guides automatically detect rotation angles, ensuring consistent alignment no matter the orientation. Restrict object snappingYou can now restrict snapping to objects solely within the active artboard, and enable snapping to isolated objects directly from the Preferences panel. This helps avoid unwanted alignment with elements outside your workspace, keeping your edits precise and focused. New advanced Smart Guides settingsTake advantage of the new advanced Smart Guides settings to tailor how objects align and snap on the canvas. You can enable forced snapping to the grid, adjust snapping tolerance, or display guides during snapping - allowing snapping to effortlessly adapt to your workflow.  Share Your Feedback Explore this more intuitive way to work with snapping in Illustrator and let us know your thoughts in the comments. Feel free to create a new post if you have any issues related to the release or need more tips!If you found this announcement helpful, click 👍 Like.Use ⭐ Subscribe to stay informed about future updates.You may also share this post with others who might benefit from these enhancements.

Image showing the integration of Premiere Pro and Firefly. Hero Image.

Premiere Pro v25.6 — Firefly integration, smarter search, and more

 We’ve released Premiere Pro v25.6, and it’s full of updates designed to make editing easier, faster, and more connected. Whether you’re working on quick social edits or long-form projects, this version helps you stay focused on your creative work. What's new in Premiere Pro v25.6 Firefly integration Send media from Adobe Firefly on the web straight to Premiere on desktop for a smoother creative workflow.Learn how to import media from Firefly to Premiere. Smarter search with Media Intelligence Search your footage for specific sounds by simply describing what you want to find. Locate similar shots or alternate takes with ease.Learn how to search for audio and search for similar visuals quickly with Media Intelligence. Bulk audio cleanup Easily bleep or mute unwanted words and sensitive information across your timeline in one go. Learn how to clean audio with bulk mute or bleep. Adobe Stock built-in Discover, license, and import over 835 million high-quality images, videos, templates, music, and more directly within Premiere.Learn how to use the built-in Adobe Stock panel. More features and fixesFrame.io V4 Panel: Navigate, view, and import media from Frame.io V4 into Premiere using a newly designed native panel. Learn more Edit Anywhere: Edit anywhere using Premiere on iPhone, then send your project to Premiere on desktop and keep your creative flow uninterrupted. Learn more Native Nikon N-RAW Support: Premiere now supports native import and editing of Nikon N-RAW footage for improved image quality and faster workflows. Firefly Boards in Premiere: Access Firefly Boards from the File menu in Premiere to explore early ideas, craft moodboards, and develop storyboards. Learn more What's new in Premiere Pro BetaObject Masking: Apply effects or color corrections to specific areas with precision. Redesigned Masks: Improved Rectangle, Ellipse, and Pen masks for more control. Learn more Intel NPU Audio Tagging: Faster AI-powered audio workflows with Intel hardware acceleration. Learn more Why this matters These updates are about saving time and giving you more flexibility. Smarter tools and connected workflows mean less time searching and fixing—and more time creating. Try these new features now Update to Premiere Pro v25.6.2 and discover powerful features for your video creation. Update Premiere Pro We recommend updating to Premiere Pro 25.6.2 for the best experience. This version includes a fix for an issue that could prevent projects from opening in earlier builds. If needed, a downgrader tool is available. Join the conversation Have you tried Premiere Pro 25.6? Share your thoughts, tips, or questions in the comments—we’re listening. 

Discover new ways to summarize documents with Acrobat Studio

Discover new ways to summarize documents with Acrobat Studio

 We’ve introduced powerful AI features in Acrobat Studio to help you summarize documents faster, stay organized, and collaborate more effectively. Meet Acrobat Studio Managing reports, research, contracts, and meeting notes can be overwhelming. Acrobat Studio combines trusted PDF tools with AI-powered summarization and creative features—so you can search, summarize, and collaborate in one place. 6 ways to work smarter with Acrobat Studio Consolidate and summarize multiple sources in PDF Spaces In Acrobat Studio, you can combine multiple files—reports, research studies, and meeting notes—into a single PDF Space. Once you have all of your documents in one place, use Acrobat AI Assistant to identify key insights and generate concise summaries, so you can see the big picture faster. Chat with your documents Your AI document assistant can be a great research partner. Ask questions and get quick answers, request a short overview of any document, or create shareable summaries from synthesized concepts and takeaways. The AI assistant works across a wide range of source types, including PDFs, Word documents, JPGs, PPT slides, web links, plain text, and Scans. Instant summaries anywhere, anytime Whether you’re using the Acrobat desktop app, Acrobat web, or a mobile device, AI Assistant in PDF Spaces provides quick summaries and short takeaways on demand. On mobile, you can even use voice prompts while on the go for hands-free interactions that keep you productive and safe. Trust every summary with Source Citations Each AI-generated summary includes clickable citations, so you can trace insights back to their original source to verify accuracy, ensure personal relevance, and learn more. You’ll always know where the information came from—so you can make smarter decisions based on trusted insights. Compare and contrast different files Need to understand changes between two contracts or find patterns across reports? AI Assistant highlights similarities and differences for you almost instantly, saving hours of tedious back-and-forth comparisons and manual toggling between files. Break down complex documents Got a document that’s full of technical jargon or complex concepts? An AI Assistant can simplify dense language into clear, easy-to-understand explanations, so you can grasp complex information faster and more accurately. Real-world uses for AI summarizationBusiness professionals: Synthesize market research, user interviews, trend reports, and more into one actionable summary for faster decisions. Consumers: Review contracts and agreements, letting AI Assistant summarize key points, define legal terms, highlight version difference, and surface considerations before you sign. Students: Ask the AI Assistant to outline, explain, and simply new concepts from reading materials, research papers, lecture slides, and class notes. Try it now Try Acrobat Studio today and experience how much time you can save.Go to Acrobat Studio We'd love to hear from you Have you tried these features? Share your thoughts, tips, or questions in the comments—we’re listening and your feedback helps us make Acrobat better for everyone. 

ChatGPT feature in Acrobat
Latest Photoshop Features - Smarter Collaboration, Sharper Text

Photoshop v26.11 — Collaborate with Projects, refine Firefly generations, and more

We’ve just released Photoshop v26.11 with new features and improvements to make your creative work easier and more collaborative. What’s New in Photoshop v26.11 Organize, share, and collaborate with ProjectsSay hello to Projects, a new way to work across Adobe apps. Whether you're designing in Photoshop, illustrating in Illustrator, or creating content in Adobe Express, you can now:Group assets into a shared cloud-based project Invite collaborators with edit or comment permissions Manage files together in real timeThis feature is perfect for teams working across disciplines — from social media campaigns to product launches — and ensures everyone stays aligned and productive.Learn more about Projects. Refine Firefly generationsAccess your Adobe Firefly generation history directly from the Photoshop home screen. Open any Firefly-generated image as a Photoshop document to enhance it using the complete set of Photoshop editing tools. Your original Firefly asset stays unchanged, so you can safely create and experiment with variations.Learn how to refine Firefly-generated images. Sharper text for Chinese, Japanese, and KoreanPhotoshop v26.11 introduces vector-based text rendering enhancements for CJK languages:Sharper, more accurate text output for Chinese, Japanese, and Korean Consistency across versions and fonts, even when opening legacy filesThis update ensures your typography looks crisp and professional, no matter the language.Learn how to add text. Bug fixesInfo panel now shows “before” and “after” values. See original post First input on the font search bar is no longer ignored. See original post Droplets issue resolved for Create Droplet command on macOS. See original post Try these new featuresUpdate to Photoshop v26.11 and start using these improvements.Update Photoshop We'd love to hear from youTried the update? Let us know what you think! Share your experience, tips, or questions in the comments—we’re always listening and your feedback helps us make Photoshop better for everyone.

Photoshop v27.1 — Improved Scratch Disk management and key fixes

【解消済】Windows版InDesignにてヒストリーが消える問題について

2026年1月28日追記多くの方にご不便をおかけしました事、改めてお詫び申し上げます。本件、2026年1月28日アップデートの21.2で修正を完了いたしました。また、一部の方にて発生していた「テキストが一時的に非表示となりズームやスクロールをすると表示される」問題もこのアップデートにて修正されております。 お手数ではございますが、お手元でもアップデートを実行し動作をご確認ください。 ------------------------------------------------2025年12月2週目の後半から、Windows版のInDesignにてヒストリーが消える問題の報告が複数寄せられております。 一部のWindows環境では問題なく使えている場合もございますが、現時点で明確なトリガーは確認できておりません。以下に現時点で判明していることを記載いたします。 【確認されている問題】・ヒストリーが3~5つ程を残し操作中に自動削除される・ヒストリーが消えることにより「戻る」コマンドが効かない工程が生まれる・データ保存後にヒストリーが消えるとドキュメントが保存可能な更新情報が含まれる印の「*マーク」が付属する【確認されている環境】・Windows10/11・InDesign 2025/2026※Mac環境や2024バージョンでは問題は確認されていません。 大変恐縮ではございますが、この問題は調査中であり現在明確な回避策はございません。今後、新たに確認が出来ましたら本記事を更新いたします。ご不便おかけいたしますが、続報を今しばらくお待ちください。  最後に、現在実施をしても解消に繋がらなった対処を念のため記載いたします。【解消に繋がらなかった対処】・InDesignの環境設定の再作成・InDesignの再インストール・OSの新規ユーザーアカウントでの動作確認・セーフモード+ネットワークONの状態での動作確認・オフラインでの動作確認・KB5072033の削除

Acrobat | 新UIですべてのツール内が空欄になる、表示されない件について

Acrobat の新UI をご利用されている一部のお客様にて、本事象を確認しています。【対象のAcrobat】Acrobat【対象OS】Windows【事象の詳細】Acrobat の新UI画面ですべてのツールが表示されない【回避策】Acrobat を旧UI画面に変更いただき、ご利用をお願いします。 <旧 UI への変更手順>1. Acrobat を起動2. 画面左上の「メニュー」をクリック3. メニューの「新しい Acrobat を無効にする」をクリック4. 確認画面で「再起動」をクリック 【解決策】 本件につきましては、修正版となる 25.001.21208 をリリースし、本事象が解決していることを確認いたしました。※ 以下のアップデート方法は Windows の管理者権限が必要です。<手順>1. Acrobat を起動2. アップデートを実施旧UI : [ヘルプ] > [アップデートの有無をチェック] の順にクリック新UI : [メニュー] > [ヘルプ] > [アップデートの有無をチェック] の順にクリック3. 画面に従い、作業をお願いします。 [アップデートの有無をチェック] が表示されないお客様は、自動アップデートを無効にされています。以下からアップデーターをダウンロード後、msp ファイルを実行し手動でアップデートをお願いします。※ Acrobat の bit 数に合わせたアップデーターをダウンロードください。Acrobat 32bit版 / Acrobat 64bit版 ダウンロードされたファイルをダブルクリックで実行いただきましたら、画面に従いアップデートをお願いします。Acrobat Reader のアップデーターを入手されたい方は、こちら にアクセスし、ダウンロードをお願いします。

Expression & Scripting Access for Dropdown Text and Keyframes in After Effects Beta 26.0x40

Hello, motionkind! Now in After Effects (Beta) build 26.0x40 and later, we are introducing two improvements for expressions & scripting.  Quickly find the keyframe or marker before or after a given time, without writing lengthy, repetitive logic.  Read the current text and the full list of dropdown menu items, so you no longer need to keep duplicate strings in your expressions just to show the text from a dropdown menu.    previousKey() and nextKey() in JavaScript expressions    This Beta build introduces new expression methods to quickly get the keyframes or markers before or after any given time:  Property.previousKey(time): Returns the keyframe or marker at or before time. If none exist before time, returns the first keyframe or marker.  Property.nextKey(time): Returns the keyframe or marker after time. If time is after the last, returns the last keyframe or marker.    These new methods are only available in the JavaScript expression engine, so make sure to set the engine to "JavaScript" in File > Project Settings > Expressions.    We hope these new methods help you reduce repetitive code, especially when triggering animation via markers and keyframes.      Expression examples for previousKey() and nextKey()  Get the time since the previous keyframe (useful for triggers, overshoot, etc.):  const prev = thisProperty.previousKey(time); time - prev.time;   Time to the next keyframe (useful for anticipating transitions):  const next = thisProperty.nextKey(time); next.time - time;  Trigger keyframes at each layer marker:  const animDuration = key(numKeys).time - key(1).time; const animTime = time - marker.previousKey(time).time; const animRemap = linear(animTime, 0, animDuration, key(1).time, key(numKeys).time); valueAtTime(animRemap);   Use neighboring keys to control a property (e.g., auto fade-in between keys):  const prev = thisProperty.previousKey(time); const next = thisProperty.nextKey(time); const t0 = prev.time; const t1 = next.time; const u = (time - t0) / Math.max(1e-6, (t1 - t0)); linear(u, 0, 1, 0, 100); // 0% at prev key, 100% at next key     Reading text strings from dropdown menus    In the latest Beta, you can now read both the current item’s text string and the full list of text strings from any dropdown menu property. This gives you access to the strings of both customized Menu properties of Dropdown Menu Controls and dropdown menus of other effects and layers.    Importantly, note that expressions and scripting use different syntax to access the text strings, to maintain consistency with existing syntax.    For JavaScript expressions, the new APIs are:  Property.text: This will give you the currently active text string of the dropdown menu at the current time.  Property.textAtTime(time) This will allow you to get the text strings from a dropdown menu at any given time (replace time with the time you need), just like .valueAtTime(time).  Property.items: This will give you an array of all the strings in the dropdown menu.    These are only available in the JavaScript expression engine.    Expression Examples (modern JavaScript expression engine)  Show the current dropdown text directly in a Text layer:  effect("Dropdown Menu Control")("Menu").text;   Use the array returned by items to display choices:  const menu = effect("Dropdown Menu Control")("Menu"); const allStrings = menu.items; const selection = menu.value; // Add "•" bullet point to selected item allStrings[selection - 1] = "• " + allStrings[selection - 1]; allStrings.join("\n");       For ExtendScript scripting, the new properties are:  Property.valueText: The text of the current selection. Naming corresponds to Property.unitText.  Property.propertyParameters: The array of all item strings in the dropdown. Naming corresponds to Property.setPropertyParameters.    Scripting Example  // Given an existing Dropdown Menu, alert the // text of the current item and then all items. var activeComp = app.project.activeItem; if (activeComp && activeComp.selectedLayers.length > 0) { var theLayer = activeComp.selectedLayers[0]; var dropDownFx = theLayer.property("ADBE Effect Parade").property("Dropdown Menu Control"); var menuProp = dropDownFx.property("Menu"); var currentTextString = menuProp.valueText; var allStrings = menuProp.propertyParameters; // array of strings alert("Selected: " + currentTextString); var lines = ""; for (var i = 0; i < allStrings.length; i++) { lines += (i + 1) + ". " + allStrings[i] + "\n"; } alert("Options:\n" + lines); }   Notes & tips for accessing dropdown menu strings These APIs only apply to dropdown menu properties of effects and layers.  In dropdown menus, you will see "(-" represents a divider item. You can use this in your own custom Dropdown Menu Controls to add your own dividers to organize long lists. The text of Layer Control dropdowns is not accessible with the new methods. If you need the selected layer's name, you can use the .name property of the layer returned by the Layer Control.  If you share projects or Motion Graphics Templates, we recommend continuing to use the index of dropdown menus when driving expression logic (versus matching the strings), since indexes will be more reliable. The text in some dropdowns can change with the application language, which will result in broken expressions.   We need your feedback Are there scenarios where these new methods or properties don't behave as you'd expect? Do these fit into your existing workflows? Are there related features or enhancements you'd like to see?   We hope you'll enjoy using these new APIs in your projects. Please let us know how they're working for you or how you've utilized them in the Beta builds. Thank you for your feedback! 

After Effects Preferences Refresh in Beta 26.0x40

We're excited to share an update to the After Effects Preferences, starting with After Effects Beta 26.0x40. We've reorganized and refreshed the preferences to make it easier to find the settings you need, when you need them.   What's New The preferences have been thoughtfully reorganized into logical groups that reflect your workflow: Project & Workflow Startup & Repair - Configure how After Effects launches and handles project recovery Project - Manage workspace preferences, Dynamic Link settings, new project templates, solids folders, and auto-save options Composition - Fine-tune composition behavior, layer creation settings, double-click actions, mask preferences, and more Previews - Control preview quality, caching, and playback settings User Interface Appearance - Customize themes, UI scaling, colors, hardware acceleration, and visual display options Grids & Guides - Configure grid spacing, guide snapping, and safe margins Label Colors - Manage your project organization color scheme Type - Set typography and text layer defaults Import & Export Import - Control footage interpretation, still image duration, and import behavior Export - Configure output preferences and audio block duration for rendering Performance Audio - Set up audio hardware, channel mapping, and audio block duration Disk - Manage disk cache location and settings Memory & CPU - Optimize RAM allocation and multi-frame rendering settings Video - Configure video output and preview hardware Feature Control 3D - Control 3D camera behavior and 3D cache Scripting & Expressions - Manage scripting preferences and security settings; customize expression editor styling New Preference: Synthetic Layer Length We’ve added a new preference called Synthetic Layer Length in the Composition preference panel. This gives you control over the default duration for newly created synthetic layers—including text layers, shape layers, solids, cameras, lights, and null objects.   You now have two options: Use Composition Length (default) - Synthetic layers match your comp duration, just like the still footage preference. Set Custom Duration - Define a specific default length for synthetic layers, perfect for motion graphics workflows where you want precise control   This small addition streamlines your workflow by reducing the need to manually trim many layer types after creation. Scripting Access The existing preferences command IDs have not changed and will remain functional, rerouting to the appropriate new preference panel. Should you wish to directly target the new preferences panel with app.executeCommand(), here are the new command IDs to use.   Preference panel ID Startup & Repair 3201 Project 3202 Composition 3203 Previews 3204 Appearance 3205 Grids & Guides 3206 Labels 3207 Type 3208 Import 3209 Export 3210 Audio 3211 Disk 3212 Memory & CPU 3213 Video 3214 3D 3215 Scripting & Expressions 3216 We Want Your Feedback We'd love to hear your thoughts: Are the new categories working well for you? Is anything harder to find than before?   Please share your feedback and suggestions in the replies below. Your input helps us continue improving After Effects!

Introducing Variable Font Animation in After Effects Beta 26.0x40

Get hyped for variable type! We're excited to announce support for Variable Font Animation in After Effects! Stretch, squash, jitter and transform your text with the combined power of After Effects text animators and variable font axes.  You can now animate variable font properties like Weight, Width, Slant, and more directly in the Timeline using Text Animators, edit them interactively in the Properties Panel, and drive them through the Essential Graphics Panel + Mogrts, unlocking powerful new typographic animation possibilities.  Imagine animating your text from whisper-thin to ultra-bold with buttery smooth transitions, all the characters at once or with a gradual fade from one weight to another. Or making each character dance with its own unique style. Or driving font dynamics with expressions that respond to your scene. Now stop imagining—because it’s all real. Any axis your variable font supports can be animated with the full power of After Effects’ Text Animators.That means full keyframe control, expression support, and up to 8 axes animated simultaneously per layer. Whether you're designing slick title sequences, expressive motion graphics, or experimental typographic art, this feature unlocks a whole new playground. Properties Panel EditingWhen you select a text layer with a variable font, a Variable Font Axes button appears in the Properties Panel next to the font family selector. Click this button to reveal a showing all available axes for your font with interactive controls.  Text Animator AnimationVariable fonts contain multiple stylistic variations within a single font file, and now you can animate between these variations smoothly in After Effects. Access any axis available in your variable font—from standard axes like Weight and Width to custom designer-defined axes—and animate them just like any other property. You can have your type interpolate from Light and Roman to Bold and Italic, with the transition traveling across your entire text block.     Getting StartedQuick Font Tuning in the Properties PanelFine-tune your typography without animation:Select a text layer with a variable font Open the Variable Font Axes popup from the Properties Panel Adjust Weight, Width, or other axes to find the perfect look Dynamic Weight TransitionsAnimate text from thin to bold for emphasis or title reveals:Add Font Axis Weight as a text animator Keyframe from minimum to maximum weight values Creates smooth, native font weight transitions Per-Character Wiggly TypographyCreate organic, playful text animations:Add Font Axis Weight (or any axis) as a text animator Add a Wiggly Selector to the animator Each character will randomly vary its font weight over time Expression-Driven TypographyLink font properties to other animation parameters:Use expressions to drive a Font Axis based on any other property Map slider controls to multiple font axes Create responsive typography that reacts to layer properties Range-Based RevealsAnimate text reveals with changing font characteristics:Add Font Axis Weight and a Range Selector to a text animator Animate the Range Selector Start from 0% to 100% Text reveals while simultaneously changing weight Mixed-Font Variable AnimationsApply axis animations across multiple variable fonts in one layer:Use character ranges to apply different variable fonts Add axes from any font used in the layer Each character animates according to its font's axis capabilities 7. Essential Graphics and Motion Graphic Template SupportDrag and drop the Font Axes from the timeline into the Essential Graphics Panel:Decide which axes are available as values in parent comps Save as a Motion Graphic Template and use in Premiere with access to the selected Font Axes Animations using variable fonts will replay and render in PremiereVariable Font SpacingThe Variable Font Spacing property gives you control over how After Effects handles character spacing when animating Variable Font axes. When you animate Variable Font axes (like Weight, Width, etc.), the individual characters can change width. After Effects can apply per-character tracking adjustments to compensate for these design changes. This property lets you control when and how these adjustments are applied. Variable Font Spacing ModesThe Variable Font Spacing property offers three modes:Adaptive – Applies per-character tracking compensation when appropriate to maintain natural spacing as font axes change. Per-Character – Always applies per-character tracking compensation. Default – Disables per-character tracking compensation entirely. Characters maintain their original spacing despite font axis changes. Useful for creative effects where you want the natural width changes of the font to affect the overall text layout.Accessing Variable Font SpacingTo access the Variable Font Spacing property:Expand your text layer's Text property group Add a Variable Font Axis to animate Open the More Options section Look for the Variable Font Spacing property (it appears only when at least one font axis is active) Scripting API DocumentationAdding Variable Font AxesVariable font axes are added to Text Animator Properties using the addVariableFontAxis() method:// Create a compvar comp = app.project.items.addComp("Create Axis Comp", 1920, 1080, 1, 30, 30);comp.openInViewer();// Create a text layervar textLayer = comp.layers.addText("Hello World!");// Set the font to primary fontvar textDocument = textLayer.property("Source Text").value;textDocument.font = 'ShantellSans';textLayer.property("Source Text").setValue(textDocument);// Get the font object back from the text documenttextDocument = textLayer.property("Source Text").value;// Get the text property and animators groupvar textProp = textLayer.property("Text");var animators = textProp.property("Animators");// Add a new animatorvar animator = animators.addProperty("ADBE Text Animator");var animatorProps = animator.property("ADBE Text Animator Properties");// Add the Weight axisvar axisProp = animatorProps.addVariableFontAxis("wght"); Common Axis TagsStandard registered axes include:"wght" - Weight (100-900 typical range) "wdth" - Width (percentage of normal width) "slnt" - Slant (angle in degrees) "ital" - Italic (0-1 range) "opsz" - Optical Size (point size)Fonts may also include custom axes with 4-character uppercase tags (e.g., "INFM" for Informality).Note: Axes must exist on the font to have any impact. These are just examples of some axis tags. Working with Axis PropertiesOnce added, variable font axes behave like standard After Effects text animator properties:// Set a static valueaxisProp.setValue(700);// Set keyframesaxisProp.setValueAtTime(0, 300); // Light at 0 secondsaxisProp.setValueAtTime(2, 900); // Heavy at 2 seconds// Read valuesvar currentWeight = axisProp.value;var weightAtTime = axisProp.valueAtTime(1, false);// Check propertiesvar axisName = axisProp.name; // "Font Axis Weight"var numKeyframes = axisProp.numKeys;// Display the resultsalert("Axis Name: " + axisName + "\n" + "Current Weight: " + currentWeight + "\n" + "Weight at time 1: " + weightAtTime + "\n" + "Number of keyframes: " + numKeyframes); Getting Font Axis InformationTo discover what axes a font supports:var comp = app.project.items.addComp("Test Comp", 1920, 1080, 1, 30, 30);comp.openInViewer();var textLayer = comp.layers.addText("hello world");var textDocument = textLayer.property("Source Text").value;var fontObject = textDocument.fontObject;if (fontObject && fontObject.designAxesData) { var axes = fontObject.designAxesData; var message = "Variable Font Axes (" + axes.length + " total):\n\n"; for (var i = 0; i < axes.length; i++) { var axis = axes[i]; message += "Axis " + (i + 1) + ":\n"; message += " Tag: " + axis.tag + "\n"; message += " Name: " + axis.name + "\n"; message += " Min: " + axis.min + "\n"; message += " Max: " + axis.max + "\n"; message += " Default: " + axis.default + "\n"; if (i < axes.length - 1) { message += "\n"; } } alert(message);} else { alert("No variable font axes found");} Adjusting the Variable Font Spacing Property// Working with Variable Font Spacingvar moreOptions = textProp.property("More Options");var variableFontSpacing = moreOptions.property("ADBE Text Variable Font Spacing");// Variable Font Spacing has 3 modes:// 1 = Adaptive - Applies per-character tracking when appropriate// 2 = Per Character - Always applies per-character tracking// 3 = Default – Tracking is per the default Text Animator settings// Set to Per-Character variableFontSpacing.setValue(2);// Get the current modevar currentSpacingMode = variableFontSpacing.value; Accessing Axes in ExpressionsVariable font axes can be referenced in expressions using their property accessor. It will be fontAxis[4 char tag], e.g. fontAxisWght, fontAxisWdth, etc.// Reference axis from another propertytext.animator("Animator 1").property.fontAxisWght// Link layer opacity to font weightvar weight = text.animator("Animator 1").property.fontAxisWght;weight / 10;// Create responsive typography – apply to Font Axis Weightvar scale = thisComp.layer("My Layer Name").transform.scale[0];linear(scale, 50, 150, 300, 900); // Map scale to weight A few things still to come…While Variable Font Animation works with both Point and Box Text, the defined area of Box Text is not maintained with Text Animators. Variable fonts will cause the rendering area to change, and justified text will not wrap as expected. We are investigating improvements here. We can't wait to see what you create with this powerful new typography animation feature! Share your projects and techniques in the comments below. 

Photoshop 27.1 is now live

  We're happy to announce the release of Photoshop v27.1   What's new in this update?  The latest release of Photoshop(v27.1) includes several performance enhancements and fixes for customer-reported issues.    Scratch disk management is improved: Scratch disk handling is now more efficient, with updated free-space recommendations and optimized settings that help ensure smoother performance. Click here for more details.   Notable Fixes in this release: Generate Image and Import Image options are visible in the marquee style dropdown in the tool Options bar.  Select People hangs when added to an Action.    For details on issues resolved in earlier versions, check out the Fixed issues page.   Update now to experience these improvements and elevate your creativity!   Try Adobe Photoshop Download the latest version and dive into the new Adobe Photoshop features. Update Photoshop 27.1 To update Photoshop 27.1, click "Update" in the Creative Cloud desktop app next to Photoshop. More detailed instructions for updating.    We’d love to hear from you! Try out the new Photoshop 27.1 and let us know your thoughts. Feel free to reach out if you have any questions or need more tips! If this was helpful, please click the Upvote icon in the top left corner of this post. Your feedback helps us improve the experience. Thank you!   We’d love to hear about your experience or feedback! Click 'Reply' below. Click 'Follow' below to bookmark this post for easy reference. For other questions, feel free to start a new post in the community.

【既知の問題】Premiere Pro25.6.1でプロジェクトが開けない問題について

2025/11/25追記現状の対応策として、プロジェクトダウングレードツールが公開されました。----------------------------11月19日に配信されたPremiere Pro2025(25.6.1)バージョンで確認されている問題についてご案内いたします。 【Premiere Pro25.6.1でプロジェクトが開けない】●確認されている症状 プロジェクトを開くと「このプロジェクトは新しいバージョンのAdobe Premiere Proで保存されたので、このバージョンでは開けません。」とメッセージが出て開けない 開けるプロジェクトと開けないプロジェクトがある Premiere Pro25.6.1へアップデート前までは開けていた    ●問題の発生する条件11月13日頃に配信されたPremiere Pro25.6バージョンへアップデートしていた環境 ※25.6バージョンは現在配信停止されております。 オブジェクトマスク機能を有効にして編集されたプロジェクト こちらの問題は、新機能であるオブジェクトマスク機能を有効にして変換されたプロジェクトを25.6.1バージョンで開いた際に発生します。※オブジェクトマスク機能は25.6.1バージョンには搭載されておりません。 ●現状の対応策2025/11/25更新----------------------------◆回避策1:プロジェクトダウングレードツールで変換するv25.6.0で保存されたプロジェクトをv25形式に変換するアプリが公開されました。<Premiere 25.6.0 Project Downgrade Tool>WindowsMacご利用のOSに応じたリンクを開き、右上の「Download」ボタンからインストーラーをダウンロードして実行し、インストールを行ってください。※プロジェクトはバックアップをお取りください。ダウングレードツール起動後、開けないプロジェクトをドラッグ&ドロップして変換をお試しください。※「This file contains mask data that cannot be safely processed.」という赤いエラーメッセージが出る場合そのプロジェクトはオブジェクトマスク機能が含まれるためダウングレードツールでダウングレードができません。ベータ版で編集を継続いただくか、XML変換をお試しください。-------------------------------------------------------- ◆回避策2:Premiereベータ版で開くオブジェクトマスク機能はPremiereベータ版に搭載されています。Creative CloudデスクトップよりPremiereベータ版を導入し、開けないプロジェクトの編集をお試しください。※Premiereベータ版が英語で起動してしまった場合は、一旦終了してからもう一度ベータ版の起動をお試しください。詳細は以下の公開文書をご参照ください。■Adobe Creative Cloud ベータ版のよくある質問https://helpx.adobe.com/jp/x-productkb/global/creative-cloud-beta.html※ベータ版はサポート対象外となるため、自己責任でのご利用をお願いいたします。また、Premiereベータ版で開いたプロジェクトをXML書き出しすることで、メジャーリリース版でもプロジェクトが開ける可能性がございます。ベータ版でプロジェクトを開いた後に以下の操作をお試しください。画面上部メニュー<ファイル→書き出し→Final Cut Pro XML>を選択 XMLファイルの書き出し先を選んで保存 Premiere Pro25.6.1(メジャーリリース版)を起動し、手順2で書き出したXML読み込み ※XML変換により、元のプロジェクト内容が完全には再現できない可能性がございます。あらかじめご了承ください。 ◆回避策3:以前のバージョンで編集した自動保存プロジェクトを探すパソコン内で「.prproj」を検索し、Premiere Proのプロジェクトファイルを確認してください。Premiere Pro 25.6は2025年11月13日に配信されたため、更新日時がそれ以前のプロジェクトファイルであれば開ける可能性があります。開けたプロジェクトから作業をお試しください。 問題が改善しない場合やそれ以外のトラブルが発生した場合、以下の記事もご参照ください。「以前のバージョンで作成したプロジェクトが最新版でうまく動かない?」Premiere Pro アップデート後によくあるお問い合わせについて▶︎https://adobe.ly/3jlztNk 本障害につきまして、なるべく早く改善できるようチーム一同取り組んでおりますが、すでにこちらのトラブルでお困りの方におかれましては、上記の回避策で製品を引き続きご利用いただけましたら幸いです。またアップデートがありましたらお知らせいたします。

The November 2025 release of Painter is here!

  We’re psyched to announce that we’ve just released the latest version of Substance 3D Painter. Updates and additions for this release are very much focused on improving workflow and performance. Namely:   A new Ribbon Tool allowing you to paint complex repeating details, like stitches or zippers – or even text. This is even possible along curved surfaces and intricate geometry; you can now paint with patches that remain visually consistent without any stretching artifacts, or need to place elements manually.   Improved Symmetry controls for fills and effects, allowing you to apply symmetry directly to fill layers and effects in the layer stack.   Real-world displacement for digital twins and product design – Painter now includes Physical Displacement, which is particularly useful in fields such as product visualization and digital twin creation, where scale accuracy is vital.   Vulkan support and Baker API updates, for both Windows and Linux, providing smoother workflows and improved performance across complex projects.   And the ability to Extend Painter with Creative Cloud (CCD) Plugins, providing new ways to automate tasks and customize workflows.   For more details, take a look at our post on the Adobe blog discussing what’s new. You can also find complete information on the release in the Painter 11.1 release notes.   Keep on texturing, folks!

6 Ways to Use One of the Best AI Platforms to Summarize Documents

6 Ways to Use One of the Best AI Platforms to Summarize Documents Learn how to use Adobe Acrobat Studio to create a trusted AI workspace that increases productivity with AI summaries. SUMMARY Learn how to use one of the best AI platforms for summarizing documents to save time and streamline document creation and collaboration workflows. Adobe Acrobat Studio combines trusted PDF tools, AI-powered summarization, and creative features into one seamless AI workspace to help you stay productive wherever you work   Ever feel like you’re buried in documents? Between reports, research, contracts, and meeting notes, business professionals and students alike often find themselves scrambling to summarize documents so they can get the information they need in time to take action. Whether you’re preparing presentations, comparing proposals, or just trying to keep pace with a growing workload, manual reviews are too slow and error-prone when you need to be productive, and they just don’t cut it anymore. What you need is an AI-powered solution that reduces your workload by handling the heavy lifting, allowing you to search, summarize, and collaborate on documents all in one place. Representing the next generation of Adobe Acrobat and one of the best AI workspaces for faster, more focused document summarization, Adobe Acrobat Studio is designed to address these challenges.   Meet the New Acrobat Experience: Acrobat Studio Adobe invented the PDF and is trusted by millions of users across 745,000 organizations worldwide. More than 400 billion PDFs were opened or created with Acrobat last year alone—and now, that legacy of trust and innovation is evolving. Acrobat Studio brings together the proven reliability of Acrobat’s core PDF tools with AI and Adobe Express to make summarizing documents fast and easy. It transforms the familiar Acrobat experience into one of the best AI-powered productivity tools and creative platforms—combining smart AI capabilities, streamlined collaboration, and powerful design tools:   PDF Spaces: Organize and summarize a batch of multiple files at once to create custom workspaces for collaboration AI Assistants: Share PDF Spaces with a personalized AI Assistant to deliver knowledge, not just files – use a prebuilt AI Assistant like an analyst or instructor, or easily personalize your own and help guide its responses Adobe Express: Easily create standout content and polish your PDFs with simple tools, professionally-designed templates, and custom AI images to quickly create flyers, infographics, or social posts   Together, these tools make Acrobat Studio one of the best AI workspaces for teams. Now, let’s explore the six best ways you can use AI for document assistance and work smarter every day.      6 Ways to Summarize Documents in Adobe Studio   Consolidate and Summarize Multiple Sources in PDF Spaces: In Acrobat Studio, you can combine a batch of multiple files, like reports, research studies, and meeting notes, into a single PDF Space. Once you have all of your documents in one place, use Acrobat AI Assistant to identify key insights and generate concise summaries, so you can see the big picture faster.   Chat with Your Documents Using an AI Assistant: Your AI document assistant can be a great research partner. Ask questions and get quick answers, or request a short overview of any document. The AI Assistant works across a wide range of source types, including PDFs, Word documents, JPGs, PPT slides, web links, plain text, and Scans, to help you better understand content in seconds, synthesize it into key concepts & takeaways, or create summaries to share with others.   Get Instant Summaries Anywhere, Anytime: Whether you’re using the Acrobat desktop app, Acrobat web, or a mobile device, AI Assistant in PDF Spaces provides quick summaries and short takeaways on demand. On mobile, you can even use voice prompts while on the go for hands-free interactions that keep you productive and safe.   Verify and Trust Every Summary with Source Citations: Each AI-generated summary includes clickable citations, so you can trace insights back to their original source in your documents to verify accuracy, ensure personal relevance, and learn more. You’ll always know where the information came from—so you can make smarter decisions based on trusted insights.   Compare and Contrast Different Files Effortlessly: Need to understand changes between two contracts or find patterns across reports? AI Assistant highlights similarities and differences for you almost instantly, saving hours of tedious back-and-forth comparisons and manual toggling between files.   Break Down Complex Documents with Ease: Got a document that’s full of technical jargon or complex concepts? An AI Assistant can simplify dense language into clear, easy-to-understand explanations, so you can grasp complex information faster and more accurately.   Sounds easy, doesn’t it? It is! Let’s take a look at how businesses, students, and consumers are using AI assistants for summarizing documents in real-world scenarios.     Real-World Ways to Use AI Summarization No matter your goal or profession, Acrobat Studio adapts to how you work. Here are a few ways it makes life easier for everyone:   Business Professionals: Quickly synthesize insights from multiple files, market research, user interviews, trend reports, and more into one actionable summary to guide next steps and decision-making. Consumers: Review complex contracts like leasing docs, service agreements, or work proposals, letting AI Assistant summarize key points, define legal terms, highlight version differences, and surface potential issues & considerations before you sign. Students: Learn new concepts faster by uploading reading materials, research papers, lecture slides, or class notes, and asking the AI Assistant to outline, explain, or simplify them for deeper understanding.   The possibilities are endless, and so are the time savings. Get inspired by curated PDF Spaces. Discover new ideas and insights with ready-to-use knowledge, then customize, save, and share.     Why Acrobat Studio Is One of the Best AI Platforms for Summarizing Documents Acrobat Studio provides clear, concise summaries quickly to help you work smarter and faster. The platform’s AI-powered insights are built on Acrobat’s long-standing reputation for security and precision, and you can trust that the documents and data you upload will remain your own. Adobe does not use your content to train its generative AI models. (Learn more about how Adobe protects your documents and content using responsible practices.)   You can stay productive anywhere with desktop, web, and mobile app access, and use Chrome or Edge browser extensions for quick edits and reviews. Acrobat Studio also integrates seamlessly with Microsoft 365, Dropbox, and other third-party cloud storage tools to keep your workflows connected. The Fastest Way to Understand Your Documents Whether you’re reviewing a single document or managing hundreds, Adobe Acrobat is hands-down one of the best AI platforms for summarizing documents—and one that combines the precision and trust of Acrobat with the creativity and intelligence of an all-in-one AI workspace. Try Adobe Acrobat Studio today and experience how fast and simple document summarization can be.     If this was helpful, please click the  Upvote icon in the top left corner of this post. Your feedback helps us improve the experience. Thank you!

Acrobat に「問題が発生しました」「登録を初期化しています」「ログイン画面が表示されない」などによりログインが行えない件について

Acrobat をご利用中の一部のお客様で問題が発生し、ご不便おかけして申し訳ございません。 【対象のAcrobat】Acrobat  【対象OS】Windows 【事象の詳細】Acrobat にログインを行う際に以下の事象を確認しています。 ・「登録を初期化しています...しばらくしてからやり直してください。」・「問題が発生しました」・ログインを押しても無反応となり、ログイン画面が表示されない 【回避策】以下の手順で英語の Acrobat に切り替え、ログインが可能かご確認をお願いします。 <手順>1. Ctrlキーを押下しながら、Acrobat のアイコンをクリック2. プルダウンを選択し、日本語から English に変更し、[OK] をクリック3. "Sign in" 画面でメールアドレスを入力し、[Continue] をクリック4. "Select an account" 画面が表示された場合、Acrobat のライセンスが紐づいているプロファイルを選択※ "Company or School Account" が "法人または学校のアカウント" です。 5. "Password" 画面にてパスワードを入力し、OK をクリック6. 右上のログインが丸いアイコンに変わったことを確認し、Acrobat を終了7. Ctrlキーを押下しながら、Acrobat のアイコンをクリック8. プルダウンを選択し、English から日本語に変更し、[OK] をクリック 【調査について】11月19日追記本事象は、日本語環境でもログイン画面が表示されていることを確認いたしました。 事象が発生したお客様には、大変ご不便をおかけして申し訳ございません。Acrobat を起動いただき、ログインが行えるかをご確認ください。