
















『アドビコミュニティフォーラム』に質問/トピックを投稿する方法
Announcements
新着順
Hi Everyone, The Circle, Arch, and Bow styles of dynamic text are now available in Photoshop beta! Here’s how to use dynamic text circle, arch, and bowCreate a Point type or Paragraph type layer, and convert to dynamic circle, arch or bow using the dynamic text button menu found in the Options bar, Contextual Task Bar, or using the dynamic text section in the Properties panel. New dynamic text options For circle, arch, and bow, there are 4 options for Position (Above, Center, Below) or changing the direction of the text. Edit the start, middle, and end pointsOnce a circle, arch, or bow layer has been created, you can adjust the start, middle, and end points with the Path Selection tool. Customize your text to tasteWith dynamic text circle, arch, and bow, most other text attributes are still editable aside from Font Size. ProtipIf you know how to edit the anchor points on a path, once a dynamic text layer has been made circle, arch, or bow, you can manipulate the path with the Direct
Describe what you want, and the AI Assistant makes multi-step edits across your whole composite.The AI Assistant works directly inside the Photoshop desktop app. Tell it what you want done, such as swapping a background, resizing for every platform, or cleaning up your layers, and it applies the changes across the whole composite. Every change stays fully editable. As you work, it also suggests edits tailored to the image you have open, next to a prompt field where you can type your own.The AI Assistant panel, docked on the right, suggesting edits tailored to the open image.What you can doRemove & Replace BackgroundsReplace a background by describing the one you want.Smartly Resize Images and AssetsExport your design in any format you need for a poster, ad, or social post. Layouts and object positions adjust to fit each size.Rename and Organize LayersClean up your layer stack: delete empty layers and give the rest clear names.How to try it in Photoshop (beta) for desktopClick the A
We are excited to announce the beta launch of an on-device generative AI model for the Remove Tool!You can now download the Generative AI model onto your personal device and work off-line and process locally - ideal when internet connections are unreliable or when cloud processing isn’t preferred. (It’s kind of a big deal!) How to:Select the Remove Tool. In the Options bar, open the Mode drop‑down (Auto / GenAI On / GenAI Off). In the Generative AI Processing section, choose Device.If the Device option is dimmed and unavailable, your system does not meet the minimum requirements to run the model. When prompted, click Download to start the download (approximately 5 GB). Once the download completes, the on‑device model will be used automatically. Switch between Cloud and Device processing at any time from the Mode drop‑down.Choose the Remove Tool, then visit the Mode drop-down in the Options Bar to find the Generative AI processing options.System RequirementsThis is a GPU‑intensive feat
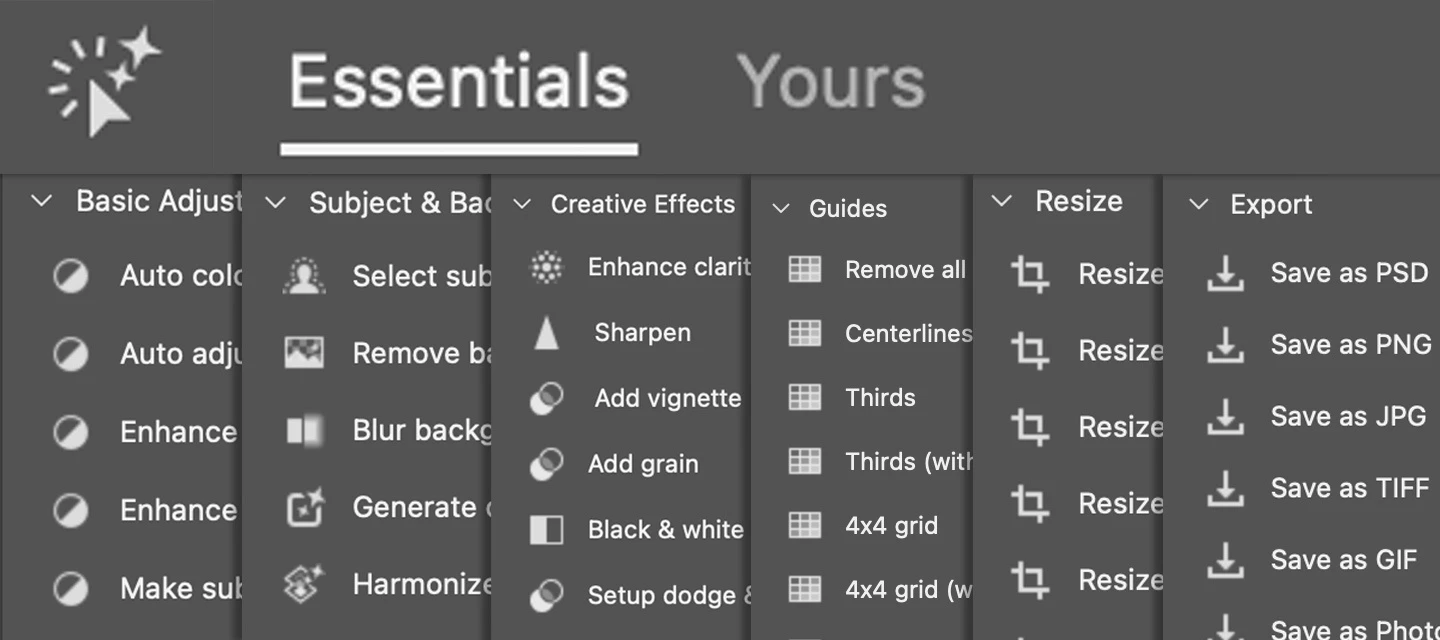
We are excited to announce the latest updates to the Actions panel which are now in Photoshop beta!As part of our continuous efforts to improve the Actions panel, we have introduced some changes to help streamline your editing workflows. 🆕 Introducing the Essentials tabWe're excited to unveil the rebranded "Essentials" tab (formerly known as the "Suggestions" tab). The new Essentials tab provides a new default set of categorized actions, created to help simplify common editing workflows from edit to export. Check it out!Go to Window > Actions. Browse through the Essentials set of actions and select the ones that fit your workflow. Essentials categories include: Basic Adjustments, Subject & Background, Creative Effects, Guides, Resize, and Export. Please try out the new Essential actions and share your feedback with us! Thank you!
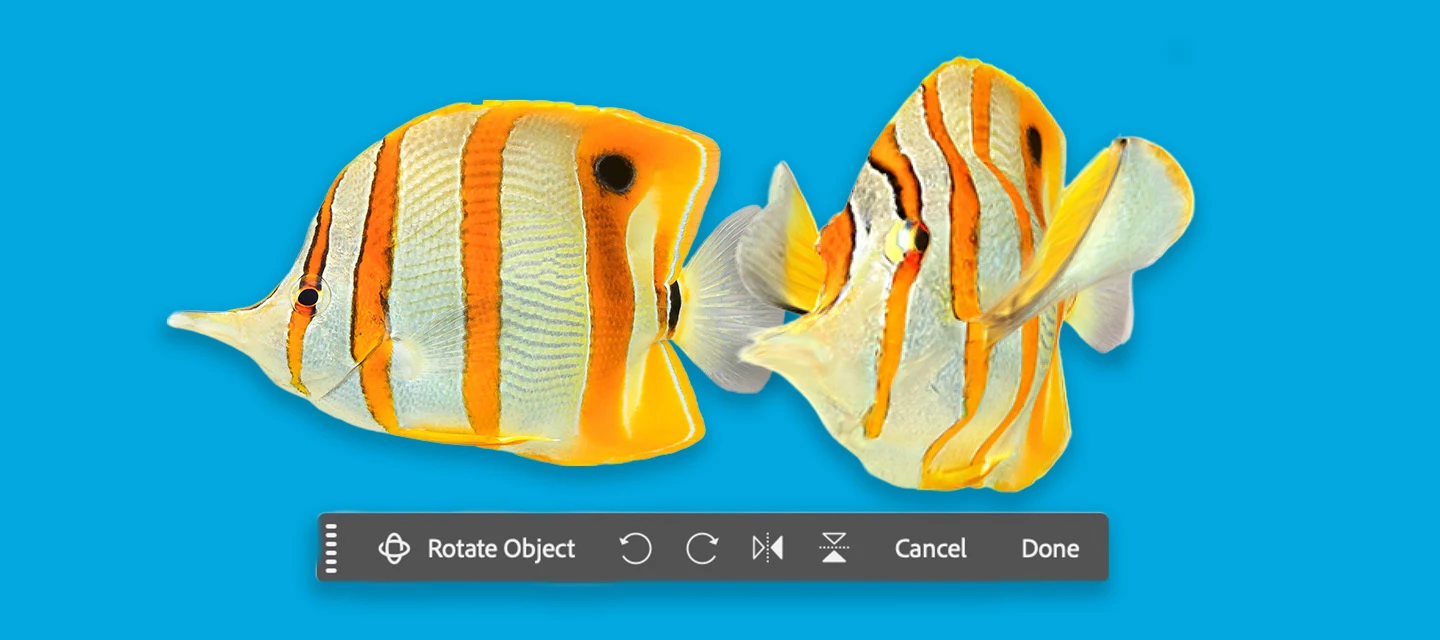
Rotate Object lets you quickly transform 2D objects into rotatable 3D images, allowing rotation (spin, tilt, dolly) from any viewpoint to match perspective and depth. (Version: 27.5.0 20260311.m.3453)HOW TO TEST:1. Open or place an image 2. Select a pixel layer that contains an object. PRO TIP: You may want to duplicate the layer → as the layer will be converted to a Rotate Object LayerCmd + T to enter transform mode or Edit > Rotate Object Click the Rotate object button in the context bar - note this feature is 20 Generative Credits, the first 3 tries do not deduct generative credits.3. After the 3D conversion is complete, the initial rotated object will be a low-res PREVIEW. The layer was converted to a Rotate object layer. DIFFERENT WAYS TO ROTATE AN OBJECT: Contextual Task Bar: click to use the Rotate and Tilt sliders. Click and drag the blue on-canvas controls around the object. Right-click on the object and drag (on-canvas for unconstrained rotation). Properties panel:
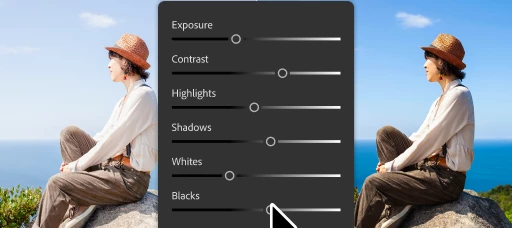
We've upgraded the classic Brightness/Contrast adjustment layer into Light, bringing more powerful, non-destructive lighting controls directly into your layer-based workflow. With the new Light adjustment layer, you get:Exposure Contrast Highlights Shadows Whites BlacksA few important notes:• Brightness/Contrast has NOT gone away. It's now part of the Light adjustment layer and remains available through the Legacy controls menu.• Existing actions & plugins that use Brightness/Contrast will continue to work as expected. You can update them at any time to take advantage of the latest high-quality controls.• It is available for 8-bit and 16-bit RGB images. For all other color modes, Brightness/Contrast continues to work exactly as it does today.The goal is to give you more precise control over all lighting adjustments while preserving compatibility with your existing workflows.We'd love to hear your feedback as you try it out in Photoshop Beta.
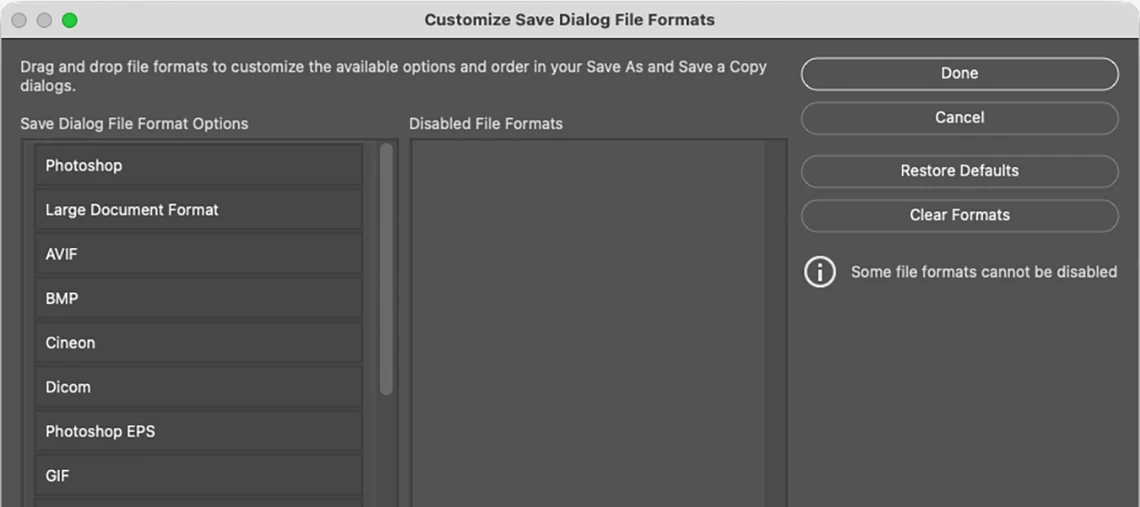
Save As and Save a Copy now let you customize your file format list.When you choose Save As or Save a Copy, Photoshop shows every supported format, all 25 of them. Most people only ever use a handful, and scrolling past formats you'll never need slows you down.With this feature, you can trim that list down to just the formats you actually use, so finding the right one takes seconds instead of a search. How to access: Edit > Customize Save Dialog File Formats…Default view:Drag a File Format to the Disabled File Formats column:After dragging the Cineon File Format to the Disabled File Formats column:After dragging multiple File Formats to the Disabled File Formats column:
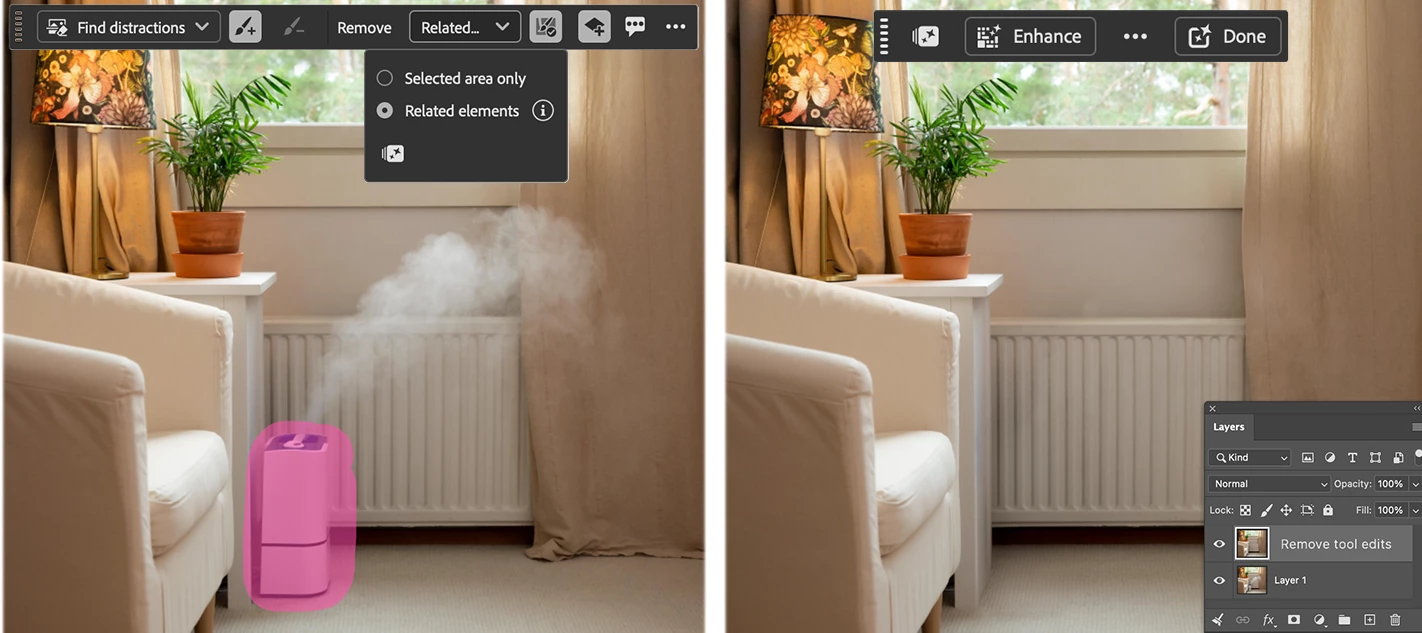
The Remove Tool just got even easier to use. It now includes a dedicated Contextual Task Bar (CTB) that brings the most important controls right to your cursor—so you can stay focused on your image, not the options bar.Distraction Removal Brush + Brush - Remove After Each Stroke on/off Create New Layer on/offWhat’s newKey controls at your fingertipsQuickly access the most-used Remove Tool options without moving your cursor across the screen. Distraction removal drop-down Choose Distraction Removal with the drop-down list. Add & Subtract brushes Easily refine your selection by adding to or subtracting from the target area. Auto-apply after each stroke Toggle whether Remove runs automatically after every brush stroke. Create on new layer Choose to make edits non-destructive with a simple on/off toggle. Quick feedback button Share feedback on results in just a click—this helps us improve the tool for you. Dynamic action buttonsRemove and Cancel appear when you n
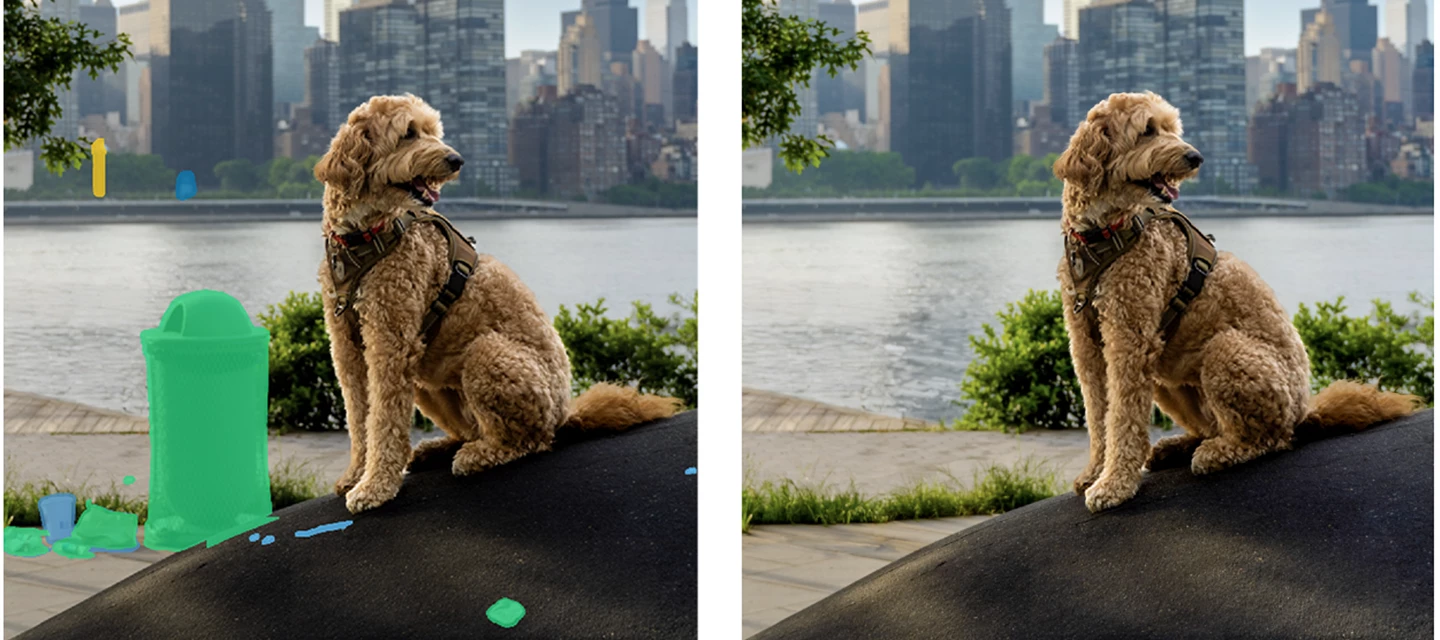
This month's update brings on-device removal powered by a downloadable AI model, the Remove Tool's ability to detect signs, poles, and other distractions beyond people, Live Filter Layers for non-destructive filtering directly in the layer stack, and the ability to send documents straight to Firefly Boards. A broad set of generative AI, interface, and file handling bugs have also been resolved. Feature Updates & Additions On-Device Remove ToolYou can now download an AI model (approximately 4 GB) to run generative removals entirely on your device, with no internet connection required. Processing is faster, works offline, and is well suited for enterprise or restricted-network environments. On NVIDIA-equipped systems, the model now correctly uses GPU acceleration for optimal performance.General Distractors DetectionThe Remove Tool can now automatically detect and remove signs, poles, trash, and other unwanted objects, not just people and wires. One-click removal handles a broader ran
We are happy to introduce an update to Photoshop, scratch disk monitoring. Photoshop uses a scratch disk—a portion of your hard drive—to store temporary files and as virtual memory when the computer's RAM is insufficient for operations. If your scratch disk runs out of space, you risk losing unsaved work. This update could help you avoid that by monitoring the available space. What is the update? At launch, Photoshop will verify that you have the recommended amount of scratch disk space. If you do not, a popup will alert you and allow you to: Switch to a larger scratch disk volume Delete files on your hard drive to free up additional space Add and designate an external hard drive as an scratch disk Close the popup and continue working Opt out of future warnings Click “Learn more” for additional info. Want to set the recommended threshold for your scratch disk warning? By default, you will get a warning if your free space is less than 45GB. Here’s how chan
Hi Everybody,We are pleased to share that the backend infrastructure for UXP plugins has been updated and is now available in the Photoshop Beta build starting with Adobe Photoshop Version: 27.8.0 20260510.m.3537. This update ensures a more consistent look and feel for Photoshop UXP plugins across Creative Cloud applications and lays the foundation for future UI enhancements and shared capabilities. This change is not expected to affect UI look and feel of most of your UXP plugins, but please do let us know in case if you notice functional or visual changes in your favorite plugins.Thanks,Photoshop Team
Preferences Update: April + MayApril focused heavily on preferences stability, fixing several crashes and session issues tied to the Modern UI framework. May brought a long-requested filter improvement and a toolbar reliability fix.What's newNew toggle to prevent accidental brush opacity changes while dragging the resize HUD (community-requested) Filters now remember your last-used settings when reapplying via Ctrl/Cmd+F, instead of resetting to defaults each timeBugs fixedFour crashes and UI issues caused by the Modern UI framework during preferences reset -- including black documents on launch, startup failures, and disappearing UI elements Object Selection Tool settings no longer revert between sessions Keyboard shortcuts for the modernized Toolbar no longer break after a clean preferences reset Thanks,Cory - Photoshop Product Manager
This month's update includes a redesigned Generative Fill interface with reference image support and an updated model picker in the contextual task bar. Rotate Object received visual and interaction refinements, and a broad set of stability and workflow issues have been resolved across Generative AI, Adjustments, Actions, and Type. Feature Updates & Additions Generative Fill: Redesigned InterfaceThe Generative Fill dialog has been redesigned. Reference images are now accessible directly in the interface, with no need to switch to a separate panel. The model picker now appears in the contextual task bar alongside the prompt. A curated set of models replaces the previous long scrolling list, making it faster to switch between Firefly, Gemini, and other available options. Your generative AI credit balance is now visible in the contextual task bar while you work. Firefly Image 3 is no longer available in the Generative Fill model picker. The new default model is Firefly Fill & Expa
Quickly clean-up unwanted objects that pull attention away from your main subject.General Distraction Removal (beta) in the Remove Tool automatically finds and removes common distractions—like poles, vehicles, and visual clutter—with just a few clicks.How to try it in Photoshop (beta) for desktop:1. Select the Remove Tool from the toolbar.2. In the Options bar, click Find Distractions.3. Click Find next to General Distractions.A color‑coded list of detected distractions appears, and each distraction is highlighted on the canvas with a matching overlay. You can change the color of the distraction overlay by clicking on the color swatch in the panel. Select the Remove Tool, then choose Find General Distractions from the Options Bar to see color‑coded results and editable overlays 4. Use the checkboxes to turn targeting on or off for each distraction category.You can also refine the results by brushing directly on the canvas using the + / − controls in the Remove Tool options bar.
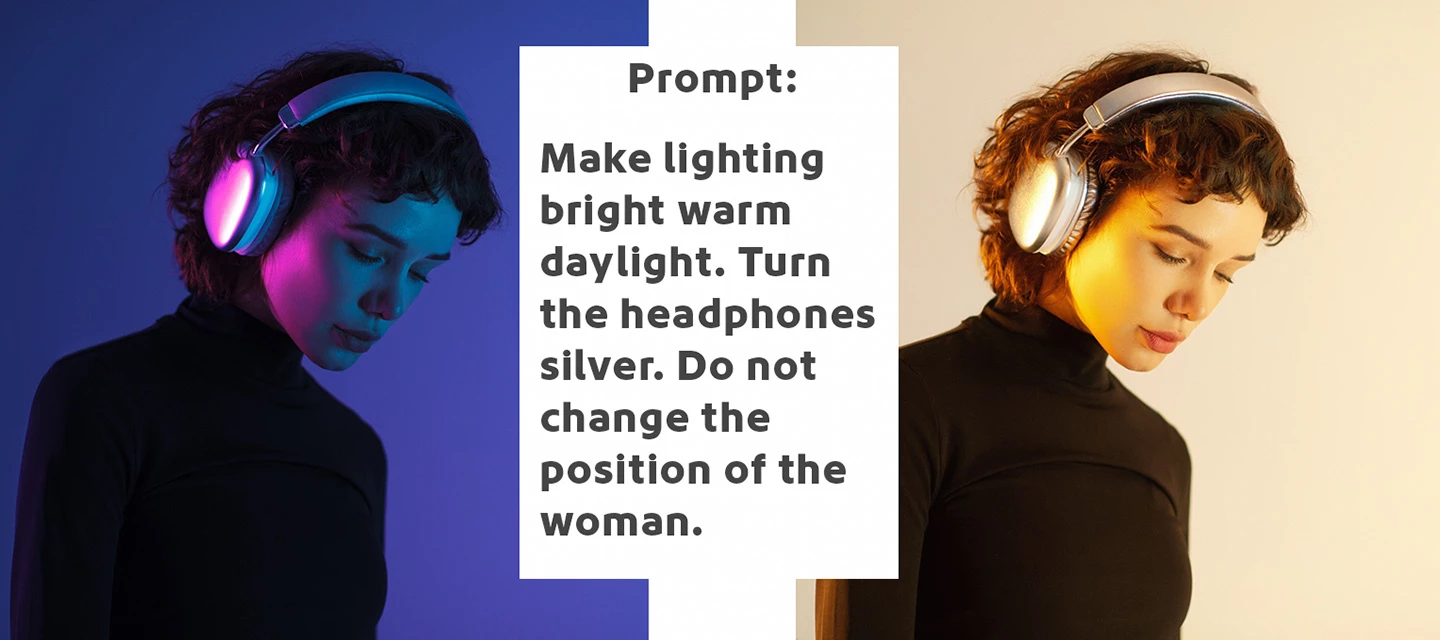
Firefly Image 5 enables a new instruction‑based editing workflow in Generative Fill and it's currently in Photoshop (Beta) for desktopFirefly Image 5 is Adobe's most advanced image generation and editing model yet; you can edit images more intuitively and precisely with just a prompt. Simply describe your edits with natural language instructions to transform the entire image—such as changing time of day or modifying a subject’s pose - making the precise changes you want with high quality results, while keeping the rest of your pixels and the details of your original image the same. How to try it:1. Open an image and select the entire canvas (Select > Select All…).(While smaller selections are supported, this beta performs best when the full image is selected.)2. Click Generative Fill in the Contextual Task Bar.3.Choose Firefly Image 5 (Preview) from the model picker in the Contextual Task Bar.4. Enter a clear, instructional prompt (for example: “change the time of day to sunset”).5.
In the current Ps Beta update: Adobe Photoshop Version: 27.6.0 20260412.m.3501 2f62d66 arm64 (beta, PublicBeta) you will find a new layout of the Save for Web dialog screen.The Photoshop team has been updating many dialog screens and popups as part of an ongoing UI modernization effort, and this is one example of that work.WHY the change? Photoshop has carried a lot of creative work for a long time. But carrying that much, for that long, adds up, and some of the friction you've been feeling is the natural result of a tool that's grown enormously complex over the years.We've heard you on the micro-stutters, the slow previews, the panels that slow you down rather than speed you up. Rather than patch around those things, we're taking a bigger step like modernizing the underlying UI framework that powers Photoshop's interface. That's what this effort is about.WHAT you will see once it is complete We're rolling this out surface by surface, not all at once.Individual panels and controls wil
We’re excited to share that Firefly Boards is now more closely integrated with Photoshop workflows, enabling seamless ideation, organization, and round-trip editing. What is Firefly Boards?Firefly Boards is an AI-powered ideation workspace that helps Photoshop users capture inspiration, explore multiple visual directions using the latest AI models, and organize ideas on an infinite canvas. All linked assets stay synced, so updates reflect directly on the Boards canvas.Try it out:Home > Your Files > 3-dot menu > Open in BoardsShare icon > Send to Firefly Boards (PSDC files)File > Export > Send to Firefly Boards (PSDC files)Round-trip workflow from Firefly Boards → Photoshop (Adobe Firefly Boards) We’d love for you to try Firefly Boards for ideation and share your feedback!
Generative Fill 3rd party partner models such as Gemini 2.5, 3.0 (with Nano Banana), FLUX Kontext Pro, and FLUX.2 Pro can use reference images as inputs that it can "read" and apply according to your prompt instructions.The party partner model scans all uploaded images for identity, style, and structure, then matches your prompt instructions to specific parts of those images. When complete, the 3rd party partner model generates a new image that merges the subject and style from the reference images. HOW TO TEST Open an image > Select All Select > Generative Fill on Context Bar or Edit > Generative Fill Select either Nano 2.5, 3.0, FLUX Kontext Pro, FLUX.2 Pro ENTER A PROMPT in the text field (Example prompt: Replace the model’s clothing with the 6 reference images) Select the Reference Image icon (icon to the right of the model picker dropdown) Add up to 8 reference images if using Gemini 3 > Generate HOW TO PROVIDE FEEDBACK:1. Click on the Beaker Icon in the upper right
The AI-powered Reflection Removal feature lets you easily extract and remove reflections that impact the majority of your scene. The Reflections Removal command eliminates large and prominent window reflections in just a few steps, allowing your image's subject to stand out clearly. While AI-powered, it is not generative AI and does not use credits.How to:Open a file with reflections that dominate the image. Edit > Reflections Removal…The Reflection Removal Dialog appears Choose the quality of the results from the pop up. Turning on "Create separate reflection layer" will give you both the subject "Reflection Removal" layer and a layer with the extracted reflection. Click [OK] The "Reflection Removal" layer and, if checked ON, the Reflection layer appear in the Layers panel. Adjust the Layer Opacity of the subject "Reflection Removal" layer to bring back subtle reflections if desired. Adjust the Opacity slider in the layers panel to bring back subtle reflections for a natural
We are excited to announce the first of many releases of the Photoshop beta. For more info on what a beta is and how you can participate, see Adobe Creative Cloud Beta FAQ. Why should I try the Photoshop beta? Be the one of the first customers to try brand-new features and directly influence the future of Photoshop Become a part of a community of Photoshop enthusiasts Share your thoughts and ideas directly with Adobe here in the beta community Participate in exclusive live sessions with design influencers and evangelists Occasionally receive financial incentives for providing feedback How do I install the Photoshop beta? Visit the Beta apps tab of the Creative Cloud desktop app and select Install next to Photoshop (Beta). How can I provide feedback on my Photoshop beta experience? Here in the Photoshop beta community, you can search and vote on any thread. If a similar thread does not yet exist, feel free to create a new bug or idea thread where others can vote.
Welcome! We're so glad you're here and want to show you around. This beta community is the place to connect with others and share your feature feedback, bug reports, and new feature ideas on the Photoshop betas directly with the Photoshop team. Get started with Photoshop beta 👉 Download the desktop Photoshop beta. See also, Photoshop beta is now available. 👉 Launch Photoshop on the web beta First thing's first, there are different types of conversations Conversation types: Discussions: Chat with other community members, ask questions, share tips and techniques. Bugs: Have a problem you need help with? Find a bug or a crash in Photoshop beta? Post in bugs so we can help! Ideas: Are any features missing from Photoshop? Have an idea to improve existing features? Share your ideas so others can vote! Featured posts Visit the Featured tab to see what features are available in the Photoshop be
Remix with Firefly Community Gallery
Thousands of free creations to fall in love with and remix in Firefly.
すでにアカウントをお持ちですか?ログイン
アカウントをお持ちではありませんか? アカウントを作成
Enter your E-mail address. We'll send you an e-mail with instructions to reset your password.