














After Effects (Beta)
Recently active
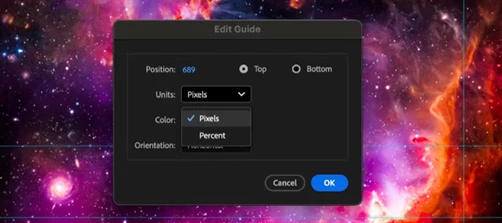
Guides are a foundational tool for responsive, reusable layouts and simplifying design decisions. We're bringing new features to After Effects guides that make them closer in line with Premiere Pro, so guides behave more consistently when you move between apps. Here's how to get the most out of the new functionality.What's New in After Effects GuidesPercentage‑based guides Position guides relative to the composition or view, not just absolute pixels, making them resilient to resolution and aspect‑ratio changes. Pinned guides Pin guides to the bottom or right edge (in addition to top/left) so layouts stay stable as dimensions change. Per‑guide color control Assign colors to individual guides for better visibility and organization. Improved guide editing Right‑click a guide to open the Edit Guide dialog, where you can adjust Position, Unit (pixels or percent), Pinning (origin or opposite edge), and Color. Guide import and export After Effects and Premiere Pro use the same .guides format,
The pan behind tool needs fixing
The object matte tool is not working in the latest version of After Effects Beta (on Mac OS 15.7.4 (24G517) with a late 2017 iMac Pro. I tried everything, but the option doesn’t show up. I double clicked the footage so I’m in the right footage window but even the icons do not appear. Is my system or OS too old maybe?
Sometimes you just need a copy of what’s in your Composition panel—a still of the current frame, ready to paste into chat, email, socials, etc. Exporting a frame works, but it’s more steps than it should be.We’re (finally) introducing Copy Frame to Clipboard: a one click option accessible from the Composition, Footage, or Layer panel to grab the currently rendered frame and put it on the system clipboard. How do I use it?Set the Current Time Indicator to the frame you want to copy and let it render. Click the Toolbar button in the Composition, Footage, and Layer panel toolbars. Or use the Keyboard shortcut when any of those panels are active. Defaults: Ctrl+Alt+Shift+F5 (Windows) and Cmd+Option+Shift+F5 (Mac). What Does Copy Frame to Clipboard Support?On Mac and Windows, a PNG will be placed on the clipboard (up to 16-bit when using 16bpc or 32bpc comps in After Effects). On Windows, a bitmap representation is also provided, so more apps can paste reliably. With regard to color, wha
the tool objet mate tool doesnt work
There’s a bug whenever using the refine edge tool in conjunction with the object matte tool. When masking multiple people, I am having the issue of after several frames, the entire subject will fade out completely. It seems that the AI is having trouble identifying new edges when the subject moves. Two screenshots are included below. The first screenshot is a frame about halfway through the scene. You can see where the black (refine edge tool) is trying to follow her hair (not doing a great job). The second screenshot shows the next frame when it bugged out, just masking both of the other kids. The kids faces are covered for safety reasons. The other problem is, when I unfreeze the object matte tool and try to fix it with one of the other tools, it recognizes that I’m selecting them, but then reverts back to bluring them out. I end up having to cut the section out and redo the object matte as a whole new mask on a different clip on the timeline.
*UPDATE: Posted in the bug report section of After Effects (Beta), but I can’t delete my question here.I’m not really asking a question -- I went to report a bug and Adobe led me here. There’s a bug whenever using the refine edge tool in conjunction with the object matte tool. When masking multiple people, I am having the issue of after several frames, the entire subject will fade out completely. It seems that the AI is having trouble identifying new edges when the subject moves. Two screenshots are included below. The black is the refine edge tool trying to follow her hair (not doing a great job), the second picture shows it bugging out just masking both of the other kids. The kids faces are covered for safety reasons. The other problem is, when I unfreeze the object matte tool and try to fix it with one of the other tools, it recognizes that I’m selecting them, but then reverts back to bluring them out. I end up having to cut the section out and redo the object matte as a whole new m
We’re excited to introduce a small but mighty workflow boost: Crop Comp to Selected Layer(s) Bounds. Starting with After Effects Beta version 26.0 build x40, AE will resize your composition to the visible bounds of the selected layers: either shrinking the comp to tightly frame smaller content, or expanding it to include layers that extend beyond current comp edges.Many of you have asked for a quicker, native way to make pre-comps and assets fit their true content size—without manual resizing or third‑party scripts. This helps you: Pre‑comp faster with comps that match the content you actually need. Keep projects tidy by removing empty margins. Avoid effect cutoffs when elements (like glows/blur) spill beyond the frame. How to Use:Select one or more 2D layers, then choose "Crop Comp to Selected Layer(s) Bounds" from: The Composition menu Right-click on the selected layers in the Timeline Right-click on the selected layers in the Composition panel Note: This feature is designed for
Mask tracking in After Effects just got a major upgrade, including up to a 5x speed improvement.Controls are more accessible so you can start tracking without hunting through panels, the tracker itself is significantly faster so you spend less time waiting for it to complete, and the results are also more accurate. Whether you're isolating a subject or refining a tricky shot, the updated mask tracker is here for you. How do I use it?In the Timeline Panel, select a footage layer. Click the Mask or Pen tools in the Toolbar. Draw the mask on the visual you want to track in your footage. Click the Track Forward button to start tracking forward. Use the Wrench button to change the tracking method. The first four tracking methods have been updated to a new algorithm that is up to 5x faster, with enhanced accuracy. Did I mention it is also really really fast? Of course, if you're used to the Tracker Panel, worry not, as we have also kept the controls there. Please, try the newly updated m
If you’ve been on recent After Effects Beta builds, you might’ve noticed the Effect Control Panel getting a little tidier: things like GPU Acceleration and Camera Aware have moved to the right side of the effect header, and Reset is a proper button instead of plain text. Today we’re excited to tell you why.As of build 26.5x7, After Effects allows you to assign color labels to individual effect instances on a layer. When you add an effect (or open a project that already has effects), you’ll see that familiar small grey square next to the effect name. Click it and you get the same kind of label menu you already know from elsewhere in AE. Upon applying an effect, each effect’s default label is None, but you can tag effects however it helps your workflow, same idea as layers or keyframes.In addition to the familiar square swatches, we've also added (optional) background tinting: the effect row can get a subtle background wash that follows the label color you picked. We've found this to b
Something in AE Beta has caused a new problem where AE freezes if a script tries to add a sampleImage expression. You can Escape out of the freeze but AE may crash. The expression ends up with a flagged error reported as ‘internal error’ but if you manually click out of the expression field it will apply and work fine. It just freezes if a script applies it.Steps to reproduce:Import some test QT, drop into a new comp. Apply the Expression Control > Color Control effect Twirl open in timeline and select the Color property Choose File > Script > Run Script File and choose the attached scriptAE will freeze. Hit Escape to unfreeze manually. But of course this utterly ruins scripts that use sampleImage to test for things like missing / dropped frames, cut points, etc.
I was watching a YouTube video of CoSA After Effects 1.1, and noticed this long-forgotten gem in the prefs:...which reminded me of a feature request I made ages ago (but has long disappeared in the transition to this new-ish discussion forum), and that is to be able to set the default keyframe interpolation mode. I often have to tediously go through many keyframes, setting them to ‘easy ease’ (F9). I know that it’s possible to set the spatial interpolation mode to linear (or not) in the prefs, but it’d be nice to bring back the long-lost option to set the default temporal interpolation, don’t you think?
The Frame.io V4 panel in After Effects (Beta)What is it?Hey friends! We’re pleased to announce that the new Frame.io V4 panel is now available in After Effects (Beta). Render, upload, share, comment, and manage feedback without ever leaving After Effects.What’s New?Unlike the Review with Frame.io panel, the new Frame.io V4 focuses on uploading from the Render Queue, rather than requiring users to set render settings from within the panel itself. Upload one or many comps to the same place in Frame.io at once!What’s Coming Later?If you’ve used our new Frame.io V4 panel in Premiere 26.2 or later, there are a few features in that panel, but are not yet available in After Effects (Beta).Playhead sync - Today, clicking a comment will jump the After Effects playhead to a comment. In Premiere, you can also sync playhead scrubbing between Frame.io and Premiere bi-directionally. It’s not in After Effects today, but we know it’s important to you. Asset import - Today, you can use Frame.io drive t
Multi-frame Rendering is here for After Effects beta users. Right now, you will have access to Multi-Frame Rendering for export only. Keep your eye on this forum, as we will be rolling out new features until we launch. Internally, we have been testing a representative sample of projects with a suite of hardware configurations, and we are excited to finally put this feature in your hands and get your feedback. Test your unique projects on your own hardware so we can ensure that our performance updates benefit all of our customers and meet speed and quality metrics before we launch. Beta testing of Multi-Frame Rendering will last a little longer than some of our other features because we currently do not support Multi-Frame Rendering in Preview, Motion Graphics templates, Dynamic Link, Adobe Media Encoder and AERender Command Line Interface. Check out the blog and FAQ post to learn the following: What is Multi-Frame Rendering? What factors influence performance? Whi
Hello, motionkind! Now in After Effects (Beta) build 26.0x40 and later, we are introducing two improvements for expressions & scripting. Quickly find the keyframe or marker before or after a given time, without writing lengthy, repetitive logic. Read the current text and the full list of dropdown menu items, so you no longer need to keep duplicate strings in your expressions just to show the text from a dropdown menu. previousKey() and nextKey() in JavaScript expressions This Beta build introduces new expression methods to quickly get the keyframes or markers before or after any given time: Property.previousKey(time): Returns the keyframe or marker at or before time. If none exist before time, returns the first keyframe or marker. Property.nextKey(time): Returns the keyframe or marker after time. If time is after the last, returns the last keyframe or marker. These new methods are only available in the JavaScript
Using text in the beta version has become impossible for. It types out right to left instead of left to right. Resetting the preferences seems to work at first, but then it goes back to writing backwards.
Steps to reproduce: 1. ... Result: ...Expected: ... System info Application: After Effects (Beta) v26.3.0.75 OS: Windows v10.0.19045, RAM: 127.70 GB GB, CPUs (logical): 28I use extendScript to code relinking 3d models (glb).. This works in 2026 but not in the beta. In After Effects Beta, FootageItem.replace(File) fails for GLB/3D Model footage with the warning: “Cannot replace a 3D model with this file.” The same GLB can be imported by script with app.project.importFile(), and the same GLB can be replaced manually using Replace Footage > File. The issue appears specific to scripted FootageItem.replace(File) for 3D Model footage. I am wondering if it is a bug or you are no longer supporting it. You can run this test script to see what I am talking about. (function testReplaceOnlineGLB() {var item = app.project.activeItem;if (!item || !(item instanceof FootageItem)) {alert("Select one online GLB FootageItem in the Project panel first.");return;}var f = File.openDialog("C
New in After Effects Beta 26.3x34: Modernized Effect Controls Panel After Effects has a long and storied history, and a lot of today’s UX still sits on a legacy framework. That foundation has made it harder than we’d like to fix bugs, ship new ideas, and keep panels feeling fast. We have been reimagining what’s under the hood for the Effect Controls Panel to make the experience easier to evolve, more reliable, and genuinely better to use. With that in mind, we have been working to modernize the underlying framework of the Effect Controls Panel. We are essentially rebuilding it from the ground up. This is the first stage of a larger project to modernize the UX framework of After Effects. What is changing? For now, the panel will look nearly identical to the existing version and retain all current behavior and functionality. However, this architectural shift allows us to deliver incremental improvements to the AE user experience moving forward. You may already notice a few subtle chang
When you reopen file with torus or sphere mesh with sbsar meaterial texture, taht meshes does not display materials. Cube mesh is applied and displayed correctly. To see material on the sphere or torus I have to manually change material to other and switch back to the initially applied.GPU 5070 Ti.
Latest Beta.Using a bunch of presets that I always use.None of my exports with alpha render with an alpha channel.Is there a new setting that must be enabled to render the comp with alpha.I can see alpha in the comp viewerIn export settings I have RGB+Alpha selected.I’m using my own presets that I’ve been using for the last 6-7 years - none of the test renders have an alpha channel :o
Hi, your object matte upgrade of rotobrush is fantastic, but I am facing lot of strange behavior, often with error message and sometimes with AE crash..One of the most frequent bug I experienced is the offset of selected matte in time - like the object tracking is frame or two behind the video. Sometimes it happened in the middle of tracking, sometimes (with the same footage) it happened from the begining.. And sometimes it is all OK..As I wrote, this is the most frequent bug I meet.. Footage is 25fps progressive prores 100%scale fullHD. Comp is also 25fps FullHDHere is link to my onedrive - screenrecording of AE with this behavior..Adobe After Effects (Beta) - P__TEST MASEK.aep _ 2026-04-08 11-18-53.mp4
It is only when exported with clips that have disabled color management. I added my own technical LUT and then color graded on top. When I export with Premiere’s automatic color management settings, it renders just fine. Working with 6k files. Steps to reproduce: 1. ... Result: ... Expected: ... System info Application: Premiere Pro (Beta) v26.3.0.71 OS: macOS v26.3.0, RAM: 64.00 GB GB, CPUs (logical): 12
We’re excited to introduce Object Matte in the latest After Effects Public Beta (26.2 build 27) — a major evolution of the Roto Brush workflow.Object Matte shifts rotoscoping from a brush-only workflow to a hybrid approach that combines single-click AI subject selection with precision refinement and intelligent propagation over time. Built on the same AI technology powering Premiere Pro’s Object Mask workflow, Object Matte delivers faster, more intuitive results with significantly less manual effort. What’s New in Object Matte?The Object Matte suite includes four core tools designed for speed, control, and flexibility.Object Selection Quickly isolate objects in your footage with one-click or marquee-based selection (rectangle or lasso). This tool leverages advanced segmentation logic for accurate propagation across frames, reducing manual effort for complex scenes. You can access Object Selection by clicking the icon highlighted in blue. You can select an object in your comp by clickin
Your new Object Matte just got more interactive. With the new Live Update feature, your Quick Select and Selection Brush strokes are reflected in realtime as you paint, so you can see exactly what's being selected without waiting for a refresh. It makes the selection process smoother, faster, and far more intuitive — letting you refine your mattes with better precision and stay in your creative flow. This may look like a small update, but we think it makes a huge difference — and we'd love to hear what you think. Give Live Update a try and let us know how it fits into your workflow. If you run into any issues or have thoughts on how we can make it even better, please share your feedback — your input directly shapes where we take this next.
The middle mouse button isn't working in the effects control panel anymore. In the latest After Effects Beta versions, you can no longer pan around by clicking the middle button in the Effects Control panel.
Remix with Firefly Community Gallery
Thousands of free creations to fall in love with and remix in Firefly.
Already have an account? Login
No account yet? Create an account
Enter your E-mail address. We'll send you an e-mail with instructions to reset your password.