

























Master Photoshop with the help of our global community.
Recently active
A realistic shadow helps your subject feel grounded in the scene. In Photoshop, there are several ways to create one, depending on your subject and lighting. Based on workflows shared by experts in the Photoshop community, we've brought together a few of the most effective techniques here. Choose the method that best fits your workflow. Method 1: Using Generative AIAI can speed up the setup, but you will still get the best results by refining the shadow yourself.Use Select Subject or Remove Background to quickly isolate your object. Use Generative Fill to extend the surface where the shadow will fall. Learn more. You can also use Harmonize. It analyzes the lighting, color, and tone of the scene, and can also generate a matching shadow to help the subject feel more naturally integrated. Learn more. Refine the generated shadow manually using one of the methods above for the most realistic result. Method 2: Drop Shadow EffectThis is the quickest way to add depth and separation to elemen
The June 2026 Photoshop update is here, bringing more creative choices and meaningful workflow fixes. What’s newThis release expands creative choice in Generate Image with access to custom‑trained AI models, similar to what you’ve seen with Generative Fill. You can now choose from Adobe and partner models, including Firefly Image 5, Flux.2 Pro, and Gemini, making it easier to explore different visual styles, achieve stronger photorealism, and get results that stick closer to your prompts. Whether you’re experimenting with concepts or polishing production‑ready visuals, having multiple models at hand gives you more control over how your ideas come to life. Bug fixes — thanks to you!Your feedback continues to shape these updates. In this release, we’ve addressed several customer‑reported issues to make everyday workflows more reliable:Canvas size relative mode fields display incorrect default values, reject zero and negative values, and use incorrect increment steps. Add support to renam
We've split the Photoshop community into two dedicated spaces so you can find the conversations, tips, and apps that fit how you actually work:🖥️ Photoshop (Desktop & Web)📱 Photoshop Mobile Two focused communities mean more relevant content, better discussions, and an easier way to connect with creators and experts who work the way you do. Were you part of the Photoshop Ecosystem community? That space has been renamed Photoshop and is now home to all Desktop and Web conversations. To jump in, head to the App Communities page and select Photoshop. You'll find desktop-first editing techniques, inspiration, and a place to share your creations. On mobile? Drop into the new Photoshop Mobile community to explore the space and connect with fellow mobile creators. We'd love to hear from you. Does separating Desktop & Web from Mobile make it easier to find what you need? Explore the new spaces and let us know how they're working for you in the comments.
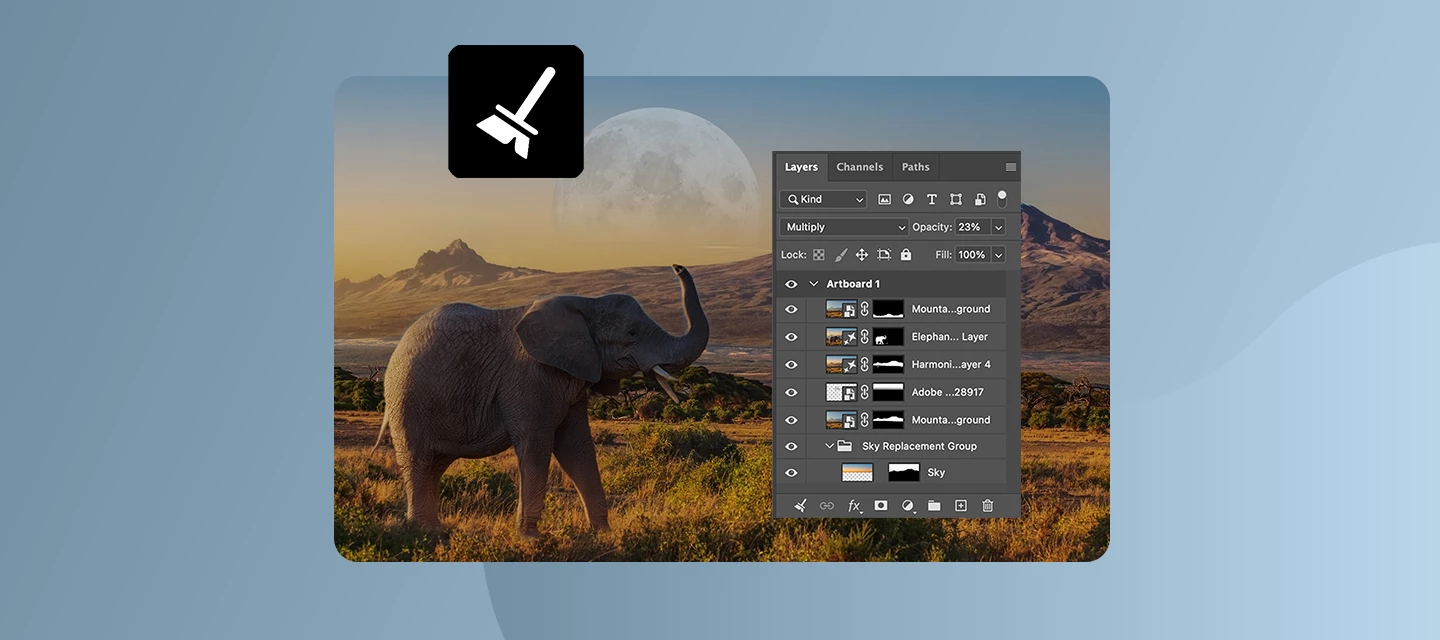
Keeping your Layers panel organized just got a whole lot easier. Layer Cleanup in Photoshop 27.6 and above automatically deletes empty layers and renames layers based on their content, so you can focus on creating, not housekeeping. With a single action from the Layers panel, Photoshop scans your document and removes blank pixel or text layers that tend to pile up during exploration. At the same time, it can intelligently rename layers, giving them clear, descriptive names that reflect what’s inside, so you no longer have to guess what “Layer 37 copy 2” contains. You’re in control of how much cleanup happens. Run it across the entire document for a full reset, or apply it only to selected layers when you want to tidy up as you go. Here is a quick tutorial demonstrating this feature. Why this mattersFaster navigation in complex files Cleaner handoffs when sharing PSDs with teammates Less friction when revisiting older projects Better layer discipline without manual effortWhether you’r
Help us shape this community: What content do you want to see? Whether you're a longtime community member or just found this space, your input will directly shape what we publish here. We want this to be a place you return to, not just when something breaks, but when you want to learn, get inspired, or connect with other creatives. What we’re considering:🚀 Feature Highlights: What’s new in Photoshop, explained with real workflows.📖 How-to Guides: Step-by-step tutorials for common tasks, errors, and workflows.💬 Community Discussions: Polls, questions, and conversations about how you work.🌟 Community Highlights: Spotlighting community members, standout work, and creative journeys. We’d love to hear your thoughts:What type of content do you find most useful when you visit this forum? Is there a Photoshop topic you keep looking up but never find a great answer for here? Would you want to share your own creative workflow or be featured in a community highlight? What kind of projects wou
How to Report a Bug in the Adobe App Community Run into something that’s not working the way it should in Photoshop? Let’s tackle it together. When you share bugs in the Adobe Community, you’re helping product teams see what’s really happening, recreate the issue, and fix things faster. Think of this guide as your sidekick—it’ll walk you through creating a clear, helpful bug report, no technical expertise needed. Before you startBefore jumping in with a new bug report, take a quick look around the community to see if someone’s already spotted the same issue. If you find a matching post, add your vote and feel free to add your experience there instead of starting from scratch. It keeps everything in one place and helps the team connect the dots and solve things faster. Note: Any duplicate posts will be merged into a primary post that you can follow for updates on the issue. What makes a good bug report?A great bug report tells the full story it explains what happened, what you expected
Create a GIF from a series of photos or a video clip Have you ever wanted to create a GIF of your own to post on social media? It really isn't hard!You can easily turn a series of photos or a segment of a video into an animated GIF in a few minutes using Photoshop. Here's how: Create a GIF from a series of photos Step1: Import the still photos you want to use to create a GIF Identify a series of photos that would make a good GIF Open Photoshop and go to File > Scripts > Load Files into Stack Click Browse and locate the photos you want to use (Use the Shift key to select more than one file) and click Open Click OK to import the photos into layers If it is not already open, click on Window > Timeline to open the Timeline panel Click the arrow to the right of the Create Frame Animation button in the middle of the Timeline panel and select Create Frame Animation Now click the Create Frame Animation button to the left of the arrow and it should look something
Lens Blur option if Camera Raw filter is not working, showing an error "Something is wrong.....etc" without any error code.
Generative Fill / Fill & Expand creates a visible horizontal seam at the boundary of the original image. The generated area does not blend seamlessly with the existing background and introduces an artificial brightness/color band exactly where the original image ends. This happens even with an empty prompt on a simple, smooth wall background.
I am compositing a Redshift Render EXR in Photoshop. The compositing itself works fine, thanks to the OCIO implementation and the image looks as expected. However, when finishing the image for 8bit export, there is a problem with the "Duplicate to Profile" functionality: it shifts my colors. What's worse, adding an extra Step to the conversion process seems to fix this, so I think it's a bug. What's happening:I have my composited 32 bit ACEScg file. I press Edit > Duplicate to Profile and choose "sRGB 32 bit" as "Target Settings". This way, the colors change / desaturate, especially the blues / cyans. At first I though that this is expected behaviour due to sRGB having the smaller gamut, but then I realized that OCIO is supposed to preview the ACEScg file how it looks in sRGB, so it should NOT change when converting. After some more research, I confirmed this. Now the part why I think this is a bug, or jank:If you take that same 32 bit ACEScg file and use Duplica
TitleHow can I automate replacing model images in hundreds of Photoshop PSD files? (JavaScript, UXP, AI, etc.)BodyI manage a large number of Photoshop PSD files for an e-commerce website.Due to licensing agreements with manufacturers, we have to replace all model images with new licensed images every year.My current workflow is:Open a PSD file. Identify the model image being used. Search the new year's image folder for the corresponding replacement image. If a replacement exists, replace the model image. If no replacement is available, remove the model image and replace it with a product-only image. Save and close the PSD.I have to repeat this process for hundreds of PSD files, so it's extremely time-consuming.Current situationPhotoshop 2026 Some model images are Smart Objects, while others are placed JPEGs or EPS files. Layer names are not standardized. The image files provided by manufacturers have inconsistent filenames every year, so matching by filename is not reliable. Product nu
We are using lybrary to work with assets in our company, it`s in use by ~15 people, but from recent time it stoped syncing and we can`t upload any new mockups in it. How can that be fixed? https://www.adobe.com/files/libraries/urn:aaid:sc:EU:e3dbae26-4fc8-44de-80e1-7f4d4d5334c9
Running latest Photoshop BETA (27.10.0). Opening a black-and-white photo with gradients through CameraRAW. Banding is visible. Convert to RGB, banding disappears. GPU acceleration is enabled, precise HDR colour management is enabled. I had problems before when saving to JPEG, but that turned out to be the colour profile. Can’t use the wider colour profiles for 8-bit JPEG. Now the problem looks the same, but this time already inside photoshop.Might go back to regular Photoshop again, but there were problems a while back there, which made me switch to BETA.
Just upgraded from Phootoshoop 2025 to Phootoshoop 2026 (27.8.0). When running large batch jobs get this crap:Have 40GB RAM so that’s not the prob. My (wild) guess is that the Phootoshoopers have messed with the “close” command - files are closed but their RAM remnants are not purged.End up having to split single jobs into multiples (huge headache), never happened with Phootoshoop 2025. New versions are supposed to be improvements, Phootoshoop????[edited by moderator]
Since updating to version 27.6.0, the "Quit" shortcut has been grayed out, and the program cannot be closed "manually" either. I have to "force quit" it completely. Is this a new feature?
I’ve been getting double billing for a Plan I subscribed to. I only have two devices connected using one plan, I paid for just one plan but I see two plans on my account, why is that? where can I get support, I need to be refunded, because the other plan just appeared since day one, but I just realized I’ve been getting double billing.
When I create a droplet in Photoshop 2025, it creates a folder instead of an EXE file. What is the solution?
Bonjour,Quand j'utilise l'Outil Correcteur Localisé en cliquant avec ma souris sur une zone de la photo à l’écran, une multitude de lignes partent dans tous les sens. Donc cet outil ne fonctionne plus depuis plusieurs jours. Est-ce un bug ?
Would love help on this issue its happening on 3 of my PSD files
Ok, bear with me please as this is the first time I’m asking a question but I’ve been a photoshop user for over 15 years. I am having problems in the last month that after editing a bit several things will happen at once- My alt no longer works (I am usually using it before adding layer mask in order to hide all when I notice it). Any brush type tool (brush, heal, dodge, etc) as well as quick select and lasso, etc will only register the initial place I click and will not drag. Meaning one pin point whatever size and nothing else. IT seems to be only in photoshop, although I did notice in Camera raw none of my sliders are working. I can adjust by clicking or manually entering numbers but I cannot grab and drag it across the sliders which I used to be able to do. That is a constant and doesn’t happen just with the glitch happens. When the glitch happens, restarting photoshop will fix it temporarily. I cannot find one thing that sets it off, after MULTIPLE days of testing things.
Since version 27.4 and continuing in 27.5 I’ve been experiencing image flickering when using the Curves adjustment. In version 27.4, the issue occurs in all Curves use cases. In 27.5, it appears primarily when applying Curves as a Smart Adjustment on a Smart Object. It is slightly improved, but still noticeable when using Curves as a standard adjustment layer.I’ve attached a video demonstrating the issue: The first example shows Curves applied as a Smart Adjustment on a Smart Object (strong flickering). The second shows a direct adjustment on a non-Smart Object layer (no issue). The third shows a standard adjustment layer (minor flickering still visible). The flickering is clearly visible, especially in the first case.Please look into this issue, as it makes precise adjustments very difficult.Thank you.example video:https://youtu.be/jbe6K-ORr44
Buen día, he tenido un problema con mi programa ultimamente. Solo me habia pasado una vez anteriormente, pero con las ultimas 2 actualizaciones del Photoshop Beta, los archivos tienen bug en el color cada vez que lo abro. En la imagen 1, los colores del archivo se ven transparentes y apagados. El modo de vista del ajuste de prueba está en “Monitor RGB”, y al cambiarlo a cualquier otro modo y regresarlo a ese, el color se ve normal (imagen 2). Este es un proceso que tengo que repetir con todos los archivos, y todas las veces que los abro.Actualmente tengo la versión 27.10 Imagen 1. Bug en la vista del colorImagen 2. Vista normal del color en el mismo modo “Monitor RGB”
I'm looking for a Photoshop script (JavaScript/ExtendScript or UXP) to automate my card deck mockup workflow.My workflowI create Tarot and Oracle card mockups.Each PSD contains multiple Smart Objects representing cards arranged in a specific composition.Each Smart Object already contains a card image from a folder.For example: Deck A/1.png2.png3.png...56.pngThe PSD already uses these images in different positions.For example: Card 1 → 14.pngCard 2 → 3.pngCard 3 → 27.pngCard 4 → 8.pngNotice that the Smart Object names are not related to the image filenames.The composition has already been carefully designed.What I wantI have another folder: Deck B/1.png2.png3.png...56.pngThe filenames are identical.The images are different.I want to select the new folder and have the script automatically replace every Smart Object with the image that has the same filename currently used inside that Smart Object.Example:Current PSD Card 1 → 14.pngCard 2 → 3.pngCard 3 → 27.pngAfter running the script: Car
My imac is a powerful imac intel i7 - unable to install the latest photoshop because of compatibility.please provide a link to a working download link version for intel i7? photoshop 2024? I cant find any sort of access to older versionsthank you
The on-device Remove Tool is consistently slower than Cloud Remove on an Apple M1 Pro (32 GB RAM). The slowdown becomes severe when removing multiple small objects such as electrical outlets. SystemMacBook Pro M1 Pro 32 GB RAM macOS Tahoe 26.5.2 Photoshop 27.8.0 Native Apple Silicon GPU acceleration enabledExampleOne outlet: Cloud: ~6 seconds Device: ~15 seconds Eight outlets: Device processing takes several minutes. Even on a blank 2000×2000 document with a simple black rectangle, Device Remove takes around 10-20 seconds.I have already:Reset Photoshop preferences. Reinstalled the AI model. Tested newest Photoshop Beta and rolled back to 27.7- neither affected the issue Verified GPU acceleration is enabled. Confirmed Photoshop is running natively on Apple Silicon.
Remix with Firefly Community Gallery
Thousands of free creations to fall in love with and remix in Firefly.
Already have an account? Login
No account yet? Create an account
Enter your E-mail address. We'll send you an e-mail with instructions to reset your password.