Master Photoshop with the help of our global community.
Als letztes aktiv
The July 2026 update to Adobe Photoshop (version 27.9.1) introduces faster creative exploration, smarter AI-assisted image generation, and improved productivity tools to help designers, photographers, and creators work more efficiently and stay in flow. What’s NewPhotoshop 27.9.1 introduces several enhancements designed to streamline creativity, improve productivity, and make everyday tasks easier. You can now send layers directly to Firefly Boards for faster ideation and creative exploration, making it simple to compare concepts and develop new directions from existing Photoshop content. Editing workflows are now more efficient thanks to expanded Remove tool controls in the Contextual Task Bar, giving you quick access to options such as Find distractions, Add to, Subtract from, and Remove after each stroke without interrupting your workflow.Font management has become more reliable with the ability to save and restore your favorite fonts, ensuring your curated font lists remain availab
A realistic shadow helps your subject feel grounded in the scene. In Photoshop, there are several ways to create one, depending on your subject and lighting. Based on workflows shared by experts in the Photoshop community, we've brought together a few of the most effective techniques here. Choose the method that best fits your workflow. Method 1: Using Generative AIAI can speed up the setup, but you will still get the best results by refining the shadow yourself.Use Select Subject or Remove Background to quickly isolate your object. Use Generative Fill to extend the surface where the shadow will fall. Learn more. You can also use Harmonize. It analyzes the lighting, color, and tone of the scene, and can also generate a matching shadow to help the subject feel more naturally integrated. Learn more. Refine the generated shadow manually using one of the methods above for the most realistic result. Method 2: Drop Shadow EffectThis is the quickest way to add depth and separation to elemen
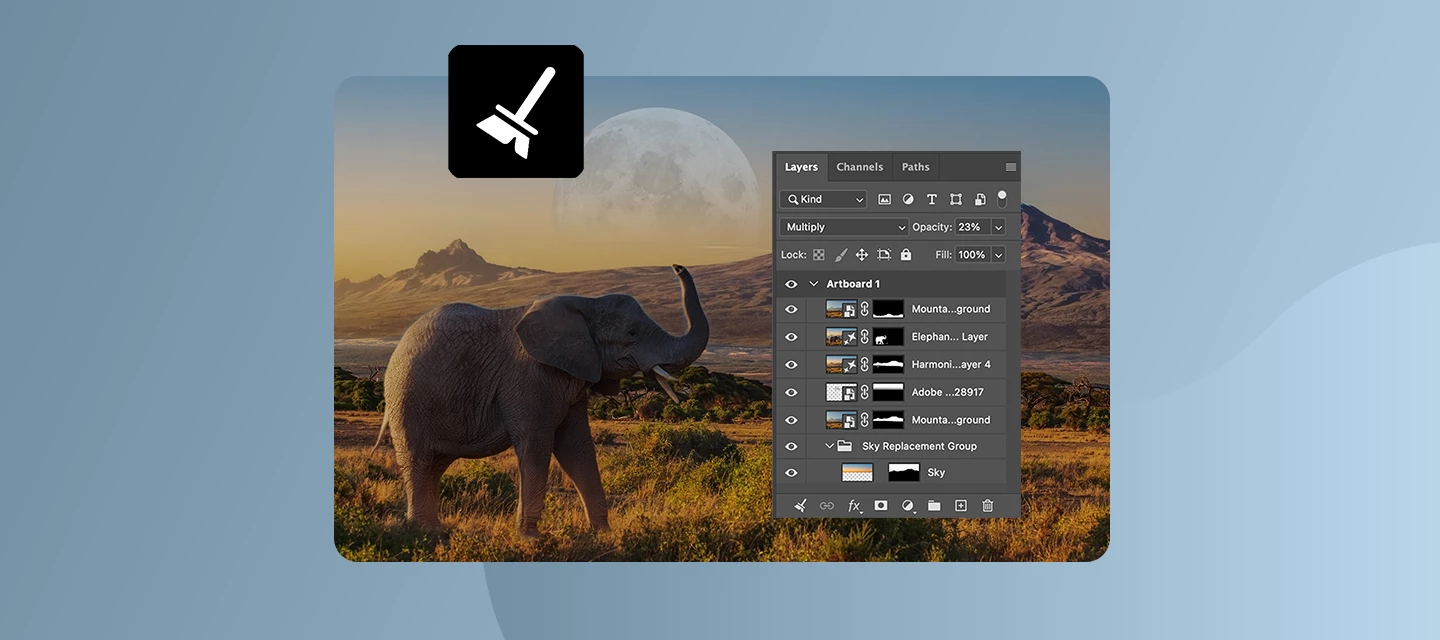
Keeping your Layers panel organized just got a whole lot easier. Layer Cleanup in Photoshop 27.6 and above automatically deletes empty layers and renames layers based on their content, so you can focus on creating, not housekeeping. With a single action from the Layers panel, Photoshop scans your document and removes blank pixel or text layers that tend to pile up during exploration. At the same time, it can intelligently rename layers, giving them clear, descriptive names that reflect what’s inside, so you no longer have to guess what “Layer 37 copy 2” contains. You’re in control of how much cleanup happens. Run it across the entire document for a full reset, or apply it only to selected layers when you want to tidy up as you go. Here is a quick tutorial demonstrating this feature. Why this mattersFaster navigation in complex files Cleaner handoffs when sharing PSDs with teammates Less friction when revisiting older projects Better layer discipline without manual effortWhether you’r
Help us shape this community: What content do you want to see? Whether you're a longtime community member or just found this space, your input will directly shape what we publish here. We want this to be a place you return to, not just when something breaks, but when you want to learn, get inspired, or connect with other creatives. What we’re considering:🚀 Feature Highlights: What’s new in Photoshop, explained with real workflows.📖 How-to Guides: Step-by-step tutorials for common tasks, errors, and workflows.💬 Community Discussions: Polls, questions, and conversations about how you work.🌟 Community Highlights: Spotlighting community members, standout work, and creative journeys. We’d love to hear your thoughts:What type of content do you find most useful when you visit this forum? Is there a Photoshop topic you keep looking up but never find a great answer for here? Would you want to share your own creative workflow or be featured in a community highlight? What kind of projects wou
How to Report a Bug in the Adobe App Community Run into something that’s not working the way it should in Photoshop? Let’s tackle it together. When you share bugs in the Adobe Community, you’re helping product teams see what’s really happening, recreate the issue, and fix things faster. Think of this guide as your sidekick—it’ll walk you through creating a clear, helpful bug report, no technical expertise needed. Before you startBefore jumping in with a new bug report, take a quick look around the community to see if someone’s already spotted the same issue. If you find a matching post, add your vote and feel free to add your experience there instead of starting from scratch. It keeps everything in one place and helps the team connect the dots and solve things faster. Note: Any duplicate posts will be merged into a primary post that you can follow for updates on the issue. What makes a good bug report?A great bug report tells the full story it explains what happened, what you expected
Create a GIF from a series of photos or a video clip Have you ever wanted to create a GIF of your own to post on social media? It really isn't hard!You can easily turn a series of photos or a segment of a video into an animated GIF in a few minutes using Photoshop. Here's how: Create a GIF from a series of photos Step1: Import the still photos you want to use to create a GIF Identify a series of photos that would make a good GIF Open Photoshop and go to File > Scripts > Load Files into Stack Click Browse and locate the photos you want to use (Use the Shift key to select more than one file) and click Open Click OK to import the photos into layers If it is not already open, click on Window > Timeline to open the Timeline panel Click the arrow to the right of the Create Frame Animation button in the middle of the Timeline panel and select Create Frame Animation Now click the Create Frame Animation button to the left of the arrow and it should look something
I am just learning to work with mockups and smart objects. This is a faux postage stamp I created and it’s going into a mockup that has deckled postage stamp edges etc. I’ve tried to use Free Transform to resize the “stamp” to the green “canvas” but it won’t fit exactly or proportionately. Is there something I can do to make it fit the green area precisely? Or something I can do to change the size of the green area so they’re both a closer match? Thank you.
一直无法使用旋转对象功能,任何图片都无法旋转
I recently downloaded the latest Photoshop update and now none of my drivers/processors are compatible to allow me to edit in camera raw. After digging around and trying to update drivers, I realized I need windows 11 and will have to buy a new laptop to be compatible with the new update. Can I uninstall the update and install an older version? Which version is the last to work well with windows 10?
I have my export settings to JPG quality Max of 7. But every time I go to export an image and close "Export As" it always defaults to quality of 6 and I have to manually change it every time. This is the case in both PS and PS Beta. On a MAC. PS beta V27.9.0 What can I do?
Hello Adobe team,I am reporting an issue with Photoshop 27.7 on Windows 11 where the new Remove Tool on-device generative AI model cannot be enabled on an NVIDIA GeForce RTX 5080.The “Device” option remains greyed out, even though all documented requirements appear to be met.SYSTEM SUMMARYPhotoshop version: Adobe Photoshop 2026 / 27.7Operating system: Windows 11GPU: NVIDIA GeForce RTX 5080VRAM: approximately 16 GBDirectX: DirectX 12 / DirectX 12.2 availableNVIDIA driver: current and newer than Adobe’s stated minimum requirementPhotoshop GPU acceleration: enabledPhotoshop GPU status: GPU is detected and allowedAvailable disk space: sufficientThe GPU is usable for normal Photoshop GPU acceleration.The important detail is that Photoshop appears to detect and use the RTX 5080 for general GPU acceleration, but in the system information / GPU identification path the card is shown as:NVIDIA GeForce RTX 5080 UNKNOWNThis strongly suggests that the issue is not general GPU acceleration, but the
I just updated my Photoshop this morning to version 27.9.0 and now, no matter what file format or options I use to export an image, the export appears washed out or sun-bleached.On a Reddit, I found the solution (posted 11 hours ago, very much in the same timeframe as I began experiencing it), which is to go into Preferences, under Performance, and uncheck Use Graphics Processor:https://www.reddit.com/r/photoshop/comments/1vak5kj/photoshop_update_and_now_my_images_look_washed/This should definitely be fixed. Thanks so much.
Thanks to all who took part in our previous ‘Fixer Upper’ challenge. As always, there were many interpretations of the image and the brief.This week, we start out with a simple object. This Victorian pipe can be found in Adobe 3D assets. I made the wrap-around wood materials using Adobe Substance 3D Designer and then added them to the surface using Adobe Substance 3D Painter, before rendering in Blender 3D.So, now we have our starting image. What can you make with it?The “rules”:Use the starter image as at least part of your own image entry. Anything goes, as long as it meets the forum rules on decency, copyright, etc. Anyone, and everyone, is welcome to have a go, whether you are a complete beginner or a Photoshop expert. This is not just for our forum “regulars”. The challenge is not limited to Photoshop. Any Adobe software can be used. There are no prizes apart from the chance to practice, show off your skills, or bring a bit of humour and fun. Don't be shy, join in and have a go!
The latest version of Photoshop is like learning a new program completely. It is so complicated and designed for professional designers who use it daily. It is cheaper for me to use Canva but I just love my old version of Photoshop as I use it when I need it and I can still do a lot that Canva doesn't have.Another option is to have a pay per use option. Instead of paying monthly, I can pay a small fee for each time I use it which is about 10 times a month. This will cut the costs down so I can keep on using Photoshop and not another system. 🙏🙏🙏🙏
The Adobe Firefly connector in Codex is repeatedly failing with:HTTP 403 Forbidden — “MCP streamable transport probe failed”Endpoint: https://photoshop-mcp-service.adobe.io/v3-creativity-b8f2a/mcpThe connector worked briefly and successfully generated images, but then began returning this error again. It occurs before Firefly receives the prompt, even when generating one image at a time. Disconnecting, reconnecting and restarting the app have not resolved it. Please investigate the connector’s authentication/transport authorization.
i have a design like this. i want to recreate this on the right way. how do i creat lines lik the ones ath the front coming from the marble style?i have already this to start from.
Hello,Après quelques jours de congés, je reviens travailler sur photoshop, et je me rends compte que mes brush d’arrondi flous font un rendu très bizarre. Au lieu d’avoir une opacité progressive, j’ai des sortes de dégradés en paquet avec des couleurs étranges saturées sur les contours. Impossible de réaliser un dégradé progressif pour un fond de ciel, cela me bloque complèetement sur mon travail en cours. Tous mes calques sont en mode normal, mes brushs aussi, opacité et flux en 100%. J’ai réinitialisé par défaut tous mes outils, pas de changement.Avez-vous eu ce type de bug? Car c’est clairement un souci de fonctionnement, je n’avais jamais eu ça en plusieurs années de travail sur photoshop, et ça arrive du jour au lendemain. Ou est-ce que je passe à côté de quelque chose?Merci pour vos retours!rendu des brush à opacité flouebrushmode
Hello,I have encountered what appears to be a GPU-related rendering bug when converting RGB images to CMYK in Photoshop.SystemPhotoshop 27.8 macOS Tahoe 26.5.2 Mac Studio M2 Ultra Apple Silicon GPUProblemWhenever GPU acceleration is enabled, converting an RGB image to CMYK produces severe black rendering artifacts across the image. The artifacts appear immediately after the color conversion and make the document unusable.The issue occurs with multiple images and is fully reproducible on my system.Steps to ReproduceOpen an RGB image. Make sure Use Graphics Processor is enabled under Preferences > Performance. Convert the document to CMYK (either Image > Mode > CMYK Color or Edit > Convert to Profile). Large black artifacts appear throughout the image.Expected ResultThe RGB image should convert normally to CMYK without any visual corruption.Actual ResultThe converted image contains large black rendering artifacts that were not present in the original RGB document.WorkaroundDi
When editing an adjustment applied to a Smart Object as a Smart Filter, such as Hue/Saturation or Curves, the canvas does not update continuously while dragging a slider or adjustment control.Instead, the Smart Object temporarily displays its original, unfiltered appearance while the mouse button is held down. The adjusted result appears only after the mouse button is released.This makes it difficult to evaluate small or incremental changes because the adjustment can’t be previewed in real time.Steps to reproduceOpen an image in Photoshop. Convert the image layer to a Smart Object. Apply an adjustment through Image > Adjustments, such as Hue/Saturation or Curves. Double-click the adjustment beneath the Smart Object to reopen the Smart Filter controls. Confirm that Preview is enabled. Click and drag one of the adjustment sliders without releasing the mouse button.Expected resultThe canvas should continuously redraw and display the Smart Filter result as the slider or adjustment value
There’s a troubling issue with Photoshop/Beta 27.7+ on Windows 11 where the new Remove Tool’s on-device generative AI model fails to work with 16 GB NVIDIA GeForce RTX 5080/90 cards from PNY, MSI, ASUS, and others. This problem has been around for months without a fix from Adobe or Nvidia. Might as well stick with the RTX 5070 and use the cloud-based remove free credits until it’s resolved—after all, most people are online anyway. Feels like a pointless feature unless you’re one of the rare few without Internet access. However, you're n luck in using a premium MAC PC.
# Generative Upscale returns solid black layer — Desktop only, Web works## SummaryGenerative Upscale in Photoshop 27.9.1 (macOS) always produces a solid black pixellayer*with a white layer mask. The "Original" layer is fine. Affects all models(Firefly Upscaler, Topaz Gigapixel, Bloom).The exact same account, image and scale factor works correctly onphotoshop.adobe.com — so the cloud service, the account and the generative creditsare demonstrably fine. The defect is in the desktop application.Generative Fill works perfectly in the same desktop app (both Firefly and NanoBanana). Only Generative Upscale is broken. The relevant difference: Generative Fillworks inside the existing document, Generative Upscale creates a **new document**.## Environment| | ||---|---|| Photoshop | 27.9.1 — build 20260803.r.1 65900e1 || macOS | 26.3 (build 25D125) || Hardware | MacBook Pro, Apple M2 Pro, 19 GPU cores || GPU | Metal 4, 12.713 MB GPU-accessible RAM || Displays | tested on built-in XDR, LG, Dell —
Currently Photoshop is only available on Windows and macOS, forcing Linux users to rely on dual-booting, virtual machines, or compatibility layers like Wine — none of which offer a reliable, full-featured experience. Linux has a growing base of designers, illustrators, and photographers, especially in tech, open source, and Linux-native creative workflows. A native Photoshop build (or GPU/color-management-optimized support via a compatibility layer) for major distros would remove a significant barrier for this community. Even a phased rollout starting with core editing features would be a big step forward. plz
I am having trouble getting my Photoshop desktop app to work. It was working before last night but starting last night I cannot get it to stay open. It will start to open but then it will close again. I have tried all the usual work arounds and talked to tech support, who said to call today if it wasn't working and so here I am.
At first I thought it was due to the latest update, but after a tip to install an older version, I still couldn't open a file. I use macOS 15.7.9
Remix with Firefly Community Gallery
Thousands of free creations to fall in love with and remix in Firefly.
Sie haben bereits einen Account? Anmelden
Noch kein Konto? Konto erstellen
Enter your E-mail address. We'll send you an e-mail with instructions to reset your password.






















 AdChoices