















Design the future of fashion, win Firefly Pro 👗✨
After Effects (Beta)
Recently active
Rolling out now in the After Effects Beta, starting with CCD Beta build 27.0.049 After Effects now includes the Account Menu -- the same account panel you already use in Photoshop, Illustrator, InDesign, and Premiere Pro. Click your account icon in the toolbar or on the Home screen, and the Account Menu panel opens to display the information relevant to your account. If you move between Creative Cloud apps, the menu looks and behaves exactly as it does everywhere else and now the experience will be consistent across our suite of applications. Account Menu - Click on the account icon on the top right to access the flyout panel
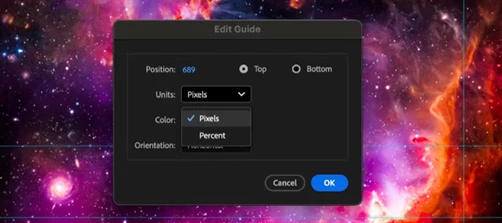
Guides are a foundational tool for responsive, reusable layouts and simplifying design decisions. We're bringing new features to After Effects guides that make them closer in line with Premiere Pro, so guides behave more consistently when you move between apps. Here's how to get the most out of the new functionality.What's New in After Effects GuidesPercentage‑based guides Position guides relative to the composition or view, not just absolute pixels, making them resilient to resolution and aspect‑ratio changes. Pinned guides Pin guides to the bottom or right edge (in addition to top/left) so layouts stay stable as dimensions change. Per‑guide color control Assign colors to individual guides for better visibility and organization. Improved guide editing Right‑click a guide to open the Edit Guide dialog, where you can adjust Position, Unit (pixels or percent), Pinning (origin or opposite edge), and Color. Guide import and export After Effects and Premiere Pro use the same .guides format,
Version 27.0x41 of After Effects Beta introduces support for Layers as Material Sources. You can now apply layers — animated pre-comps, solids, images, and videos — directly as 3D materials on parametric meshes, 3D models and 3D text and shapes when using the Advanced 3D renderer. No more round-tripping through other apps or baking out intermediate textures: animate your 2D content and your 3D scene together, in the same project. We’re also changing how materials are applied so that you don’t have to scroll through big lists of material assignment slots when you only want to tweak part of a model. Getting Started Select a parametric mesh, 3D model, 3D text, or 3D shape, then open the Material dropdown in the Timeline or Properties panel and choose any eligible layer to use it as the base color source. Once assigned, you can fine-tune the look using new intrinsic material streams — Opacity, Roughness, Metallic, Emission Color, Emission Intensity, and Ambient Response — all keyframeable
Hello everyone!The rumors are true: we’ve brought a native AI Assistant to After Effects and it’s now here in beta! Update to the latest beta build (7 or above), restart After Effects, and open the panel from the icon in the header bar or via “Window” > “Assistant.” Exhibit A: a disaster project file.First, what this is and isn't. The Assistant is not here to replace you as the artist. Our north star for the Assistant is for it to do the tedious work that takes away from the joy of creating (think expression troubleshooting, reorganizing a project you inherited from a contractor who didn't follow your team's project organization guide, manually checking the spelling in your text layers...)So while you can point the Assistant at a wide range of workflows and get varying success rates, we've deliberately made it best at two things right now: project organization and expressions.Ask it to explain, restructure, rename, and color-code your project: handy for anything that's gotten away f
Version 27.0.41 of After Effects Beta introduces support for 3D Materials on Text & Shapes. You can now apply Substance materials directly to 3D text and shape layers in Advanced 3D, replacing their default legacy materials with something photo-real or stylized — think wood, stone, brushed metal, or sci-fi surfaces. You can assign different materials to the front, bevel, side, and back, and bevel independently, following the same material assignment workflow you'd use on parametric meshes and 3D models. It works together with the Layers as Material Sources feature, so you can use animated pre-comps, solids, images, and video as materials on your 3D text and shapes too, not just Substance (SBSAR) materials. Getting StartedSelect a 3D text or shape layer, then open the Material Assignment dropdown in the Timeline or use the Properties panel to assign a Substance material (or a layer, if you also have Layers as Material Sources enabled). Use the per-face options to apply separate mate
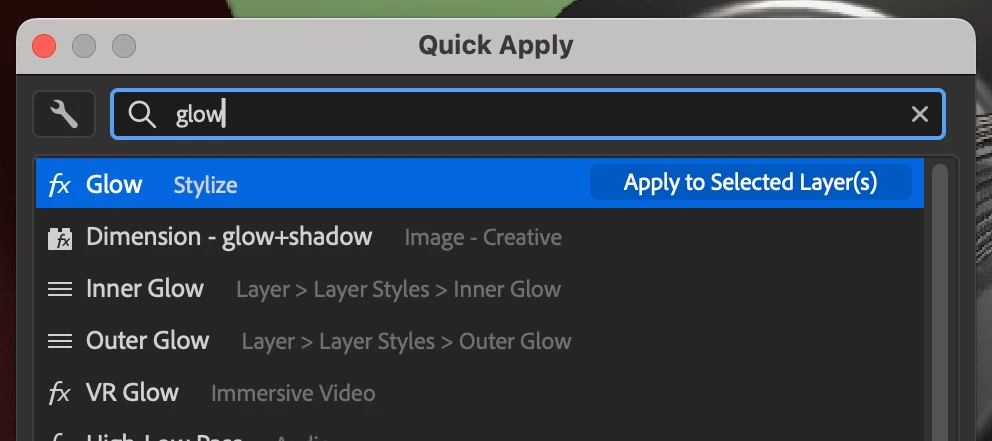
Quick Apply was released in After Effects 26.2. Ongoing improvements will be posted here as they are made available in the Beta builds.Hi all!We are very excited to unveil Quick Apply in After Effects (Beta) 26.2.0.30 or higher. Quick Apply is a search box that puts every effect, animation preset, and menu command right at your fingertips. Type a few characters, pick what you want, and apply or run it. It’s that simple.Effects — Search by name or category and apply to the selected layer, or create a new Solid or Adjustment layer with the effect already applied. Animation Presets — Search and apply text presets and other animation presets to the selected layer, or to a new layer or adjustment layer. Menu Commands — Search and run any top-level menu command, including access to blending modes, installed scripts, and preferences.Showing result for “glow” in Quick ApplyTo open the Quick Apply dialogEdit menu > Quick Apply Ctrl+Enter (Windows) / Cmd+Return (macOS) — the shortcut can also
Rolling out now in After Effects Beta, starting with CCD Beta build 27.0.048After Effects now lets you choose how much to compress PNG files when you export. When you set PNG as your Output Module format, the PNG Options dialog now includes a Compression slider. This is similar to the kind of control you already have for JPEG. Steps to Access the Output Module and PNG OptionsOpen the Render Queue: Select your composition in the timeline or project panel, then go to File > Export > Add to Render Queue (or press Ctrl+M on Windows or Cmd+M on Mac). Click the Output Module Link: Look for the section labeled Output Module in the Render Queue panel. Click the blue underlined text (which often says "Lossless" or displays a format name like "H.264") to open the Output Module Settings dialog. Adjust Your Settings: Choose your desired Format (PNG Sequence) from the dropdown menu. Under Video Output, click on format options to open the PNG Options dialog to access the compression slider.
Rolling out now in the After Effects Beta, starting with CCD Beta build 27.0.044 Adobe Stock panel in After Effects (Beta)What is it?We're excited to share that the Adobe Stock panel is now available in After Effects (Beta). Search the full Adobe Stock library, preview assets, and bring them straight into your project without ever leaving After Effects. What's New?Until now, getting Stock content into an After Effects project meant using the Libraries panel with Adobe Stock selected as a sub-category and searching for the required assets or jumping out to your browser, downloading, and importing by hand. The new Stock panel with a better search experience now brings that whole loop inside the app. Find what you need, add it to your project, and it downloads and lands right in your Project panel, ready to use. You can also choose where downloaded assets are saved from the Project Settings in the new Scratch Disk tab, so they stay organized alongside the rest of your footage. Caveat: All
Rolling out now in the After Effects Beta, starting with CCD Beta build 27.0.044.We have made two meaningful upgrades to the After Effects auto-save, now in Beta. Your backups now happen on a consistent schedule, and recovering after a crash takes one click instead of digging through a folder. What's updated:Never-saved work is covered: Auto-save now runs for untitled projects, so a project you haven't saved yet can still be recovered. We have also improved to have cleaner file names on auto-save. Auto-save on a consistent clock: Auto-save now fires on a fixed interval measured from your last auto-save and is not reset every time you save manually. One-click crash recovery: After a crash, After Effects will now offer to reopen your most recent auto-save. This helps in reducing the need to try navigating to the Auto-Save folder by hand. Recovered Projects protect your original: An opened auto-save now opens as an untitled “Recovered Project,” so your first Save creates a new file inste
Version 27.0x33 of After Effects Beta introduces support for editable text from Illustrator files.Previously, converting an Illustrator layer to native shapes would turn all its vector content into shape layers and text would be lost unless it had been converted to curves. Now, text stays text: when you use Create Shapes and Text from Vector Layer on an Illustrator footage layer, text objects come into your comp as fully editable After Effects text layers instead of outlines. Font, size, fill, position, styles (like bold and italic), strokes, and variable font settings all carry over, so you can keep editing in After Effects instead of being locked into static shapes. Getting StartedSelect an imported Illustrator layer in the Timeline, then choose Layer > Create > Create Shapes and Text from Vector Layer. Any text in the source file will be converted into its own editable text layer (rather than a shape layer), matching the font, size, fill, and position from the original file a
Starting with After Effects Beta 27.0x41, a new Audio De-esser effect is now available. This compliments the previous audio effect updates released in 26.0 (e.g. compressor, noise gate, distortion). What is a de-esser?If you've ever recorded a voiceover or narration and noticed that the "s", "sh", "z", and "t" sounds jump out sharp and hissy — almost whistling — that's sibilance. It's completely normal, especially with certain microphones, close-mic'd voices, or bright EQ. But it can be fatiguing to listen to and makes an otherwise clean recording feel harsh.A de-esser fixes exactly this. It's a smart, automatic volume control that only kicks in on those harsh high-frequency sounds and gently turns the the audio down automatically. You get a smoother, more polished vocal without dulling the whole track.The new De-esser effect in After Effects lives under Effect > Audio > De-esser. Drop it on any audio layer and you're ready to go. Why use it?Vocals and narration — the most commo
We've been having a lot of fun with a new effect we're calling Curl Noise, and we want you to try it.If you've ever wanted a noise effect that feels less like static grain and more like smoke, flowing water, or swirling ink— that's the space Curl Noise is aimed at. It generates smooth, animated 2D noise with a fluid, organic quality that's naturally well-suited to backgrounds, texture overlays, abstract motion, and anywhere you want movement that flows rather than flickers.The reason it feels different from other noise effects is in how the noise field is curled — the vectors that define the noise are rotated so they always flow tangentially, which is what gives the result that characteristic fluid quality. Crank up Swirl and it starts to coil and spiral. Push Turbulence Speed and it churns. Keep things subtle and it just... drifts. Here are some examples… Curl Noise with Default SettingsModify the Transform properties and add some swirlReduce the swirl, add in smoothness and a little
After Effects Beta now supports native fullscreen on macOS. Click the green button in the top-left of the window to expand AE into its own fullscreen Space — complete with menu bar auto-hide and Mission Control swipe support, just like other native Mac apps. We've also cleaned up the title bar to match macOS conventions:Now shows just your project filename instead of "After Effects - filename." Cmd-click (or right-click) the filename to get the standard macOS path popup, letting you jump straight to any folder in the project's file path. Unsaved changes are now reflected with the native "edited" indicator alongside the existing asterisk. Click-drag the project icon (when a project is saved) to access the underlying project file for drag-and-drop.Let us know if this is working for you.
Starting in the AE Beta 27.0x7, we've changed how text animators handle combining marks — the tone marks, vowel signs, and diacritics that sit above, below, or around a base character in scripts such as Thai, Arabic, and many Indic languages. Scope of the changeThis affects the per-character text animator properties:Scale Skew Rotation Tracking Variable Font axes that change a character's width (not only an axis literally named "Width" — any axis whose effect widens or narrows the glyph) What used to happenWhen you animated one of these properties on text containing combining marks, each glyph/mark was positioned independently. As the base character moved, scaled, rotated, or changed width, its marks did not travel with it and they drifted away from the character they belong to, so the mark could end up detached and floating over a neighboring character. What happens nowMarks are now grouped with their base character and transform as a single unit. As you animate, the whole cluster (ba
In After Effects Beta 27.0 Build 6 and later, we're happy to announce Contour Paint, a new visual effect that allows you to change your images and videos in creative ways!At it's core, Contour Paint analyzes your frames and finds the visible flows along the edges of the shapes (the contours) within it, and then simplifies and smears your images along these contour edges like finger-painting, as well as optionally posterizing the smeared shapes by drawing solid color fills using a reduced palette. You can get illustrative, or print-like effects or very abstracted imagery. We really think you're going to have some fun with it!Contour Paint Understanding How Contour Paint WorksHere’s some source footage we’ll be using. A skateboarder and a frog.Untreated Skateboarder footage frame (cropped) Untreated Frog footage frameContour Paint processes the frame via several different stages, illustrated here on the skateboarder footageContour Paint Pipeline (clockwise)To dig further in, let’s go thr
As we prepare for our upcoming version 27.0 release of Adobe Premiere, After Effects, Media Encoder, and Audition, we are sharing an important update regarding Macintosh hardware compatibility. Beginning with version 27.0, our video and audio applications on the Mac platform will require Apple silicon (M1 or later) processors. Intel-based Mac systems will no longer be supported for v27.0 and future updates. What Macintosh Users Need to Know Intel-Based Macs: You can continue installing and using version 26.x. Security updates for v26.x will continue per our standard support lifecycle. To update to v27.0 upon release, an Apple silicon Macintosh will be required. Apple silicon Macs (M1 or newer): No action needed. You can update to v27.0 as normal. Moving exclusively to Apple silicon on macOS allows us to focus on modern architecture and hardware acceleration across our video and audio applications. This update also aligns our roadmap with Apple’s transition roadmap: Apple has announced
Hi all! Here today to let you know we've added Disk Caching for Object Matte!As you know, when you propagate an Object Matte across a clip, After Effects analyzes every frame. Until now, all of that lived in memory. If you closed the project without freezing or ran low on RAM, those results were gone. Reopen the next day and you'd have to wait through the propagation all over again.With disk caching, Object Matte propagation results are now cached to disk, so the work you've done sticks around. You should also see slimmer .aep files, have an easier time working with large formats (hello 4K!) on low-memory machines, and AE will cache your Object Matte frames in the background while idle.What's newYour Object Matte survives across sessions. Propagate a matte, save, and close your project. When you reopen it, the cached frames are still there.Less pressure on your RAM. Because propagated frames can now live on disk instead of only in memory, After Effects can hold onto more of your work w
Sometimes you just need a copy of what’s in your Composition panel—a still of the current frame, ready to paste into chat, email, socials, etc. Exporting a frame works, but it’s more steps than it should be.We’re (finally) introducing Copy Frame to Clipboard: a one click option accessible from the Composition, Footage, or Layer panel to grab the currently rendered frame and put it on the system clipboard. How do I use it?Set the Current Time Indicator to the frame you want to copy and let it render. Click the Toolbar button in the Composition, Footage, and Layer panel toolbars. Or use the Keyboard shortcut when any of those panels are active. Defaults: Ctrl+Alt+Shift+F5 (Windows) and Cmd+Option+Shift+F5 (Mac). What Does Copy Frame to Clipboard Support?On Mac and Windows, a PNG will be placed on the clipboard (up to 16-bit when using 16bpc or 32bpc comps in After Effects). On Windows, a bitmap representation is also provided, so more apps can paste reliably. With regard to color, wha
Mask tracking in After Effects just got a major upgrade, including up to a 5x speed improvement.Controls are more accessible so you can start tracking without hunting through panels, the tracker itself is significantly faster so you spend less time waiting for it to complete, and the results are also more accurate. Whether you're isolating a subject or refining a tricky shot, the updated mask tracker is here for you. How do I use it?In the Timeline Panel, select a footage layer. Click the Mask or Pen tools in the Toolbar. Draw the mask on the visual you want to track in your footage. Click the Track Forward button to start tracking forward. Use the Wrench button to change the tracking method. The first four tracking methods have been updated to a new algorithm that is up to 5x faster, with enhanced accuracy. Did I mention it is also really really fast? Of course, if you're used to the Tracker Panel, worry not, as we have also kept the controls there. Please, try the newly updated m
If you’ve been on recent After Effects Beta builds, you might’ve noticed the Effect Control Panel getting a little tidier: things like GPU Acceleration and Camera Aware have moved to the right side of the effect header, and Reset is a proper button instead of plain text. Today we’re excited to tell you why.As of build 26.5x7, After Effects allows you to assign color labels to individual effect instances on a layer. When you add an effect (or open a project that already has effects), you’ll see that familiar small grey square next to the effect name. Click it and you get the same kind of label menu you already know from elsewhere in AE. Upon applying an effect, each effect’s default label is None, but you can tag effects however it helps your workflow, same idea as layers or keyframes.In addition to the familiar square swatches, we've also added (optional) background tinting: the effect row can get a subtle background wash that follows the label color you picked. We've found this to b
The Frame.io V4 panel in After Effects (Beta)What is it?Hey friends! We’re pleased to announce that the new Frame.io V4 panel is now available in After Effects (Beta). Render, upload, share, comment, and manage feedback without ever leaving After Effects.What’s New?Unlike the Review with Frame.io panel, the new Frame.io V4 focuses on uploading from the Render Queue, rather than requiring users to set render settings from within the panel itself. Upload one or many comps to the same place in Frame.io at once!What’s Coming Later?If you’ve used our new Frame.io V4 panel in Premiere 26.2 or later, there are a few features in that panel, but are not yet available in After Effects (Beta).Playhead sync - Today, clicking a comment will jump the After Effects playhead to a comment. In Premiere, you can also sync playhead scrubbing between Frame.io and Premiere bi-directionally. It’s not in After Effects today, but we know it’s important to you. Asset import - Today, you can use Frame.io drive t
Hello, motionkind! Now in After Effects (Beta) build 26.0x40 and later, we are introducing two improvements for expressions & scripting. Quickly find the keyframe or marker before or after a given time, without writing lengthy, repetitive logic. Read the current text and the full list of dropdown menu items, so you no longer need to keep duplicate strings in your expressions just to show the text from a dropdown menu. previousKey() and nextKey() in JavaScript expressions This Beta build introduces new expression methods to quickly get the keyframes or markers before or after any given time: Property.previousKey(time): Returns the keyframe or marker at or before time. If none exist before time, returns the first keyframe or marker. Property.nextKey(time): Returns the keyframe or marker after time. If time is after the last, returns the last keyframe or marker. These new methods are only available in the JavaScript
New in After Effects Beta 26.3x34: Modernized Effect Controls Panel After Effects has a long and storied history, and a lot of today’s UX still sits on a legacy framework. That foundation has made it harder than we’d like to fix bugs, ship new ideas, and keep panels feeling fast. We have been reimagining what’s under the hood for the Effect Controls Panel to make the experience easier to evolve, more reliable, and genuinely better to use. With that in mind, we have been working to modernize the underlying framework of the Effect Controls Panel. We are essentially rebuilding it from the ground up. This is the first stage of a larger project to modernize the UX framework of After Effects. What is changing? For now, the panel will look nearly identical to the existing version and retain all current behavior and functionality. However, this architectural shift allows us to deliver incremental improvements to the AE user experience moving forward. You may already notice a few subtle chang
We’re excited to introduce Object Matte in the latest After Effects Public Beta (26.2 build 27) — a major evolution of the Roto Brush workflow.Object Matte shifts rotoscoping from a brush-only workflow to a hybrid approach that combines single-click AI subject selection with precision refinement and intelligent propagation over time. Built on the same AI technology powering Premiere Pro’s Object Mask workflow, Object Matte delivers faster, more intuitive results with significantly less manual effort. What’s New in Object Matte?The Object Matte suite includes four core tools designed for speed, control, and flexibility.Object Selection Quickly isolate objects in your footage with one-click or marquee-based selection (rectangle or lasso). This tool leverages advanced segmentation logic for accurate propagation across frames, reducing manual effort for complex scenes. You can access Object Selection by clicking the icon highlighted in blue. You can select an object in your comp by clickin
Your new Object Matte just got more interactive. With the new Live Update feature, your Quick Select and Selection Brush strokes are reflected in realtime as you paint, so you can see exactly what's being selected without waiting for a refresh. It makes the selection process smoother, faster, and far more intuitive — letting you refine your mattes with better precision and stay in your creative flow. This may look like a small update, but we think it makes a huge difference — and we'd love to hear what you think. Give Live Update a try and let us know how it fits into your workflow. If you run into any issues or have thoughts on how we can make it even better, please share your feedback — your input directly shapes where we take this next.
Remix with Firefly Community Gallery
Thousands of free creations to fall in love with and remix in Firefly.
Already have an account? Login
Enter your E-mail address. We'll send you an e-mail with instructions to reset your password.