• 1497 Product updates

Beta Release Notes - Beta Build 30.4.0.80

Hello, The latest Beta Build 30.4.0.80 is now available in CCD. We have the below fixes in this build: Live Text on a Curve:Live Text just got even more flexible. You can now generate curved text in your vector artwork—and keep it fully editable. Whether it’s circular logos, badge-style icons, emblems, or text flowing along a path, your generated curved text stays live so you can easily update wording, adjust fonts, tweak spacing, or refine styling—without regenerating the artwork.Combined with support for complex backgrounds, Live Text now gives you even more creative freedom across a wider range of designs. This feature is in Beta, and your feedback matters. Align Center (Both Axes):You asked, we delivered! You can now center objects both horizontally and vertically in a single click. No more clicking twice. Look for the new option in the Align panel. Improved Curve Fitting for Image TraceImage Trace now handles corners, text regions, and T-junctions more accurately and consistently, producing cleaner paths and vector output that more closely matches the original input image Following UV issues are resolved in this beta build: One button for Horizontal and Vertical Center Align [Vote Count : 7] : Links panel showing wrong date created and date modified [Vote Count : 12] : Deselect Artboards command and hotkey problem [Vote Count : 11] : IgnoreWhite option no longer works in javascript bug [Vote Count : 14] : アートボード左上の角に丸が表示される / Brush tip shape appears in top-left corner of the artboard [Vote Count : 17] : Order of duplicated artboards is reversed [Vote Count : 19] : Em dash incorrectly rotates upright in vertical text layout [Vote Count : 2] : Images embedded disappear after reopening the file 2025 [Vote Count : 3] : Hitting Tab key after changing artboard name in Artboard palette [Vote Count : 1] : [Beta] document background white only when artboard edges are turned off

Firefly 사용자 지정 모델 Beta 버전 출시!

 Firefly 사용자 지정 모델(베타)를 사용하여 여러분의 창의적인 스타일을 재사용 가능한 모델로 만들어 보세요.   Firefly 사용자 지정 모델이 모든 유료 개인 고객을 대상으로 공개 베타 버전으로 출시되었습니다. 사용자 지정 모델을 직접 이미지로 학습시키면 매번 처음부터 다시 시작할 필요 없이 특정 일러스트 스타일, 캐릭터 또는 시각적 분위기에 일관되게 부합하는 새로운 콘셉트와 아이디어를 탐구할 수 있습니다.   사용자 지정 모델을 생성하면 반복적인 작업과 버전 관리를 없애 전략적 비전, 아트 디렉션 및 최종 마무리 작업에 더 많은 시간을 할애할 수 있습니다. 사용자 지정 모델을 학습시키고 플랜에 포함된 생성 크레딧을 사용하여 Firefly 및 Firefly 보드에서 콘텐츠를 생성하세요.  Firefly 사용자 지정 모델(베타)을 사용해 보시고 피드백을 통해 기능 개선에 도움을 주세요.    여기서 시작하세요  자주 묻는 질문(FAQ):-  Firefly 사용자 지정 모델(베타)이란 무엇인가요?   Firefly 사용자 지정 모델(베타)은 사용자가 직접 생성한 애셋으로 학습 과정을 통해 맞춤형 콘텐츠를 일관되게 생성할 수 있도록 세밀하게 조정된 Firefly 생성형 AI 모델입니다.    제가 모델 학습을 위해 업로드한 에셋은 계속 제 소유로 남나요?   네. Adobe는 사용자가 업로드한 콘텐츠를 기반으로 Firefly 생성형 AI 모델을 학습시키지 않으며, 사용자의 동의 없이는 사용자 지정 모델을 절대 공유하지 않습니다.  Adobe의 생성형 AI 접근 방식에 대해 자세히 알아보세요.   이 베타 기능을 이용하려면 비용을 지불해야 하나요?   기존 플랜에 포함된 생성 크레딧을 사용하여 Firefly Custom Models(베타)로 콘텐츠를 학습하고 생성할 수 있습니다.   크레딧이 부족하면 월별 초기화를 기다리거나 크레딧을 추가로 구매하여 Firefly를 계속 사용하고 실험해 볼 수 있습니다. *본 문서는 글로벌 커뮤니티 Firefly Custom Models is now available in public  beta 의 번역본입니다.

Photoshop (beta) :反射の削除

いつもPhotoshopベータ版をお使いいただきありがとうございます。新機能がベータ版に搭載されているのでご紹介します。 [反射の削除]AIパワーの「反射の削除」機能は画像中の大きな反射を抽出し削除します。このコマンドはガラスに映った大きな反射などを数ステップで削除して被写体を強調します。 AIを使った機能ですが生成クレジットは消費しません。使用方法:1. 大きな反射がある画像を開く2.メニューの編集>反射の削除をクリック3.反射の削除のダイアログが出るので結果のクオリティを選択します。4.「別の反射レイヤーを作成」(上図一番上)をオンにすると「反射の削除」レイヤーの他に抽出された反射物を別レイヤーとして作成します。5.OKボタンをクリック6.下図のようにレイヤーパネルに「反射の削除」レイヤーと「反射レイヤー」(上記#4でオンにした場合)が表示されます。7.「反射の削除」レイヤーの不透明度を調整することで削除した反射を適度に表示することも可能です。  クオリティー設定:プレビュー:最も低解像度でSNSでシェアしたりサッとみたりする時に適しています。標準:中位の解像度で通常の解像度のスクリーンで見る画像用です高い:ベストのクオリティで作成時間がかかることがあります 既知の問題:ガラス全体にある反射などに適していて現時点ではメガネに映った反射のようにエリアが小さい反射には使えません 選択範囲があっても画像全体を解析して適用します スマートオブジェクトはサポートしません。スマートオブジェクトにはCamera Rawの反射の削除機能を使ってください。スマートオブジェクトのアイコンクリックで開きます。 現時点ではRGB 8 bit の画像のみでしか使えません お使いになりご感想や問題、リクエストがあればこちらでお知らせください。よろしくお願いします。

Photoshop (beta):生成塗りつぶしの新しいモデルFirefly Image 5(プレビュー)

いつもPhotoshopベータ版をお使いいただきありがとうございます。 [生成塗りつぶしの新しいモデルFirefly Image 5(プレビュー)]今回ベータ版に搭載されたFirefly Image 5は新しい生成モデルで細かく指示をして編集するワークフローです。Firefly Image 5はAdobeの最先端の画像生成、編集のモデルでプロンプトだけでより直感的により正確に画像を編集することが可能です。画像全体を変換するのに平易で自然な言葉でどう変えたいかを説明するだけです。昼夜を入れ替えたり、被写体のポーズを変えたりを元画像にあるその他の部分はそのままにハイクオリティな結果が入手できます。  使用方法:1.画像を開きカンバス全体を選択する(メニューの選択範囲>すべてを選択またはCmd/Ctrl+Aキー)部分選択でも可能ですが、このベータ版では全体選択の方がうまく実行できます。2.コンテキストタスクバーの「生成塗りつぶし」をクリック(下図中A)3. コンテキストタスクバーのモデルピッカーより Firefly Image 5 (プレビュー)を選択(下図中B)4.明確な指示のプロンプトを入力(例:日没時に変える)5.「生成」をクリック  結果:プロパティパネルに表示されるようにバリエーションをひとつ生成します。 注:この新しいFirefly Image5は他のFireFlyモデルは異なっています。下記をご覧ください。詳細で明確なプロンプトでベターな結果が出ます。カラーコードでの正確な色、名前、詳しい説明、わかりやすい動詞で指示してください。曖昧な表現や言葉は避けてください。 変えてほしくない要素はそれを言及してください。(家の形は変えない、他は変えない、など) テキストの変更には「 」や‘ ’をつけてください。(例:「おはよう」を「こんにちは」に変える) カメラアングル、ポジションを指示できます。変更したくない場合はそれを言及してください。(例:アングルは変えない) わかりやすい動詞で指示してください。(特に文学的な比喩などは避けてください) お試しになりご感想やご質問をこちらにお寄せください。生成後のプロパティパネルのサムネイルからも下図のように評価をいただけると幸いです。  よろしくお願いします。

Explore New Possibilities with Photoshop for ChatGPT

Explore New Possibilities with Photoshop for ChatGPT

Big update for creators, Photoshop just got even more powerful inside ChatGPT.We’ve just rolled out new updates to Photoshop for ChatGPT, and this one is a game-changer! This feature is available to all ChatGPT users, including free users! What’s NewUntil now, you could make quick adjustments to color settings, making your pictures vibrant. You can now create complete generative edits with simple text prompts, adding, removing, or replacing elements, generating entirely new backgrounds, editing specific objects or people, and adjusting lighting or color,  all with a small prompt! No more complex tools! No steep learning curve! You simply type your idea and watch it come to life. What makes this even more powerful is what happens next. Once you’re happy with your edit, you can take your image into Photoshop on web or mobile to keep refining and building on it.  Let’s dive in!Getting started is straightforward. Open Photoshop for ChatGPT , connect your account, upload an image, and start editing with a clear, structured prompt for best results. Here are a few structured prompts for the most accurate and consistent results. If you don’t see generative features right away, try reconnecting the Photoshop app — that usually does the trick. No premium account needed, any ChatGPT user, including free users, can try Photoshop for ChatGPT and get complimentary daily AI edits to explore and experiment. We'd love to hear from youWhether you’re experimenting with ideas or working toward something polished, this update makes the entire process faster and more flexible. Give it a try and share what you create in the comments. We’d love to see what you make!

Firefly Custom Models is now available in public beta

Firefly Custom Models is now available in public beta

 Turn your creative style into a reusable model with Firefly Custom Models (beta)   Firefly Custom Models is now available in public beta for all paid individual customers. When you train custom models on your own images, you can explore new concepts and ideas that stay consistently aligned to a specific illustrative style, character, or visual tone—without starting from scratch each time.   Creating custom models helps you eliminate repetitive tasks and versioning so you can spend more time on strategic vision, art direction, and final refinements. Train your custom models and use them to generate content in Firefly and Firefly Boards with the generative credits included in your plan.  Check out Firefly Custom Models (beta) and help shape the feature with your feedback.    Get Started here  FAQ:-  What are Firefly Custom Models (beta)?   Firefly Custom Models (beta) are fine-tuned Firefly generative AI models that you train with your own assets and use to generate customized content consistently.    Will the assets I upload to train my models stay mine?   Yes. Adobe doesn’t train Firefly generative AI models on the content you upload to train your own custom model, and we’ll never share your custom model without your consent. Learn more about Adobe’s approach to generative AI.   Will I need to pay to access this beta feature?   You’ll use the existing generative credits included in your plan to train and generate content with Firefly Custom Models (beta).   If you run out of credits, you can either wait for your monthly reset or buy more credits to keep creating and experimenting with Firefly. 

Reflection Removal in Photoshop (Beta)

Reflection Removal in Photoshop (Beta)

The AI-powered Reflection Removal feature lets you easily extract and remove reflections that impact the majority of your scene. The Reflections Removal command eliminates large and prominent window reflections in just a few steps, allowing your image's subject to stand out clearly. While AI-powered, it is not generative AI and does not use credits.How to:Open a file with reflections that dominate the image. Edit > Reflections Removal…The Reflection Removal Dialog appears Choose the quality of the results from the pop up.    Turning on "Create separate reflection layer" will give you both the subject "Reflection Removal" layer and a layer with the extracted reflection. Click [OK] The  "Reflection Removal" layer and, if checked ON, the Reflection layer appear in the Layers panel. Adjust the Layer Opacity of the subject "Reflection Removal" layer to bring back subtle reflections if desired.  Adjust the Opacity slider in the layers panel to bring back subtle reflections for a natural look.  Quality setting info:Preview - This is the lowest resolution, suitable for sharing on social media, and the fastest to process.Standard - This is an intermediate resolution, ideal for viewing photos at normal screen resolution.Best - This is the full resolution, which takes the longest to process. Current Known Issues/Limitations:Is designed for full-image reflections (like a window pane), not for small-areas, such as reflections on eyeglasses. The result is applied to the entire document, even if there is a selection. No Smart Object Support. (Alternate: use Reflection Removal in Adobe Camera Raw as a Smart Filter.) Currently 8-bit RGB support onlyPlease visit the Beta Feedback panel to share your thoughtsThank you!

Lightroom Classic 15.2.1 Is Now Live with Camera Raw Support
Firefly Image 5 (Preview) in Photoshop Generative Fill

Firefly Image 5 (Preview) in Photoshop Generative Fill

Firefly Image 5 enables a new instruction‑based editing workflow in Generative Fill and it's currently in Photoshop (Beta) for desktopFirefly Image 5 is Adobe's most advanced image generation and editing model yet; you can edit images more intuitively and precisely with just a prompt. Simply describe your edits with natural language instructions to transform the entire image—such as changing time of day or modifying a subject’s pose - making the precise changes you want with high quality results, while keeping the rest of your pixels and the details of your original image the same. How to try it:1. Open an image and select the entire canvas (Select > Select All…).(While smaller selections are supported, this beta performs best when the full image is selected.)2. Click Generative Fill in the Contextual Task Bar.3.Choose Firefly Image 5 (Preview) from the model picker in the Contextual Task Bar.4. Enter a clear, instructional prompt (for example: “change the time of day to sunset”).5. Click Generate. The Contextual Task Bar. The model picker is set to Firefly Image 5 (Preview)The model picker menu. Set to Firefly Image 5 (Preview)Result:One variation is returned in the properties panel.Note: The way to write prompts for Firefly Image 5 is very different from other Firefly models. Here are a few tips:Precise prompting gives better results. Use exact color, names, detailed descriptions, and clear action verbs instead of vague terms. Explicitly prompt what should remain unchanged to protect important elements. Quote the exact text you want to change: For example, Replace 'joy' with 'happy'. Specify camera angle, position, or framing to prevent unwanted repositioning. Choose specific, powerful, and clear action verbs.Please visit the Beta Feedback panel to share your thoughts or rate the result in the Properties panel using the rating options. Thank you.

Desirable Patina: Rust-themed Signature Collection arrives in Substance 3D Assets!
March Updates to the Actions panel

Acrobat を起動、PDF をダブルクリックするとクラッシュする件について

Acrobat をご利用中の一部お客様で問題が発生し、ご不便おかけし申し訳ございません。 【調査状況について】弊社サーバーの仕様変更により問題が発生しておりました。現在、サーバー側の仕様は修正されております。そのため、新規端末で問題が発生することはございません。既に問題に遭遇しており、現在も問題が発生しているユーザーは後述の【対処策】をご確認ください。 【対象のAcrobat】Acrobat  【対象OS】Windows  【事象の詳細】以下の事象を確認しています。・Acrobat を起動し、クラッシュ・PDF をダブルクリックし、クラッシュ・「問題が発生しました」のポップアップアップが表示される 【対処策】以下2点のいずれかをご実施いただくことで解消されます。問題が発生したユーザーはお試しください。[A] Acrobat を 25.001.21288 にアップデートする現在、US時間 3月 10日リリースバージョンの 25.001.21288 にアップデートすることで回避が行える事例を確認しています。お手数ですが、以下の手順でアップデートをお願いします。※ 以下のアップデート方法は Windows の管理者権限が必要です。以下からアップデーターをダウンロード後、msp ファイルを実行し手動でアップデートをお願いします。※ Acrobat の bit 数に合わせたアップデーターをダウンロードください。Acrobat 32bit版 / Acrobat 64bit版 ダウンロードされたファイルをダブルクリックで実行いただきましたら、画面に従いアップデートをお願いします。 Acrobat Reader のアップデーターを入手されたい方は、こちらにアクセスし、ダウンロードをお願いします。 [B] NglFeatureConfig のファイルを削除以下の手順でファイルの削除をお願いします。 1. Acrobat を終了する2. エクスプローラーで以下 2点のファイルを開き、NglFeatureConfig のファイルを削除%temp%/acrobat_sbx/NGL%temp%/NGL2-1.上記のパスをコピーし、エクスプローラーの以下の場所にペースト後にEnterキーを押下  2-2. NglFeatureConfig のファイルを右クリックし、削除をクリック  2-3. %temp%/NGL のパスにある NglFeatureConfig のファイルを同様に削除 3. Acrobat を起動する

What’s New: Shared Credits (formerly Generative Credit Pool) and Request Access for Firefly-powered Features

  Shared credits (formerly Generative credit pool) provide access to organization-level Operations, enabling continued use of Firefly-powered features after users exhaust their individual monthly generative credits. Users consume their individual credits first. Once those credits are exhausted, eligible Firefly-powered actions automatically draw from the organization’s Operations for users who are assigned access. Users can now request access to shared credits once their individual credits run out. System administrators can review and approve these requests or automate access using assignment rules in the Admin Console.Go to Admin ConsoleWhy this mattersThis update helps organizations manage generative AI usage more efficiently while maintaining administrative control.With Shared Credits, organizations can:Extend access to Firefly-powered features after individual credits run out Enable users to request additional generative credit access when needed Simplify management using automatic assignment rules and request workflows Support scalable usage of generative AI across enterprise teams  PrerequisitesThis feature is available for organizations with an Enterprise Term License Agreement (ETLA) that includes Firefly Services or Firefly Creative Production and Creative Cloud for enterprise – Edition 4 or Edition 4 with Premium Stock. Assign Users to Shared CreditsTo enable Shared Credits: Go to Admin Console > Products. Select Firefly Services or Firefly Creative Production. Create a new product profile or open an existing one. Under Enable services, turn on the generative credits conversion option to enable Shared Credits. Select Save. Add users or user groups to this product profile so they can continue using Firefly-powered features after their individual monthly generative credits are exhausted. Ensure the same set of users are also assigned to Creative Cloud for enterprise – Edition 4 or Creative Cloud for enterprise – Edition 4 with Premium Stock. Important Notes Shared Credits do not pool or redistribute individual monthly generative credits. They only provide fallback access once individual credits are exhausted. Individual generative credits reset each month and are consumed before Shared Credits are used. For a step-by-step guide, visit our documentation: Enable Shared Credits for your organization Have feedback or encountering issues? Let us know by posting in the thread below, we’d love to hear from you! Quick Links Generative credits overview Creative Cloud Generative AI features Assign users to Firefly Creative Production  If this was helpful, please click the ‘Like’ icon in the bottom left corner of this post. Your feedback helps us improve the experience. Thank you! ​*For queries, feedback, and suggestions, please feel free to start a conversation.*Please visit our ICYMI page for all the other updates & releases. ​

Generative Rotate Feature with Fish

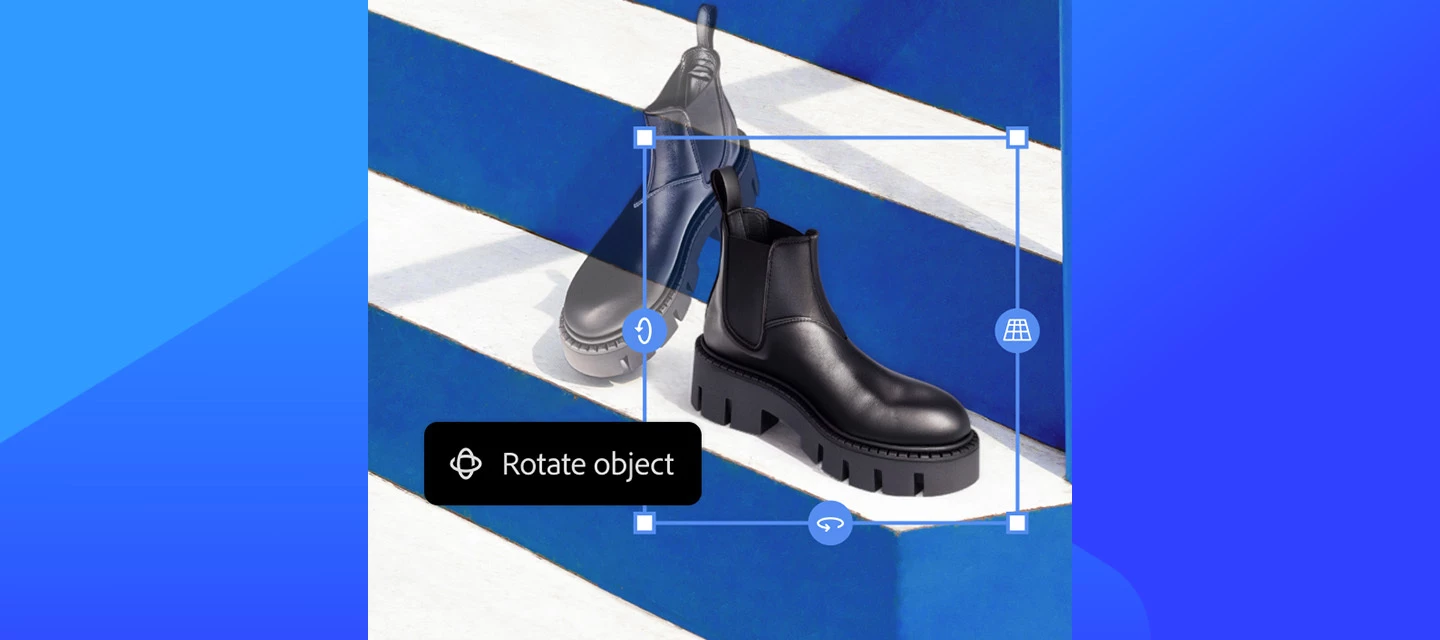
Rotate Object is now available in Beta!

Rotate Object lets you quickly transform 2D objects into rotatable 3D images, allowing rotation (spin, tilt, dolly) from any viewpoint to match perspective and depth. (Version: 27.5.0 20260311.m.3453)HOW TO TEST:1. Open or place an image 2. Select a pixel layer that contains an object. PRO TIP: You may want to duplicate the layer → as the layer will be converted to a Rotate Object LayerCmd + T to enter transform mode or Edit > Rotate Object Click the Rotate object button in the context bar - note this feature is 20 Generative Credits, the first 3 tries do not deduct generative credits.3. After the 3D conversion is complete, the initial rotated object will be a low-res PREVIEW. The layer was converted to a Rotate object layer. DIFFERENT WAYS TO ROTATE AN OBJECT:  Contextual Task Bar: click to use the Rotate and Tilt sliders. Click and drag the blue on-canvas controls around the object. Right-click on the object and drag (on-canvas for unconstrained rotation). Properties panel: enter specific values while in rotation mode. 4. After the rotation is complete, select the Done button, and the object is UPSCALED with details.PRO TIP: Select Harmonize to blend the rotated object with the background.5. You can select “Edit rotation” to change the rotation - select done to accept changes. (20 credits ONLY deducted on the FIRST rotation). HOW TO PROVIDE FEEDBACK:1. Click on the Beaker Icon in the upper right of the Photoshop application:2. Find "Rotate Object" in the left panel, and provide YES, Rotate Object is ready to be released to the non-Beta Photoshop (full) release or NO, Rotate Object is not ready to be released to the Photoshop full release. Leave a comment if you have one...3. Or you can leave a comment in this Beta Forum post.

ベータ版で提供開始:Premiereに5つの新エフェクトとトランジションが登場

  この記事は Now in Beta: 5 new effects and transitions coming to Premiere ​@Francis-Crossman17221443 の翻訳です。  Premiereにエキサイティングな新エフェクトとトランジションを追加しました。現在ベータ版でテスト可能です。エフェクト(グラデーション、チャンネルブラー、ノイズ)トランジション(3Dスピンバック、プッシュ)各機能の詳細は以下をご覧ください。  グラデーション効果エフェクトパネル > ビデオエフェクト > 生成グラデーションは、ランプの現代的な代替として設計された新しいジェネレーター効果です。幅広いビジュアルスタイルに対応した背景テクスチャ作成に最適なツールです。直線グラデーションと放射状グラデーションの両方をサポートし、拡張されたカラーとテクスチャ制御により創造的な柔軟性を高めます。位置、スケール、方向、繰り返し、ミラーリング、補間、フェザリング、グレインを精密に制御可能。マスター不透明度とアルファ値の保持により、予測可能な合成を実現します。カラーコントロールでは、トーンカラーとアンビエントカラーを独立してブレンドでき、オプションで彩度低下やポスタリゼーションを適用して様式化された外観を実現します。オプションのテクスチャコントロールでは、調整可能なパターン、スケール、歪み、量を通じて、繊細または大胆な表面ディテールを追加できます。どこから始めればいいかわからない?「Surprise Me!」を押せばランダムな結果が表示されます。アイデアを素早く得るのに最適な方法です。その後、さらに磨きをかけてください。  チャンネルぼかし効果場所: エフェクトパネル > ビデオエフェクト > ぼかしとシャープチャンネルブラーは、アルファチャンネルを含む個々のカラーチャンネルを独立してぼかす高品質なぼかし効果です。RGB、HSV、YUVカラーモードに対応し、滑らかで自然な結果を得るためにガウス式ぼかしを使用します。これは、Premiereがかつて採用していた旧式のチャンネルブラー効果に代わる現代的な代替品です。その馴染み深いワークフローを、品質の向上とより広範なカラースペース制御とともに現代に継承し、合成作業、カラーワーク、特定箇所へのぼかし処理に最適です。  「Surprise Me!」を押すとランダムな結果が表示されます。 Noise effect場所: エフェクトパネル > ビデオエフェクト > ノイズ&グレインノイズは制御されたアニメーションノイズを追加するために設計されています。フィルムグレインとは異なりますが、滑らかなグラデーションを崩し、微妙な質感を加えるのに適しています。グローバルな量調節に加え、シャドウ、ミッドトーン、ハイライトの個別調整が可能で、カスタムの高品質ノイズカーネルを用いて階調範囲全体に選択的にノイズを分散させられます。 追加機能として、ノイズ彩度の調整、HDR対応のブレンドモード(通常、スクリーン、加算、ソフトライト)、安全な合成のためのオリジナルアルファチャンネル保持オプションを備えています。これは、しばしば「デジタル」で不自然な見た目になりがちだった従来のノイズ効果の現代的な代替品です。微妙なノイズ量を簡単に調整したり、最大まで上げて非常にクランチーな見た目を作り出したりできます。 「Surprise Me!」を押すとランダムな結果が表示されます。 3D スピンバック遷移場所: エフェクトパネル > ビデオ遷移 > トランスフォーマー3Dスピンバックは、クリップ間のエネルギーと華やかさを加えるために三次元的な回転をシミュレートしたスタイリッシュなトランジションです。高品質なモーションブラーにより、ダイナミックで洗練された印象を与えるよう設計されています。このトランジションは複数のモーションスタイル(ベジエ、オーバーシュート、バウンス)を提供し、イーズイン/イーズアウトの制御により動きの加速と収束を微調整可能。角度、遠近法、ドリー、回転の追加アニメーション制御により、繊細な奥行きから大胆で表現力豊かな動き、満足感のある立体感まで、あらゆる表現を容易に実現します。 「Surprise Me!」を押すとランダムな結果が表示されます。 スライドトランジション場所: エフェクトパネル > ビデオトランジション > トランスフォーマー スライドは、クリップをフレーム上を滑らせるように移動させる、大胆で遊び心のあるトランジションです。ベジエ、オーバーシュート、バウンスのスタイルから選択でき、速度、弾性、バウンス回数などの制御で動きの挙動を調整可能です。角度やドリー移動の追加アニメーション制御により奥行きや方向の変化を加えられ、高品質なモーションブラーがトランジションを滑らかで洗練されたものに保ちます。 「Surprise Me!」を押すとランダムな結果が表示されます。 これらの新しいエフェクトとトランジションについて、皆様のご意見をお聞かせください。以下のコメント欄でぜひご意見をお寄せください。  インストール方法など、Beta(ベータ)版のよくある質問はこちらをご覧ください。Beta版について インストール方法など

InDesign 21.3 (Beta) - Introducing Generate Text!

InDesign 21.3 (Beta) - Introducing Generate Text!

Hey there, folks! We’re excited to introduce a new feature in Adobe InDesign (Beta). Generate Text is an AI-powered feature that helps you quickly create new content or refine what you already have—whether you want to rephrase, shorten, lengthen, or change the tone of your existing text, all directly within Adobe InDesign (Beta). You can learn more about the feature here.Start transforming existing text or creating new content: Start by opening any document in the InDesign (Beta) app.  Highlight any text or position the cursor within a text frame to encompass the entire story. Navigate to the Contextual Task Bar (Window > Contextual Task Bar) and select Generate Text to bring up the Generate panel. Alternatively, you can access the Generate option via Window > Generate, the right-click menu, or from the Quick Actions section in the Properties panel by selecting Generate Text. In the Prompt field, type a description of the output you're aiming for and click Generate. If you wish to refine existing text, choose Rephrase, Shorten, or Lengthen, and specify the tone by selecting Formal or Casual. Explore and choose from the generated variations in the Generate panel, with a preview available within your document. To finalize, select Done or click anywhere outside the Generate panel to apply the selected variation and replace the original text. Keep in mind that once committed, you won't be able to view other variations. Try InDesign (Beta) nowExcited to start using Generate Text InDesign (Beta)? Click here to get started! We’d love to hear from youExplore the latest features and share your feedback here.For information about the latest features in Adobe InDesign (Beta), click here. 

What’s New: Manage Firefly and Partner Model Access Using Roles for Enterprise Organizations

We’re excited to introduce User Roles for Firefly and Partner Generative AI Models in the Admin Console. This update allows system administrators to manage access to Adobe Firefly and partner generative AI models through predefined roles and custom roles.With these updates, administrators can assign roles to users or user groups, customize permissions, and manage generative AI access alongside other Adobe app capabilities within the Admin Console. Go to Admin ConsoleWhy this mattersThese updates help organizations manage generative AI access using role-based permissions. System administrators can assign specific roles to users or user groups to control who can access Firefly and partner generative AI models.Using roles helps administrators: Grant appropriate access without over-permissioning Delegate responsibilities safely without giving full administrative privileges Simplify user management by assigning roles to user groups Manage permissions across Adobe Express, Firefly, and partner model capabilitiesYou can refer to the following documentation to learn more about other predefined roles and their capabilities:  Assign user roles for granular access control Where to Find It Go to Admin Console > Users > RolesFrom the Roles page, administrators can view predefined roles, create custom roles, and assign roles to users or user groups.To assign a role, select the Assign users icon next to the role and add the required users or user groups, then select Save.For easier management, Adobe recommends assigning roles to user groups instead of individual users.All role assignments and updates are recorded in the Audit log.For a step-by-step guide, visit our documentation: How to create custom rolesAvailable RolesThe Admin Console provides predefined roles to help administrators manage access.Member (default for everyone)Defines organization-wide permissions and is assigned automatically to all users unless another role is applied.Firefly userAllows users or user groups to access Adobe’s commercially safe Firefly generative AI models.Partner model userAllows users or user groups to access partner generative AI models.Administrators can assign these roles depending on the level of access required.Custom RolesSystem administrators can also create custom roles to match their organization’s access requirements.With custom roles, administrators can: Select specific capabilities and permissions Combine capabilities from Adobe Express, Firefly, and partner models Create role configurations tailored to teams or workflows Custom roles can include up to 100 permissions and can be edited or removed at any time.Important Notes Only system administrators can create and assign roles. Roles can only be assigned to existing users or user groups. Users do not receive email notifications when roles are assigned or updated. This feature is available for Enterprise Edition 4 and Edition 4+ plans. Access to partner generative AI models requires Firefly access to be enabled. For a step-by-step guide, visit our documentation: Assign user roles for Firefly Have feedback or encountering issues? Let us know by posting in the thread below, we’d love to hear from you! Quick Links Manage predefined user roles User management strategies Use audit log to track user assignments and events Roster syncing for license assignment with the Adobe Admin Console If this was helpful, please click the ‘Like’ icon in the bottom left corner of this post. Your feedback helps us improve the experience. Thank you! ​*For queries, feedback, and suggestions, please feel free to start a conversation.*Please visit our ICYMI page for all the other updates & releases. ​

Adobe Express: 2026 Updates

Adobe Express: 2026 Updates

Hi everyone, Here’s a quick roundup of some of the latest updates and improvements in Adobe Express. These enhancements focus on improving creation workflows, video editing, brand management, and overall usability. Read on for highlights from: March 2026 April 2026 May 2026 June 2026 Enhancements Generate Presentations (Adobe Express × Acrobat) Create presentations faster by starting in Express or Acrobat. Use Acrobat AI to generate slides, then refine and present seamlessly in Adobe Express. Crop Pages Set precise crop dimensions or automatically fit the crop to content while keeping variable elements in place. Copy & Paste Style (Paintbrush Tool) Use the paintbrush icon in the Edit toolbar to quickly copy styling from one text element and apply it to another. New Edit Mode The left panel will no longer open automatically when selecting an object, reducing unnecessary canvas shifts.  Start creating your presentation slides using Acrobat AI! Video Editing Improvements Video Captions in Editor Captions are now available directly within the video editor, improving the captioning workflow and reducing friction. Slip Edits Adjust the visible portion of a video within a clip without changing its position or duration on the timeline. Sway Loop Animation Add a gentle looping sway animation to objects, creating a smooth and dynamic motion effect.  Check out the “Animation” tab on your next Express project! Add-Ons Export to Google Slides Using the Google Drive add-on, presentations can now be exported directly to Google Slides. Export PPT to Storage Export PowerPoint files directly to storage services such as Google Drive or OneDrive without needing to download them first. Find Add-ons in Global search Search for and discover add-ons directly from the top global search bar.  Use the search bar at the top to find the best add-ons for your workflows! Additional Capabilities HEIC Image Import Improved support for HEIC images commonly used by Apple and newer Samsung devices. Spellcheck Language Settings Users can now choose and customize their spellcheck language from Profile → Settings. Improved Tables in PDF Import Tables now render more accurately when importing PDFs.   We hope these updates help make your creative workflows in Adobe Express even smoother.Feel free to share your thoughts or questions as replies, we’d love to hear your feedback! 

More control, less friction in texturing workflows: The latest Substance 3D innovations